Before plastics took over our world, people and companies had to make things out of different materials. If we look at the toys of a century ago, we’ll find that many toys which are made out of plastic today were made out of wood, fabric, metal and even leather. Commercially manufactured toy cars and trucks were almost always stamped out of steel, while homemade cars and trucks were made out of wood.
There’s just something special about a toy truck made out of wood. While it may not have the details that one molded out of plastic does, the simplicity of the design, along with the natural warmth of wood, make wood trucks a timeless favorite. Most children today will appreciate a homemade wood truck as much as they will one bought in the store, while the parents of that child will appreciate the work that went into making that gift.
Wood toy trucks can be as simple or as complex as the woodworker that makes them would like. They can be built out of any wood available and are often made out of whatever is found in the scrap bin. For a really beautiful truck, different types of wood can be combined, using different colors of wood for the body and trim to create an artistic masterpiece.
While the woodworker can make every part of the truck, some prefer to use manufactured components for wheels & tires, barrels, milk cans, steering wheels and other decorative components. It’s even possible to buy wood toy truck kits, some of which are quite elaborate, that have these components in them.
Of course, the term “truck” is somewhat ambiguous, covering a lot of ground. While a pickup truck is the most basic form of truck available, wood toy trucks can include semi tractor-trailers, dump trucks, front-end loaders and other pieces of heavy machinery. The same techniques work for making all types of trucks, with different components being used to make the different designs.
Simplest Wood Toy Trucks
Wood toy trucks can become extremely complicated, but on the simplest level they are nothing more than a silhouette with wheels attached. This sort of toy truck is extremely easy to make and so can be a great starting point for how to make a truck.
These simple trucks are best cut out of two inch stock, standard construction material. Choose a section without knotholes/how-to-drill-straight-hole/holes-without-electric-drill for the truck, as the knotholes make it harder to cut out, as well as having the possibility of leaving voids. For a wider truck, consider cutting two layers of wood and laminating them together.
It’s best to work from a pattern, which can be made on stiff paper or cardboard. Lay out the truck, using a real or cartoon truck as your basis for design. Make sure that you identify where the wheels will go and mark positions for the axles. Windows can be added as cutouts.
Transfer the pattern to the wood by tracing it. If two layers of wood are going to be used, either glue the two layers together first or use double-sided masking tape to hold them together, assuming that your saw has the capacity to cut through two layers of wood at once. If not, cut the layers individually, working off the same pattern, and then glue them together afterwards.
A number of different saws can be used to cut out the outline of the truck. If a band saw is available, that will cut quicker and neater than a scroll saw will. However, a 1/8” to ¼” blade will be needed, depending on how tight the radiuses are. Windows are best cut out with a scroll saw, as a band saw blade cannot be put through a hole drilled in the wood. Using a handheld jigsaw is possible as well, but care must be taken to not put any sideways pressure on the blade and bend it. With the heat that is caused by the friction of cutting, it is very easy to bend the blade, resulting in a slanted cut.
If the truck is going to be two layers thick, then they should be glued together once cut out and before any further work is done on them. Align carefully and apply as many clamps as possible to ensure that there is pressure on all parts of the wood. Due to the thickness of the two halves, the pressure of the clamps will not spread out very far. Allow the glue 24 hours to fully cure before continuing.
The outer edge of the truck will need to be sanded. An oscillating spindle sander or oscillating horizontal belt sander are the best tools for this, but those aren’t common tools in most home workshops. If the oscillating sanders are not available, most of the sanding can be done on a belt sander. The inside curves can be sanded with a drum sander mounted in a drill press.
Stepping it Up a Notch
A lot can be done with this basic truck design, by adding trim pieces to it, without making the project all that much more complicated. Fenders and bumpers are ideal pieces to add on, along with some sort of load in the bed of the truck. The only precaution that needs to be taken when making these pieces is ensuring that they do not interfere with the wheels. That is easily accommodated by making sure that the inside of the fenders is larger in diameter than the diameter of the wheels.
Basic truck with fenders
Parts being added to the outside of the body like this should be both glued and nailed with finish nails. Gluing along will probably hold them, but adding the nails offers an additional level of security, much like adding rebar to concrete. The nails will help to hold the accessories in place, should the glue receive a shock that could break it loose.
Making Wheels
One of the distinguishing characteristics of any wood truck is the wheels. A variety of wheel designs are available, starting with commercially manufactured wheels that can be purchased. These can range from wheels with a more traditional rounded profile, through those that have a tread something like a passenger car to the more knurly mud tires found on an off-road truck.
In the case of a woodworker that wants to make their own wheels, there are a number of different ways to go about it. Probably the easiest of these is to cut the wheels out with a hole saw, using the cutout piece as the wheel. The hole saw will also put a ¼” diameter hole right in the middle of that wheel, which is ideal for the axle.
Taking that idea a step further, an inset for a hubcap can be made into the wheel by first using a forstner bit to drill an inset partially into the wood. Then the center indentation made by the forstner bit can be the pilot hole for cutting the wheel. A circle of contrasting wood, cut out with a smaller hole saw, can be used for the hubcap.
Another way of making a wheel is to use the band saw. For this, a simple jig will be needed, that consists of a piece of flat material, with a nail pounded through it so that just the point of the nail sticks through. The jig is clamped to the table saw table, so that the jail is set just far away from the cutting edge of the saw blade to match the desired radius of the wheel. A thin blade should be used, cutting all the way around the circle, while not letting the workpiece jump off of the nail.
Whichever way the wheel is cut out, it will need to be sanded to smooth out the outer edge. If a knobby tread design is desired, it can be cut on the table saw, using a miter sled that has a pin centered over the blade, for the center of the wheel to rotate on. The sled being at an angle will allow cutting a shallow groove across the “tread” of the tire. Additional passes, side by side, will make that groove wider. Make a series of these at even intervals around the wheel. Then flip the miter sled to the opposite angle and make another crossing set of cuts.
Dowel rods make a perfect axle. Drill a hole through the center of the wheel to match the size of the dowel rod and then glue it in place. Drill a hole 1/64” larger through the body of the truck for the axle to go through and then glue it into the wheel on the other side.
Making a More Complex Wood Truck
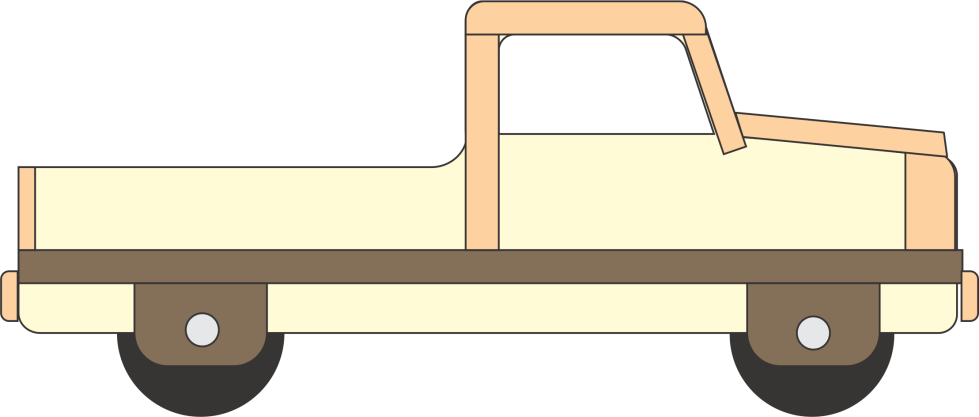
Fancier wood toy trucks can be made by making the body of the truck out of pieces, rather than cutting them out of one solid piece. The basic truck consists of a few discreet parts, shown in pale yellow and dark brown in the diagram below:
A truck bed, which extends through the entire length of the truck, holding everything together
Sides for the truck, which combine the sides of the bed, the cab and the engine compartment
Two axle mounts, mounted to the bottom side of the bed
Pieced together truck
With the truck bed established, the addition of the pieces to make up the cab, hood, grille, tailgate and bumpers are added to finish out the truck. It is with these pieces, especially the grille, tailgate and bumpers that the truck can give real personality.
In order to make these pieces, resawn lumber will need to be used. The bed of the truck can be ½” to ¾” thick, depending on how large the truck is going to be. But the other pieces, including the sides of the truck, will probably need to be somewhere between ¼” and 3/8” thick. If a band saw is not available to resaw standard stock, it is possible to buy pine and hardwood that is already resawn at the local home improvement center. Both Lowe’s and Builders square carry it; look in the area where hardwoods are stocked.
All of these pieces need to be both nail glued and nailed together, especially since it will be difficult to clamp so many pieces at once. Nailing will act as clamping for the pieces, allowing the truck to be assembled.
Of course, that’s just the basic truck. With that basis for a design, there’s a lot of other things that can be done, turning that truck into just about any sort of truck one can imagine.
Turning that Truck into a Monster Truck
The only real difference between a regular truck and a monster truck is that the monster truck has a jacked up suspension and much bigger tires. That’s an easy modification to the basic truck design, adding larger axle blocks to the design above, so that larger wheels and tires can be mounted. To make it especially “monster” use wide tires with a heavy tread cut into them.
Turning that Truck into a Semi
To make that basic truck design into a semi, jack it up, making the truck higher, with larger wheels, while making it a bit longer, so that a second rear axle and wheels can be added. The sides of the bed and tailgate are eliminated, leaving just the deck for the trailer to attach to. The hitch is nothing more than a disk of wood with a hole in the middle, mounted in the middle of the bed, right over the axles.
Of course, that truck needs a bit of embellishment to really look like a semi, so be sure to add a couple of exhaust stacks behind the cab, one on each side. It will also need fuel tanks, right below the doors on either side and behind the front wheels.
Then there’s the issue of a trailer. That’s actually extremely easy to do. A typical semi trailer is nothing more than a box, sitting on an axle box for two axles. It can be attached to the truck by drilling a hole in the bottom and gluing in a dowel rod to fit into the “hitch” on the bed of the truck.
How About a Dump Truck?
A dump truck is nothing more than a box that’s open on the top. The trick is to make it so that it will dump. That can easily be done with a dowel rod. Mount an axle block on the bed of the semi truck, near the back, rather than the disk that acts as a hitch. Then mount two small axle blocks on the bottom of the dump bed, in the back, so that they will bracket the axle block. Slip a dowel rod through all three and the truck will dump.
The Possibilities are Endless
Once the basic truck design is established, turning it into any sort of specialized truck is easy. It’s just a matter of breaking the basic design down into its basic elements and then making those elements out of wood.
Some woodworkers have gone rather extreme in their wood trucks, especially in making semis. A lot of detail can be added by those who want to, including fancy grilles, lights and even windshield wipers. It’s all up to the imagination of the woodworker.
It is important to round all the edges of a truck that is made as a child’s toy, especially for small children. Sharp edges can cause injury. Sand everything smooth, ensuring that there is no possibility of splinters coming off into children’s fingers. Apply some sort of finish to seal the surface.
Color can add a lot to the design of a wooden truck, whether that is the natural color of different types of wood or added color. For children, it is not uncommon to paint wooden trucks in bright colors. But for those who are looking to make something that looks like a nice woodworking project, using different types of wood can go a long way. Walnut or ebony tires, with maple rims is a great example of this.
For expanding the range of colors, consider using colored stains, rather than paint. Stain will allow for coloring the wood, without losing the natural beauty of the wood grain. It’s a good compromise that will work well to make the finished truck more attractive.
Related Posts:
Drying Wood in Oven: A Complete DIY Guide by Admin September 23, 2025 More About Most people don’t give a second thought to drying wood in an oven until something goes wrong. I didn’t either. I slapped together a pine…
Best Practices for Using Mineral Spirits on Wood by Admin May 20, 2025 Finish . Looking to clean old wood or prepare it for stain? Mineral spirits offer an easy, safe, and effective method for refreshing wood without damage.…
Sandblasting Wood: How to Clean & Restore by Admin May 17, 2025 Finish There’s something satisfying about bringing old wood back to life. Whether it's barn siding, an antique door, or a weathered cedar plank, wood has a…