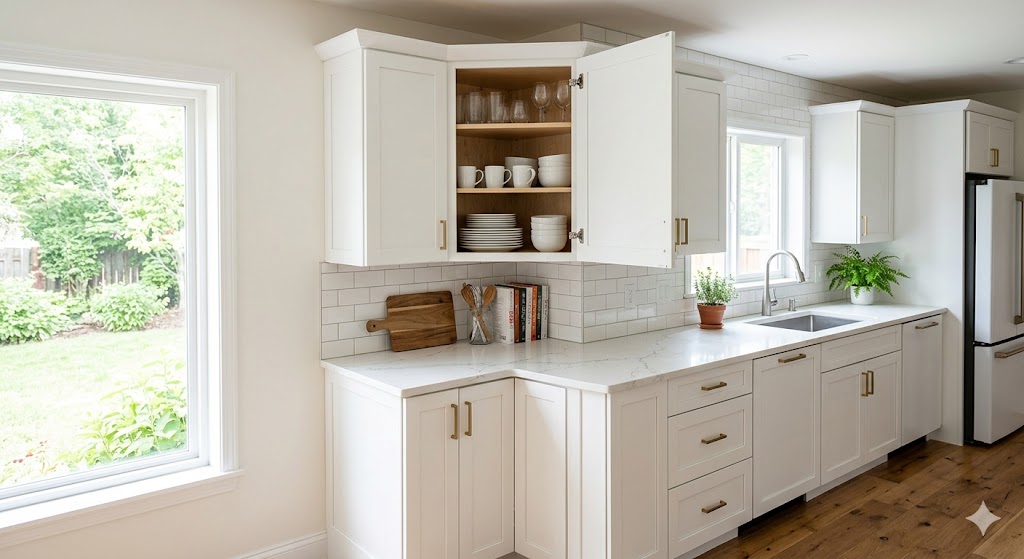
DIY corner wall cabinets are one of the smartest ways to maximize kitchen storage without wasting valuable corner space. Whether you build a blind-corner cabinet, a square-corner cabinet, or a diagonal design, a well-built cabinet can transform an awkward kitchen corner into highly functional storage.
The Reality of Kitchen Corners: Why DIY is Better
The first diagonal cabinet I built was a total disaster. I assumed my kitchen walls were a perfect 90 degrees (spoiler: they weren’t), and I ended up with a gap so wide I could park a spatula in it. After installing dozens of cabinets since then, I’ve learned that the secret isn’t just in the wood—it’s in the planning.
When you build your own, you control the plywood thicknessand the layout. Whether you want a sleek diagonal face or a 90-degree “L” shape, building it yourself ensures it actually fits your specific wall.
One mistake I made early on was trying to use a circular saw for my finish cuts without a guide. Unless you have a very steady hand and a high-tooth-count blade, you’ll end up with massive plywood splintering.
DIY vs. Store-Bought: The Real Cost
Cabinet Type
Average Cost
Why Choose It?
IKEA Corner Cabinet
$180–$400
Fast, but limited to standard sizing.
Custom Cabinet Shop
$700–$2,000
Beautiful, but will drain your renovation budget.
DIY Cabinet Build
$120–$350
Beautiful, but it will drain your renovation budget.
💸 Cost Difference: You can build three DIY cabinets for the price of one mid-range store-bought unit. Plus, you’re avoiding the flimsy particleboard back panels that usually sag after a year of holding heavy stoneware.
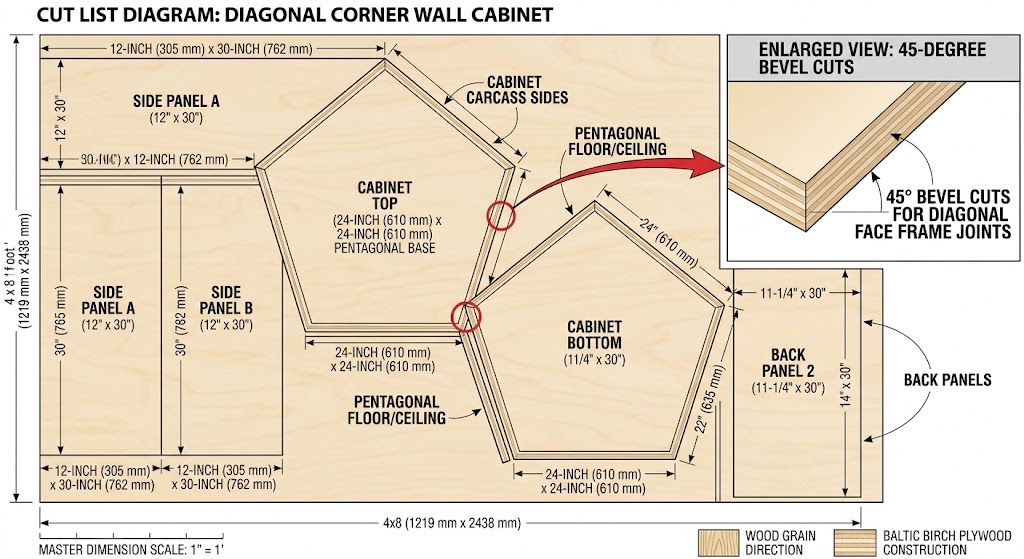
📐 Standard 24″ Diagonal Cabinet Cut List
If you are looking for specific cabinet plans, this is the most common footprint for a standard kitchen. This assumes 3/4″ material for the box and 1/2″ for the back.
Part
Quantity
Dimensions
Purpose
Top/Bottom Plates
2
24″ x 24″ (Pentagon)
Main structural floor and ceiling
Side Panels
2
12″ x 30″
Connects to adjacent cabinets
Back Panels
2
11 1/4″ x 30″
Anchoring point for wall studs
Diagonal Face Frame
1
17″ x 30″
Opening for the cabinet door
Shelves
2–3
22 1/2″ x 22 1/2″
Interior storage (Pentagon profile)
🛠️ No Table Saw? The “Low-Tool” Build Strategy
One of the biggest barriers for DIYers is the assumption that you need a $2,000 cabinet saw to get professional results. Accuracy matters more than the tool’s price tag.
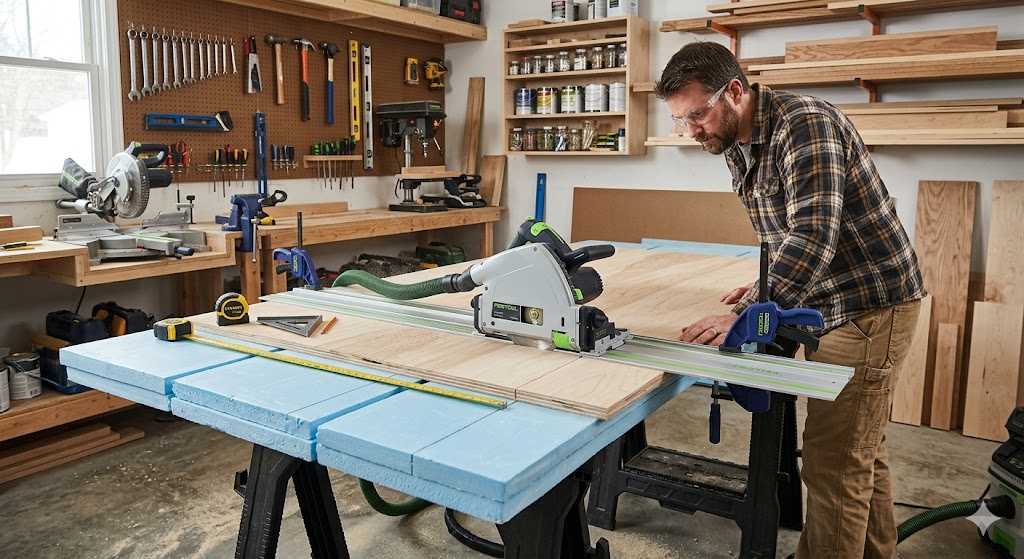
The Track Saw Method
If you’re only going to buy one big tool for this project, make it a track saw. It allows you to break down full 4×8 sheets of Baltic birch with surgical precision. Unlike a table saw, a track saw stays stationary on the wood, which is much safer for solo builders.
The Circular Saw + Straight Edge
This is the “budget hero” method. Take a factory-cut strip of plywood and clamp it to your workpiece as a fence.
🧪 Real Test: Use a 60-tooth carbide-tipped blade. If you use a standard 24-tooth construction blade, you’ll chew up the veneer so badly that even wood filler won’t save it.
The Router Cleanup
If you have a slightly wonky cut, clamp a straight board to your plywood and use a router with a flush-trim bit to “shave” the edge perfectly straight. This is one of my favorite router alternatives for cleaning up joints.
Why Jigsaws Fail on Cabinets
⚠️ Warning: Never use a jigsaw for the main box cuts. Jigsaw blades “wander,” meaning the top of your cut might be on the line, but the bottom of the cut is 1/8″ off. Save the jigsaw for cutting out holes for electrical outlets in the back panel.
💰 Real-World DIY Cost Breakdown
When people ask me if DIY is actually cheaper, I show them this list. While the wood is the main expense, the “small stuff” adds up.
Material Component
Estimated Cost
Notes
3/4″ Baltic Birch Plywood
$65–$90
Half a sheet per cabinet
1/2″ Plywood (Backing)
$20–$30
Can use scraps
Blum Soft-Close Hinges
$15–$25
Specialized 45° corner hinges
Kreg Pocket Screws
$10
1-1/4″ fine thread
Edge Banding
$12
Iron-on birch veneer
Primer & Cabinet Paint
$30
Calculated per cabinet
Polyurethane
$15
Moisture protection
Total Build Cost
~$167–$232
Prices vary by region
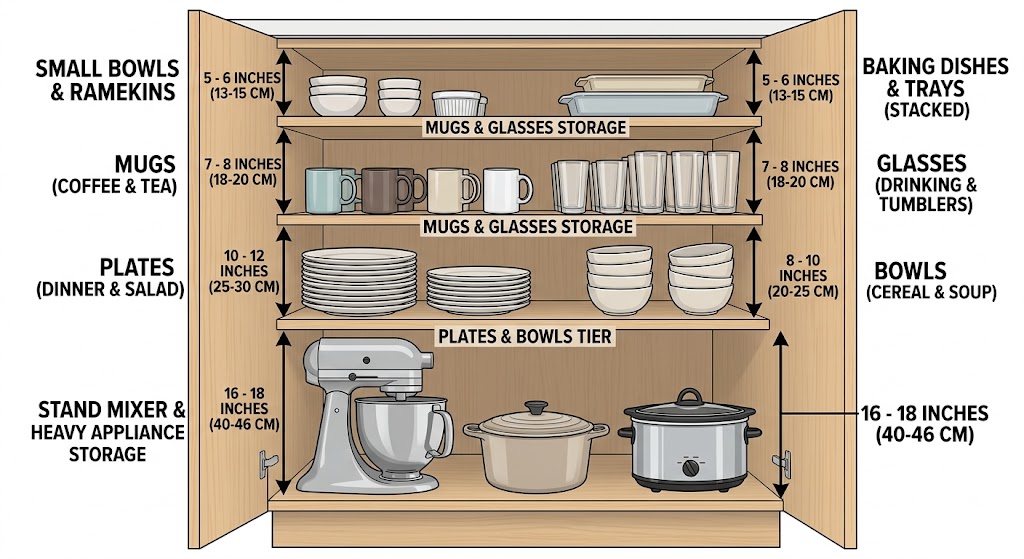
📏 Perfect Shelf Spacing: The “Anti-Clutter” Guide
What surprised me most after my first build was how much space I wasted by putting shelves exactly in the middle.
The “Plate Zone” (Bottom Shelf): Set this at 10–12 inches.
The “Glassware Tier” (Middle Shelf): 7–8 inches is the sweet spot.
The “Small Appliance” Gap: If you plan on storing a stand mixer, you need 14–16 inches.
Adjustable vs. Fixed:😬 Regret Warning: Never build a corner cabinet with fixed shelves. Use a shelf pin jig to drill holes every 32mm.
🏠 Small Kitchen Optimization: Making It Feel Huge
A diagonal corner cabinet is a storage beast, but it can visually “close in” a small kitchen. Use these design tricks to keep it airy:
1. Shallow Depth Trick
Instead of the standard 12″ sides, pull them back to 11″. It sounds small, but that extra inch of wall visibility makes the corner feel less aggressive.
2. Glass Door Inserts
Swap the solid plywood center panel for glass. This allows the eye to travel into the cabinet rather than stopping at the door, creating an illusion of depth.
3. Under-Cabinet Lighting
Installing LED puck lights or strips underneath the corner unit eliminates the “dead zone” shadow on your countertop. Since corner cabinets are often the darkest part of the kitchen, this is a functional must.
🛠️ Step-by-Step Assembly Walkthrough
1. The Dry Fit (Don’t Skip This!)
Before you even touch your Kreg pocket hole jig, tape the box together with painter’s tape.I’ve learned the hard way that if your floor is slightly out of level, your wall cabinets will show it immediately.
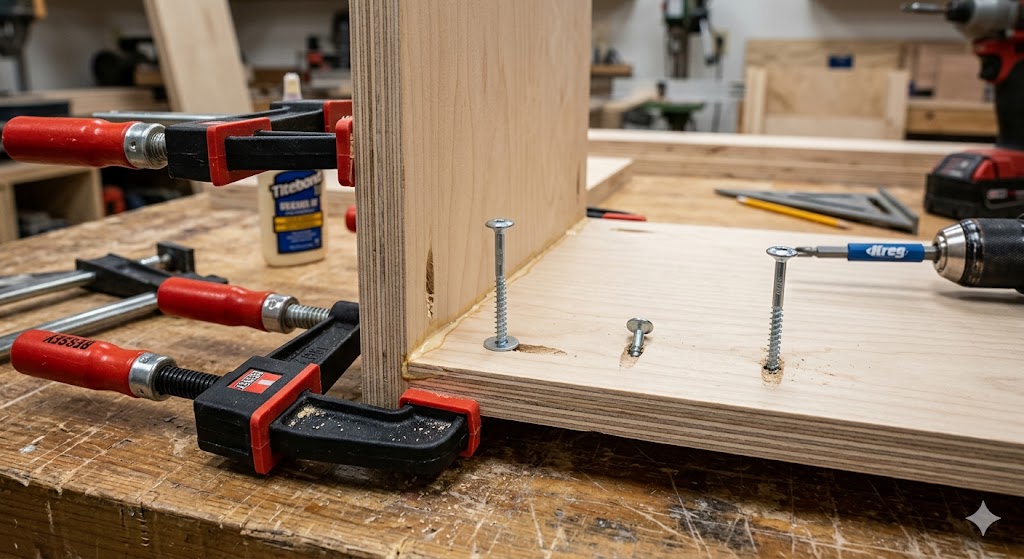
2. Fastening the Carcass
I prefer using glue and pocket screws for the main box. Apply a thin bead of wood glue, clamp the joint, and drive your 1 1/4″ screws. Wipe away squeezed-out glue immediately with a damp rag. If the glue dries on the surface, it will block your cabinet paintor stain from adhering.
3. Squaring the Box
Measure the diagonals of the back. If the measurements are equal, the box is square. Tack your 1/2″ plywood back panel in place with 1″ brad nails. This panel is what actually keeps the cabinet from “racking” or sagging over time.
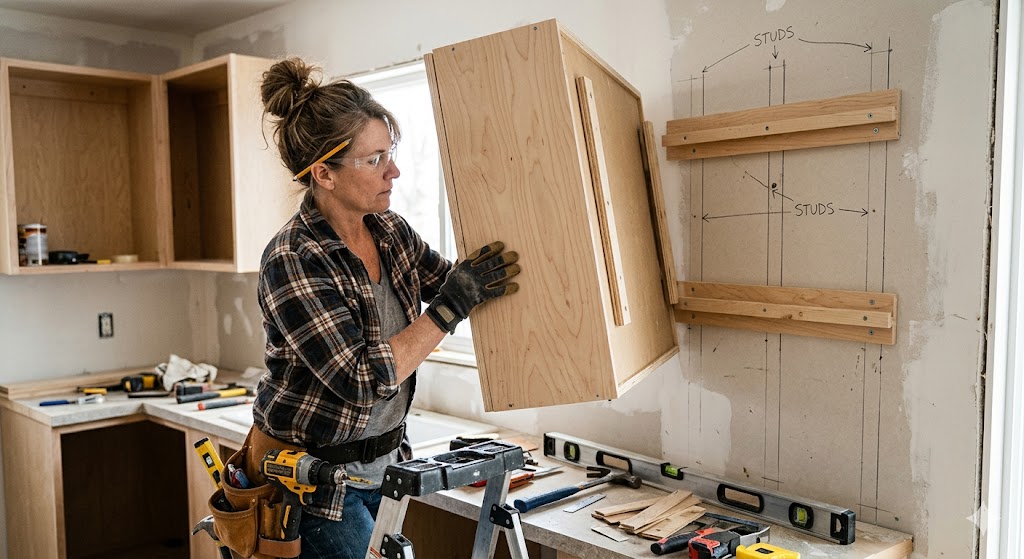
4. Hanging with the French Cleat
If you’re working alone, a French cleat is your best friend. Screw one half to the wall studs and the other to the back of the cabinet. You can “hook” the cabinet on the wall, slide it to align it perfectly, and then drive your permanent 3″ screws through the hanging rail into the studs.
❌ 6 Common Corner Cabinet Mistakes
Ignoring Wall Irregularities: Most walls bow outward. I always build the cabinet 1/4″ short” and use a scribe piece.
Weak Fasteners: Never use drywall screws to hang a cabinet. They can snap under weight. Use specialized washer-head cabinet screws.
Wrong Hinge Choice: A diagonal cabinet needs a 45-degree hinge. If you buy standard 90-degree hinges, the door won’t open.
Skipping the Sanding Sequence: You cannot jump from 80-grit to 220-grit. You must hit 120 and 180 in between, or you’ll see “pigtail” swirl marks under your HVLP sprayer finish.
Forgetting the “Nailing Strip”: Ensure there is a solid piece of 3/4″ wood at the top and bottom of the back so you have something substantial to screw through.
Plywood Grade Mismatch: Using C-grade plywood for the interior but A-grade plywood for the exterior. Check our plywood grades guide.
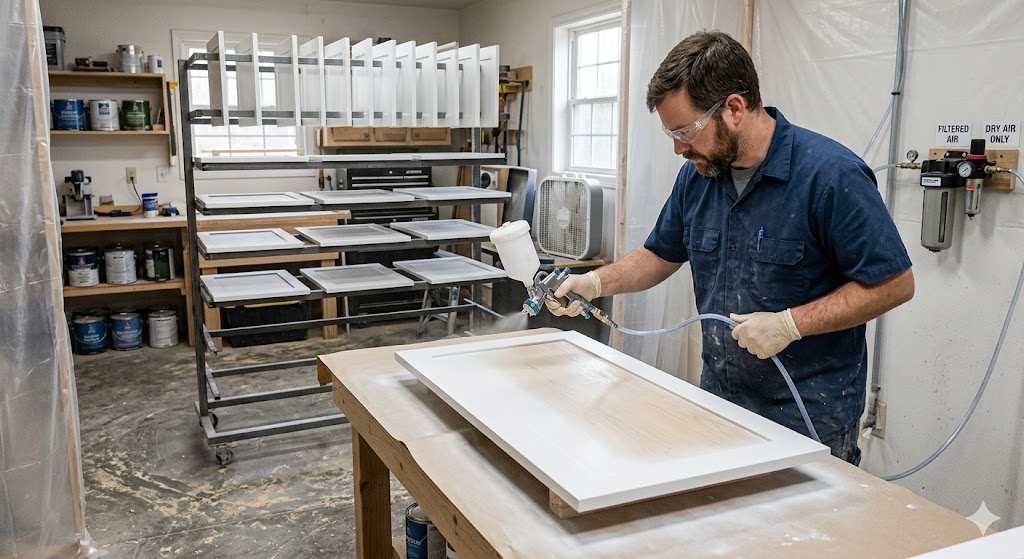
The “Finishing Disaster” That Taught Me Everything
The first time I tried to achieve a “factory-smooth” finish, I ended up with a surface that looked like orange peel and felt like sandpaper. I had invested in a decent HVLP sprayer, but I made the amateur mistake of thinking the paint was ready to go straight from the can.
I skipped straining the paint, and halfway through the first door, tiny dried paint chunks clogged the sprayer tip. The resulting “spit” left raised globs on the wet surface that I couldn’t just wipe away. I had to wait two days for it to cure, sand the entire door back down to the Baltic birch, and start over.
Beyond the clogging, I also ignored the ambient temperature. It was a humid July afternoon, and I was working in an open garage. The moisture in the air prevented the cabinet paint from leveling properly, resulting in those dreaded “runs” along the vertical edges.
Now, I never spray without a paint strainer and a dedicated moisture trap on my airline. I also learned that edge sealing is non-negotiable.
Plywood edges are incredibly porous; if you don’t seal them with a thin layer of wood filler or extra edge banding before priming, they will “drink” the paint and leave a rough, dull texture that stands out against the smooth faces of the panels. It’s these “unseen” prep steps that actually determine the quality of the final product.
How Long This Actually Takes: The Time Reality
If you watch a thirty-second montage on social media, you’d think building a corner wall cabinet is a Saturday afternoon project. In reality, for a solo DIYer, you are looking at a multi-day commitment where “active work” is often interrupted by “passive waiting.”
Planning and measuring should take you at least two hours; if you rush this, you’ll spend four hours fixing mistakes later. Cutting and dry-fitting the plywood usually eats up a full morning, especially when you are dealing with the precision bevels required for a diagonal corner cabinet.
Assembly with a pocket-hole jig is relatively fast, but the real time sink is the sanding sequence. Moving from 120-grit to 220-grit across all surfaces, including the interior shelves, easily takes three hours of focused labor.
The “waiting game” begins with finishing. Even the fastest-drying primer and topcoats require hours of cure time between layers. If you are doing two coats of primer and two coats of paint—plus a protective polyurethane layer—you are looking at a minimum of three days just for the finishing phase.
Finally, installation and hinge adjustment are the most deceptive tasks.
Hanging the cabinet on a French cleat might take twenty minutes, but fiddling with the soft-close hinges to get a perfectly even 1/8″ gap (the reveal) around the door can take an hour of tiny, frustrating turns of a screwdriver. When you add it all up, a high-quality build is a 15–20 hour project spread across two weekends. If you try to compress it into one day, the finish quality is usually the first thing to suffer.
FAQ Section
How much weight can a corner cabinet hold? If secured to two studs, 150 lbs is a safe bet.
Can I build a corner cabinet from MDF? Use MDF for the doors for a smooth paint finish, but stick to
Baltic birch for the structural box.
What is the best way to hide plywood edges? Edge banding is the gold standard.
How do I handle a “blind” corner? A blind corner cabinet requires a filler strip so the adjacent drawer can open without hitting the cabinet handle.
“Mistakes I Still Make” (and How to Avoid Them)
Even now, I occasionally forget to account for hinge overlay when sizing the door, especially when switching between frameless and face-frame styles. If your door is 1/8″ too wide, it will rub against the adjacent cabinet door every time you open it.
Another lesson learned: Always account for the lazy susan clearance before you glue the face frame. I once built a beautiful diagonal cabinet only to realize the rotating tray was 1/2″ too wide to fit through the door opening. I had to disassemble the entire bottom of the cabinet to get it in.
What I’d Do Differently
If I built another one tomorrow, I’d make the cabinet 1/4” shallower than the plans show. It’s amazing how much a deep wall cabinet can visually crowd a small kitchen. I’d also spend more time on the load-bearing wall analysis. In my early days, I once missed a stud and spent three hours repairing a section of drywall that crumbled under the weight of the cabinet. I’d also invest in a better quality wood filler—the cheap stuff shrinks and leaves a visible “dimple” after the paint dries.
Kitchen corners used to be dead space—the place where Tupperware went to die.
A well-built DIY corner cabinet turns that wasted area into some of the most useful storage in the entire room. Unlike store-bought units made from particleboard, a properly built plywood cabinet can realistically last decades. Grab your shelf pin jig, check your wall angles twice, and start building.
How to Remove Wall Cabinets – Easy DIY Guide by Admin March 17, 2025 DIY Planning a kitchen makeover? One of the first things that usually has to go is the old set of cabinets. Swapping them out for something…


")


")

