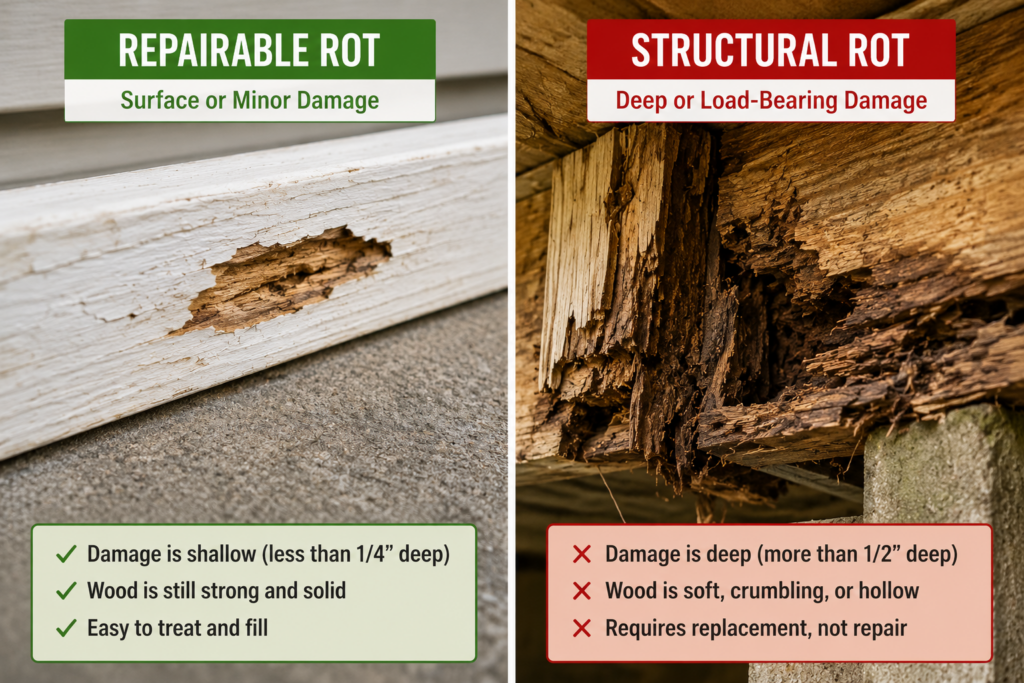
Yes. Rotting wood can often be repaired if the damage is shallow and confined to non-structural areas. Once rot reaches structural framing, load-bearing members, or spreads beyond the visible damage, replacement is usually the safer and more cost-effective solution.
I’ve repaired everything from window trim and porch posts to deck boards and sill plates over the years, and the lesson that took me longest to learn is this: repairing wood rot is less about which filler you buy and more about knowing when not to repair it at all.
The difference between “saved it” and “wasted a weekend” comes down to one thing — how far the rot has actually traveled into the wood. Get that wrong, and you’re not fixing a problem. You’re hiding one until it comes back twice as big, usually in the one spot you can’t easily reach.
This guide walks through how to tell the difference, what actually works to stop and repair rot, when replacement is the only honest option, and two of my repairs that didn’t go the way I expected.
Quick Answer: Save It or Replace It?
Situation
Can You Save It?
Best Fix
Approx. Cost
Surface mold, no soft spots, wood still hard under a screwdriver test
✅ Yes
Clean, treat, seal
$20–$40
Soft spot less than 1/4″ deep, surrounding wood is solid
✅ Usually
Dig out, epoxy wood filler or hardener
$30–$80
Screwdriver sinks in more than 1/2″, wood feels spongy or crumbly
⚠️ Rarely worth it
Dutchman patch or partial replacement
$60–$150
Rot has reached a structural member (joist, sill, stud, beam)
❌ No
Full replacement, no exceptions
$150–$2,000+
Rot is at a load-bearing connection point (post base, ledger board)
❌ Never
Replace immediately, call a contractor
$300+
If you only remember one row from that table, remember the last one. I’ll explain why further down, because it’s the one people talk themselves out of.
[Featured image: insert can-it-be-saved-infographic.svg here as this post’s featured image]
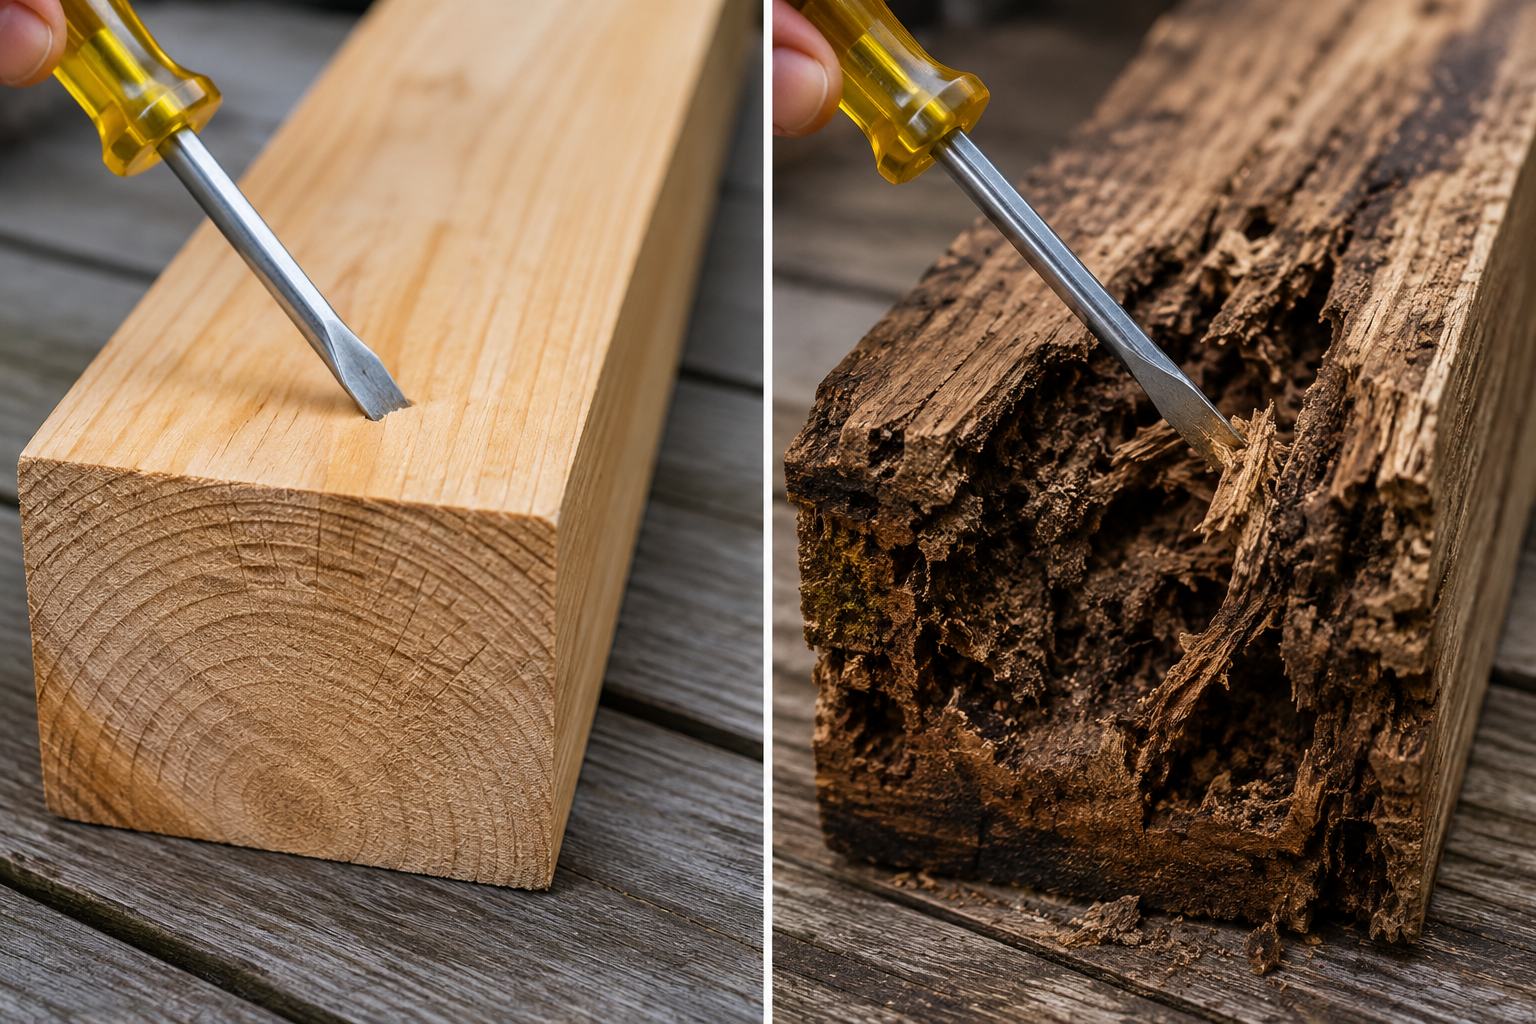
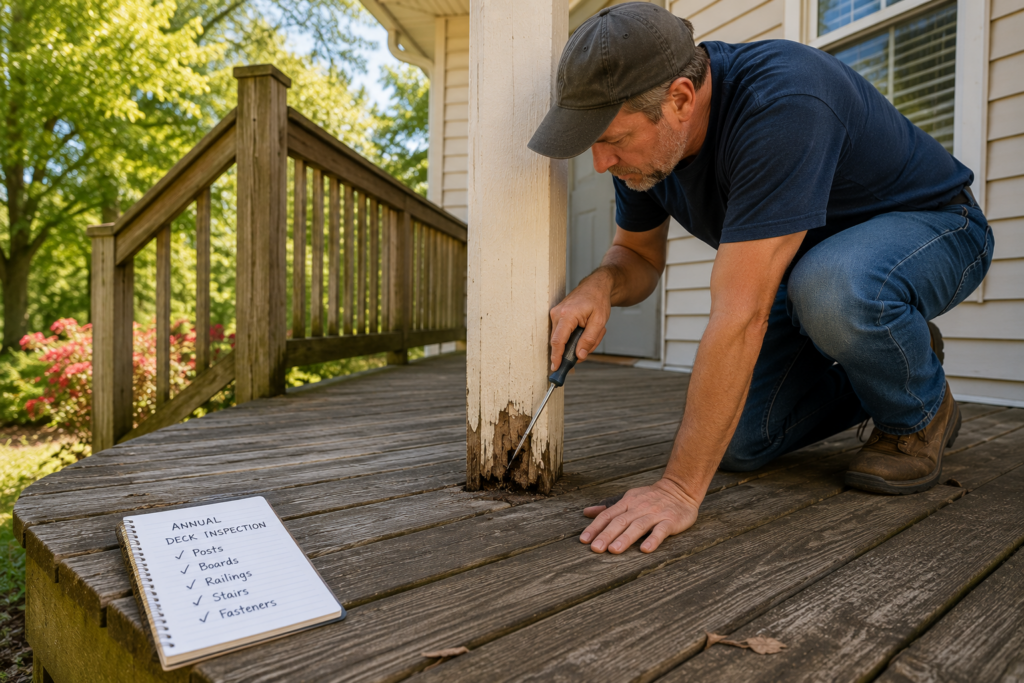
The Screwdriver Test (My Go-To, Takes 10 Seconds)
Before you buy a single product, do this: press an awl or a flathead screwdriver into the suspicious wood at a low angle. Hard, healthy wood resists. Rotten wood gives way with almost no pressure, like pushing into a stale loaf of bread.
This is the test that should decide everything else. I’ve watched homeowners sand a rotten board smooth, paint over it, and call it fixed — only to have a foot go through it eight months later. Sanding doesn’t change what’s underneath. The screwdriver does, in ten seconds, for free.
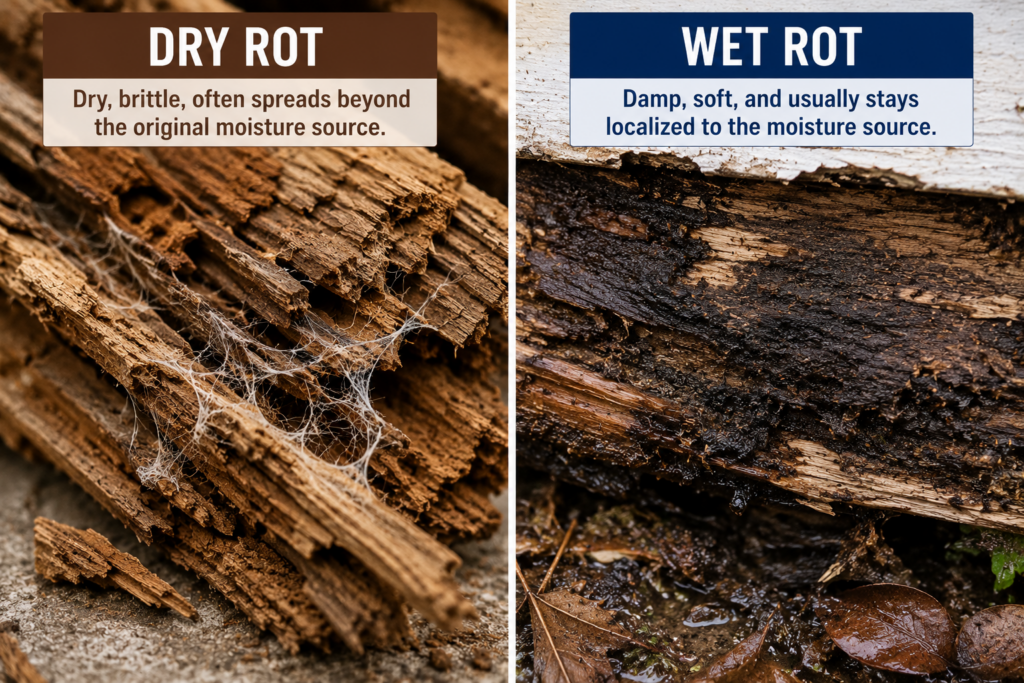
Two Kinds of Rot, and Why It Changes Your Fix
Wet Rot
Wet rot needs a constant moisture source — a leaking gutter, a failed flashing detail, ground contact, a sprinkler hitting the same spot every day. The wood stays damp, fungus moves in, and the wood darkens and softens. The good news: wet rot almost always stays localized to where the water is. Fix the water source and the rot usually stops spreading, even if the existing damage still needs repair.
Dry Rot
Dry rot (technically a misnomer — it still needs some moisture to start) is the one that should worry you. Certain fungi can send root-like strands through masonry and across dry timber to find new moisture sources, which means they can spread farther from the original wet spot than people expect. Dry rot can even take hold in pressure-treated lumber under the right conditions, which surprises many homeowners who assume treated wood is immune. If you’ve got rot showing up in wood that has no obvious water exposure nearby, dry rot is usually the explanation, and it needs a more aggressive response — often full removal of the affected timber plus a fungicidal treatment on everything adjacent to it.
What the Numbers Actually Say
It’s easy to assume your situation is unusual. It usually isn’t. A few data points worth knowing before you start:
Industry repair-cost data puts the typical dry rot repair between roughly $500 and $2,350, with an average homeowner spend around $1,400 — but severe structural cases routinely climb past $6,500 once framing, drywall, and finish carpentry are all involved.
A widely used guideline among contractors is the “50 percent rule”: if more than half the cross-section of a beam, joist, or frame is compromised, replacement is the more reliable long-term call, and repair is reserved for smaller, contained areas. I personally use a more conservative one-third threshold as my own cutoff — rot rarely stops exactly where it’s visible, so giving yourself that extra margin before committing to a “repair” verdict has saved me from redoing work more than once.
Among homeowners who report moisture damage, the most common visible signs are surface deterioration, such as buckling, warping, or peeling — and damp or visibly wet patches aren’t far behind. Musty odor is a less common complaint but a strong one, since it usually indicates that active fungal growth is already underway somewhere out of sight.
Most standard homeowners insurance policies treat wood rot as a maintenance issue, not sudden damage — so it’s typically excluded unless it’s a direct result of a covered event like a burst pipe. That makes prevention and early repair a financial decision, not just a maintenance one.
The pattern across all of it is the same one I keep coming back to: small, early, contained problems are cheap; large, late, structural problems are not.
The takeaway: In my experience, catching rot early usually means spending under $100 in materials. Waiting until structural framing is affected often turns that same repair into a $1,000–$5,000 project.
⚠️ Warning: The One Thing That Makes Rot Worse
Painting or sealing over wood before it’s fully dry traps moisture inside instead of letting it escape. I’ve seen this exact mistake on porch posts that “looked fine” after a quick scrape and a fresh coat of paint — only for the post to be mush at the base eighteen months later, because the paint sealed the moisture in rather than keeping it out. If the wood isn’t bone dry, don’t seal it. Let it dry for at least 48–72 hours in good airflow first.
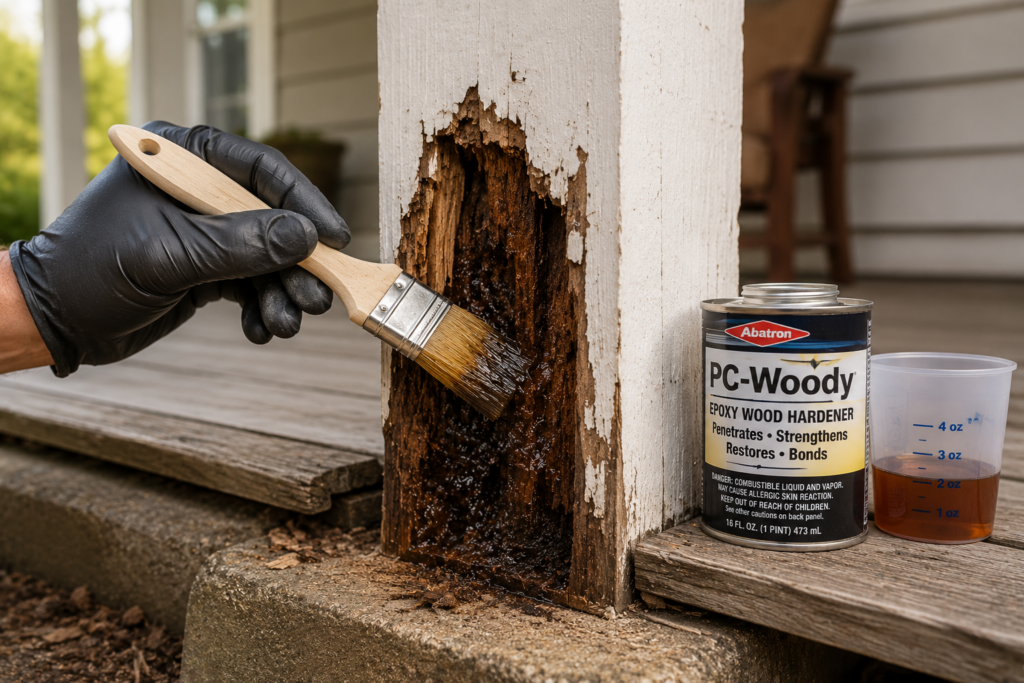
🧪 Real Test: I Tried Epoxy Wood Hardener on My Porch Post
A few years back, I had a porch post with soft wood right at the base — the kind that’s just past “borderline” on the screwdriver test. Instead of replacing it, I dug out the soft material with a chisel until I hit solid wood, let it dry for three days, soaked the area in wood hardener, let it cure overnight, then filled the cavity with a two-part epoxy wood filler.
It held. Four years later, that spot is still solid. The repair succeeded because the damage was confined to a visible, non-structural area where I could remove every trace of the rot before rebuilding it. If that same softness had been at the actual ground-contact joint where the post meets the concrete footing, I wouldn’t have trusted epoxy — I’d have cut the post and sistered in a new section, because that connection point taking a soft spot is a structural risk, not a cosmetic one.
That’s the real lesson from the test: epoxy and hardener systems genuinely work, but they work on contained damage. They are not a substitute for replacing wood that’s doing structural work.
😬 Regret: The Deck Board I Should Have Replaced
I once talked myself into “saving” a deck board that had about an inch of soft rot at one end, reasoning that the rest of the board was solid and I didn’t want to pull up three boards just to swap one. I dug out the bad section, packed it with filler, sanded it flush, and painted over it.
It looked perfect for about a year. Then a guest’s chair leg went straight through it at a backyard cookout. Nobody got hurt, but it was an embarrassing, completely avoidable failure — because filler has no structural strength. It fills a void; it doesn’t replace the wood fiber that used to be load-bearing there. On anything you’ll actually stand, sit, or walk on, that inch of “just dig it out and fill it” thinking is exactly how deck boards fail.
The fix that should have happened: cut the board back to solid wood on a joist, and either patch in a new section or replace the whole board. It would have taken twenty extra minutes and saved me the chair-leg incident entirely.
❌ The Mistake Almost Everyone Makes
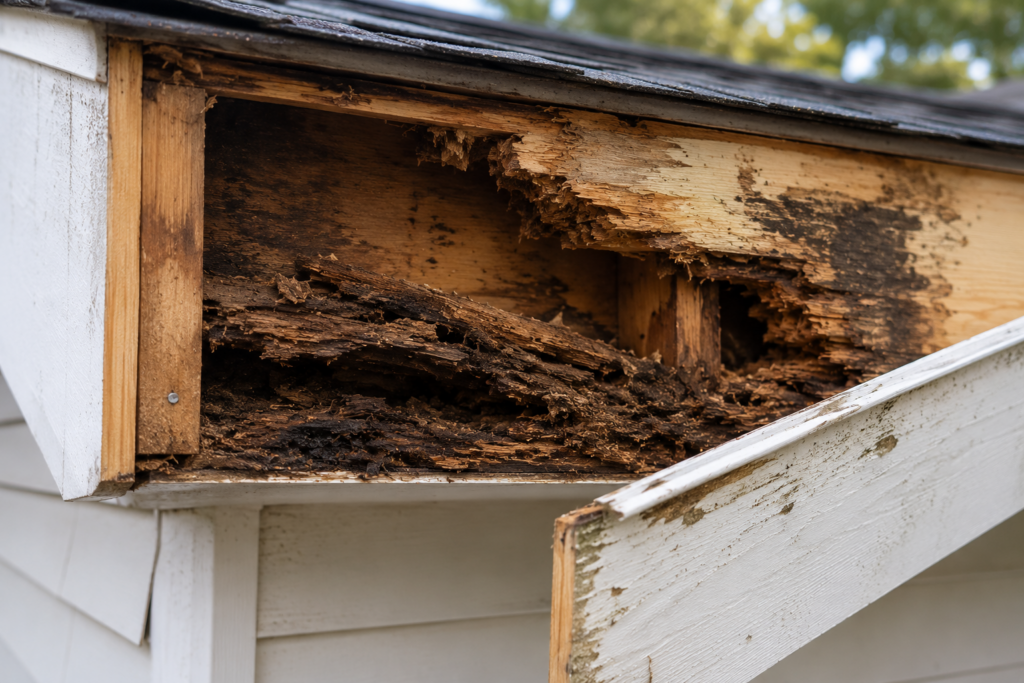
The single most common mistake isn’t choosing the wrong product — it’s stopping the investigation too early. Rot spreads under siding, under flashing, and along the grain of the wood itself, often well past where the discoloration is visible from the outside.
I learned this the hard way on a fascia board repair. The visible damage was maybe four inches wide, right where a gutter had been overflowing for who knows how long. I cut that section out, and the wood on either side looked fine — until I pulled the trim board behind it to check the flashing, and found another two feet of soft, dark wood running back toward the roof sheathing that had been completely hidden from view the entire time. If I’d just patched the visible four inches and moved on, I would have sealed active rot inside the wall instead of removing it.
If you find soft wood, keep probing in every direction with the screwdriver until you find solid wood on all sides, then add a couple of inches past that for a margin of safety — and if there’s trim, siding, or fascia covering the area, pull it back and look before you assume the damage stops where you can see it.
💸 Cost Difference: Repair vs. Replace, By the Numbers
This is where a lot of guides get vague, so here are real, typical ranges based on jobs I’ve either done myself or watched done:
Treating surface rot before it progresses: $15–$30 in borate treatment and sealant, plus an afternoon.
Epoxy repair on a contained soft spot: $40–$90 in materials (hardener, filler, sealant), a weekend of dry time included.
Replacing a single deck board: $25–$60 in lumber, an hour of labor.
Replacing a rotted window sill: $150–$400 including trim work, more if a contractor does it.
Replacing a rotted structural sill plate or joist: $800–$3,000+, because it usually involves jacking the structure, removing siding or decking to access it, and inspection sign-off in a lot of jurisdictions.
The pattern is consistent: the cost of catching rot early and repairing it is almost always 5–10% of the cost of catching it late and replacing structural wood. That gap is the entire argument for doing the screwdriver test twice a year instead of once a decade.
Repair vs. Replace at a Glance
Repair (usually fine)
Replace (don’t shortcut this)
Trim boards
Sill plates
Window sashes
Joists
Porch trim
Ledger boards
Small localized surface rot
Structural-member rot
Fascia board, caught early
Fascia board with hidden rot behind it
Shed floor edge, non-load-bearing
Shed floor framing or center supports
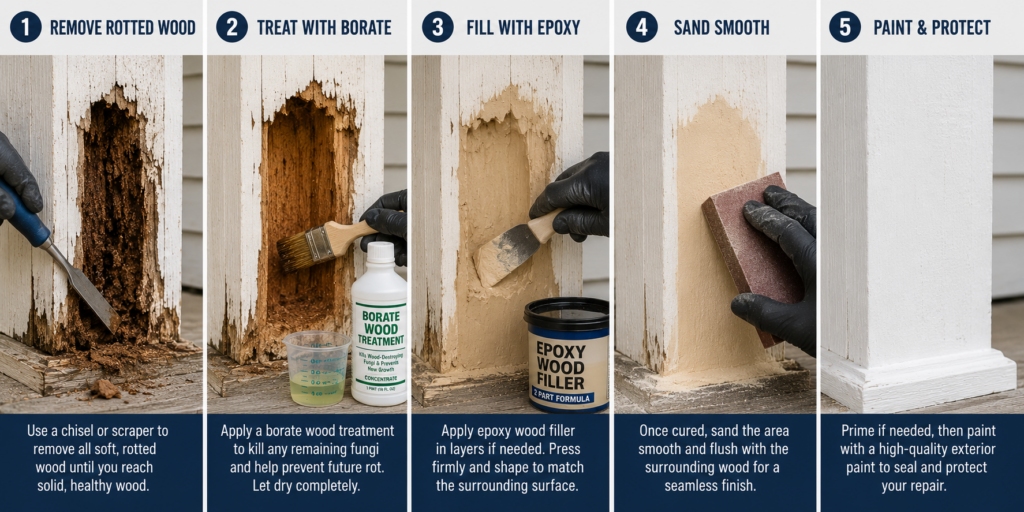
Step-by-Step: How to Repair Salvageable Rot
Identify the boundary. Screwdriver-test outward in all directions until you consistently hit solid resistance.
Remove the damaged material. A rotary tool, chisel, or even a flathead screwdriver works for small areas. Get well past the visible rot line.
Treat for fungus. A borate-based wood preservative kills remaining spores and resists future growth.
Let it dry completely. Minimum 48 hours, longer in humid climates. Don’t skip this — see the warning above.
Stabilize with hardener. A penetrating epoxy hardener soaks into the remaining wood fiber and stiffens it before filling.
Fill the void. A two-part epoxy wood filler sands and paints like real wood and bonds permanently.
Sand, prime, and seal. Use an exterior-grade primer and a paint or stain rated for the exposure the piece will see.
Fix the moisture source. None of the above matters in the long term if the leak, the grade slope, or the sprinkler pattern that caused the rot is still happening.
When Replacement Is the Only Right Answer
Skip straight to replacement when:
The rot is in a joist, beam, sill plate, ledger board, or post base — anything that carries a structural load.
More than one-third of the cross-section is compromised. Many contractors use the “50 percent rule” as a minimum replacement guideline, but I prefer to replace structural members sooner rather than push the limit.
You’re finding rot in more than one connected piece, suggesting moisture has been traveling — like the fascia-into-sheathing situation above.
The piece is hard to inspect fully (inside a wall cavity, under a slab, behind exterior plywood sheathing) — if you can’t verify the full extent, don’t trust a partial repair.
This is also the point where it’s worth bringing in a contractor or a structural inspection, especially for anything connected to a deck’s structural posts or a home’s roof sheathing and framing. The cost of being wrong there isn’t cosmetic.
Products I Actually Use (and Why)
Skip the 40-piece “deck restoration kit.” Here’s what’s actually in my kit, and the reasoning behind each pick:
Borate-based wood preservative— this is the unglamorous product that matters most. Hardener and filler get the attention, but borate is what keeps the fungus from coming back after you’ve patched the visible damage.
Abatron LiquidWood — a two-part penetrating epoxy consolidant I reach for on punky wood that’s still structurally important, like a window sill or porch trim. It soaks deep into the fiber and hardens from the inside out, which matters more than surface strength on anything exposed to weather.
Minwax High Performance Wood Hardener — my go-to for smaller, less critical spots like trim and fascia where I want a fast-curing, easy-to-find hardener without ordering a kit online.
Abatron WoodEpox or PC Woody — both are two-part epoxy putties for filling the cavity after hardening. I prefer these over standard wood filler because they don’t shrink or crack outdoors the way putty does, and they sand and paint like real wood.
Bondo Wood Filler— a budget option that works fine for small, fully indoor, non-structural fixes (like a gouge in interior trim), but I don’t trust it outdoors the way I trust the two-part epoxy systems above.
That’s the entire list. I’ve seen people spend $150 on a bundled kit and use maybe $35 worth of what’s actually in it.
Product
Best For
Avoid Using On
Borate Treatment
Killing fungi
Filling voids
Wood Hardener
Stabilizing soft wood
Large missing sections
Epoxy Filler
Rebuilding missing material
Structural beams
Exterior Paint
Weather protection
Wet wood
How Climate Changes the Math
Rot risk isn’t the same everywhere, and it changes what “good enough” looks like for a repair. In a dry climate, a borderline soft spot might stay stable for years because there’s rarely enough sustained moisture to feed active fungus. In a humid Gulf Coast or Pacific Northwest climate, that same soft spot can go from “watch it” to “replace it” in a single rainy season. If you live somewhere humid, treat every borderline call on the comparison table above as one category more serious than it looks — when in doubt, replace rather than repair, because the moisture that caused the rot in the first place isn’t going away on its own.
Preventing the Next Round of Rot
The cheapest rot repair is the one you never have to do. A few habits that actually move the needle:
Keep wood-to-ground contact to a minimum; use post bases that hold wood off concrete and soil.
Clean gutters every season — overflow against fascia boards and trim is one of the most common sources of rot I see, and it’s exactly how I found the hidden rot behind my own fascia.
Reseal exposed end grain yearly; end grain absorbs water many times faster than the face of the board.
Choose pressure-treated plywood or marine plywood for any wood that will be exposed to consistent moisture — our breakdown of marine plywood vs. pressure-treated wood covers which one is right for your project if you’re deciding between the two.
For exposed structural applications like a shed floor or roof sheathing, exterior-rated plywood resists moisture far better than interior-grade sheets; see our exterior plywood guide for what to look for.
For furniture or interior builds where rot risk is lower but moisture still matters, our guide to choosing plywood thickness for furniture covers how core type and ply count affect long-term durability.
If you want the full system for stopping rot before it starts, including how to treat deck boards, fascia, and shed floors before problems start, we cover it in detail in How to Stop Wood Rot Permanently.
FAQ: Can Rotting Wood Be Saved?
Can you stop wood rot once it’s started? Yes, as long as the rot hasn’t compromised a structural piece. Removing the damaged material, treating it with a fungicide, fully drying it, and sealing it will prevent active rot from spreading.
Does vinegar or bleach kill wood rot? Bleach kills surface mold but doesn’t penetrate deep enough to kill rot fungus inside the wood fiber. A borate-based wood preservative is far more effective for actual rot.
How do you know if rotted wood is too far gone? Use the screwdriver test. If it sinks in more than about half an inch with light pressure, or the piece is structural (joist, sill, post base), it’s past the point of a cosmetic repair. Many contractors use the “50 percent rule” — replace if more than half the cross-section is compromised — but a more conservative one-third threshold gives you a safety margin, since rot is rarely contained exactly where it looks visible.
Is epoxy wood filler as strong as real wood? For small, contained, non-structural repairs, yes — it bonds permanently and can be sanded, primed, and painted like real wood. It is not a substitute for structural wood fiber on load-bearing pieces.
How long does a wood hardener repair last? Done correctly — full removal of soft wood, complete drying, proper sealing — a hardener-and-epoxy repair on non-structural wood can last well over a decade.
Does homeowners insurance cover wood rot repair? Generally no. Most policies treat wood rot as a gradual maintenance issue rather than sudden, accidental damage, so it’s typically excluded unless it results directly from a covered event, such as a burst pipe or storm damage.
Can Rotting Wood Be Saved? Final Verdict
I inspect my deck, fascia, porch posts, and window trim every spring with nothing more than a screwdriver. It takes less than fifteen minutes and has saved me thousands of dollars in repairs. I’ve found three separate hidden rot problems this way over the years, and each would have required a major repair if I’d waited another season.
Rotting wood can absolutely be saved — but only the kind that hasn’t crossed into structural territory or escaped your ability to fully inspect it. The screwdriver test costs nothing and tells you which category you’re in before you spend a dime on filler, hardener, or a call to a contractor. Catch it early, treat the moisture source, and most rot is a cheap Saturday project. Catch it late, and you’re not patching wood anymore — you’re rebuilding it.
Related Posts:
Can Rotting Wood Be Saved? Expert Repair Guide by Admin June 25, 2026 DIY Yes, rotting wood can often be saved if the damage is limited, the moisture source is eliminated, and the remaining wood is treated with a…
Replace Stair Spindles by Admin August 6, 2023 Repairs An attractive staircase can add a lot to a home’s appearance. Stately homes were often known for their grand staircases off the entry foyer. While…