Building deck stairs is one of those DIY projects that looks simple until you start calculating the measurements.
The actual construction is fairly straightforward. The difficult part is getting the rise, run, stringers, landing, and connections right. A small error in the layout can leave you with uneven steps, an awkward bottom riser, or stairs that do not meet local building requirements.
This guide explains how to build deck stairs from start to finish, including how to calculate the number of steps, lay out and cut stair stringers, prepare the landing, install treads, add railings, and protect the finished stairs from weather.
If you are also planning or repairing the deck itself, read our guide on whether you can use plywood for a deck before using sheet goods in an exposed outdoor assembly.
Important: Building codes vary by location. The dimensions below reflect common residential-code requirements, but always verify current requirements with your local building department before construction.
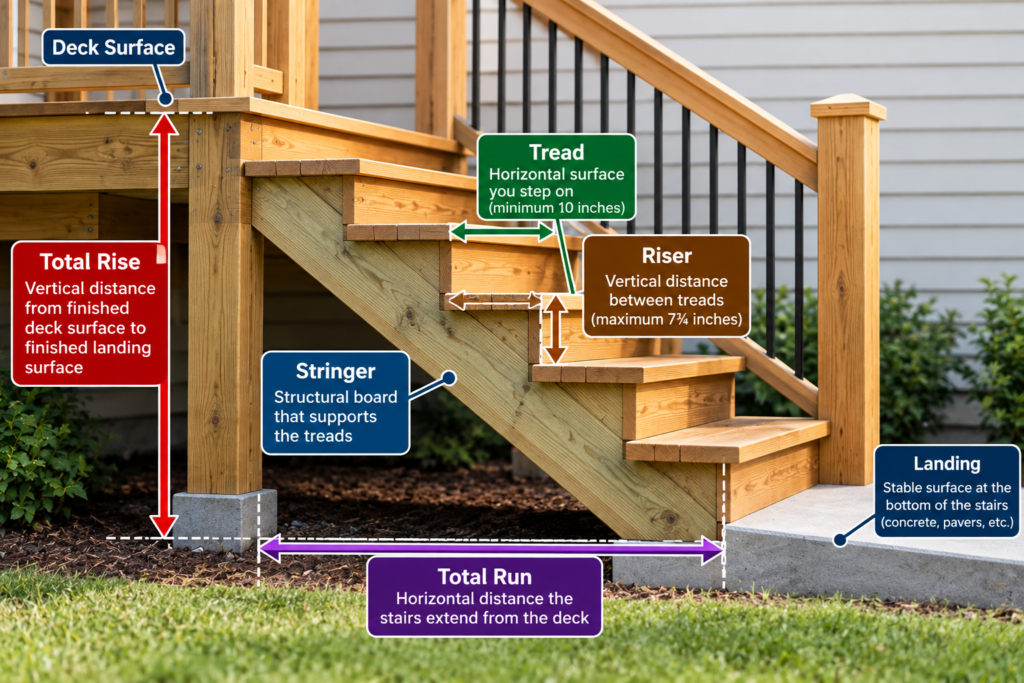
Deck Stair Terms You Need to Know
Before measuring anything, understand these basic terms.
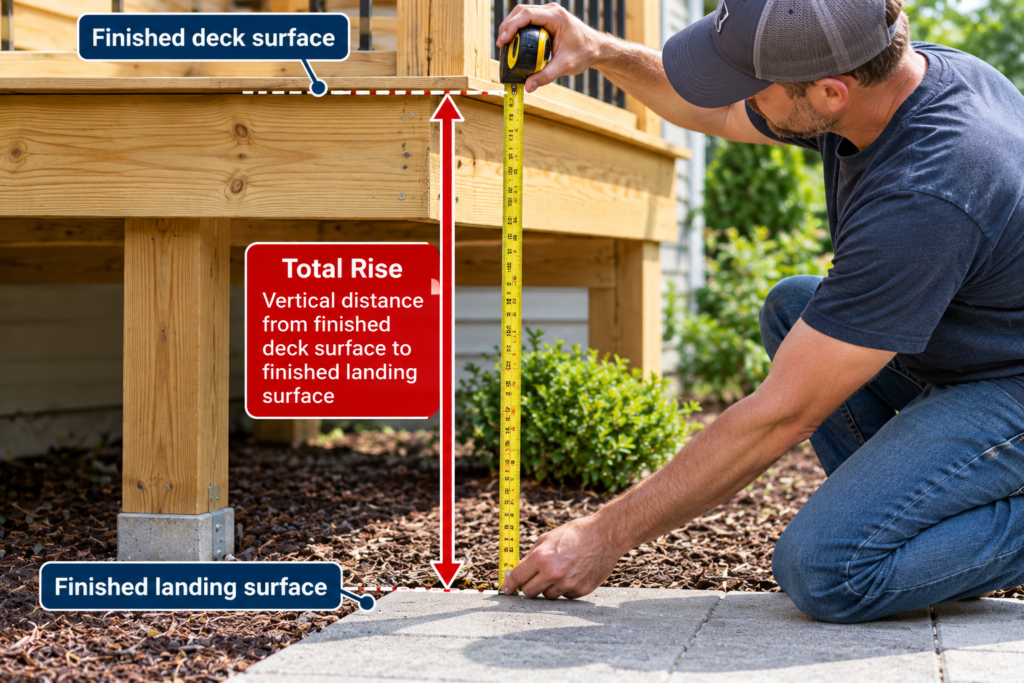
Total Rise
The total rise is the vertical distance from the finished deck surface to the finished landing below.
This measurement determines how many risers your staircase needs.
Riser
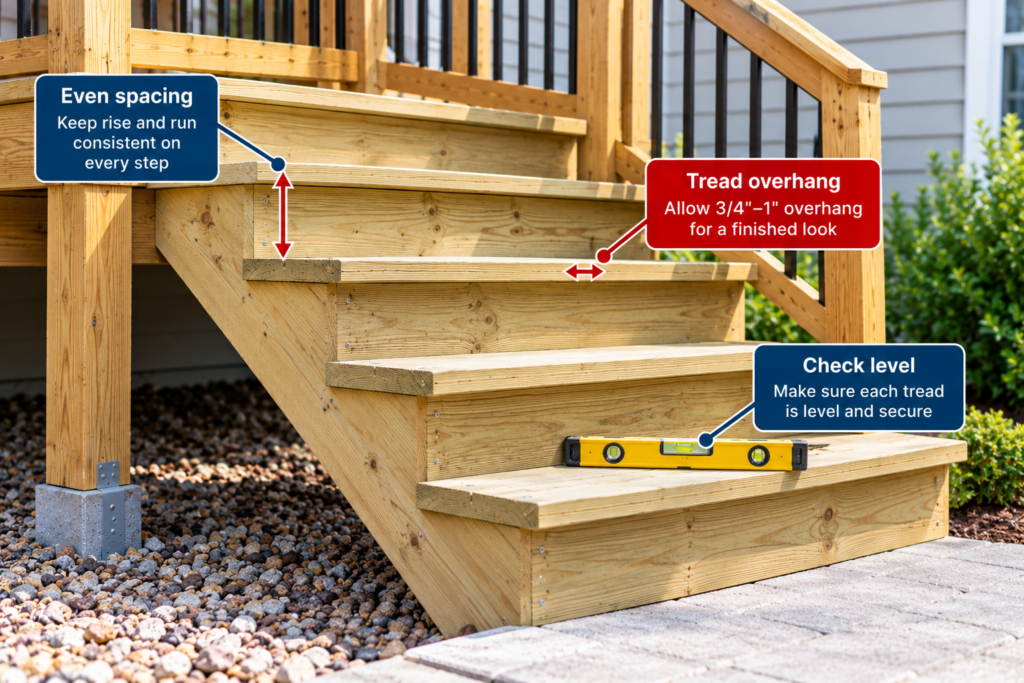
A riser is the vertical distance from one walking surface to the next.
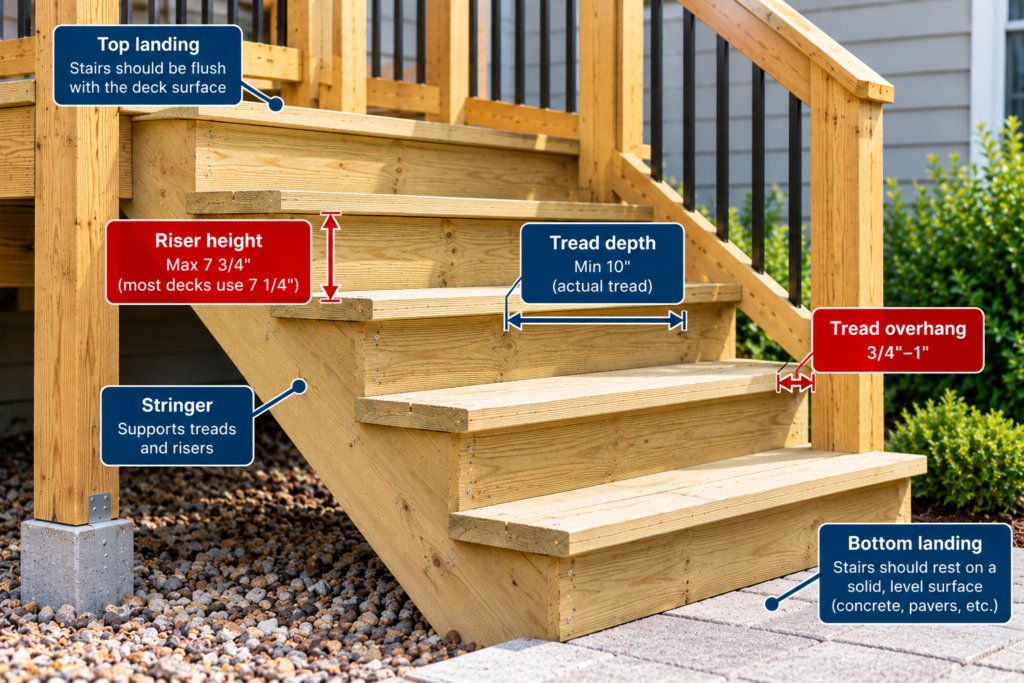
Under commonly used residential-code standards, the maximum riser height is generally about 7¾ inches, although local requirements may differ.
Tread
The tread is the horizontal surface you step on.
A minimum tread depth of about 10 inches is common for residential stairs.
Run
The unit run is the horizontal distance of one step.
The total run is the approximate horizontal distance the entire staircase extends away from the deck.
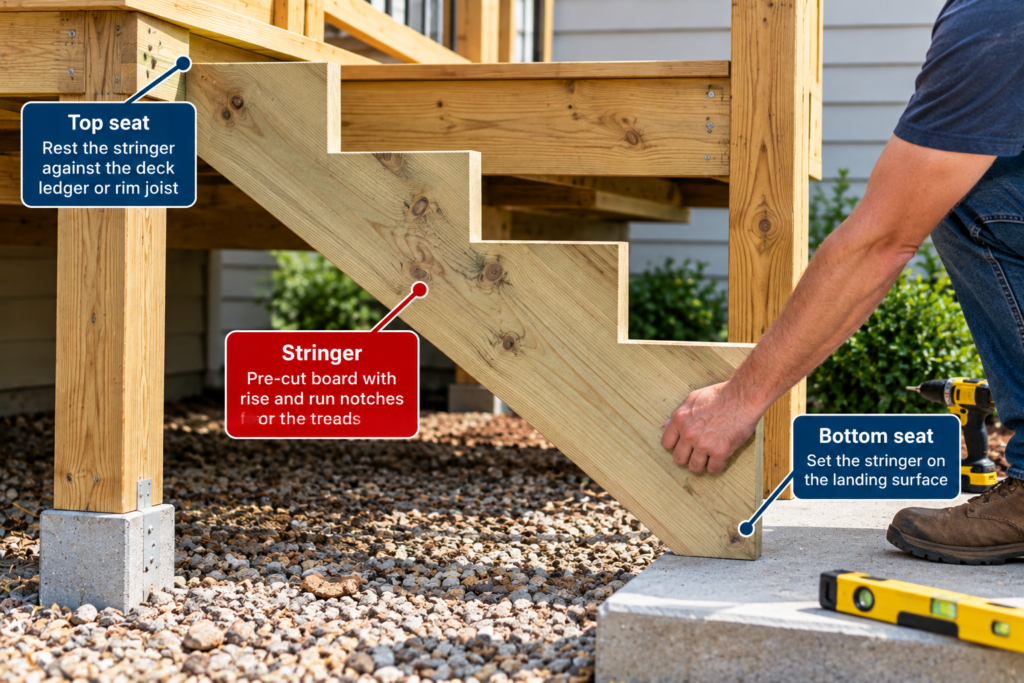
Stringer
A stringer is the structural board supporting the stair treads.
Cut deck stair stringers are commonly made from pressure-treated 2×12 lumber.
Deck Stair Code Basics
Before buying lumber, check your local building requirements.
Common residential requirements include:
Maximum riser height around 7¾ inches
Minimum tread depth around 10 inches
Consistent riser heights
Stair width commonly at least 36 inches
Handrails on stair flights with four or more risers
A stable landing at the bottom of the stairs
The exact rules can vary by jurisdiction.
Consistency is especially important. Even a relatively small difference between riser heights can make a staircase uncomfortable and increase the chance of tripping.
Check the requirements before cutting your first stringer rather than trying to correct the staircase afterward.
Tools for Building Deck Stairs
Most DIY deck stairs can be built with common carpentry tools.
Pressure-treated lumber is commonly used because of its resistance to outdoor decay and insect damage. If your project also involves exterior sheet goods, our pressure-treated plywood guide explains where treated plywood makes sense and where conventional lumber is the better choice.
Use fasteners and connectors rated for exterior use and compatible with pressure-treated wood.
How to Build Deck Stairs Step by Step
The layout is the most important part of the project.
Measure carefully before making any cuts.
Step 1: Measure the Total Rise
Measure vertically from the finished deck surface to the finished landing surface.
The finished landing height matters.
If you measure down to bare soil but later add pavers or a concrete pad, the first riser can end up shorter than the others.
Suppose your deck surface is:
42 inches above the finished landing
Your total rise is therefore 42 inches.
Use that measurement to calculate the number of risers.
Step 2: Calculate the Number of Risers
Divide the total rise by an approximate desired riser height.
For a 42-inch rise:
42 ÷ 7 = 6
That gives you six risers, each exactly 7 inches high.
The calculation will not always divide evenly.
Suppose your total rise is 46 inches:
46 ÷ 7 = 6.57
You cannot build 6.57 risers.
Instead, use seven risers:
46 ÷ 7 = approximately 6.57 inches per riser
The important part is making every riser approximately the same height.
Do not build most of the stairs at one riser height and then make the final step taller or shorter to absorb the difference.
Step 3: Calculate the Number of Treads
This is one of the easiest stair calculations to get wrong.
The number of separate stair treads is usually one fewer than the number of risers when the deck surface acts as the final upper walking surface.
For example:
6 risers = typically 5 separate stair treads
If those five treads each use a 10-inch unit run:
5 × 10 inches = approximately 50 inches of total run
That tells you roughly how far the staircase will extend into the yard.
Actual dimensions can vary slightly depending on tread overhang and the way the staircase meets the deck.
Step 4: Check the Stair Location
Measure the approximate total run outward from the deck.
Make sure the stairs will not interfere with:
Doors
Windows
Air-conditioning equipment
Downspouts
Walkways
Fences
Garden beds
Retaining walls
Sloped ground
Straight stairs are usually the easiest DIY option.
If the stairs would extend too far into the yard, an L-shaped or U-shaped staircase with an intermediate landing may make more sense.
Also consider where people will naturally walk after reaching the bottom.
Step 5: Prepare the Bottom Landing
Deck stairs need a stable surface at the bottom.
A poured concrete pad is common, but it is not necessarily the only option. Depending on local requirements, acceptable surfaces can include:
Concrete
Properly installed pavers
Stone
Another approved stable surface
Do not place finished stringers directly on loose soil or mulch.
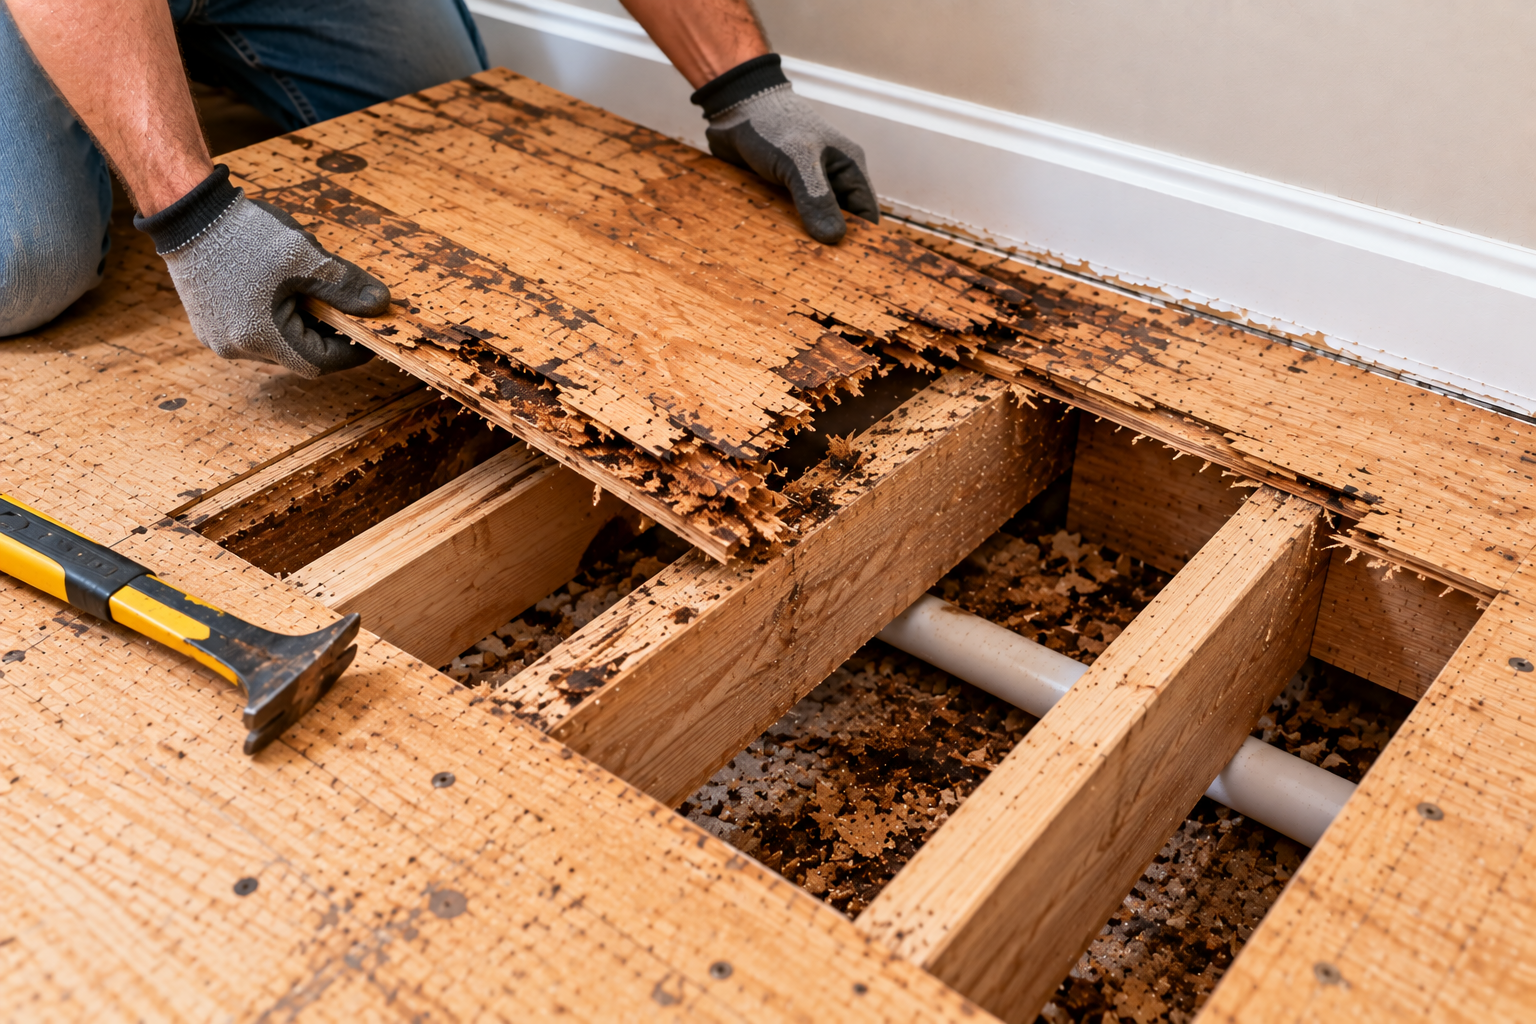
If the soil settles or erodes, the first riser height changes and the bottom of the stringers can remain wet.
Persistent moisture around exterior wood can eventually lead to decay. Our guide on how to stop wood rot permanently explains why correcting the moisture source is essential before repairing damaged wood.
The landing should generally be at least as wide as the staircase and provide enough depth to step safely off the stairs.
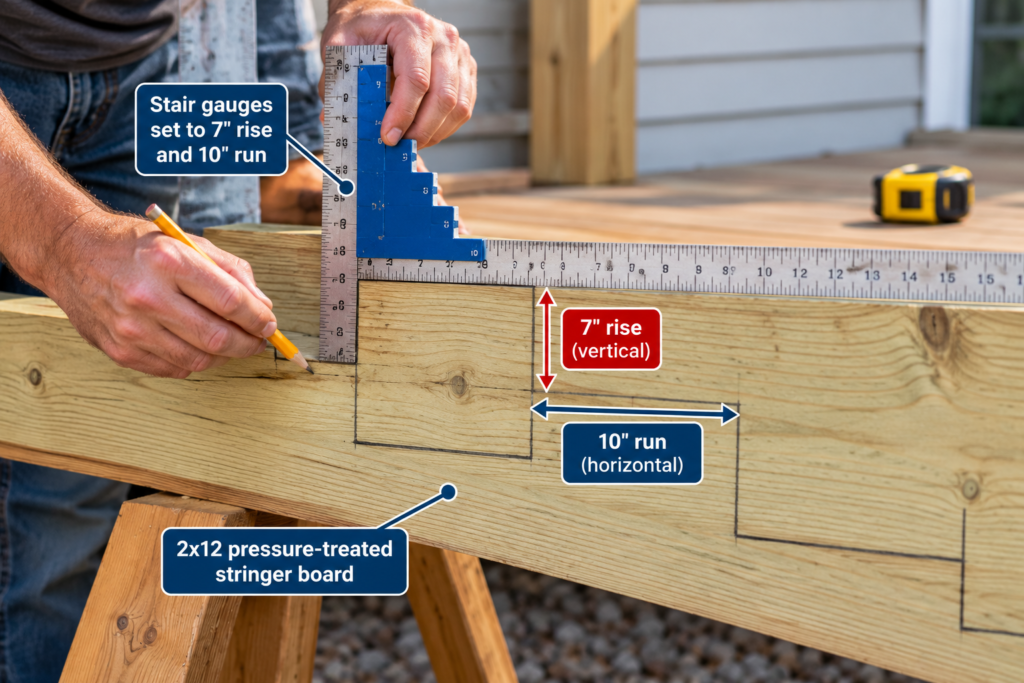
Step 6: Lay Out the First Stringer
Use a straight pressure-treated 2×12.
Avoid boards with significant twisting, splitting, or large defects near the planned cuts.
Set your stair gauges on a framing square using the calculated rise and run.
For example:
Rise: 7 inches Run: 10 inches
Position the square against the edge of the 2×12 and mark the first step.
Move the square forward and repeat the process until all steps are marked.
Before cutting, verify:
Number of risers
Riser height
Tread depth
Top attachment position
Bottom landing position
Tread thickness
The first stringer becomes the template for the others, so accuracy here matters.
Step 7: Cut the First Stringer
Cut the marked stair pattern with a circular saw.
Do not allow the blade to continue past the inside corners where the rise and run lines intersect.
Overcutting those corners removes additional material and can weaken the stringer.
Instead:
Cut close to the corner with the circular saw.
Stop before crossing the intersecting line.
Finish the cut with a jigsaw or handsaw.
Once the stringer is cut, test-fit it against the deck.
Check:
The top connection
Contact with the landing
First-riser height
Final-riser height
Overall stair angle
Do not cut the remaining stringers until the first one fits correctly.
Step 8: Cut the Remaining Stringers
Once the first stringer fits properly, use it as a template.
Place it on another 2×12, trace the shape, and cut the remaining stringers the same way.
The number of stringers required depends on:
Stair width
Tread thickness
Tread material
Manufacturer instructions
Local structural requirements
Composite decking often requires closer stringer spacing than wood decking.
Always follow the tread manufacturer’s specifications.
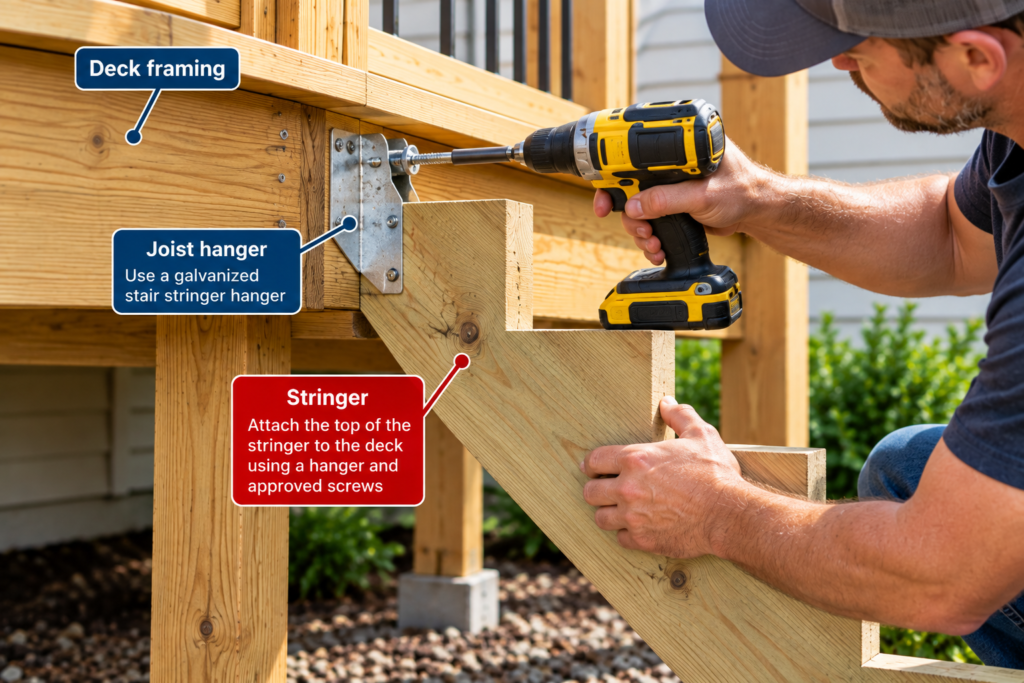
Step 9: Attach the Stringers
The connection between the stairs and the deck is structural.
Do not depend on a few ordinary deck screws or angled nails.
Stringers should connect to properly sized deck framing using approved structural hardware such as:
Stair-stringer connectors
Structural screws
Bolts
Other approved framing hardware
Follow the connector manufacturer’s installation requirements.
Before installing the treads, confirm that the stringers:
Are parallel
Sit at the same elevation
Are securely attached
Have proper support at the landing
Do not move
Remain correctly spaced
Place a level across the stringers and fix alignment problems before moving forward.
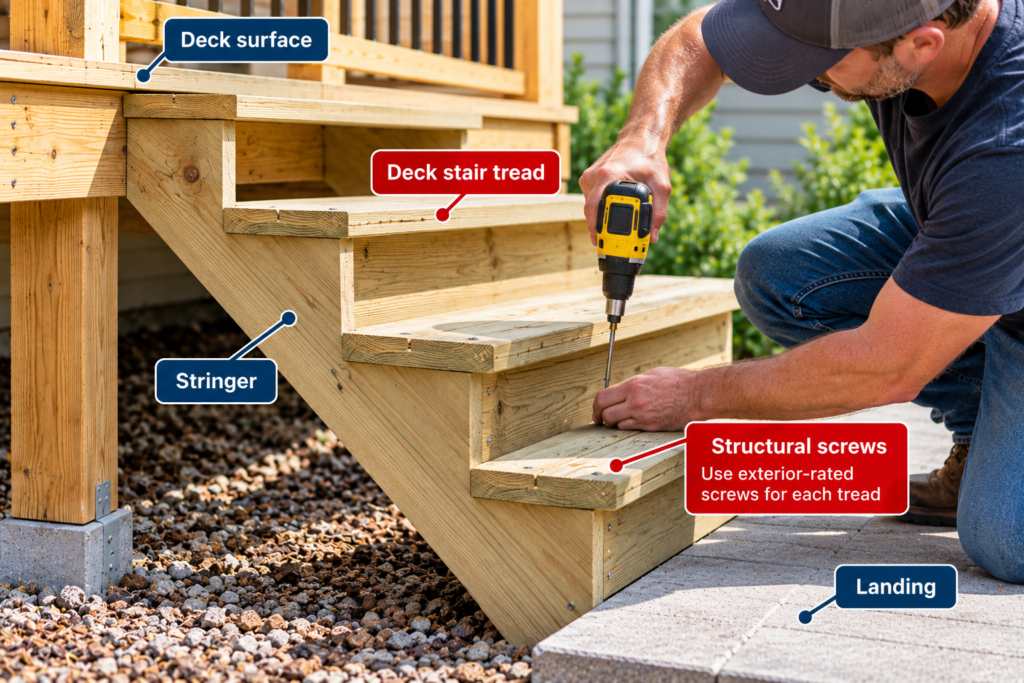
Step 10: Install the Stair Treads
Once the stringers are secure, install the treads.
Starting at the bottom can make it easier to maintain consistent placement as you work upward.
If each tread uses multiple deck boards, maintain the spacing recommended by the decking manufacturer.
Proper gaps help with:
Drainage
Wood movement
Air circulation
Removing debris
Fasten every tread securely to each supporting stringer with approved exterior fasteners.
The finished treads should not rock or flex excessively under normal use.
Step 11: Install Risers if Needed
Outdoor deck stairs can have open or closed risers.
Open Risers
Open risers provide better drainage and use less material.
However, building codes may restrict the allowable opening between steps.
Closed Risers
Closed risers create a more finished appearance and prevent you from seeing through the staircase.
They can also make the stairs feel more enclosed around children or pets.
Check local requirements before deciding which design to use.
Step 12: Install Railing Posts
Railing posts need a structural connection.
Do not simply screw posts into the tread boards.
Depending on the design, post attachment may require:
Bolts
Structural screws
Blocking
Approved post hardware
Install every post plumb and verify that it does not move when pressure is applied.
Then install the rails and balusters according to the railing-system instructions and local code.
Step 13: Install the Handrail
A guard and a handrail serve different purposes.
A guard helps prevent someone from falling from the side of an elevated staircase.
A handrail provides a surface that can be grasped while walking up or down.
Under common residential standards, stairways with four or more risers generally require a handrail.
A wide decorative top rail does not automatically qualify as a graspable handrail.
Verify local requirements for handrail:
Height
Shape
Clearance
Continuity
Graspability
Step 14: Inspect the Stairs
Before finishing the wood, walk up and down the staircase several times.
Check for:
Loose treads
Stringer movement
Uneven steps
Loose railing posts
Protruding fasteners
Splinters
Excessive tread flex
Sharp edges
Pay particular attention to the first and last risers.
Those are common places for errors because tread thickness, deck height, and landing elevation all affect the final dimensions.
If one step feels different, measure it again.
Step 15: Seal and Protect the Wood
Deck stairs are exposed to rain, sunlight, dirt, and repeated wetting and drying.
Once the lumber is sufficiently dry for your chosen finish, apply a compatible exterior stain, water repellent, or sealer.
Pay particular attention to:
Cut ends
Exposed end grain
Stringer cuts
Stair treads
Areas where water can collect
Pressure-treated wood resists decay, but good drainage and finishing still help extend its service life.
If plywood is used elsewhere in the deck structure, exposed panel edges need special attention. See How to Seal Exterior Plywood for the correct approach to protecting edges and faces.
For a broader comparison of outdoor panel types, see our complete Exterior Plywood Guide.
Best Materials for Deck Stair Treads
Three common options are pressure-treated lumber, naturally durable wood, and composite decking.
Pressure-Treated Wood
Pressure-treated lumber is usually the most economical choice.
Advantages include:
Low cost
Wide availability
Easy cutting
Good outdoor durability
The main disadvantages are checking, splitting, maintenance, and possible splintering as the wood ages.
Cedar or Redwood
Cedar and redwood offer attractive appearance and natural resistance to decay.
They generally cost more than pressure-treated lumber and still need periodic maintenance.
Composite Decking
Composite decking resists rot and splintering and generally requires less maintenance.
However, composite boards can require closer stringer spacing and specific fastening methods.
Follow the manufacturer’s stair-installation instructions.
Can You Use Plywood for Deck Stair Treads?
Bare plywood is generally not a good choice for exposed deck stair treads.
Deck boards allow water to drain between individual boards. A broad plywood panel creates a large horizontal surface where moisture can remain.
Plywood can be used in certain covered or waterproof deck assemblies where it serves as a protected structural substrate.
For normal exposed backyard stairs, use exterior-rated stair-tread material instead.
See Can You Use Plywood for a Deck? for a more detailed explanation of where plywood can and cannot work in a deck assembly.
Common Deck Stair Mistakes
Confusing Risers and Treads
Six risers typically means five separate stair treads when the deck is the final upper walking surface.
Getting this calculation wrong changes the total run.
Measuring to Bare Soil
Calculate the total rise from the finished landing surface, not unfinished dirt.
Making One Step a Different Height
Do not make the bottom step taller or shorter simply to make the staircase fit.
Recalculate the complete layout instead.
Overcutting Stringers
Stop circular-saw cuts before crossing the inside corners and finish them with a jigsaw or handsaw.
Weak Stringer Connections
Use structural hardware appropriate for the application.
Ordinary interior screws should not be used as structural deck-stair fasteners.
Unstable Landing
Loose soil can settle and change the bottom-riser height.
Use a stable landing that meets local requirements.
Poor Drainage
Water should be able to drain away from treads, stringers, and the landing.
If wood begins softening or showing decay, determine where the moisture is coming from before applying filler or sealer.
How Long Does It Take to Build Deck Stairs?
A straightforward set of straight deck stairs can often be completed over a weekend by an experienced DIYer.
A typical project might require:
Planning and measuring: 1–2 hours
Stringer layout and cutting: 2–4 hours
Landing preparation: several hours
Stringer installation: 1–3 hours
Tread installation: 2–4 hours
Railings: several additional hours
Concrete work, inspections, complicated railings, or taller staircases can extend the project.
Do not rush the stringer layout to save time. A mistake in the first stringer can be repeated across every stringer you cut.
Frequently Asked Questions About Deck Stairs
How many steps do I need for deck stairs?
Measure the total rise from the finished deck surface to the finished landing.
Then divide that measurement by the approximate desired riser height.
For example:
42 inches ÷ 7 inches = 6 risers
Six risers will typically create five separate stair treads when the deck functions as the upper walking surface.
What size lumber should I use for stair stringers?
Pressure-treated 2×12 lumber is commonly used for cut deck stair stringers.
The wider board leaves enough material around the stair notches.
How deep should deck stair treads be?
A minimum tread depth of approximately 10 inches is common under residential building standards.
Verify the requirement in your jurisdiction before cutting the stringers.
What is the maximum deck stair riser height?
A maximum riser height of approximately 7¾ inches is commonly used under residential standards.
Local codes may differ.
Do deck stairs need a concrete landing?
Not necessarily.
They generally need a stable landing, but the approved surface may be concrete, pavers, stone, or another suitable material depending on local requirements.
How many stringers do deck stairs need?
It depends on stair width, tread thickness, tread material, and maximum permitted spacing.
Composite stair treads often require closer stringer spacing than wood.
Can You Use Plywood for a Deck? Pros, Cons & Costs by Admin June 2, 2026 DIY Choosing the right material for a deck determines how long the structure will last, how much maintenance it will require, and how safe it will…