This post contains affiliate links. If you buy through them, ThePlywood.com may earn a commission at no extra cost to you.
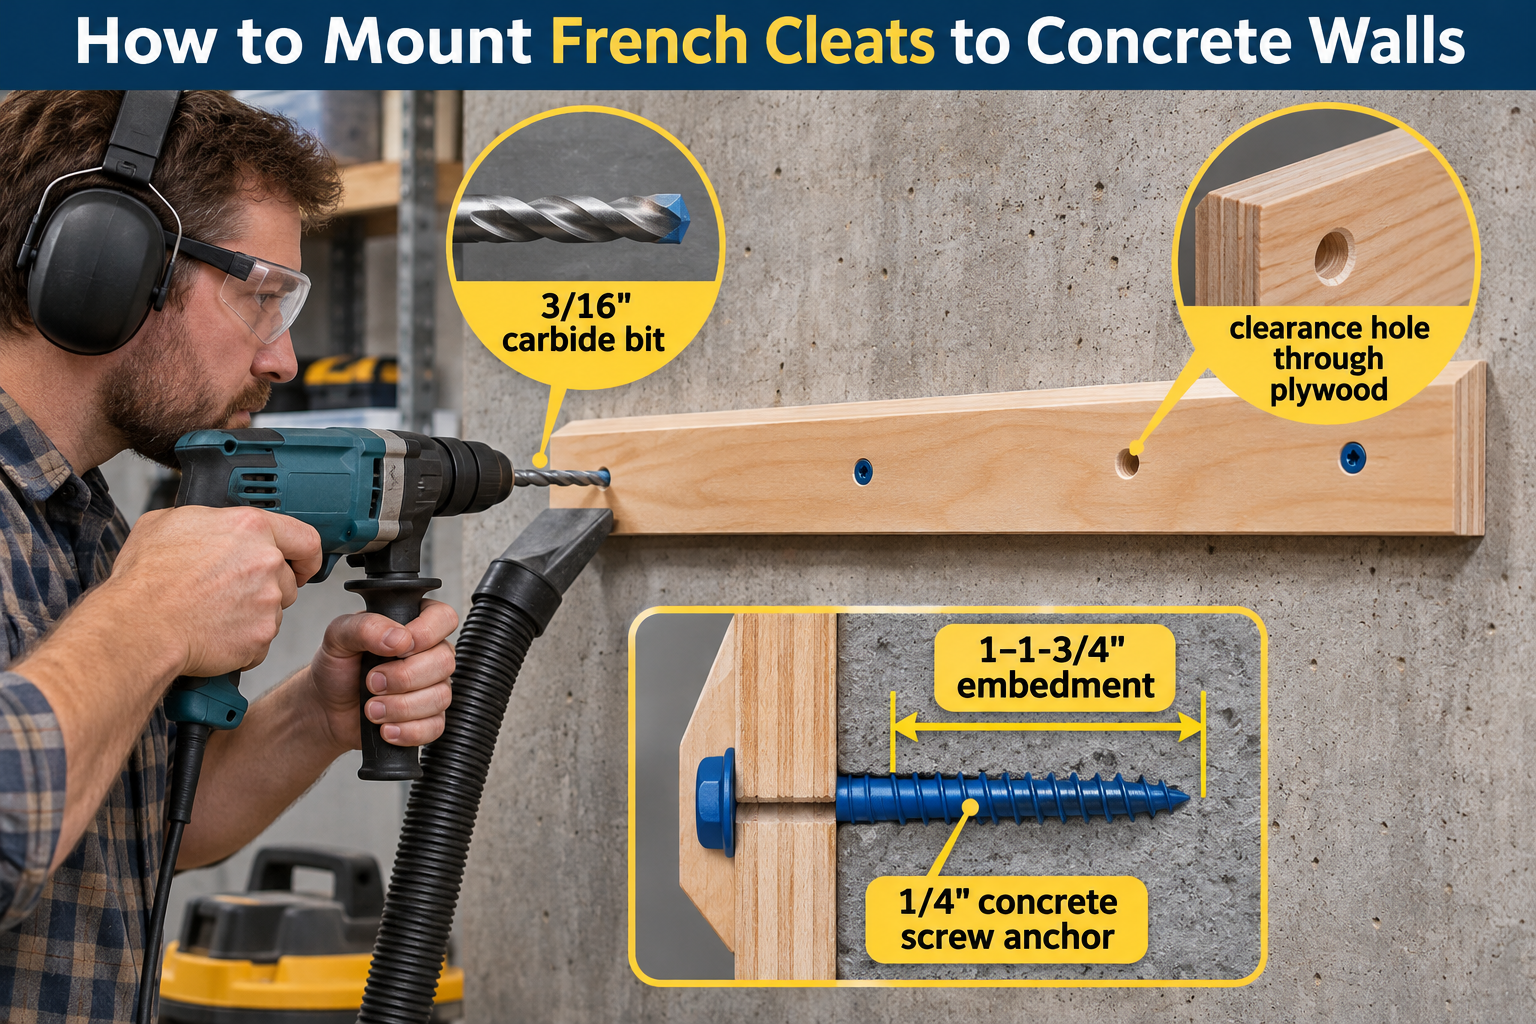
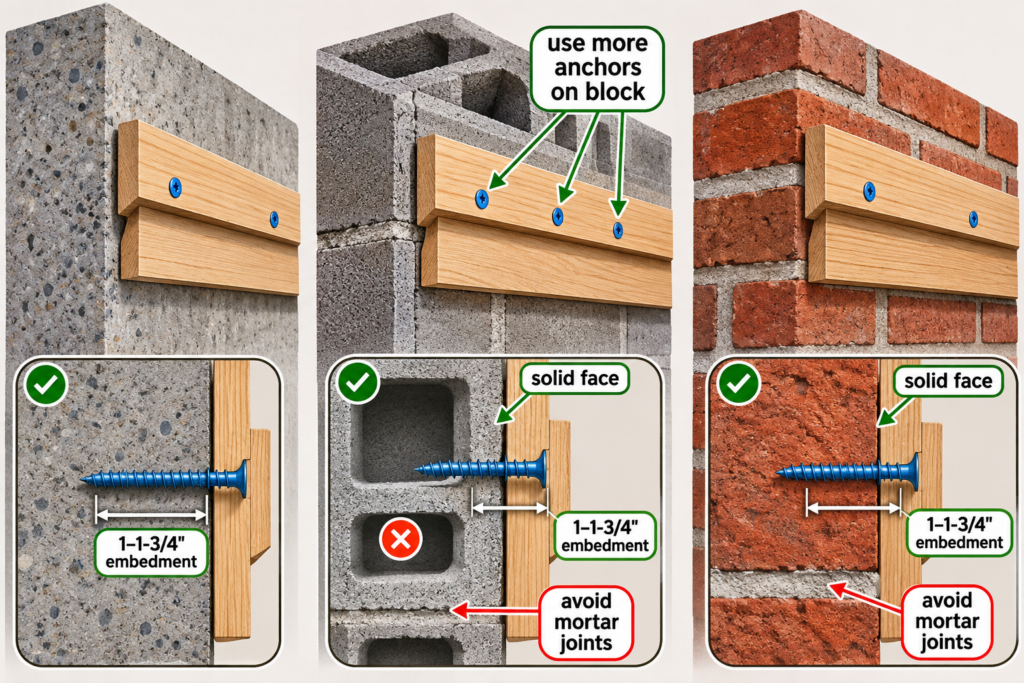
To mount French cleats to concrete walls, fasten the wall cleat with 1/4-inch concrete screw anchors (Tapcon-type) set 1 to 1-3/4 inches into the concrete. Drill the hole with the 3/16-inch carbide bit made for that anchor. On poured concrete you can usually screw the cleat straight to the wall. Hollow block and brick need more anchors, placed in the solid face of the block or brick and never in the mortar.
Quick answer
Anchor: 1/4″ concrete screw anchor (3/16″ anchors for light-duty rows)
Drill bit: 3/16″ carbide bit for 1/4″ anchors, 5/32″ for 3/16″ anchors
Clearance hole: drill through the plywood cleat first with a wood bit slightly larger than the anchor
Embedment: at least 1″, no more than 1-3/4″
Hole depth: at least 1/4″ deeper than the embedment
Anchor length: wood thickness + embedment (a 3/4″ cleat on bare concrete usually takes a 2-1/4″ anchor)
Spacing: follow the spacing and edge distances on your anchor’s own data sheet. For standard 1/4″ Tapcons, the full listed capacity needs about 4″ between anchors and 3–4″ from concrete or block edges. Other anchors and wall types differ. A common layout is one anchor every 12 to 16 inches along each cleat, closer on block.
Load planning: the manufacturer caps single-anchor working loads at 25% of the listed ultimate load under steady (static) load. That’s a starting estimate for one anchor, not a safe rating for a loaded cabinet or shelf.
Concrete Anchor Chart for French Cleats
The table shows the manufacturer’s listed ultimate loads for standard Tapcon anchors. The “plan on” column is 25% of that, the manufacturer’s maximum working load for one anchor under a steady load.
Read this before using the chart: These are preliminary single-anchor estimates under ideal conditions: correct bit, full embedment, sound concrete or block, and the listed edge and spacing distances. They are not safe capacities for a finished cabinet, shelf or tool wall. A loaded cleat puts downward and pull-out force on the anchors at the same time and spreads the weight unevenly among them. The plywood cleat, its screws and the cabinet itself can all fail before the anchors do. Use the chart to compare anchor sizes and wall types, not to calculate how much weight to hang.
Poured concrete (2,000 psi)
Anchor
Drill bit
Embedment
Ultimate shear (down)
Plan on (shear)
Ultimate tension (pull-out)
Plan on (tension)
3/16″
5/32″
1″
720 lb
~180 lb
600 lb
~150 lb
3/16″
5/32″
1-3/4″
870 lb
~215 lb
1,450 lb
~360 lb
1/4″
3/16″
1″
900 lb
~225 lb
750 lb
~185 lb
1/4″
3/16″
1-3/4″
1,670 lb
~415 lb
2,020 lb
~505 lb
Hollow concrete block (1″ embedment, the only block depth the manufacturer lists)
Anchor
Block type
Ultimate shear
Plan on (shear)
Ultimate tension
Plan on (tension)
3/16″
Lightweight
400 lb
~100 lb
220 lb
~55 lb
3/16″
Medium weight
730 lb
~180 lb
340 lb
~85 lb
1/4″
Lightweight
620 lb
~155 lb
250 lb
~60 lb
1/4″
Medium weight
1,000 lb
~250 lb
500 lb
~125 lb
The manufacturer only lists loads at 1″ and 1-3/4″ embedment. If your anchor lands somewhere in between, use the 1″ numbers.
Test before you load: On lightweight block, a 1/4″ anchor’s single-anchor pull-out estimate is only about 60 lb. The top cleat of a loaded cabinet gets pulled away from the wall, so on block that pull-out number matters more than the downward (shear) number. The fix is more anchors, not longer ones.
Which Anchor Length Do You Need?
Anchor length = total wood the anchor passes through + embedment into concrete. Keep the embedment between 1″ and 1-3/4″.
What’s on the wall
Wood thickness
Anchor length
Embedment
3/4″ cleat, straight on concrete
3/4″
1-3/4″
1″ (minimum)
3/4″ cleat, straight on concrete
3/4″
2-1/4″
1-1/2″
3/4″ cleat over 3/4″ plywood backer
1-1/2″
2-3/4″
1-1/4″
3/4″ cleat over 3/4″ plywood backer
1-1/2″
3-1/4″
1-3/4″ (maximum)
3/4″ cleat over flat 2x furring (1-1/2″)
2-1/4″
3-1/4″
1″
3/4″ cleat over flat 2x furring (1-1/2″)
2-1/4″
4″
1-3/4″
Rule of thumb: whatever sits between the cleat and the concrete, the anchor goes through all of it and into the concrete. On a 1-1/2″ furring strip, a wood screw can’t get the 1-1/2″ bite into the wood that the French cleat dimensions guidecalls for at a stud, so loaded rows on furring still need anchors that reach the concrete.
Direct to Concrete vs. Furring or Plywood Backer
Fasten straight to the concrete when:
The wall is dry, flat and close to plumb
You don’t need a finished wall behind the cleats
You want the strongest, simplest setup with the fewest parts
Add furring or a 3/4″ plywood backer first when:
The wall is wavy or out of plumb. Shim the furring flat so the cleats line up.
You want a finished look, or room to add light-duty rows later with wood screws into the backer
The concrete gets damp, and you want an air gap and treated wood against the wall
Wood that touches concrete should be pressure-treated plywood or treated lumber. Construction adhesive can help hold furring in place, but it doesn’t replace anchors. Nothing that carries load should hang on adhesive alone.
Moisture check first: Tape a 1-foot square of plastic sheeting to the bare wall and leave it for 24 hours. If moisture collects behind it, treat the wall as damp. Use treated wood and leave a gap behind the cleats, or fix the water problem first.
Warning: Concrete anchors are made to clamp wood directly against the concrete. If drywall or foam board sits between the cleat and the concrete, the soft layer can crush as you tighten, and the cleat won’t sit tight. Add blocking or furring that rests on the concrete, or use fasteners sized for the full depth.
Poured Concrete vs. Hollow Block vs. Brick
Poured concrete
This is the easiest wall to work with. Anchors can go almost anywhere, so you’re not limited to a 16-inch layout like you are with studs. Edge distance still matters. The standard 1/4″ Tapcon data sheet lists about 3″ from a concrete edge (a window opening or wall end) and about 4″ between anchors for full capacity. Other anchors have different requirements, so check the sheet for the exact anchor you buy.
Hollow concrete block
The anchor only grabs the block’s face shell, the front wall of the block, not the hollow core behind it. That’s why block values are much lower.
Put anchors in the solid face of the block, at least 1″ in from its side edge
Stay out of the mortar joints
Keep the edge and spacing distances from your anchor’s data sheet. For standard 1/4″ Tapcons in block, that’s about 4″ from block edges and 4″ between anchors for full listed capacity. Closer spacing lowers capacity.
Use more anchors per cleat than you would on poured concrete, especially on the top cleat of a cabinet
Brick
Concrete screw anchors are listed for brick, but brick quality varies a lot. Old, soft or crumbling brick can strip out. Drill into the face of the brick, not the mortar. If the brick powders easily when you drill, mount a plywood backer with more anchors spread across more bricks, or reconsider the location.
How to Mount French Cleats to Concrete Walls (Step by Step)
1/4″ concrete screw anchors in the right length, with the matching 3/16″ carbide bit
A wood bit slightly larger than the anchor for the clearance holes (1/4″ to 5/16″ for 1/4″ anchors)
A hammer drill for drilling, and a drill/driver with a clutch, or an anchor installation tool, for driving
Level, pencil, tape measure
Safety glasses rated ANSI Z87.1 and an N95 respirator. Drilling concrete makes fine dust.
A vacuum or blower bulb to clear out the holes
Pressure-treated furring or plywood backer, if you’re using one
1. Check what’s in the wall
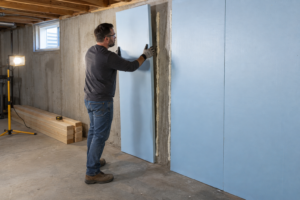
Look for electrical boxes, conduit, plumbing and anything running through the wall on the other side. Don’t drill anywhere hidden utilities might run.
2. Lay out the rows
Mark level lines for each cleat row. For tool walls, row spacing works the same as on a stud wall. The dimensions guide covers 3–6″ tool-wall spacing and cabinet cleat placement.
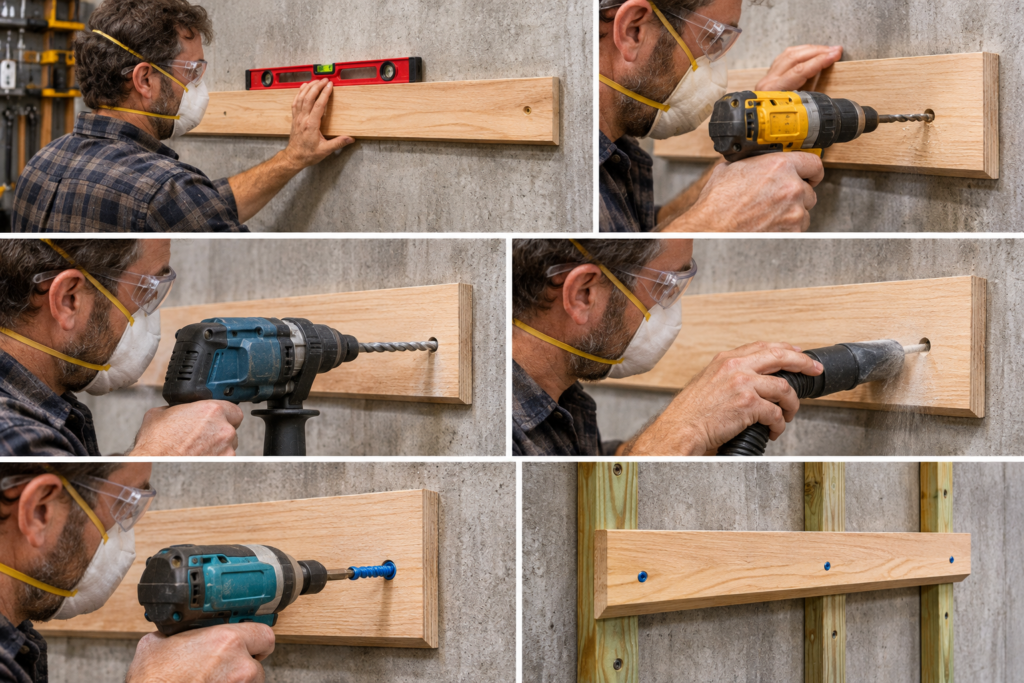
3. Drill clearance holes through the cleats
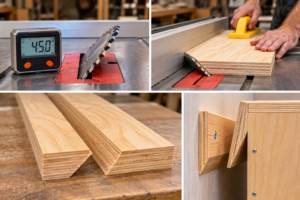
Mark anchor spots along each cleat about every 12–16″ (closer on block), using the spacing from your anchor’s data sheet. Keep the marks an inch or more from the cleat ends so the plywood doesn’t split. With a regular wood bit, drill a clearance hole through the cleat at each mark, slightly larger than the anchor (1/4″ to 5/16″ for a 1/4″ anchor). That way the anchor’s threads bite only the concrete, and the head pulls the cleat tight to the wall. The guide to drilling straight holes helps keep holes square.
4. Drill the concrete
Hold the cleat level on the wall and use the clearance holes as a guide. Switch to the carbide bit the anchor manufacturer requires (3/16″ for 1/4″ anchors, 5/32″ for 3/16″ anchors) and drill into the concrete through each clearance hole. Go at least 1/4″ deeper than the embedment. Don’t swap in a different masonry bit size.
Vacuum or blow the dust out. Dust left in the hole takes up the extra depth and can make the anchor bottom out before it’s fully seated.
6. Drive the anchors
Drive each anchor until the head sits tight against the wood, then stop. Use a drill/driver on its clutch or an anchor installation tool. An impact driver makes it easy to overdrive, which strips the threads in the concrete or snaps the head off in hard concrete.
7. Check and load
Put a level on each row and confirm the cleat doesn’t move when you pull on it by hand. Then hang your tool holders or cabinets.
Anchor Picks
1/4″ Tapcon-type concrete anchors with bit: The standard choice for French cleats on concrete. The blue coated version resists corrosion, which helps in damp basements and garages. Check 1/4″ concrete anchors on Amazon
Spare 3/16″ carbide anchor bits: Bits wear down in concrete, and a worn bit drills a hole too small for the anchor. Buy extras. Check 3/16″ anchor drill bits on Amazon
Anchor installation tool: A drive sleeve that fits on your drill to drive the anchors and control how hard they’re driven. Check anchor installation tools on Amazon
How Much Weight Can a French Cleat on Concrete Hold?
There’s no single number, and adding up anchor ratings won’t give you one. How much a cleat on concrete can hold depends on the weakest part of the whole setup:
The anchors: both the downward load and the pull-out load at the same time, at the embedment, spacing and edge distances you actually installed
How the weight spreads: only the anchors near a cabinet or heavy holder do real work. Anchors at the far end of an 8-foot cleat do little for a 24-inch cabinet.
The cleat: plywood thickness, bevel and the screws holding the matching cleat to the cabinet
The cabinet or holder: its back panel, joints and how far its weight sits from the wall
A tall or deep cabinet also pulls its top cleat away from the wall, and that pull-out force often sets the limit before the downward load does. The French cleat weight capacity guide shows how to estimate that pull.
Block changes the picture. The single-anchor pull-out estimate for a 1/4″ anchor in lightweight block is about 60 lb, roughly a third of the poured-concrete figure. On block, add more anchors under heavy items, spread the load with a plywood backer, and keep the heaviest items low on the wall.
The costly mistake: Treating the anchor chart as a cabinet rating. The chart covers one anchor under ideal conditions. For heavy cabinets, follow the cabinet maker’s mounting instructions, and for anything unusually heavy or hanging over people, get a contractor or engineer to check it.
Common Mistakes When Mounting French Cleats to Concrete
Using the wrong size drill bit
A bit that’s too big leaves the threads nothing to bite. One that’s too small snaps anchors or strips the head. The manufacturer warns the wrong bit can cause the anchor to fail. Match the bit to the anchor: 3/16″ for 1/4″ anchors, 5/32″ for 3/16″ anchors.
Skipping the clearance hole in the cleat
If the anchor threads grab the plywood, they can hold the cleat off the wall, and the cleat can rock under load. Drill a clearance hole through the wood first, then drill the concrete.
Drilling into mortar joints
Mortar is weaker than block or brick. Loaded anchors belong in the solid face of the block or brick.
Drilling the hole too shallow
The anchor hits the bottom of the hole before the cleat is tight, so you keep driving and strip it or snap the head. Drill at least 1/4″ deeper than the embedment and clean out the dust.
Overdriving with an impact driver
The threads cut into the concrete strip out and the anchor spins loose. Stop the moment the head is tight against the wood.
Untreated wood against damp concrete
Untreated plywood against a damp basement wall can grow mold and rot. Use treated wood or leave a gap, and do the plastic-sheet test first.
When Not to Mount French Cleats Directly to Concrete
Water is coming through the wall. Fix the water first. Anchors in wet, crumbling concrete lose their grip.
Old block or brick that crumbles when drilled. Spread the load with a plywood backer and more anchors, or pick another wall.
Drywall or foam board over the concrete. Use blocking or furring that sits on the concrete, so the anchors clamp wood to concrete and not to a soft layer.
Very heavy loads on lightweight block, like full cabinets of hardware or a heavy tool wall. Consider a freestanding frame tied to the floor and ceiling instead.
Rental or condo walls. Some leases don’t allow drilling into concrete walls. Check before you drill.
Anything unusually heavy that hangs over people, or a wall with major cracks. Get an engineer or contractor to look at it.
Frequently Asked Questions
Can you use Tapcons in mortar joints?
The manufacturer says they can be used in mortar. Wall-mount makers warn against relying on mortar for loaded mounts, though, because mortar is weaker than the block or brick around it. For French cleats that carry tools or cabinets, put the anchors in the block or brick itself.
Do I need furring strips to mount French cleats on concrete?
No. On a dry, flat wall, screw the cleats straight to the concrete with concrete anchors. Use furring or a plywood backer when the wall is uneven or damp, or when you want a finished surface behind the cleats.
How many Tapcons do I need per French cleat?
At least one every 12 to 16 inches along each cleat on poured concrete and closer on hollow block, with the spacing and edge distances on your anchor’s data sheet. For standard 1/4″ Tapcons, full listed capacity needs about 4 inches between anchors. Under heavy cabinets, add anchors directly behind the cabinet, because those are the ones carrying the load.
1/4″ diameter is the usual pick for anything loaded. It carries noticeably more than a 3/16″ anchor at the same depth. A 3/4″ cleat fastened straight to concrete typically takes a 2-1/4″ long anchor, which gives 1-1/2″ of embedment.
Can I use construction adhesive instead of anchors?
No. Adhesive can help hold furring in place while you work, but every load-bearing cleat or backer needs mechanical anchors into the concrete.
Should I use wedge anchors or sleeve anchors instead?
Wedge anchors are for solid poured concrete and are hard to remove. Sleeve anchors are another option for block and brick. For most French cleat walls, concrete screw anchors are the simplest choice because they install fast through the cleat and can be backed out if you rearrange the wall.
Bottom Line
For French cleats on concrete, use 1/4″ concrete screw anchors through clearance holes in the cleat, with the matching 3/16″ bit, 1 to 1-3/4 inches into the concrete. Treat the manufacturer’s 25% working loads as starting estimates for single anchors, not as a rating for the finished wall. Poured concrete is easy. Hollow block and brick need more anchors placed in solid material, and damp walls need treated wood and a moisture check before anything goes up.
Related Posts:
Floating Desk Weight Capacity: Chart by Mount Type by Admin October 20, 2026 DIY Store-bought floating desks list weight capacities between 11 and 100 pounds in their retail listings. A DIY floating desk on steel brackets screwed into studs…