Tents have taken on many different forms throughout the years. While today they are mostly used for nothing more than camping trips, there have been many cultures in the past, which lived full-time in one sort of tent or another. The American Indians were one of these, as well as the Mongolian Empire. The Mongolian tent, which is quite unique, is known as a “yurt.”
Both in the past and today yurts can vary considerably in size and how fancy they are. Some modern yurts are only ten feet in diameter, while others are as big as 33 feet. While considered a temporary dwelling, it is possible to use a yurt as a permanent home, even building walls within to make separate rooms. In cases where the yurt is large enough, a sleeping loft might be constructed above the partition walls, up near the roof, where it would be the warmest.
The Mongolian conqueror, Genghis Khan had a yurt mounted onto a wide cart, drawn by oxen. This was called a khibitka and was only used by tribal leaders, due to the cost. Khan’s gave him a permanent throne room he could use to meet with his underlings, even when his army was on the move.
Today, there is a resurgence in interest in the yurt, both from the prepping community and from millennials who are looking for a simpler lifestyle. The unique design of the yurt makes it a tent that can be comfortably lived in year round, with only a wood burning stove for heat.
As yurts vary considerably, their cost can vary too, ranging from less than $3,000 to over $30,000; some custom yurt sites quote prices as high as $65,000. The higher cost units are intended as permanent dwellings, with the price including a platform to get the yurt up off the ground, interior walls, kitchens and fine wood beams. Several companies offer kits for building yurts, although you can build one from scratch.
Some people today build yurts with plywood walls, although canvas walls over a latticework frame is traditional. Heavy layers of wool felt, sometimes as many as six, provide insulation, making the yurt a true year-round home.
Parts of a Yurt
All yurts are built following some very basic guidelines and using the same techniques. They consist of six basic components:
Base – This is the foundation that the yurt is built upon. If a yurt is being used only for camping, this is not necessary, as traditional yurts didn’t have one. But any yurt which is going to be set up semi-permanently should be built on a wood base, elevating it above the ground.
Lattice – Crisscross latticework forms the walls of the yurt, providing structural stability for the walls and supporting the weight of the roof. While the lattice may not look strong enough to support the weight of the roof structure, the angled design distributes the weight well, making a sturdy structure.
Door Frame – While the door frame’s main purpose is for the hanging of a door, it also provides a place to attach the ends of the lattice, making the entire frame sturdy. Doors can vary extensively, from the fanciest entry doors to be found on a home, to a canvas fly, as the builder desires.
Compression Ring – A round ring at the center of the roof, which all the rafters are attached to. Originally, this was a smoke ring, but in modern yurts the chimney for a wood-burning stove usually goes out through the wall. So the hole in the ceiling where the compression ring is situated is usually covered with a round skylight or an umbrella-like cover to keep the rain out. The compression ring is the most critical element of the yurt’s construction.
Rafters – A large number of rafters are used, matching the number of points in the lattice. They attach to the compression ring at the top end.
Cover – The yurt actually has more than one cover, as there is a felt inner cover, which can be several layers, to provide insulation, with a waterproof cover over it. This outer cover is usually made of canvas. For a fancier yurt, an inner cover, under the felt can be added. This would help with lighting, if the inner cover is white.
Making a Simple Base
A simple base for a yurt can be made by laying pallets on the ground and covering them with plywood. Before laying out the pallets, clear the land and make sure it is level, without any stones or roots sticking up, which would cause the pallets to sit uneven. Cut the grass and apply Roundup or another weed killer.
The pallets should be laid out to provide a platform large enough for the yurt being built. They do not need to be fastened together, as the plywood covering will do that. Since building code is not an issue, ½” thick plywood can be used for the subflooring, nailing or screw it to the pallets.
The Lattice
The wall structure for the yurt consists of a lattice, made of crossing strips of wood. This is different from the latticework that can be found in home improvement centers, in that the spaces between the strips of wood are larger; roughly one foot square. The entire structure also collapses, in an accordion style, much like the old-style wood baby gates would.
To determine the number of pieces needed for the lattice, calculate the circumference of the desired yurt and divide it by 1.4, the desired distance between the tops points of the lattice, to get a one foot square space between the lattice strips. The resulting answer provides an “ideal” number of lattice strips for one direction. That number will need to be doubled, to provide for another set of lattice strips to go perpendicular to the first.
An Important Note
The actual number of lattice strips and more importantly the actual number of tops of those strips may need to be altered to match the rafter. Rafters can be added in at every top, where the two crossing lattice strips come together. This should be done with larger yurts or in cases where snow load is a concern, because the yurt will be used in the wintertime.
For smaller yurts and in cases where snow load is not a concern, a smaller number of rafter can be used, such as 8 or 16. In this case, adjust the number of lattice strips being used to accommodate this. Thirty-two lattice strips in each direction (for a total of 64), works out well with 16 rafters, allowing one point to be skipped between each pair of rafters. But 35 lattice strip pairs would cause a problem, as there would be three places where two lattice points would need to be skipped between rafters.
Cutting the Lattice Strips
The lattice strips can be made of pine, but are better made of an inexpensive hardwood, such as poplar. They definitely need to be knot-free for strength. Lengths vary, depending on the builder, but eight feet long is usually good. Different people use different dimensions for the cross-section, with some choosing to make their lattice ¾” square, ¾” x 1” or even ½” x 1-1/4”. Due to the design of the yurt, the actual dimension is not critical, as long as they are all consistent.
After cutting the lattice strips, lay out a short section of the lattice, so that spacing can be worked out for the hole. The lattice strips will need to be clamped with spring clamps or weighted down to keep them from moving. While this spacing can be calculated, those calculations can easily be off.
Lattice
While the number of lattice strips and the spacing can vary, depending on the individual design, the number of crossings in a vertical line will usually be between 5 and 8, depending on the height of the wall. This drawing is showing eight foot lattice pieces, laid at a 45 degree angle, which results in a wall that is roughly 5 1/2 feet tall. The center of the yurt will be over 7 feet high.
Notice in the drawing above that all the lattice strips which are angled towards the right are on top of all of the lattice strips that are angled towards the left. Either direction can be laid on top, as long as they are consistent.
With the lattice laid out, mark and drill one full piece. That can then be used as a template for drilling all the others, ensuring that the spacing is consistent. The hole should be slightly larger than the hardware; so a ¼” bolt would warrant a 9/32” hole.
Traditionally, the crossings in the latticework were tied with cord, but most modern yurts use bolts and nuts for this. One-quarter inch diameter bolts, long enough to go through both layers of lattice are sufficient, with nylon insert locknuts. The nylon insert locknuts will allow the nuts to be tightened just enough to touch, without binding the wood. This will allow the lattice to be opened and closed for setting up and taking down the yurt, without having to tighten and loosen the hardwire.
When the lattice is set up, a cord is run around the top of the wall, set into all the openings at the point. This cord is then tied, providing tension to keep the lattice from spreading when the rafter are installed.
Cutting the Rafter
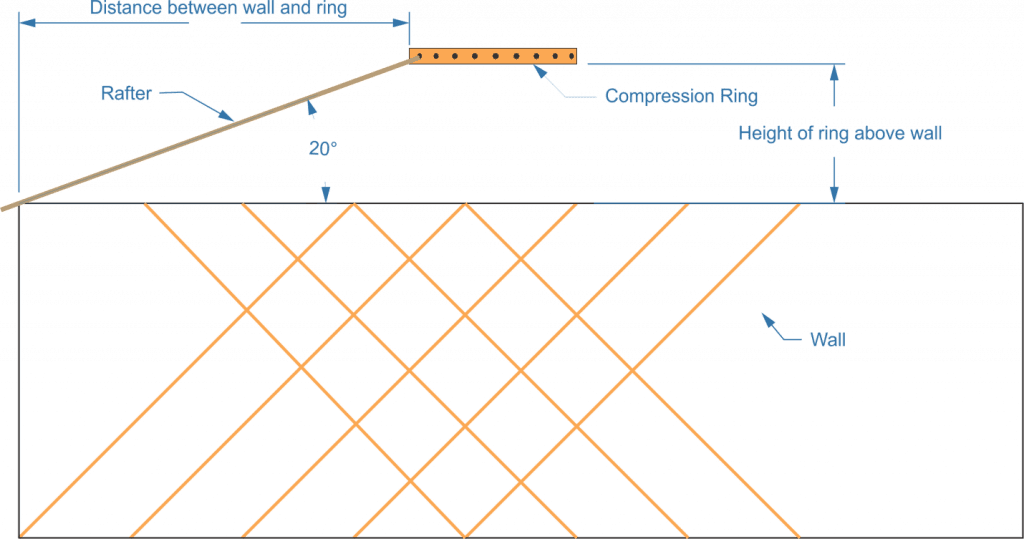
Yurt roofs are not angled steeply, but rather only at about a 15 to 20 degree angle. They only need enough of an angle to shed water. While angling them provides more headroom in the center of the structure, angling them too much makes it difficult to install the rafters and compression ring.
The length of the rafter can be calculated by using the Pythagorean theorem: the square of the hypotenuse is equal to the square of the sides of a right triangle. So, to calculate that:
Square the distance between the wall and the compression ring
Square the height of the compression ring desired above the wall
Add those two numbers together
Find the square root
Add a couple of inches for connecting to the compression ring and overlapping the tops of the latticework wall
Rafter angle
But, if you’re anything like me, you’ll lay everything out on your driveway and measure how long the rafter need to be to fit. That’s easier for most people than calculating it.
As with the lath, the rafter do not need to be particularly large, as the larger they are, the more weight. However, they need to not only hold up the covering of the yurt, but possibly the weight of any snow that falls on it. Commercially manufactured yurts will often use 2”x 6”s or 2”x 8”s for this, but for a homemade yurt, 2”x 2”s should suffice.
The end that is going to go into the compression ring will need to be cut down to fit the ring. If a wood ring is used, this would probably mean making a 3/4” or 1” tenon on the end. At the end which is going to the wall, a hole will need to be drilled and a loop of cord attached, to slip over the tips of the lattice, connecting the two together. Adding a notch, to keep the rafter from slipping, can be helpful.
Making the Compression Ring
The most complicated part of the yurt, from a woodworking point of view, is making the compression ring. Traditionally, these were made of bent saplings and the rafter were tied to them. For a modern yurt, the ring is usually made of three laminated layers of ¾” plywood.
Ring sizes vary, with some running as big as 48” for the larger commercially manufactured yurts. These rings are intended to be used with dimensional lumber rafter and metal brackets holding everything together. However, those yurts are not designed to be taken down and moved, but rather as a permanent structure.
The larger size ring in those commercial yurts is so that a larger skylight can be installed. For most yurts, a ring of 12” to 24” is sufficient. Once the layers are laminated, the ring is cut out and the edges are sanded smooth, hole need to be drilled into the middle layer of plywood, for the ends of the rafters to stick into.
Those hole must be evenly spaced around the compression ring and angled to match the intended angle for the roof. The tenons on the rafter will slip into these holes. No fasters should be needed.
Alternate Compression Rings
Compression rings can be made in a wide variety of other ways. Perhaps one of the most unique compression ring ideas has been to use a bicycle rim, taking out the hub and spokes. That provided a perfect metal circle, strong enough for the purpose. All that’s needed is to drill holes in the rim.
A metal compression ring can also be made, by those who are good at metalworking. Rather than attempting to make a perfect circle, it is easier to make a hexagon. Pieces of round stock can then be welded to all eight points and in the middle of all eight sides of the hexagon, giving a total of 16 rods for 16 rafter to attach to. These pieces of stock would need to be angled to match the roof pitch desired.
Metal compression ring
In this case, the ends of the rafter would need hole drilled in them, which could slip over those pieces of steel rod, rather than tenons to go into the holes in the wood ring.
Covering the Yurt
The circular wall of the yurt is extremely easy to cover with both the felt and canvas coverings. Canvas should be 8 oz. and should be proofed to make it water resistant. Canvas will tend to shrink, so you may want to wet it and then allow it to dry, before cutting it to length. Then all that’s needed is to cut the material to size, hem the ends and add eyelets. Those eyelets are used to tie the fabric to the lattice framework, top and bottom.
Felt covering may be difficult to find, as this is not a material normally used here in the US. However, there are a few yurt material suppliers online, which can provide these materials.
The roof is a bit more complicated and needs to be made from 12 oz. canvas. It is essentially a circle, slightly larger than the diameter of the yurt, so that it will hang over the edges about a foot, all the way around. This will need to be cut from several strips of material and sewn together, hemming the edge.
Since the roof is somewhat cone shaped, laying a flat circle of fabric on it will leave it loose, flapping in the wind. To alleviate this problem, the circle can be placed on the rafter stretching it all the way around. Some spring clamp will be useful in this, holding the fabric in place. Take the excess fabric and overlap it, so that the fold makes a straight line from the ring to the edge and cut that line. Then overlap the two ends to get the correct size. Cut off all the excess not needed for a seam and stitch the roof fabric together there.
Keep in mind that canvas and felt are natural fiber fabrics. Never put the yurt into storage wet. Allow it to dry thoroughly before storing.
Related Posts:
How to Make a Wooden Ring by Admin February 12, 2022 DIY When the word “rings” is used, it can spark a lot of different thoughts in people’s minds; mostly because there are a lot of different…
How to Make Stairs Less Slippery by Admin May 4, 2022 Installing Over one million accidents per year happen on home stairways. This accounts for up to 36 percent of all in-home accidents and includes 12,000 accidents…
How to Make Plywood Look Like Oak: A Step-by-Step Guide by Amy Reed October 6, 2022 DIY Finishing plywood is the most important stage in your plywood project. For more visible woodworking projects, like tables, cabinets, and wall panels, choosing a nice…