The wing Chun wood dummy has become a staple in martial arts training. Originally part of Kung Fu, some masters of other forms of martial arts have included Wing Chun into their training. The wood dummy used for the practice of Wing Chun provides an excellent practice workout for those who want to practice solo, without a sparring partner. It provides an effective representation of an opponent, allowing practice against something other than air, which will provide some resistance to blows.
Wooden wing Chun dummies can be rather expensive, with prices ranging from $400 to $1,500. Part of this is because they are made of quality hardwood, with the body being made of a 8” to 9” diameter log. Adding to that cost is the fact that these practice dummies are made by hand, requiring workers with the right woodworking skills, specifically, the ability to cut a deep mortise.
Most people buy a wing Chun dummy that is wall mounted, as the free-standing ones are the more expensive versions. While hardwood is the preferred material, there are some manufacturers who are producing them out of PVC plastic. One important consideration, especially with the PVC ones, is that the arms be replaceable, in case they break. While I doubt that the average student will break a hardwood Wing Chun dummy, it seems rather realistic to expect that to happen on a PVC one. Considering that breaking boards is a standard exhibition practice within the martial arts community, the possibility of breaking an arm of a wood dummy does exist.
Materials for the Wing Chun Dummy
The basic dummy consists of a body with three “arms” and one bent “leg.” The arms are generally tapered, while the leg is not. Two of the arms are mounted near chest level, with the third at about belly level. The leg is bent, as if the dummy were trying to knee the person training with the dummy in the groin. Some dummies, for use in martial arts schools, have two complete sets of limbs, on opposite sides, allowing for two students to practice at the same time.
Maple is considered the best possible wood for the dummy body. Even so, it would be more cost effective for most people to use whatever hardwood grows near where they live, at least for the body. The body needs to be nine inches or more in diameter and nearly five feet long. This isn’t the type of thing that can be found at the local lumberyard and even if we were able to find one on eBay, the shipping would be rather steep. Rather, keep your eyes open for someone cutting a tree in your neighborhood and ask them for a section of the trunk that’s long enough for the dummy. Get one that’s too long, so that the ends can be cut off, eliminating the cracking normally associated with wood drying.
When it comes to the arms and legs of the dummy, it would be best to go with maple, if it is available. There are a number of suppliers who provide hardwoods online and maple is a common hardwood for them to supply. Even so, the difficult part will be the leg, which is usually made from a naturally occurring bend in a tree limb. That might be hard to find.
For wall mounting, the dummy is hung on slats, generally made of hickory, pecan or white oak. These allow for some flexibility, making the wing Chun dummy move somewhat as it is struck, more like a human opponent will. Some people prefer a weighted floor mount, allowing them more freedom of movement. This is especially popular in martial arts schools. The most unusual mounting I encountered was someone strapping one to a boxing body bag. They claimed that the body bag provided more movement than slats, making the training session more realistic.
Making the Body of the Wing Chun Dummy
The challenging part of this project is making the dummy’s body. Few woodworkers are accustomed to working with logs, unless they are woodturners; but even then, few woodturners have a lathe big enough to accommodate a 56” long body for the dummy.
Assuming that we’re working from a raw log, it will be necessary to peel the bark off it. With some species of wood, like oak, removing the bark is extremely easy, once you’ve allowed the log to dry, as the shrinking will pull the wood away from the bark. For others, removing the bark is best done before setting the log aside for drying, as it will allow the log to dry easier. The best tool for removing the bark is the draw knife. Clamp the log in place on the bench top with bench dogs and start peeling. If the log is uneven at all, use the draw knife and perhaps a spokeshave to give it a smooth, even surface that doesn’t taper. Ideal diameter is 8”, although it can be as wide as 9” in diameter.
In most cases, it’s best to allow the log to dry for at least six months, before working it. Even that is a rather short time, when compared to how long wood normally has to dry to reach an ideal working temperature.
When it’s time to work the log, cut it off to the 56” length, taking care to ensure that the cuts are perpendicular to the axis of the log. This can be tricky, especially for those who are not accustomed to making accurate cuts with a chainsaw. It can be helpful to set up a vertical guide for sighting the chainsaw while cutting. I use two vertical guides, one on each side of the log. Matching blocks with magnetic bases are attached to the chainsaw bar, to slide along these guides and help me keep the saw straight. It’s not a perfect system, but it works.
Keep in mind that the saw’s cut is going to be rough, so it’s good to leave a little bit extra material (1/8” at each end) for grinding and sanding to give the body smooth ends. It may also be necessary to go back over the body with the spokeshave, smoothing the surface out again. Round the edges on both ends of the log with the grinder or a router.
Cutting the Arm and Leg Hole
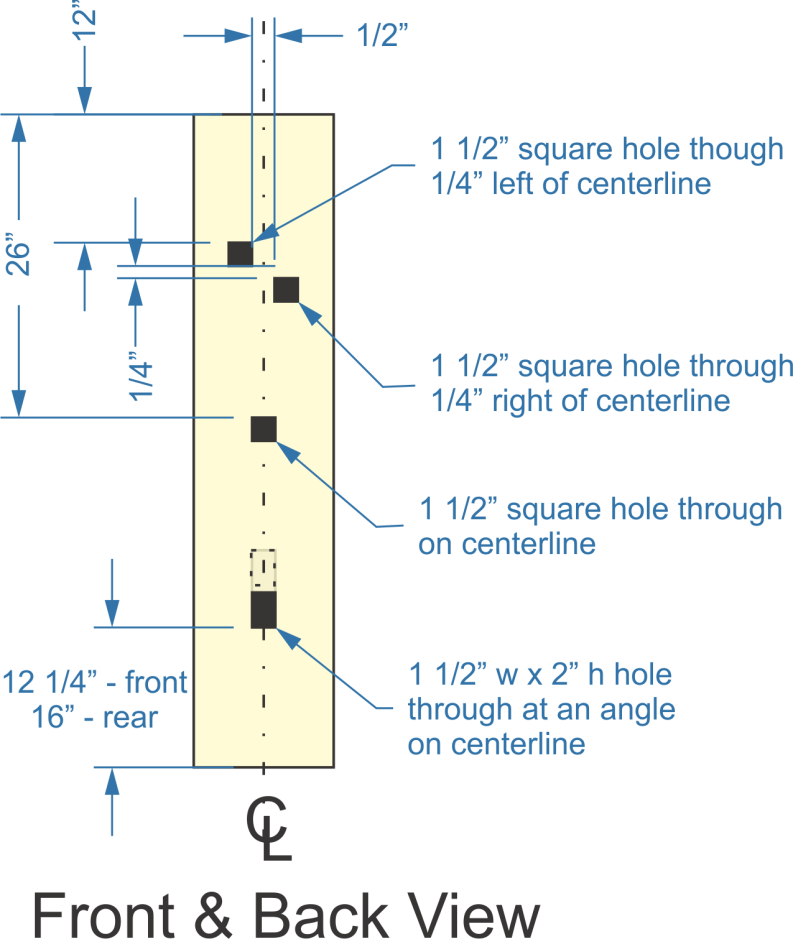
The holes for the arms and legs are nothing more than large, deep mortises that go all the way through the body. Three of those mortises are 1-1/2” square, one is 1-1/2” x 2” and two are 1-1/4” x 2”. There are two equally tricky parts to this; one is to locate the mortises correctly and the other is to cut them straight through.
The diagram below provides the dimensions for the four hole in the dummy’s body that the limbs of the dummy are mounted into. These holes must go all the way through the center of the body, coming out the other side. This means that the top two holes actually cross each other as they pass through the body. Since there is only ¼” of material between them in the middle of the log, there’s a very good chance of accidentally cutting through. If that happens, it really doesn’t affect the function of the dummy in any way.
Front & back view
Note also that the bottom hole is larger than the others and at an angle. The bottom edge of it is 12 ¼” from the bottom of the dummy body in the front, but 16” from the bottom on the rear side. That poses special challenges for cutting the mortise, although the method is the same.
Start by mounting the log on the bench and determining the center point of both ends. From there, use a level to determine the center point of the top and the bottom. Draw a line connecting these two points on the top of the log, then flip it over and draw the corresponding line on the bottom. These lines will allow you to lay out the hole in the right places, as they are all dimensioned off of the centerline.
Before cutting the mortises, draw their placement on both the front and back of the log, so that their position can be checked, following the “measure twice, cut once” mantra. The location of these hole and the challenges caused by the top two crossing and the bottom one being at an angle make it important to be sure of hole placement before going any further. This isn’t like drilling holes in a 2”x 4”, where we can run down to the local lumberyard to pick up another if a mistake is made.
To cut the mortises, it would be best to start by drilling 1 ¼” holes halfway through the log with a spade bit from both sides. For the top two holes, make sure that the log is reset to be placed in such a way that each hole is being drilled vertically. Otherwise, it’s too easy to go off to the side while drilling. In the case of the bottom, angled hole, it would be helpful to make a pattern out of scrap plywood or cardboard, providing a line at the right angle to help in guiding the drill.
Once the hole are drilled, they need to be cut out the rest of the way with chisels. Due to the depth of the holes, it would be extremely difficult to clean this out with a standard set of bench chisels. It might be necessary to buy a framing chisel for the job.
It would be useful to cut a piece of scrap the dimension of the hole and slightly smaller (1-1/4”), long enough to put through the log, to use as a check gauge for the work of cutting the mortises, especially ensuring the alignment will allow the base of the arms to go through. By working from both sides and meeting up in the middle, it will be easier to ensure that the limbs will stick out of the dummy at the right angles when assembled. If any of the holes get a bit sloppy on the inside, enlarging the amount of space that the limbs pass through, it really won’t affect the utility of the wing Chun dummy, as long as the holes are the right size for the outer inch of two on each side.
The biggest challenge here will be in cutting the hole for the leg, because of it being at an angle. Once again, the most important part of the hole, so that it can properly support the leg, is the outer part, not the pith of the log. If that ends up getting a bit sloppy, nobody will be able to tell, with the leg installed.
Cutting the Hanger Slat Hole
After cutting the holes for the limbs, cutting the holes for the slats should be easy. It’s essentially the same thing, other than size and the fact that the holes are off-center on the dummy, with the hole being towards the back side, from centerline, as is shown in the diagram below.
Side view
Cutting these hole is the same as cutting the ones for the limbs, with the exception of their sizes and that the holes aren’t placed in a way that the drill or chisel is facing the surface square on. The only edge of the hole that the chisel will approach at a perpendicular angle is the one on the centerline. The other edge of the hole is actually on the curve of the surface. As the slats that will go through these holes are only 1” thick, some variation in the width of the hole is not a problem, just as long as the slats can slip through without binding.
Making the Limbs of the Wing Chun Dummy
The arms and legs are what make this dummy useful in the practice of wing Chun. While the body is the biggest and most complex part, it is the limbs that the student will actually interface with the most, during their practice. Therefore, it is important that the limbs be well-made of quality hardwood. Check the wood for cracks and other defects before using it, as defects could cause the limb to break.
Turning the Arms
The three identical arms of the dummy require a combination of turning and cutting, as the exposed part of the arm is conical in shape, while the tenon that goes through the mortise is square. This can be challenging for the woodworker, as we are accustomed to doing one or the other, but not both on the same piece of wood. Nevertheless, if the square part is cut first, then it is fairly easy to turn the arm, making it round and tapering it.
Start with a block of maple or other hardwood that is 2 1/2” square and 21 1/4” long. Layout the tenon at one end and find the center of the other end, marking it with a diamond stylus or center punch. The tenon itself will need to end up 1 3/8” square by 10 ½” long. This means cutting 9/16” of material off of all four sides of the tenon. There are a variety of ways of doing this, depending on the equipment available in the workshop. Perhaps one of the easiest is to use a dado blade in the table saw, making a series of cuts on the underside of the workpiece, until the material is removed.
Arm
If a dado blade is used in this manner, the final dimensioning and surfacing of the tenon will need to be done with a bullnose plane or by sanding. So rather than setting the dado blade for a height of 9/16”, it would be best to set it for a height of 17/32”, allowing a little material to be removed. The same could be said for other methods that might be used to remove the material, such as cutting the excess off with a band saw or a router.
Once the tenon is cut, a mortise needs to be cut through it as well. This is a standard mortise and will be used for a pin to hold the arm in place, when it is installed on the dummy. Probably the easiest way to cut this mortise is to first use a drill to remove the majority of the material and then clean out the hole the rest of the way with bench chisels.
With the square part of the arm finished, move to the lathe and chuck it up. Ideally, a four-jaw self-centering chuck should be used. I’m not referring to the type normally used for woodturning, which locks into a dovetail cut into the bottom of a bowl or vase being turned. Rather, I’m talking about the type used for metal turning, which has stepped jaws which can grip the four outer surfaces of the square part of the arm. The end to be tapered can be supported by a live center, set into the mark made in the center of that end.
This is standard spindle turning, first truing up the piece and making it evenly round. Take care not to remove any excess material, as the cut dimension for the stock is the diameter desired at the base of the arm. Once it is trued up, taper the arm from the center of the piece down to a diameter of 1 ½” at the tip. It would be best to use a skew chisel as a plane to make the final cuts, ensuring that they are straight. Sand the finished part smooth.
It should be noted that the arms will actually fit slightly loosely in the mortises cut in the body of the wooden dummy. They are held in place by a wedge, which can be cut out of any available material and is inserted from the top through the mortise cut in the ends of the arms.
Making the Leg
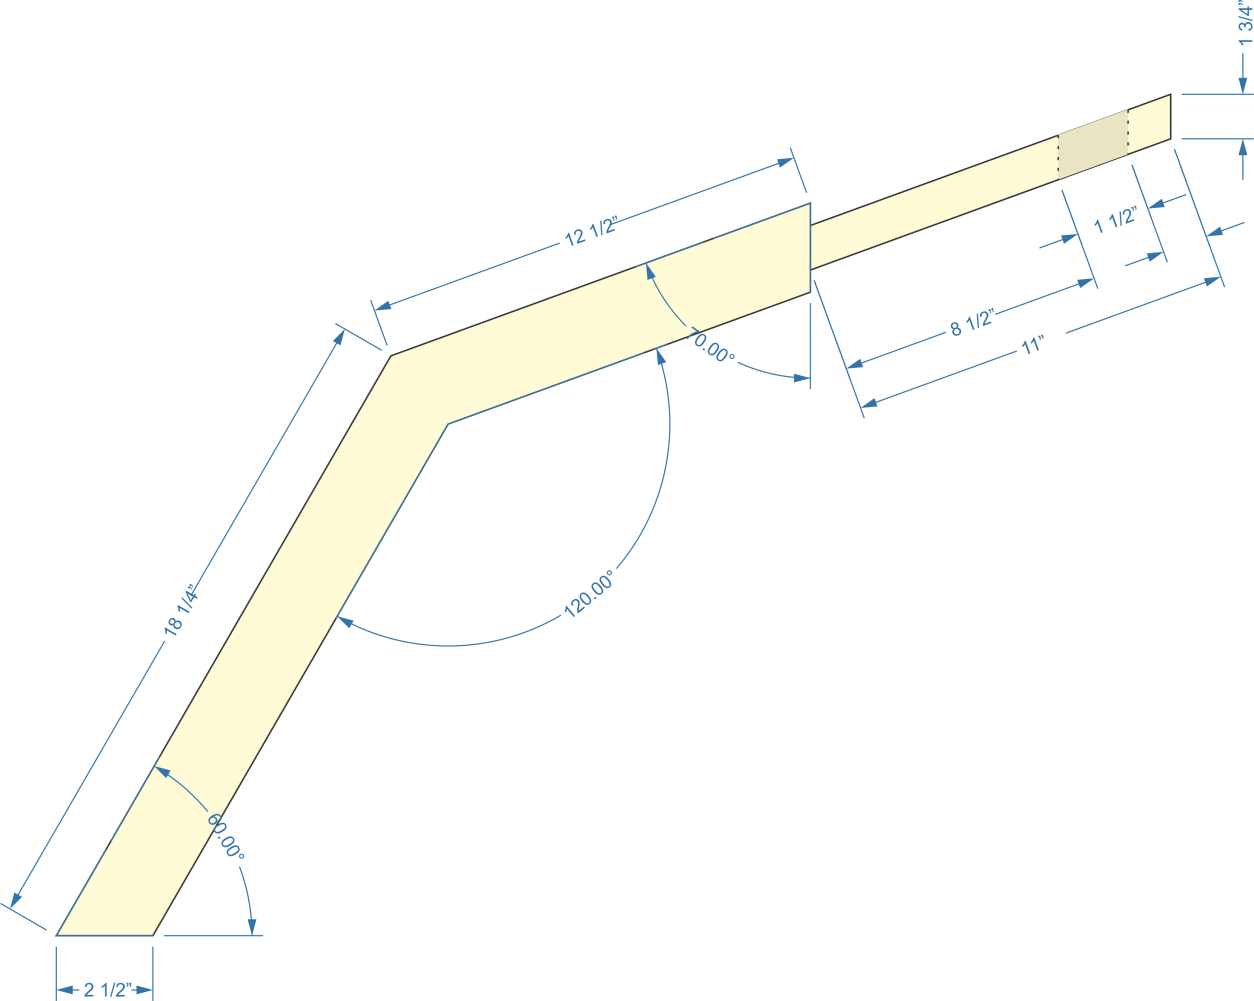
The leg is one of the more unique parts of the wing Chun dummy, at least from a woodworking point of view. What makes it unique is that it utilizes the natural growth of the tree to provide the bend and the resulting strength of that bend; something that was done considerably in the past, but is rarely taken into consideration today. When corbels were needed to support beams on wooden sailing ships, they would usually be cut from a crotch in a tree, where a branch exiting the trunk gave the needed angle. This made for a much stronger piece, just as it will for the leg in the dummy.
This means that the trick to making the leg for the wooden dummy is finding a branch of a tree with the right dimensions, which provides the necessary bend, at the right angle, while being the right diameter. A slightly larger diameter is acceptable, but that means that the branch will have to be thinned out a bit with a spokeshave. As with the body of the wooden dummy, the leg needs to have the bark removed and the surface of the resulting log smoothed out.
We must cut a similar tenon for the leg, as what we did for the arms. The big difference here is that the leg will already be round, before the tenon is cut. This makes cutting the tenon accurately all the more critical, while also making it harder to cut. finished dimension for the tenon should be 1 3/8” x 1 ¾”, which will allow it to fit into the mortise cut for it, with a little slope. As with the arms, this tenon also needs a mortise cut in it, of the same size and for the same purpose.
To cut this tenon, it is probably best to use the natural lay of the wood as a starting point, laying it flat against the workbench. Assuming it will lay flat like that, the two sides of the tenon can be cut with a dado blade on the table saw. But the top and bottom of the tenon will probably need to be cut on the bandsaw, as it will be extremely difficult to lay the leg on the table saw’s table to cut those sides with the dado blade. However, if the sides are cut with the dado first, then it will be easy to lay out the cut lines for the top and bottom of the tenon. Once the tenon is cut, it should be easy to cut the mortise into it.
Leg
There are three angles shown on the above drawing which may be of some confusion. The 120 degree angle for the “knee” in the leg is the most important one. For obvious reasons, it might be difficult to come up with a branch that is perfectly dimensioned for this; some leeway is acceptable.
The other two angles, the one at the bottom end of the leg and the one where the leg joins with the tenon don’t necessarily have to match up with the drawing. The one where the leg meets the tenon needs to sit flush up against the body of the wooden dummy, so as to avoid creating a pinch point. The easiest way to accomplish this is to cut the tenon, insert it into the body and then use a ruler to scribe the cut line for this angle, parallel with the body. Cut it out with hand tools, extending the tenon.
The angle at the bottom leg of the tenon is not critical at all; it can even be cut at a 90 degree angle. However, it is traditional for these types of dummies to have this end cut off horizontal with the floor. As with the other angle, the easiest way of ensuring an accurate cut may be to set the leg in place and use blocking to make it possible to lay a ruler alongside the leg to scribe it.
Related Posts:
Making Wooden Bathtubs Guide by Admin September 19, 2023 DIY Wooden bathtubs require planning, precise construction, and maintenance. However, they are an elegant and unique addition to your bathroom. Guide to Set Started Materials Needed:…
How to Make a Wooden Sword by Admin July 14, 2025 DIY 1. Why I Still Make Wooden Swords I wasn’t planning to make a wooden sword that day. I just needed something—anything—for my kid’s last-minute costume.…
How to Make Wooden Gears by Admin April 2, 2025 DIY Building Wooden Gears — My No-Nonsense Notes from the Garage If you've ever thought about building wooden gears for a clock, a jig, or just…