Homes don’t always have the storage space we need. Closet space is always at a premium and few homes are built with amenities like a coat closet anymore. This often leaves us looking for inventive places to put coats and extra clothing. One such place is in the laundry room, although some families end up adding clothes racks wherever they can find room.
While there are a variety of commercially manufactured clothes racks available on the market, most aren’t particularly attractive. Modern styling seems to favor wire racks. While that is functional, it just doesn’t do it for those of us who like wood. We’d much rather make our own anyway; adding to our home’s unique beauty.
Of course, the term “clothes rack” can mean many different things, depending on what one actually desires to do. The classic bentwood coat tree is a clothes rack; but it’s not wall mounted. Within the realm of wall mounted, we can find three basic categories:
Coat Rack – A simple rack with hooks to hang coats on, usually near the door. Some add a shelf, providing someplace to put hats and gloves.
Clothes Rod – Similar to a closet bar, for hanging clothing on hangers, but mounted to the wall. As with the coat rack, this can include a shelf.
Drying Rack – Normally limited to the laundry room, a drying rack is used for clothes that need to be air dried, rather than exposing them to the heat of a clothes dryer.
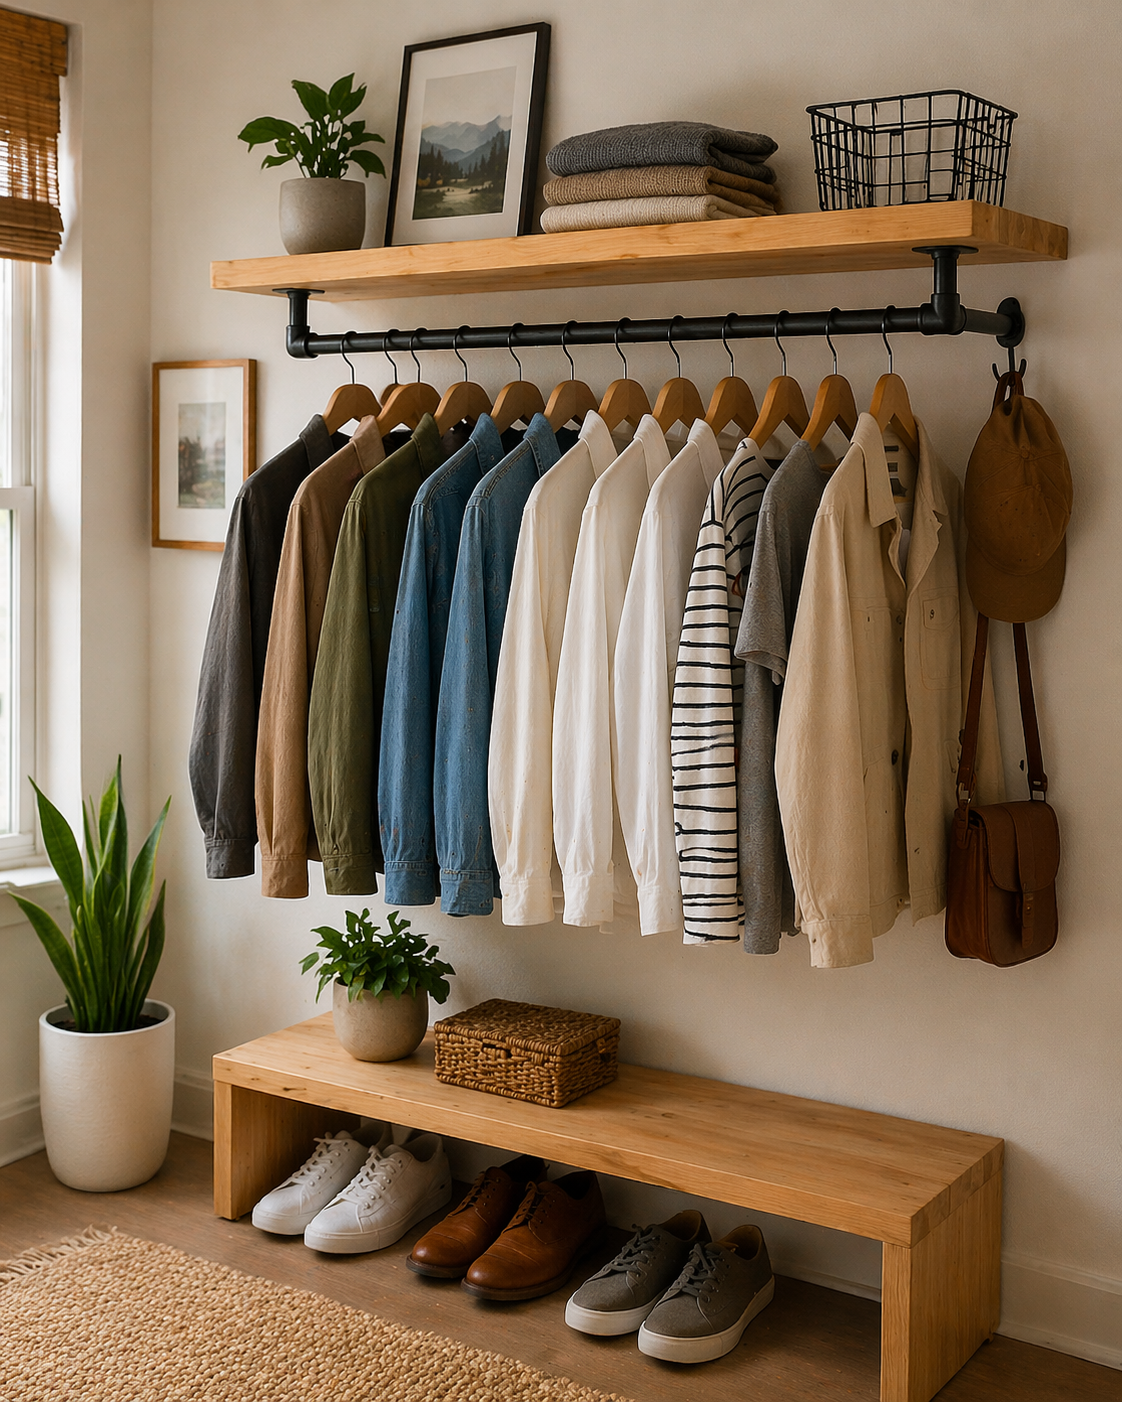
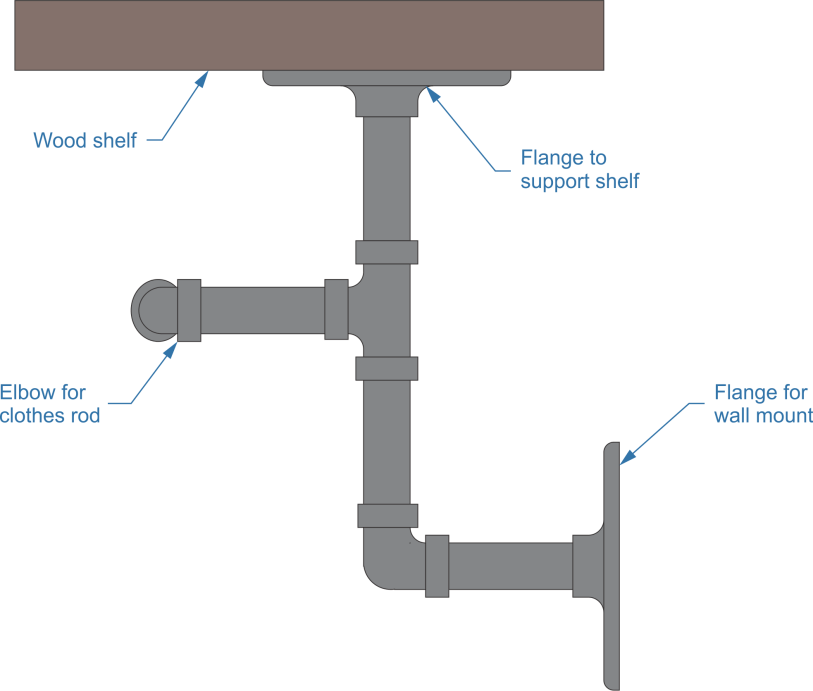
These racks can be made of different materials and take on a wide variety of styles, matching the décor of the home. One trendy style which is very popular right now is to use black iron pipe and fittings. The pipe makes for a very strong rod, and flanges can be used for the wall mounts. Adding additional flanges, pointing up, makes it easy to mount a shelf over the clothes rack, as shown in the side view below.
Pipe clothes rack with shelf
Making a Simple Coat Racks
The basic coat rack is extremely simple to make. At its base, it consists of a flat board and some metal coat hooks from the hardware department of the local lumberyard. The wood is finished and the metal coat hooks are mounted to it.
But that’s a bit boring and doesn’t do much for the décor of any home. Better to go with something a bit fancier, making the coat rack something to be proud of. To start with, there are actually a variety of different metal coat hooks available on the internet, much fancier than the simple ones they have at the local home improvement center. Just do a search for “cast coat hooks” to see what’s available.
Another option is to buy wood “shaker pegs” and use them instead of the metal hooks. Shaker pegs are regularly available at the big home improvement centers, alongside other wood molding products.
It’s also possible to use the aforementioned cast iron pipe to make coat hooks to go on a wall mounted coat rack. A hook can be made of a flange, elbow, two short pipe nipples and a cap. The cap is necessary, to keep the end of the pipe nipple from snagging on the fabric of the coat and the flange mounts directly to the wood backing board.
The other way to fancy up a simple coat rack is in how the backing board is made. Rather than just a plain rectangle of wood, a variety of different things can be done, such as:
Using a piece of reclaimed wood for the backing. Take the time to clean it up, removing splinters, and then apply some finish to it.
Make the backing board from a number of strips of wood or reclaimed wood, setting them in a frame.
Frame the backing board with some sort of architectural molding.
Use a router to shape the edges of the backing board.
Cut the outside of the backing board to form a profile of something. I used to make a moose coat rack for the kids, which was nothing more than a cut out profile and some shaker pegs. The edges of the board are routed with a roundover bit to match the curving nature of the design. If the coat rack is flipped over, it can be an octopus.
Moose coat rack
Of course, there are lots of other ways of making a profile that will make a nice coat rack.
Deer coat rack
Making a Wall Mounted Clothes Rod
Any coat rack provides only limited space, defined by the number of coat hooks built into it. More efficient use of space can be accomplished by building a wall mounted clothes rod and hanging the coats or other clothes on normal hangers instead.
For this to work, the clothes rod needs to be mounted 12 inches from the wall, providing enough room for the hangers, with the clothes on them. That means using some sort of bracket to hold the clothes bar out and away from the wall. Since we’re woodworkers, we don’t want to use the metal ones, but rather wood. That means making our own.
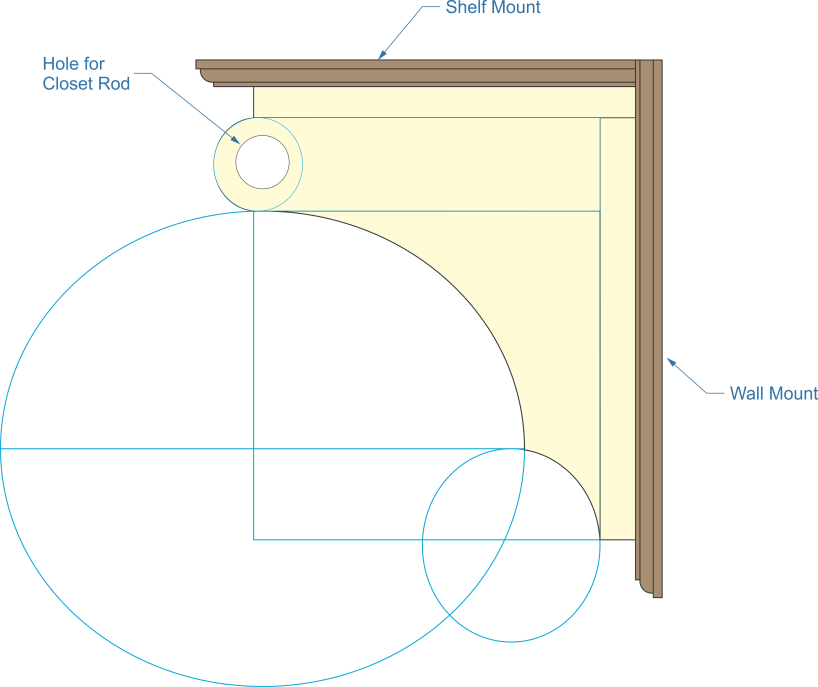
The bracket itself is essentially a specially designed corbel, which has a hole for a wood closet rod to go through. As we need this to be 12” from the wall, there are few commercially manufactured corbels on the market that will work. But we can easily cut our own corbel out of standard 1” or 2” thickpine.
Clotes rod corbel
In the drawing above, the two darker pieces are cut from 1”x 4”s or 1”x 6”s, whichever is preferred. The shelf mount should be about 1” narrower to allow for the routing of the edges. While any edge routing that’s desired can be used, the idea is that the routed edges don’t interfere with each other, design-wise. Hence the top piece of the bracket being made narrower. The part shown in yellow is the actual corbel, which is made of either 1” or 2” thick dimensional lumber, as preferred.
I’ve left the layout lines in the diagram (in blue), to show how I came up with it. Start out by making a rectangle at the top and back, spacing the curves out from the mounting pieces and keeping the ends of the curve from narrowing down to a taper. Another rectangle was added to contain the hole for the closet rod, placement of which is the most important part. Once the hole for the rod is placed, the front of that rectangle can be curved. Then one final rectangle is added (looks like a large square in the diagram), with two circles drawn to make the curves.
Make the pattern on cardboard, and then trace it onto the wood, cutting the final shape out with a scroll saw, jigsaw or band saw. The cut line should be sanded with a drum sander to smooth it out, and then can be routed to match the mounting pieces if desired.
Assembly of the corbel requires nothing more than gluing and nailing the two mounting pieces (top and wall) together, then gluing and nailing the curved piece into the right angle made by them. It can be helpful to set a spacer on the workbench, under the cured piece, with the edges of the mounting pieces on the workbench. This will help align everything while nailing, rather than trying to hold it or clamp it together.
Once the corbels are made, all that needs to be added is the shelf and the closet rod to complete the project. Hangers on the backs of the wall mounts allow it to be attached to the wall.
Making a Wall Mounted Drying Rack
Installing a wall mounted drying rack into the laundry room provides an excellent space for drying sweaters and other things that can’t go in the clothes dryer, for one reason or another. Typically, these drying racks are made with a series of crossbars, mounted into a frame. Hinging that frame into a larger frame allows the unit to be hung on the wall and the rack folded against the wall for storage when not in use. The entire project can be made out of 1”x 2”s, 1”x 3”x and ½” dowel rods.
A rack of this type can be made just about any size; however, two feet wide seems to work out well. That’s usually wide enough to hang the clothes on, without being so wide that the weight of the wet clothes will be too much for the dowel rods to support. Height depends on space available, but most are about 30” high.
The Inner Frame
It’s easier to start out with the inner frame first, before making the outer frame to fit it. This inner frame will be made of four pieces of 1”x 2, laid flat on the workbench. The corner can either be joined with pocket screw or if a pocket screw jig is not available, they can be lap-jointed. Avoid a miter joint, as it won’t be strong. Cut the pieces and joints, but don’t assemble it together yet.
Before assembling the frame, mark and drill the holes for the ½” dowel rods. These should be set into the edge of the 1”x 2” frame and laid out together, so as to ensure they are directly across from each other. Use a drill press or drill guide for the holes, to ensure that they are drilled perpendicular to the frame.
Drying rack – inner frame
glue the dowels into one side of the frame, prepare the other side with glue, and insert all the dowels at the same time. This can be tricky and requires a bit of juggling, but it only takes a few minutes to get everything aligned properly. With the dowels installed, screw (with pocket screws) or glue and nail (with a lap joint) the corner together. clamp it and allow the glue to dry.
The Outer Frame
The outer frame is made of four pieces of 1”x 3” and a couple of 1”x 2” crossbars to help keep the corner square and provide some means of mounting the rack. In this case, the frame is made with the material standing on edge on the workbench, so that the wider dimension sticks out from the wall, when hung. Start by measuring the actual dimensions of the inner frame, then adding ¼” to those dimensions. This will be the inner dimensions of the outer rack. Cut the material and rabbet it ¼” on the back side for installing a back.
Again, the corner of the frame can be assembled by a variety of means. However, if a pocket drill jig is not available, the easiest way to assemble it together is either with nails or screw, through the side of one piece and into the end of the other. While this frame acts as the support for the inner frame, it actually doesn’t need to be as strong.
With the frame assembled, install the two 1”x 2” crossbars, nailing through the outer frame to attach them. These must clear the rabbet that was cut for the back of the rack, so align them with the edge of the rabbet before nailing.
Drying rack – outer frame
The back of the rack is made from a piece of ¼” thick plywood, whatever is available. I like to use Luan plywood for things like this, as it provides a nice, smooth surface. Nail the back in place. It will help to hold the corner of the outer frame square, adding rigidity to the frame.
Final Assembly of the Drying Rack
Before final assembly, paint booth frames with a couple of coats of semi-gloss interior paint. Take care to ensure that all end grain is well sealed, to prevent moisture from attacking the wood.
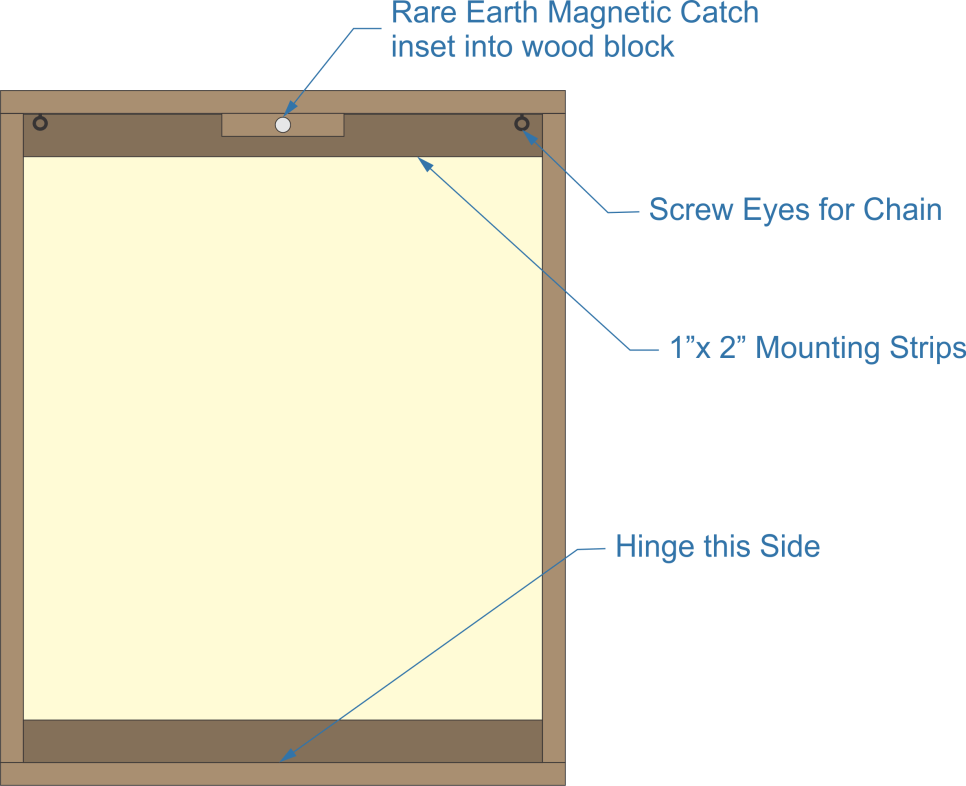
There are a few other details needed, in order to make the drying rack usable. As is shown in the diagram above, a small wood block should be attached to the inside of the top of the frame and a rare earth magnet glued flush into it. This will serve as the latch for the drying rack, holding it vertically out of the way when it is not being used. A matching metal plate needs to be mounted to the inside top of the inner frame, also inserted into the wood.
In addition to the magnet catch, screw eyes need to be attached to the inside of the outer frame and the back of the inner frame. These will be used for a chain to hold the drying rack horizontal during use. The chain itself is the last thing to be installed, after the rack is hung on the wall.
Finally, the inner rack is hinged into the outer one, attaching it with two hinges, along the bottom edge. Space the hinges so that the face side of the two frames is flush, when the unit is closed. Hang the drying rack on the wall, by screw through the 1”x 2” mounting strips attached to the outer frame. Measure the chain, cut it and attach it to the eye screws on both sides of both the inner and outer frames.
Related Posts:
DIY Kayak Rack by Admin August 8, 2023 DIY Outdoor sports are great family activities, especially during the warmer summer months. Unsurprisingly, many families invest in the equipment to partake in these sports, causing…
How to Remove Wall Cabinets – Easy DIY Guide by Admin March 17, 2025 DIY Planning a kitchen makeover? One of the first things that usually has to go is the old set of cabinets. Swapping them out for something…