The sport of rock climbing has been around since the late 19th century. That’s not to say though, that people didn’t climb cliff faces before then. The Mesa Verde cave dwellings were inhabited from 550 to 1300 AD and those probably aren’t the oldest example of man scaling cliff faces. Assassins, ninjas and other specialized warriors learned rock climbing techniques probably as far back as mankind has built fortified strongholds, as that might be the only way to gain access in some cases.
The climbing walls that we have today are a much more recent invention. Apparently the invention of a British college professor, the first rock walls appeared in the corridors of his university campuses, where they were literally built into the wall in 1964. Since that time, the climbing wall has been adopted by military forces and other enthusiasts, with the first actual climbing gym being built in the US in 1987. Today you can find climbing walls and climbing gyms all across the globe. It’s even becoming common to find small climbing walls in children’s playgrounds.
What makes climbing walls so popular is the sheer challenge of climbing up what is nothing more than a series of rock-shaped handholds, without any technical climbing gear at all. In climbing gyms, athletes will be strapped into a safety harness, so that they can be lowered safely to the ground if they fall. But that harness doesn’t help them climb up the wall, they must do that by sheer muscle power and analyzing the best way up the wall.
Climbing the wall can also mean climbing up surfaces which lean out, away from the wall, as well as climbing short distances over nearly horizontal, overhead surfaces, hanging by the fingertips. Climbing walls vary considerably, with some of the larger ones having been designed to mimic the complexity of technical climbing. Some unique places have been transformed into climbing walls, including the face of a dam and the inside of a concrete grain silo.
A basic climbing wall is nothing more than a plywood wall, with climbing holds attached. More complex climbing walls have a more complex structure, still made of plywood, with climbing holds attached. Climbing gyms and playgrounds usually use commercially manufactured holds, which are mostly molded out of plastic.
But there are also climbing gyms which stray from the norm, using other materials for their climbing holds. Picture frames, shapes cut out of wood, and things one might suspect have been scavenged from a junkyard have all been transformed into climbing holds. As long as the items being used are strong enough to support the weight of the climbers and can be securely attached to the wall, they can be turned into a climbing hold.
Making Basic Climbing Holds
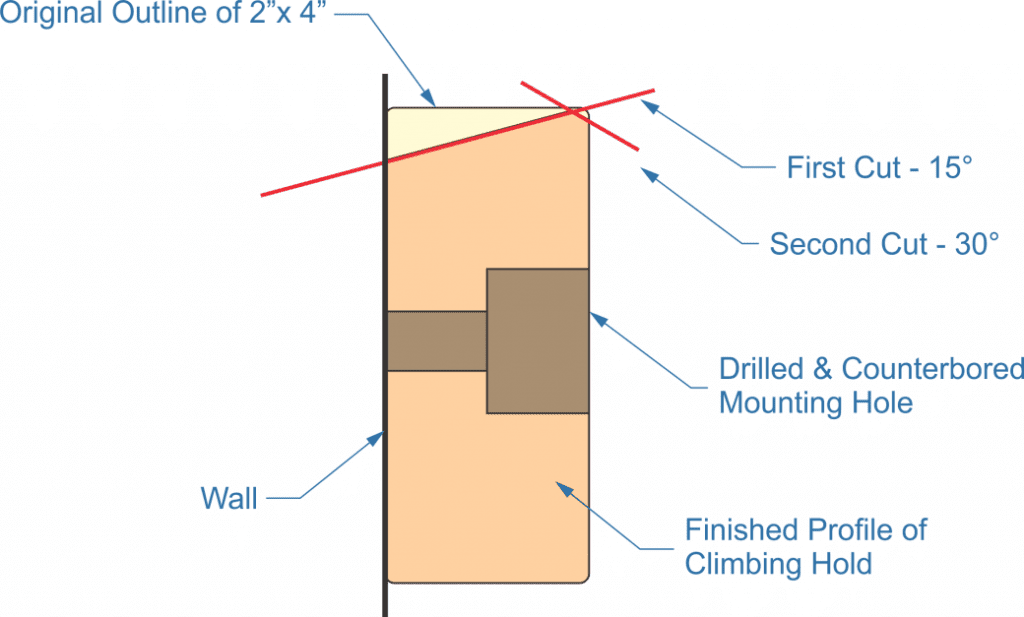
Basic climbing holds can be fabricated out of normal dimensional lumber. All it takes is a table saw, a drill, a sander and a little ingenuity. The dimensional lumber needs to be ripped at a 15 degree angle and then ripped again, taking off the sharp edge. When mounted facing up, with the top angled back towards the wall, this provides something for hands and feet to grip. Sanding the edge smooth makes it easier to grip, without anything digging into flesh, as shown in the cross-section diagram below.
Simple climbing hold
This sample climbing hold would be cut from a scrap piece of 2”x 4”, although 2”x 6”s could be used as well. Care should be taken to ensure that only wood that does not have splits or other defects is used. Once ripped, the piece could be cut off to random lengths, somewhere between 4” and 6” long if only one mounting bolt is going to be used (typical) or longer if multiple mounting bolts are going to be used. Then sand all the cut edges, but only with about 60 grit paper, taking care to eliminate anything that might splinter.
Counterboring the mounting hole is important, as the mounting hardware must be below flush, so as to avoid the risk of anyone cutting their hands on it. Socket head cap screws, backed up by a ash, are typically used for mounting. Countersinking can be used as an alternative, if martini bolts are used in place of the socket head cap screws.
The only problem with this simplified design is that it doesn’t look much like a rock. So, while it might be great for beginners or for making a small climbing wall for smaller children, anyone who gets serious about a climbing wall is going to want something that’s a bit more realistic looking.
Making Better Climbing Holds
While the climbing holds shown above might be good for a starter, it’s doubtful that anyone will remain satisfied with them for long. There’s just something about climbing holds that look like real rocks that is attractive to the sport. While the commercially available ones are all made of plastic, usually injection molded, can’t we also make them out of plastic.
Making such climbing holds is really not all that much more difficult than the simple holds shown above, although it is considerably more time consuming. Basically, this is simplified carving, albeit carving with power tools.
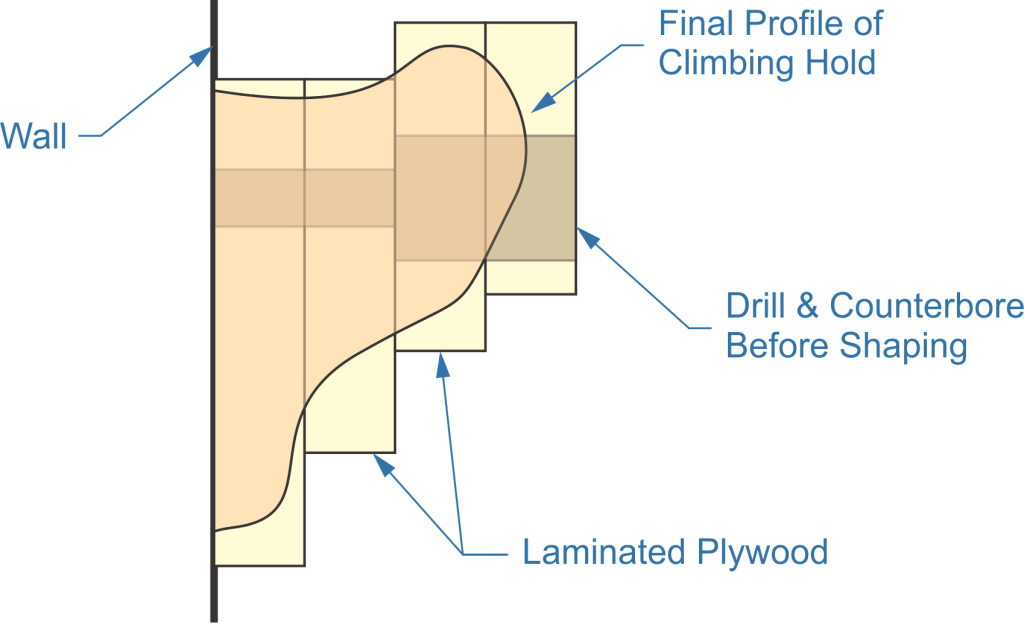
While this can be done with pretty much any wood available, it is usually done by stacking plywood. As with the simple climbing holds above, it can be done with scrap wood, although it would be good to stick with scrap wood that is void free to ensure that the climbing holds have sufficient strength and will not end up splitting under use.
The diagram above provides the basic idea of how to construct one of these climbing holds. The overall shape of the hold can be anything desired, including larger shapes that can be used as something to stand on, much like a horizontal crack in a cliff face might give a climber a place to stand.
Start by cutting a set of pieces out, with each piece being smaller than the one below it in the stack. Note how the top edge of the climbing hold in the drawing above overhangs the layers closer to the wall. This is important, so as to ensure a good grip on the hold. A straight edge or even worse, one that will end up sloping down towards the ground is much more dangerous, especially for a climber with sweaty hands.
Laminate the pieces together, gluing them with normal wood glue. If the climbing wall is going to be outdoors, then it would be better to use a waterproof wood glue, such as Titebond 3, rather than normal PVA glue. No assembly hardware is required, as the glued joint will be stronger than nails or screw would be.
Before carving, drill and counterbore the hole(s) for the fastener(s). It is much easier to do this step at this point, than after carving, as there will be a flat surface to drill into. As mentioned with the simple climbing hold, it is essential that the surface of the hardware be below flush when finished, so keep that in mind when determining the depth of the counterbore. Be sure to locate the hole in such a way that the ash is not going to be sticking out of the counterbore and so that there is ample wood all the way around the hole to provide adequate strength to support the weight of a full-grown man.
The actual carving is most easily accomplished with an angle grinder. The first pass would be made with a wood carving disk; the kind that has chain saw teeth around the edges. Once the piece is roughed out, that can be replaced by a combination of carbide grit shaping disks and flap discs. Woodworkers who have never carved with these tools may need a bit of practice to get a feel for how the various carving and sanding disks cut; but the nice thing is that there’s not going to be anyone who can say that the finished product doesn’t look right. Rocks come in all shapes and sizes, and that’s what we’re trying to emulate.
The final sanding should be accomplished using 60 grit sandpaper, which is sufficient to remove splinters in the wood and providing a relatively smooth edge; but not so smooth that a sweaty hand can easily slide off it. In the case of climbing holds that will be used outdoors, apply a coat of finish to waterproof the hold, but don’t try to make a smooth glossy finish as if it were fine furniture.
Mounting the Climbing Holds
Proper mounting of climbing holds is essential, as it is possible that one single hold could end up holding the full weight of 200 lb. man. It may not seem like it, but even a ¼” diameter, grade 2 bolt, can hold more than this much weight. Still, I would probably use 3/8” diameter bolts on my own wall if I was using common Grade 2 bolts. If I was using Grade 5 bolts, I’d be fine with the ¼” ones.
There are two issues to consider here. The first is what is known as the shear strength of the bolt. This is the amount of pressure or weight that must be applied across the thickness of the bolt to cause it to fail. The other is tensile strength. For our purposes, this is the amount of force or weight trying to pull the climbing hold off the wall, to cause the bolt to fail. But there’s another consideration as well; that of the bolt pulling out through the plywood; that’s actually the greater danger, if sufficiently strong plywood isn’t used.
There is no actual specification that I can find for how thick a sheet of plywood needs to be used to make a climbing wall. I would use ¾” ACX construction plywood. That’s the same thickness that is required for floors. If it’s strong enough for someone to stand on, then it should be strong enough for someone to hang off of as well.
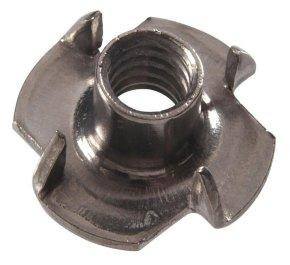
To fasten the climbing holds to the plywood wall, T-nuts should be inserted from the back side of the wall and pounded into the hole in the plywood wall. No other types of threaded fasteners should be used, as they aren’t as strong as the T-nuts. When the fasteners from the climbing holds are inserted into the T-nuts and tightened down, they clamp the plywood between the T-nut head and the climbing hold. Just be sure to tighten the bolt down to the point where the climbing hold can’t come loose or turn.
Nails or screws for plywood – T-nut
Two things I’d do to ensure that the bolts are tight enough. The first is to use a cohesive on the bolts, such as Loctite 242. The second is to check the back side of the climbing wall, after installing the bolts. If the head of the T-nut hasn’t been pulled all the way up to the plywood and there is a gap below the T-nut’s flange, then the bolt is not tight enough. It may take quite a bit of torque to get the prongs on the T-nut to dig into the plywood far enough to draw the head all the way up to the surface of the plywood.
Related Posts:
How to Make a Wooden Sword by Admin July 14, 2025 DIY 1. Why I Still Make Wooden Swords I wasn’t planning to make a wooden sword that day. I just needed something—anything—for my kid’s last-minute costume.…
How to Make Wooden Gears by Admin April 2, 2025 DIY Building Wooden Gears — My No-Nonsense Notes from the Garage If you've ever thought about building wooden gears for a clock, a jig, or just…
How to Make the Perfect Wooden Name Plate by Admin April 25, 2025 DIY Name plates are more than just labels — they’re subtle symbols of professionalism, pride, and identity. Whether it’s hanging outside an office door or sitting…