One of the problems in any workshop is where to put all the tools. Woodworkers and others who like to work with their hands have a tendency to collect tools over the years; buying tools to complete specific projects, replacing tools with better quality ones and finding tools which make it easier to do work that we do all the time. old tools don’t usually go away, unless we pass them on to someone else. So tools can ultimately end up taking up a lot of workshop space.
Not only do tools need to be stored, but they need to be accessible as well. That’s why we have the saying that “Whenever necessary, any tool automatically converts into a hammer.” Sometimes, it’s just easier to abuse tools, using them as hammers, than it is to go looking for the hammer. At the same time, the more time that any of us spend looking for tools, the less time we have available for the important work of making things. So tool storage needs to be both readily accessible and organized. That’s easier for some of us, than it is for others.
Many of the top woodworkers have solved this problem by moving their tools from the toolbox and hanging them on the wall. A tool wall is a great way of keeping the tools used most often ready at hand, in a way that is both organized and attractive. Ideally, any tool on the wall can be grabbed quickly and easily with one hand and put to use.
Tool walls are highly personal things and there is no right or wrong answer for one. Not everyone’s tool collection is the same, so there is no “one size fits all” solution. The tool wall has to be built to match the tools that are going to be hung upon it, as well as the working style of the owner.
Ideally, only the tools which are used regularly should be hung on a tool wall, unless the tool owner doesn’t have many tools. The general idea is to have tools which are most frequently located where they are readily accessible, not to see how many tools will fit on the wall. Although to be honest, most tool walls end up looking like they’re about seeing how many tools can fit on the wall, rather than about making the most-needed tools available for use.
Hand in hand with that are the size and weight of the tools. Tool walls really aren’t about storage for power tools, although it is not uncommon to hang some cordless tools, especially drills and drivers, on special holders that hang on the wall. But that’s a different subject, which I’ve covered in a separate article.
Commercial Solutions
As with every other need in life or the workshop, there are people who make products designed to solve the need for hanging tools on the wall. One thing that should be kept in mind when looking at these tool organizers and hangers is that they were designed to be as universal as possible. What that means is that while they will hold your tools, there’s going to be a lot of wasted space. Even things as simple as a screwdriver holder will probably be designed to hold a lot more screwdrivers than most people have. It is possible to get much more efficient use of space by making custom holders that fit the tools at hand.
The other problem with universal tool holders is that things don’t fit in the holders exactly, because the holders were not designed specifically for the tools. This makes for a tool wall that isn’t quite as neat, with tools that might be leaning over and the possibility of one tool falling out of the holder, while grabbing another one.
Pegboard, the old standby, has this problem as well. The whole idea of using a pegboard for hanging things on the wall is supposed to be having an easy to assemble system, which is easy to modify. While tools hanging on pegboard hooks might look good, the reality is that the hooks come out of the pegboard all too easily, causing a lot of time to be wasted picking them up off the floor and putting them back in the pegboard. As for the flexibility of moving tools around, few people do that, once they’ve got their tool wall set up.
While there are some commercial solutions that work extremely well, the criteria for buying them should probably be that the commercial solution will work well for the need. Wall hangers for garden tools, for example, tend to work extremely well, holding the tools securely and keeping them from falling all over the floor, while making it easy to see what is available and providing quick access to those tools.
Another good commercial solution to consider making part of the tool wall is plastic hardware bins. While we are talking about tools, mixing tools and hardware together in the same storage area makes sense for a lot of woodworkers, especially for fasteners that are used frequently. It makes sense to be able to grab the fasteners needed and the tools to drive them home, at the same time.
The Wall-Mounted Tool Cabinet
Some of the top woodworkers have taken the idea of a tool wall and gone one step further with it, building a custom tool cabinet; showing off their woodworking skills with the design and construction of that cabinet. The woodworkers who make such cabinets tend to be those who collect planes, spokeshaves, chisels, and marking tools with brass inserts. In other words, the kind of woodworkers who have a lot of money invested in their tools. The tool cabinet is their version of a toolbox, and even if they have other woodworkers working in their shop, that tool cabinet will be off limits.
Having looked at a number of these tool cabinets, I’d like to extrapolate a few commonalities that I have noticed, which I think are useful in the building of our tool walls.
Keep all tools of the same type together – This may seem simplistic, but keeping all marking and measuring tools together is a time saver, as is keeping all the saws together or all the planes sitting side-by-side.
Storage should be secure – The workshop isn’t a library; it’s a noisy place with lots of dust and vibration caused by working machinery. Tools can and will vibrate right out of their storage slots, if the slots are not designed to keep them from falling out. I once had a beautiful antique jointer plane fall off the wall. It wasn’t in a tool wall, but on display; yet it vibrated right off the wall.
Protect sharp edges – The longer one works with wood, the more they appreciate sharp edges. For many, sharpening tools is considered a necessary evil that takes them away from the more enjoyable work of using those tools. So tool holders for sharp tools should protect those edges. As part of that, planes sitting on the shoe should have a relieved area for the blade, so that the weight of the plane is not sitting on the blade.
Organize tools by how frequently they’re used – The tools you use the most should be the easiest to get to. Again, that may seem simplistic, but it’s all too easy to get caught up in making something attractive, rather than something practical.
Make universal holders truly universal – There’s this dream of buying everything in matching sets; but few of us actually have those sets. I think that dream was invented by marketing people, so that they could sell more tools. But the reality is that even if we do buy sets, we end up either adding to them or having to replace individual pieces. When I started woodturning, I bought a set of turning chisels. That set is now only half of my chisel collection and I expect it to continue growing.
Start with a Solid Foundation
Any tool wall starts out with a solid foundation; in other words, a solid wall to mount everything to. Since most of our workshop walls are covered with ½”sheetrock, that means covering the sheetrock with ½” or thicker plywood. Sheetrock is not a solid surface for mounting tools to and having to look for a stud, every time a new holder is being added to the wall is annoying. It also limits how well the space can be utilized.
While finely finished plywood is not needed for the tool wall, it looks better. That doesn’t mean it needs to be hardwood plywood, but a piece of sanded plywood will look better than some CDX construction plywood. It may be necessary to level the plywood while mounting it, as most drywall walls aren’t really flat. They tend to be higher at the joints, so it might be necessary to do some shimming to bring everything out to the same level and ensure a flat mounting surface for the tool holders. Mount the plywood with plenty of screws, countersinking the screw heads so that they don’t get in the way of mounting the tool holders.
Some people like to mount French cleats on their tool wall, allowing them the option of moving tool holders around. While that is a possibility, it is usually nothing more than unnecessary extra work, as the tools are rarely moved around, once mounted. If the tool holders are mounted to the tool wall with brads or screws and without any glue, they can still be moved around, if necessary.
The plywood does not need to be painted or varnished in any way, but it can be. That’s a personal decision, based on how much work and money one wants to put into the project. Most woodworkers try to save money on building a tool wall, using scrap wood to make the holders, so that they can use their money for other things.
Making the Tool Holders
Tool holders fall into a few basic categories, each of which I will discuss, showing some basic designs. A typical tool wall consists of several of each of these, all of which are built to meet the specific needs of the woodworker and accommodate their tool collection.
Before making anything, lay out the tools that are to be hung on the wall, grouping them and seeing how they will fit. This can save a lot of heartache later, by eliminating problems with getting things to fit together as desired. It also gives an excellent opportunity to find the best places for the tools which are used the most often, putting them where they are most easily reached.
The tool holders themselves can often be made from material sitting in the scrap bin, as most of the pieces are rather small. This can actually end up being rather attractive for woodworkers who use a variety of different types of wood. A walnut accent inserted into a maple tool holder shows off the woodworker’s style and work in a subtle way, while helping ensure those valuable pieces don’t go to waste.
Hooks, Nails and Pegs
The absolute easiest way of hanging tools on a tool wall is with hooks, nails and pegs. Some tools come from the manufacturer with hole in them, making it easy to hang them by those hooks. This is especially true with some types of saws and rulers. But it is possible to find other tools that have a hole for hanging.
Obviously the easiest way to make use of that hole in the tool is to pound a finish nail into the tool wall and just hang it. That will do the job just fine. A nail is better than a hook in most cases, because it can be difficult to get the tool off the hook. If we think about a standard cup hook, a ruler hung on that hook has to be turned almost 180 degrees to the vertical to get it off. However, cutting the hook can make it easier to use, allowing the tool to be removed by turning it only 90 degrees.
I have found that one of the best ways of dealing with these sorts of tools is to use ¼” dowel pins. Drilling holes and gluing in dowel pins is easy and if the tool has to be moved in the future, the dowel pin can easily be cut off flush with the backing board. Dowel pins naturally hold the tools securely against vibration, while still making them easy to remove.
Pierced Hanger Strips
Probably the best known sort of tool hanger is a pierced strip. This is what most people envision first, when the subject of hanging tools on the wall comes up. These are the holders that screwdrivers are placed in. They can also be used for chisels and pliers.
At the most basic level, these holders are nothing more than a board with hole drilled in them. That’s essentially what you get if you buy one that is commercially made, although that one will be made out of metal or plastic. While it will work, you’re better off with slots, rather than holes, as the slots make it easier to remove the tools; they only have to be lifted slightly, and then can be pulled straight out. Having to pull them all the way up through the holes can limit what can be hung above them.
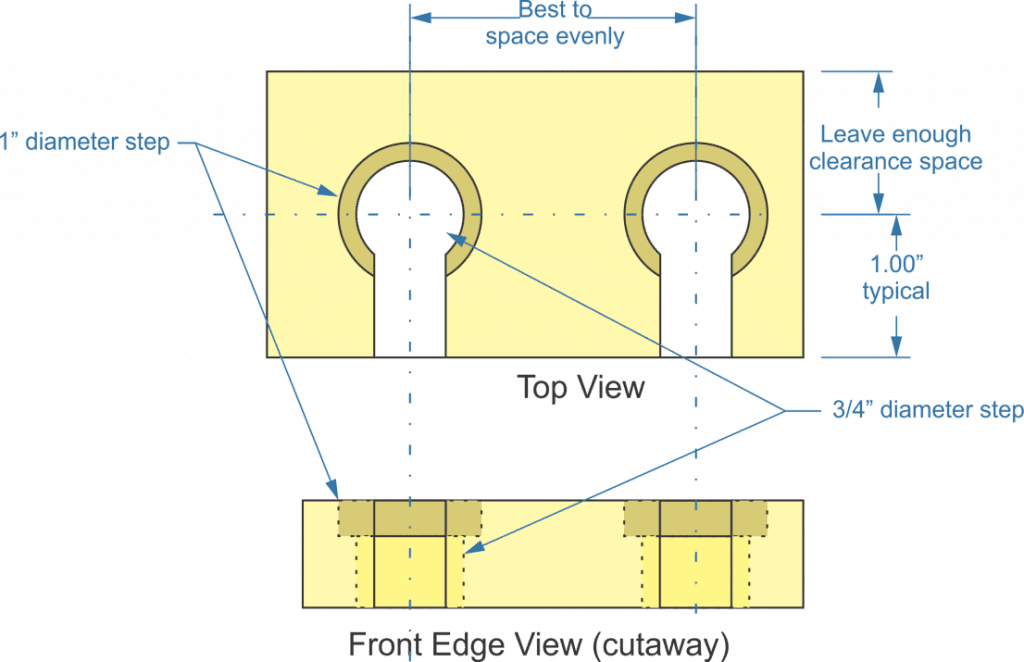
Pierced hanger strip
The idea behind the stepped hole, as shown in the illustration above, is to allow the strip to accommodate different sized tool handles. It’s not uncommon to have screwdrivers and chisels that have different diameter handles, but that we want to hang together on our tool wall. The stepped hole allows tools with smaller diameter handles to fit in the lower portion, while the tools with the larger diameter handles can sit in the upper portion. In either case, the slot allows for easy removal and replacement of the tools.
The overall size of the hanger, as well as the distance between the hole and the distance allowed behind the holes will depend a lot on the tools that are being stored in the rack. Most of the time, a 2” or even 1-1/2” strip of wood is deep enough, but some tools may require more depth.
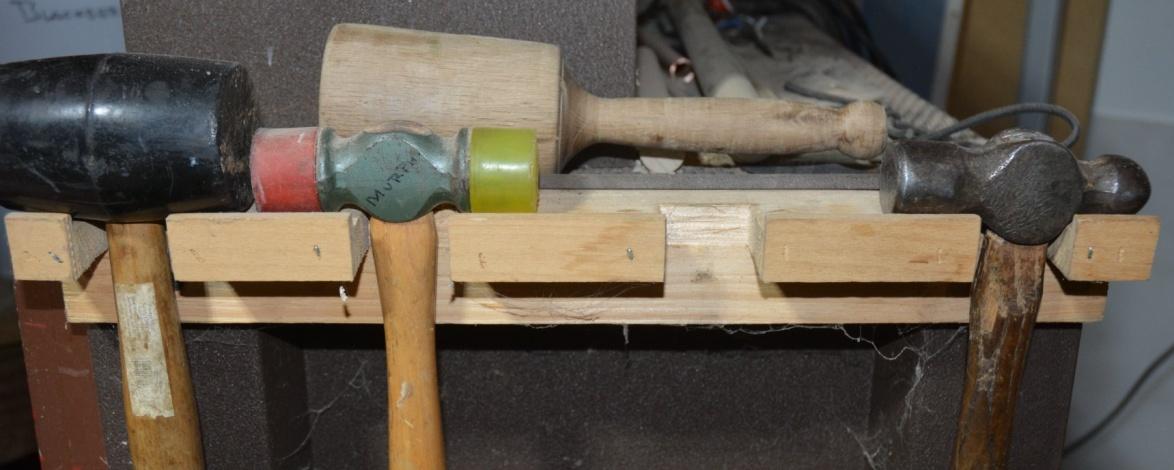
This same basic design can be modified to fit other tools, like this simple hammer rack. While it is not hung on a tool wall, it could just as well be. The one real difference is that the slots for the hammers have a lip on the front edge, to keep the hammers from falling off.
Simple hammer rack
Spokeshaves
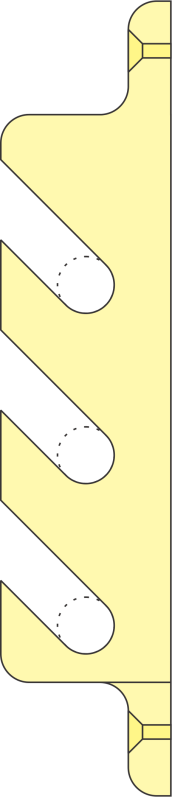
Spokeshaves and draw knives kind of fall into a category all their own, when one is building a tool wall. The unique shape of these two-handed tools means that they won’t fit into solutions that are used for other tools. Rather, they need to have a rack made for them, which is something like the pierced hanger strips standing on end. These are used in pairs, allowing each to hold the handles on one side of the spokeshaves and the tools to hang horizontally, one above the other.
Spokeshave holder
Plane Shelves
While the tool holders above are useful for screwdrivers, chisels, hammers and even pliers, they can’t hold all types of tools. Some tools, like planes, need a larger holder. Since planes are such an important part of the woodworker’s tool kit, especially those who make furniture, keeping them close at hand is important.
In the wall-mounted tool cabinet I mentioned above, it is common to find planes stored side-by-side on an inclined shelf. There are a couple of reasons for this, mostly to allow fitting longer planes into the cabinet, without taking up too much room. At the same time, it allows the planes to be seen from a top view, rather than an end view, giving a better idea of what they are. A side view works well for showing what each plane is as well. About the only time that an end view is appropriate is when storing molding planes. In that case, the important factor is the profile of the plane’s shoe and blade, which is most easily seen from an end view.
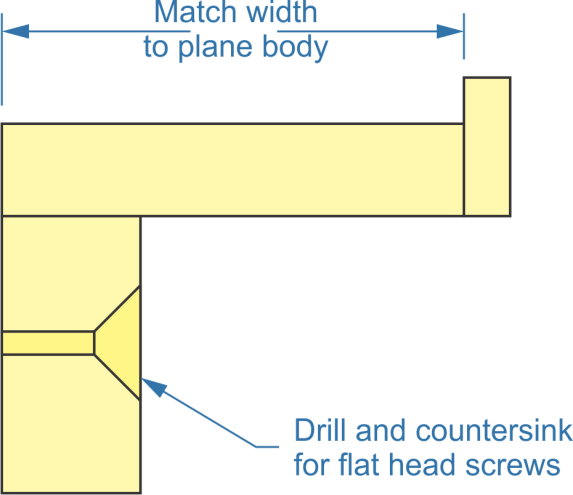
For a tool wall, simple shelves work better for storing and displaying planes, rather than the inclined shelves that are used in those tool cabinets. It is also easier to build those simple shelves. All that’s needed is two pieces of wood; one to act as the shelf itself, while the other is the wall mount. A thin strip can be added along the front edge, much like the hammer rack above, to help prevent the hammer from falling off.
Build individual shelves to fit specific planes. This will help to prevent wasting space, as well as helping ensure that the planes don’t vibrate off the shelf. That’s much more likely to happen with shelves that are too big or too small. If the plane collection changes, building a new shelf is easy.
Tool shelves
This is the one thing that absolutely should be held to the plywood base of the tool wall with screws, rather than nails. Some metal plane bodies can be quite heavy and planes are easily broken if they fall, especially on concrete floors.
While this sort of holder is mostly used for planes, it can be readily adapted to any other sort of boxy tool, such as a box that contains bits or a pair of calipers. Smaller tools, such as squares, can be hung on a version of this tool which is no deeper than the piece that mounts against the wall, with the lip in front.
Bit Holders
A modification on the idea of the abovementioned shelf can be used for holding drill and router bits of all sizes. In the case of router bits, drilling a series of hole, one size larger than the shank of the bits, in a grid, makes it easy to locate them and reorganize them as needed. In the case of drill bits, a thicker block should be used and the drill bit holes should not be drilled all the way through. I usually use the same size drill bit to drill the hole, as that ensures a good fit.
Cleats
There may very well still be a wide variety of tools to be hung on the tool wall, which don’t work with any of the abovementioned tool holders. Some sorts of saws fit into this category, as well as larger measurement tools. Individual cleats usually need to be cut to fit the tools, generally fitting into the handle.
The idea here is to cut a block of wood that fits some part of the tool and allows the tool to slip into place easily. In order to keep the tool from falling off, a small piece of wood that can turn is screwed into the cleat as a lock. Then, when the tool is hung in place, the lock is turned to hold it.
Clamps are often stored separately from the tool wall, simply because we collect so many of them that they won’t fit. A simple hanger, similar to the pierced hanger strips I mentioned first, is usually used to hang bars and F clamps on the wall. The difference is that the hole are not drilled in the holder. Instead, slots are cut for the individual clamps to slip into. If slots are not used, the clamps tend to lean and can fall off the rack.
Before building a clamp rack, measure the thickness of the clamps that are to be hung on it, as well as the thickness of the bar or pipe. Multiple types and sizes of clamps can be hung on the same rack, as long as the rack is built to accommodate it. That might mean cutting slots of different widths, as well as altering the spacing. Ideally, the slots should be just wide enough for the clamp’s bar to slip into, with just a little bit of clearance (1/64”) and the spacing should leave between 1/8” and ¼” of space between clamps.
Customized Boards
Finally, while a main tool wall is going to house the majority of the hand tools regularly used in the shop, many of our power tools have their own collection of accessories which are used with them. It makes a lot of sense to store drill bits by the drill press, router bits by the router table and other accessories by the tools they are used with. Don’t allow the tool wall to do the same thing that a tool box does and keep all the tools organized, but not in a convenient place for using them.
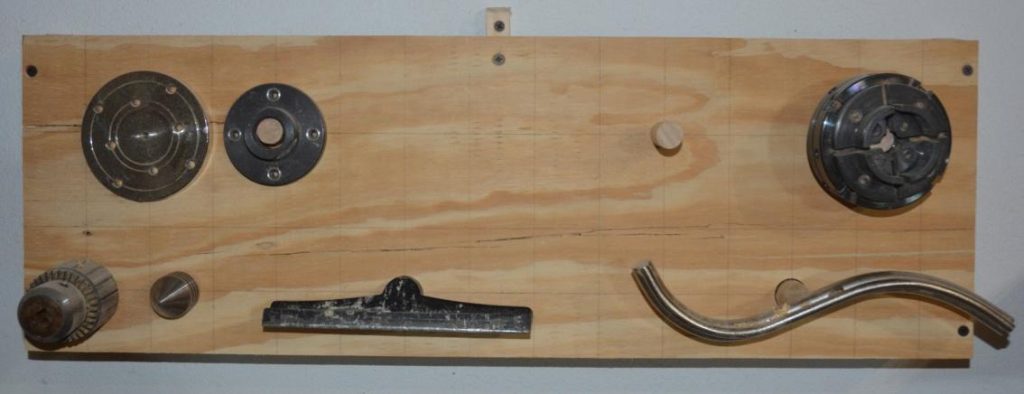
Small tool board
The picture above is of a small tool board that hangs behind my lathe. It has places to hold the chucks (including one that is currently on the lathe, tool rests, centers, Jacobs chuck and faceplates. I do not hang the chisels on this board, as some woodturners do. I don’t like the idea of reaching over a turning lathe to grab a chisel I need; so those are stored under the lathe, where they are readily available.
Firewood Guide: Best Types, Storage & Tools by Admin July 21, 2025 Grades 🔥 My Real Take on Firewood—What Works and What’s a Waste I’ve burned all kinds of firewood over the years—some that kept the house warm…