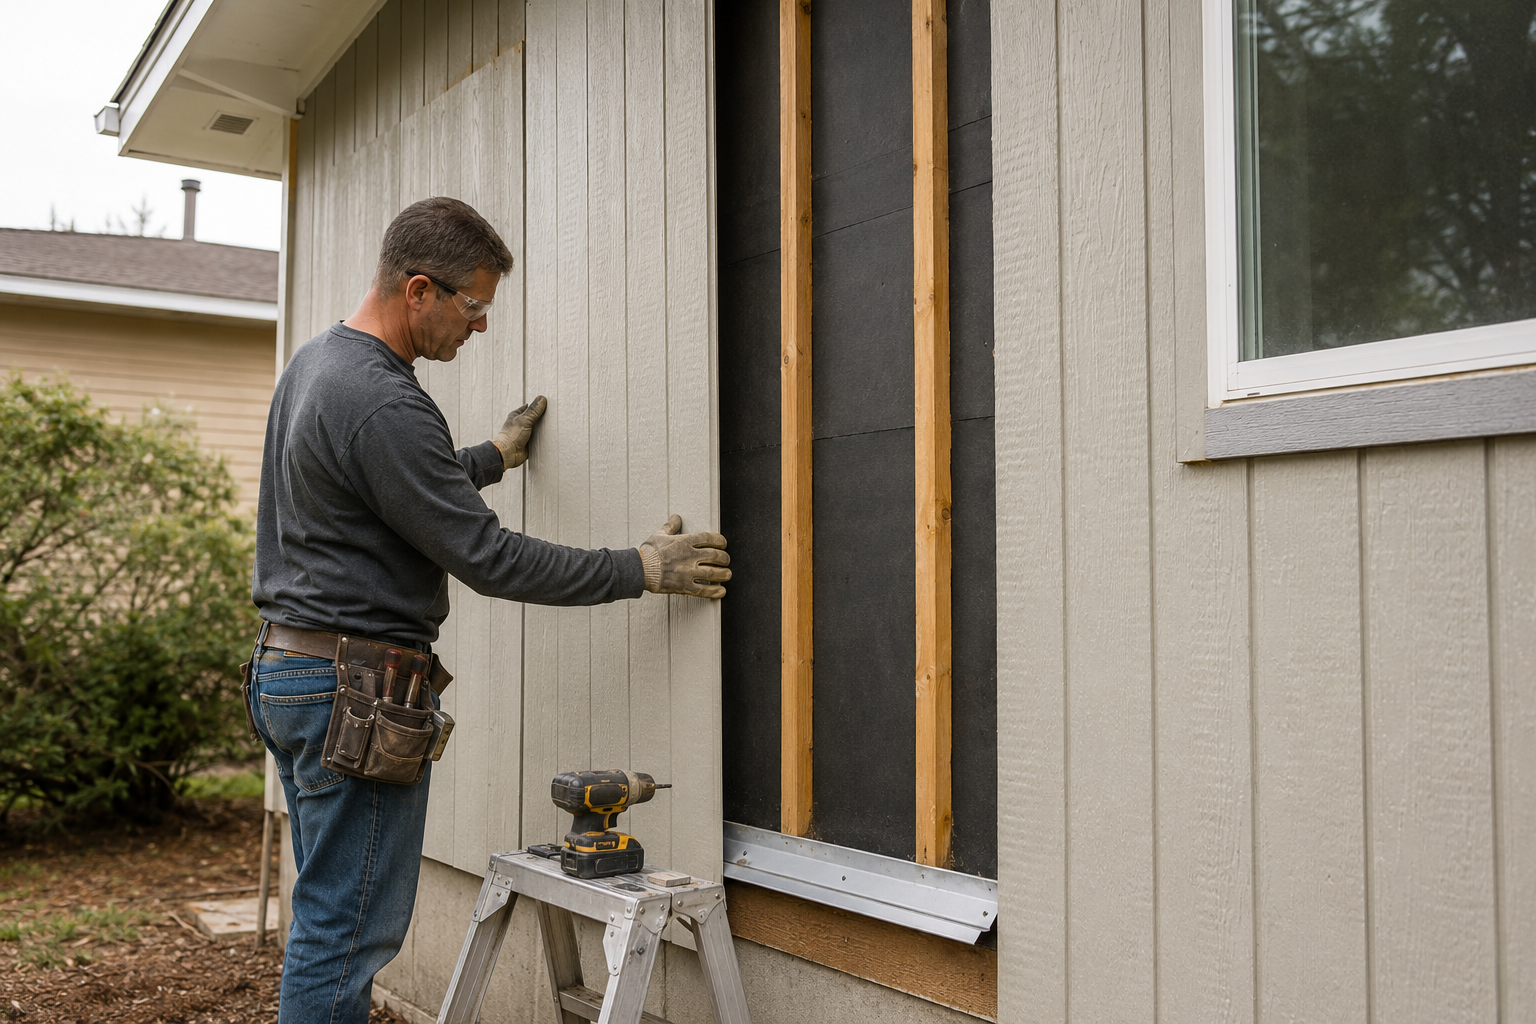
Replacing T1-11 siding means removing the old grooved panels, checking and repairing whatever the panels were hiding, and installing new siding over a fresh water-resistive barrier with proper flashing. Installing T1-11 siding generally costs about $2.50 to $7.50 per square foot. A replacement project may cost more because removing the existing siding, disposing of it, repainting, and repairing concealed damage can add substantially to the final price. But the part that decides whether the replacement lasts or begins deteriorating prematurely isn’t the panels. It’s what happens in the wall behind them.
This guide covers when replacement beats repair, real 2026 cost ranges, what to put back up, a step-by-step process, and the installation mistake that can cause brand-new panels to deteriorate prematurely.
When to replace T1-11 siding instead of repairing it
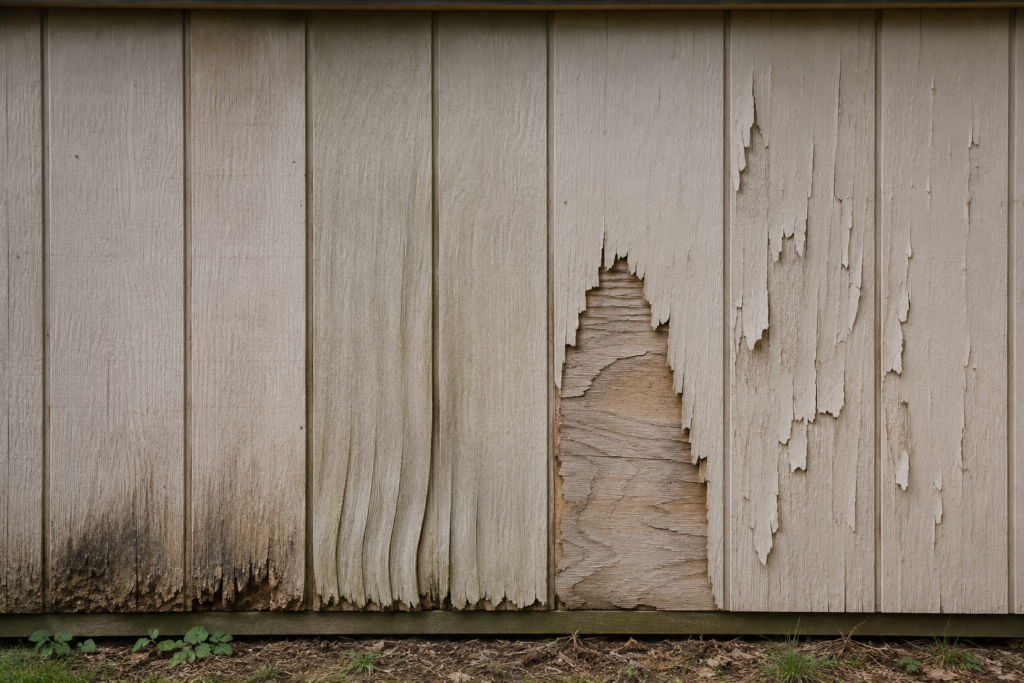
Small, isolated damage is usually a repair. Replacement makes sense when the damage is widespread, structural, or spread across panels that are all the same age and finish. Look for these signs:
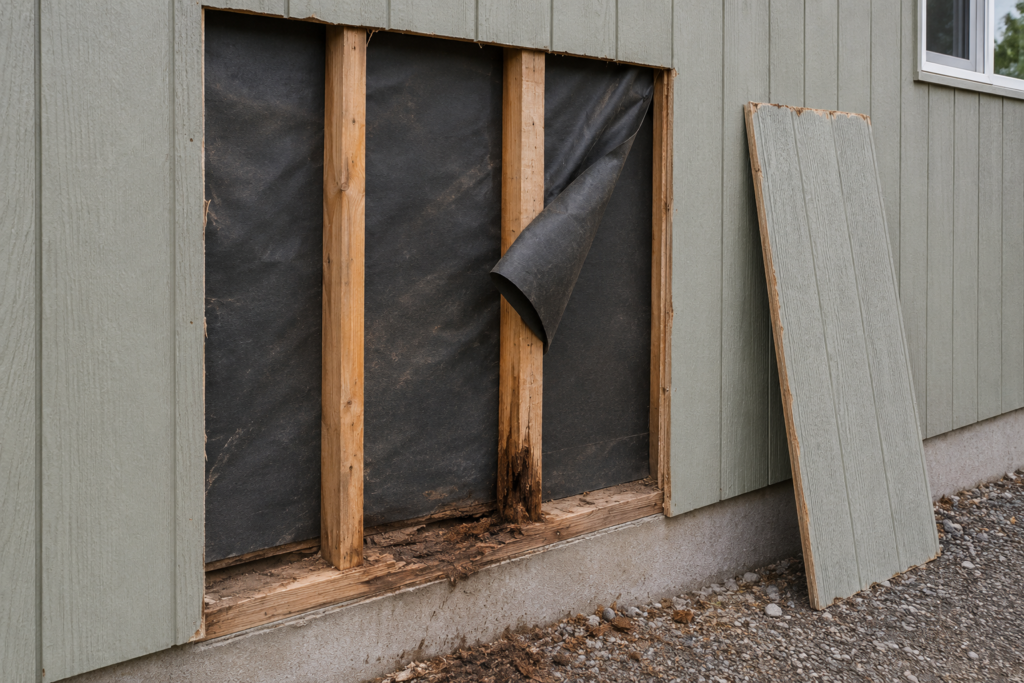
Soft, spongy panels — especially along the bottom edge, around windows, and at the vertical grooves, where water gets in first.
Delamination or bubbling — the face veneer lifting or peeling away from the layers underneath (on plywood T1-11), or swelling and crumbling edges on OSB-face panels.
Rot you can push a screwdriver into — if the tip sinks with light pressure, the wood is gone, not just weathered.
Damage across most of a wall — when several panels are failing at once, patching one at a time rarely looks right and rarely lasts.
Repeated repairs — if you’ve caulked, filled, and repainted the same spots more than once, the panel has reached the end of its service life.
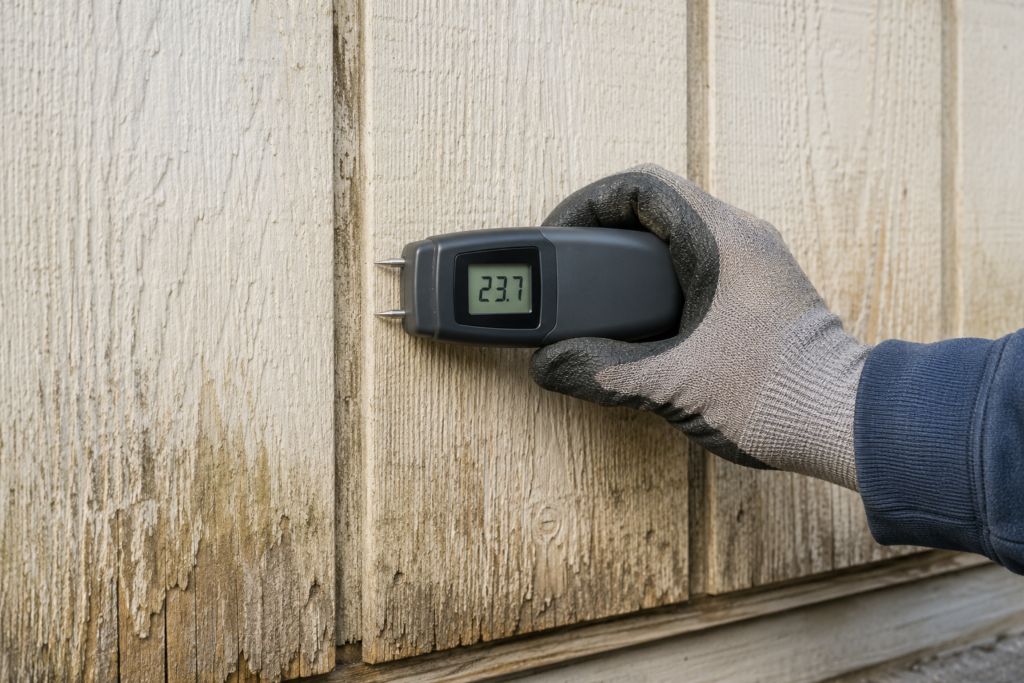
🧪 A quick real-world check before you commit: Press a pin-type moisture meter into a few suspect panels and, if you can reach it, the sheathing behind them. Readings well above the surrounding dry wood point to trapped moisture and hidden rot. It’s an informal, spot check — not a pass/fail structural verdict — but it’s the fastest way to tell whether you’re looking at a cosmetic touch-up or a tear-off. A basic unit like the General Tools MMD4E pin-type moisture meteris inexpensive and reads wood and building materials.
As an Amazon Associate, ThePlywood.com earns from qualifying purchases.
How much does it cost to replace T1-11 siding?
Replacing T1-11 siding typically costs $2.50 to $7.50 per square foot installed, according to 2026 cost data from Angi and HomeAdvisor. For a full T1-11 project, Angi puts the average near $8,500, with most jobs between roughly $6,500 and $10,000; HomeAdvisor shows a wider $4,000 to $14,000 range once home size, access, and finish are factored in. Here’s how the pieces break down:
Panels: roughly $35 to $70 for a 4×8 sheet, depending on thickness, species, and whether it’s pressure-treated. OSB-face versions sold under the T1-11 name generally cost less than genuine plywood panels.
Labor: about $1.50 to $3.50 per square foot, or $40 to $75 an hour (Angi). Tear-off of the old siding, surface prep, and painting or caulking are usually part of that labor.
Tear-off and disposal: removing the old panels adds to labor and is higher when there’s damage or nested layers to deal with.
Permits: commonly $100 to $400, depending on your area (Angi). Contractors often pull these, but confirm with your local building department.
Hidden repairs: the wildcard. If tear-off reveals rotted sheathing or framing, that repair is added on top — which is exactly why a walkaround estimate can miss the real number.
💸 The cost difference most people don’t weigh: Putting the same T1-11 back up is the cheapest option. Upgrading to an engineered-wood panel siding (the LP SmartSide category) or fiber cement costs more per square foot in materials and often pushes a full re-side toward the ~$11,000 national average for siding replacement (HomeAdvisor). The gap buys you longer manufacturer warranties and better moisture and impact resistance — worth pricing out now, since the walls are already being opened and prepared.
What to replace T1-11 siding with
You have three practical directions, and the walls being open is the moment to decide:
Same profile: new T1-11
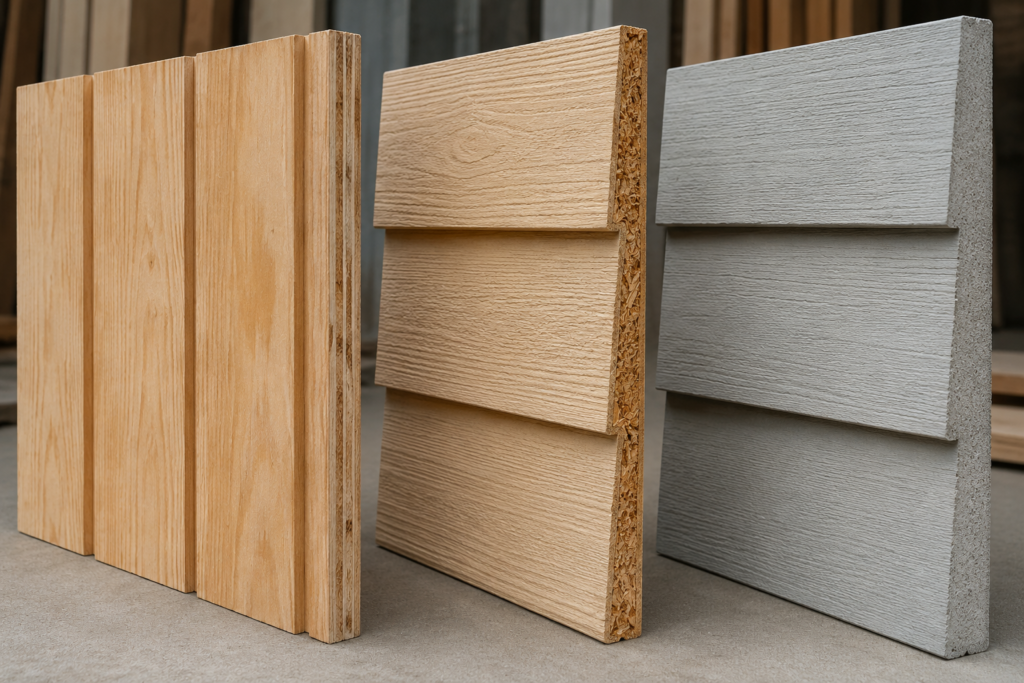
The straightforward match. If you go this route, buy genuine APA-rated plywood siding rather than defaulting to the cheapest sheet — the exterior plywood grade you choose drives how well it takes finish and resists checking. One clarification that trips up a lot of buyers: original T1-11 (APA Texture 1-11) is an all-veneer plywood panel. Many panels sold today under the “T1-11” name are OSB or hardboard engineered-wood products, not plywood — they perform differently and aren’t the same thing, even though the groove pattern looks identical on the wall.
Upgrade the material
Engineered-wood panel siding and fiber cement cost more but come with stronger warranties and better resistance to moisture and denting. Because the existing siding is already being removed, this is generally the most economical time to upgrade.
Some owners use the tear-off as a chance to switch styles entirely — for example, to a board-and-batten exterior. Just confirm the new material’s structural and bracing role matches what the old panels were doing (more on that below).
How to replace T1-11 siding, step by step
⚠️ Before you pry a single panel loose: If the home was built before 1978, the old paint may contain lead — test it and follow safe-removal practices, or hire a certified pro. Locate any electrical, cable, or gas lines running along or through the wall before cutting. Some T1-11 panels also provide structural wall bracing. Before removing panels — especially from a load-bearing wall — determine whether they perform a structural function. If you are uncertain, consult a qualified contractor or structural professional rather than stripping the wall.
Remove the old panels and trim. Pull trim, then work panels off the studs. Don’t plan to reuse old nails or flashing — buy new.
Inspect the wall assembly the siding was hiding. Depending on the original construction, T1-11 may have been installed over separate sheathing or attached directly to the framing as structural panel siding. Inspect the framing, insulation, water-resistive barrier, and any separate sheathing that is present. A wood hardener such as Bondo Rotted Wood Restorer may be suitable for small, nonstructural areas of deteriorated trim after the moisture source has been corrected. Rotted siding, sheathing, framing, or other structural components should be removed and properly replaced.
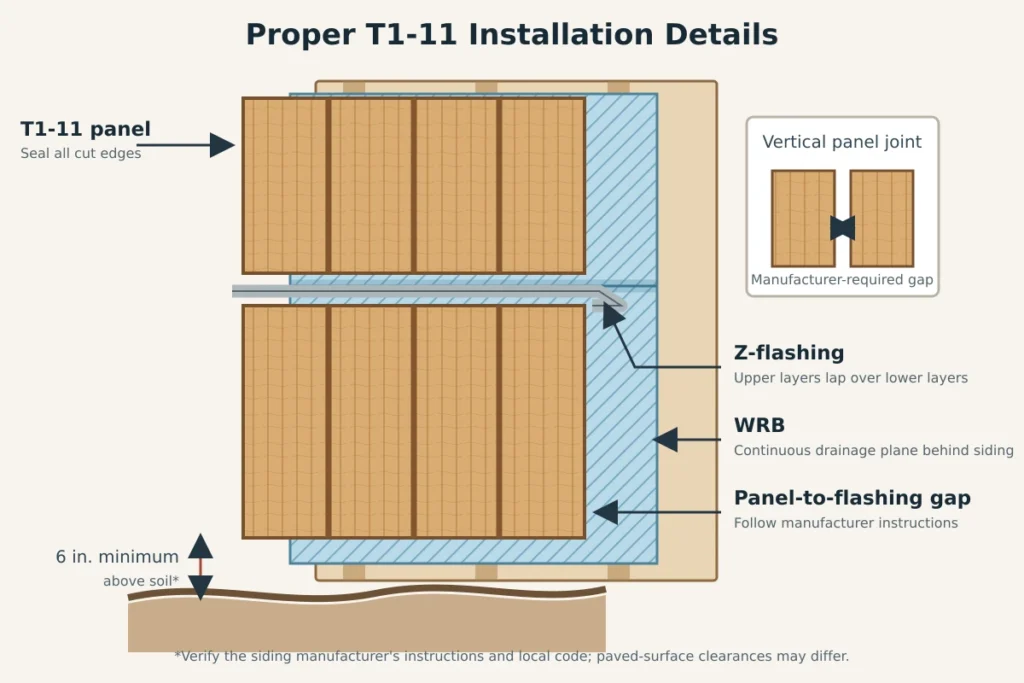
Install a fresh water-resistive barrier. Wrap the walls in new house wrap, lapped shingle-style (upper courses over lower) so any water that gets behind the panel drains down and out. This layer — not the paint — is what actually keeps the wall dry.
Integrate the flashing. Add Z-flashing at horizontal panel joints, drip caps over windows and doors, and kickout/step flashing where a roof meets the wall, all lapped into the barrier correctly. Incorrect flashing is a common cause of premature siding and wall damage.
Set the panels. Hang them with the grooved face out, keeping the bottom edge above grade — commonly 6 to 8 inches, but defer to the panel manufacturer and local code. Fasten with corrosion-resistant nails; hot-dipped galvanized siding nails(or stainless) prevent the rust streaks that plain steel leaves on a painted wall. Follow the panel’s printed APA nailing schedule, and leave the manufacturer-specified gap at panel edges and ends — don’t butt them dead tight.
Seal every edge and joint. Cut edges soak up water like a straw, so prime or seal them before or right after install. Detail vertical joints, panel gaps, penetrations, and trim exactly as required by the panel manufacturer — depending on the panel and joint design, this may involve a paintable exterior sealant such as OSI Quad Max, battens, flashing, or another approved detail. APA guidance supports manufacturer-specific joint details and spacing rather than one universal method (see APA Rated Siding). This is the same careful prep you’d use when installing T1-11 siding from scratch.
Prime and finish. Use an exterior primer and finish suited to the panel, working paint or stain fully into the grooves — that’s the first place water tries to enter.
If you’re re-siding a shed or outbuilding rather than a house, the same sequence applies at a smaller scale; our guide to re-siding a shed covers panel choices for those builds.
The mistake that makes brand-new T1-11 fail
❌ The mistake: hanging new panels over the old, failed water-resistive barrier — or with no real flashing integration — because the wall “looked fine” once the old siding was off. New panels installed over a compromised barrier can trap moisture behind the new siding and cause premature deterioration. Panel failure is frequently connected to problems with flashing, drainage, clearances, finishing, or the wall assembly behind it.
😬 The regret that follows: the partial patch. Replacing two panels on a wall of ten seems thrifty, but the new panels rarely match the weathered, faded, differently-textured old ones — and if the underlying moisture issue wasn’t fixed, the “new” section fails right alongside the old. This can eventually require replacing the entire wall and paying twice for overlapping work. If most of a wall is going, do the whole wall, fix the barrier and flashing, and only then hang siding.
Should you replace T1-11 siding yourself or hire a pro?
T1-11 is one of the more DIY-friendly sidings — large panels cover ground fast and need no specialized tools. The savings are real, since labor is a big share of the installed cost. But two things push jobs toward a pro: multi-story walls and access, and flashing detail. If you’re not confident integrating house wrap and flashing correctly, the money you save on labor can disappear into a rot repair later. A reasonable middle path is to handle a single-story or shed-scale replacement yourself and bring in a pro for tall walls, complex rooflines, or anywhere the flashing gets complicated.
Whichever route you take, the priorities are the same: fix what’s behind the panels, get the barrier and flashing right, seal every edge, and don’t patch your way around a wall that needs replacing.
Fluted Wood Panels: Costs, Types & Mistakes to Avoid by Admin April 12, 2026 DIY Fluted wood panels are decorative wall panels featuring vertical grooves that add texture, depth, and a high-end modern look to interiors. Commonly used for accent…