The cordless electric drill, often referred to as a “drill/driver” is the most commonly owned power tool to find in a homeowner’s tool kit. Even people who aren’t do-it-yourselfers are likely to have and use one of these tools. What do you do if you have to make a hole in something, and you don’t have a drill or the right drill bit to make the hole you need? You can always try and borrow one from a friend; but if all your friends are out of town, you’re stuck.
Fortunately, people have been making holes in wood much longer than you and I have been around. Through the years, these people have come up with a large variety of different ways to make those holes, some using manual tools, rather than power tools, some using power tools in unusual ways and some using other things, in the place of the appropriate tools.
Which one of these options that you and I ultimately choose depends a lot on the size hole we want to make, the material we’re making the hole in and what we have to work with. We’re going to explore some of these ways, making sure that our mental “tool box” of methods is well stocked with ideas.
Manual Ways of Making Holes
Carpenters and cabinetmakers have had to make holes in wood for centuries, long before there was any such thing as an electric drill. Even in ancient times, early man made holes in a variety of different materials, including wood, for use as beads, buttons, jewelry and other purposes.
Awl
If all you need is a small hole into a board or through a thin board, you can make it with an awl. This is the simplest of tools, being nothing more than a thin round tapered point. Yet for what was probably centuries, it was the only tool capable of making a hole through leather, wood or even bone.
Burning a Hole
To make larger holes in wood, ancient man burned them. This still works, if you find yourself in a place where you don’t have any tools available whatsoever, but need a hole through a board. It requires patience and maintaining tight control over the fire.
Chances are, you’ve got the wrong image of what this entails. Burning a hole through a board was done with a hot coal from a fire, not an open flame. The coal was set where the hole was desired, using a pair of tongs or two sticks. It would be replaced from time to time with fresh coals, as necessary, and the ashes from burning the wood would be removed, providing the coal with fresh wood to burn. Holes from less than an inch up to several inches in diameter could be made this way.
For small holes, a piece of hot, stiff wire, like the wire that clothes hangers are made of, can be used to burn through the wood. You will need a source of fire to heat the wire up repeatedly, as you push it slowly through the wood, but it will eventually manage to burn through to the other side.
Palm Drill
The first drill bits were made out of sharp pieces of antler or bone, glued into the split end of a stick with tree rosin; and then bound in place with rawhide. As time progressed, this design was improved upon by the replacement of the antler and bone tips with knapped flint. Since the flint was harder than either antler or bone and naturally fractured in a way that left a sharp edge, this was a major technological leap forward.
The drill was used by rotating it between the palms, with the hands flat. As it was rotated, downwards pressure was applied. This, of course, caused the hands to move down the stick’s shaft, towards the point; generating the need of repositioning the hand on almost every stroke. While slow, holes could be drilled with some precision.
Bow Drill
A great improvement was made upon the above mentioned palm drill by using a small bow, made of a stick and leather thong as the “motor” for the drill. The thong was looped around the drill rod, with the spring action of the bow providing sufficient tension so as to ensure that the motive power generated by the movement of the bow turned into rotational power in the drill shaft. A bearing block, nothing more than a hollowed out piece of wood, was held in the other hand, pressing down on the drill rod to provide positive control of the drill and the pressure necessary to cause the drill bit to cut into the wood.
If you’ve ever seen anyone start a fire with a bow drill, this is essentially the same. The only real difference is that the drill rod has a hardened point on it, made out of knapped flint or obsidian. This allows the bow drill to cut, rather than just generate enough heat to create a smoldering fire.
Brace & Bit
Beginning in the 1400s, the brace and bit became the standard drill used by carpenters, furniture makers and others who worked in wood, such as wheel writes and wagon makers. Compared to any other manual method of drilling a hole, the brace and bit is extremely efficient, with bits able to drill holes as large as an inch and a half or so.
A carpenter or cabinetmaker might have several different sized braces in their toolbox, along with an assortment of different sized bits. In an era where furniture and even houses were pegged together, rather than built with nails or screws, the brace and bit was an essential tool that got much use.
Even today, the braces and bits for them are still manufactured by many quality tool manufacturers. It is still a preferred tool by some woodworkers, especially those who specialize in working with timbers or doing things the old fashioned way.
Push Drill
The push drill is a convenient drill for use in making small holes, from 1/16” up to a maximum of about 5/32”. It looks somewhat like a screwdriver with a telescoping shaft. Bits are usually stored in the handle and lock into the point end of the drill via a ball and indent.
To use a push drill, one places the point where the hole is desired and pushes down on the drill. An elongated screw thread inside the tool turns that pushing action into rotary action, spinning the bit. Within a few strokes, a hole can be made up to about ½” deep in softwoods.
This is an excellent tool for use in making pilot holes for screws to go into, as well as any other time when a few small holes are needed. If you only have one electric drill and are trying to drill a wood screw clearance hole through a board, along with a countersink, as well as a pilot hole into another board, that the first will be connected to, the push drill can save you having to change drill bits one time, by creating the pilot holes for you.
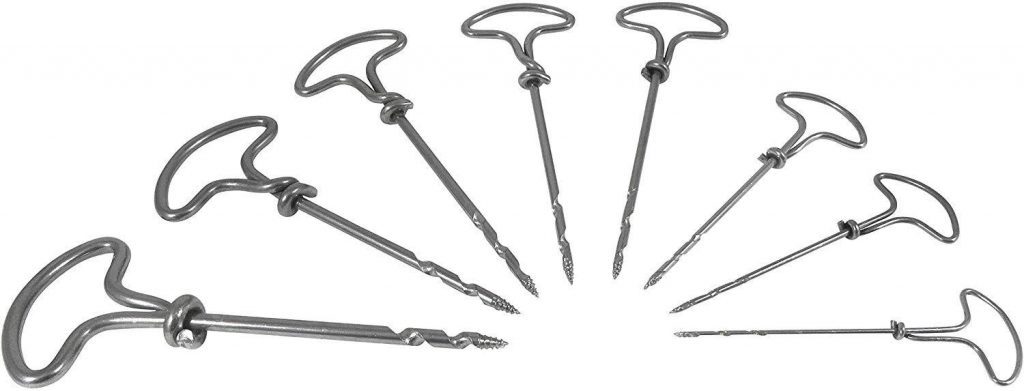
Gimlets
When gimlets are discussed or offered for sale, they are always mentioned in the plural. That’s because they are only sold in sets; often in sets of four. This simple tool can best be described as a drill bit, with a T-handle attached, although that T-handle is often in the shape of a loop. The point of the drill bit would be a screw thread, allowing the tool to be started into the wood more easily than drilling.
These were the old time woodworker’s tool of choice for making holes in cases where the hole needed was too small to use a brace and bit. The typical carpenter would have a set of these in their toolbox and use them regularly. One of the really great things about them is that they don’t split the wood.
I have a set of gimlets in my workshop and find them extremely convenient for use in place of an electric drill when I only need one or two holes to put wood screws into. They are sized not in fractions of an inch, but rather to match #2, #4, #6 and #8 screws. Some sets are larger, containing as many as eight gimlets and ranging up to #12 screw size.
Modern gimlet set (nearly identical to antique one)
Using Other Power Tools to Make a Hole
Sometimes, the solution you need is to use a different power tool, especially when a larger hole is required. While the drill is usually the ideal solution for making a hole, drills do have limits. Depending on the type of drill bit you are working with, about the biggest hole you can get is 1-½” with spade bits or 2-1/8” with forstner bits. Hole saws increase this up to about 4”. But if you need a larger hole, you’re going to have to switch over to another tool.
Jigsaw
The jigsaw can’t make a hole on its own, in the middle of a board or piece of plywood, as the saw’s blades don’t have the capability of plunge cutting. It either needs an existing hole, big enough for the saw blade to fit into (about 5/16”) or to cut in from the edge of the board. But once into the board, the jigsaw can make just about any type hole you might want, of just about any shape you can imagine. The small, thin blade adapts well to cutting curves or can be used to cut straight lines.
Reciprocating Saw (Sawzall)
While the jigsaw and the reciprocating saw operate in a similar manner, they are, in fact, quite different. Normally considered to be a demolition tool, the reciprocating saw has one capability that the jigsaw does not have, that of plunge cutting. Almost all of the styles of blades made for this saw have a sharp point, making this possible.
The limiting factor of the reciprocating saw is accuracy. While you might be able to cut through just about anything with it, trying to cut a hole of specific dimensions or follow a specific line of cut is almost impossible, without a lot of practice. You are better off switching to a jigsaw for these cuts, once you make the plunge cut with the reciprocating saw.
Circular Saw
The circular saw really isn’t designed for plunge cutting and in fact, it is recommended against doing so, for safety reasons. But that doesn’t stop carpenters and woodworkers everywhere from using this tool as a plunge cutting tool. It is extremely useful for cutting square or rectangular holes in sheets of plywood. The only difficulty is that it is hard to see exactly where you are cutting, which makes accuracy difficult.
The big advantage in using a circular saw to plunge cut a square hole in a sheet of plywood is that it cuts extremely quickly. You can get over the inherent inaccuracy with practice, making this a useful means of cutting squared-off holes.
Oscillating Multi-tool
The oscillating multi-tool is a relative newcomer to the tool marketplace. With its wide range of blades, this tool can do many different things, including plunge cutting into plywood and other boards. While it does not allow for cutting round holes, like a drill does, it is much easier to use accurately for cutting squared-off holes that you might otherwise try to cut with a circular saw. It is also much safer to use in this manner.
Router
The router is probably the only other power tool, besides the drill, which is actually designed for cutting round holes in a board, even though that is not its primary function. But if you need a hole in a board and don’t have a drill to make it with, a router will do it without any problem. The only real issue is that the number of hole sizes you can make with a router is rather limited, as there aren’t really that many sizes of straight cutting bits.
If I needed to cut a four inch round hole in a piece of plywood, without using a drill and without cutting to the edge of the board, I would first plunge cut whatever size hole I could, inside the dimensions of the hole I want to end up with, preferably using a plunge router. Then I would switch over to a jigsaw to cut around the perimeter of the hole.
Makeshift Ways of Making Holes in Wood
We’ve discussed many different ways of making holes in wood, without a drill. Hopefully, you’ll be able to find a method amongst them which will work for any needs that you might have. But what if you can’t? Necessity, they say, is the mother of invention.
Knife
I’ve made many holes in a piece of wood, using nothing more than my pocket knife. Granted, most of the time that was whittling something; but it still counts. This is one of the reasons to always buy a carry knife which has a sharp point. I prefer a clip point blade for this, but a drop point will work as well.
The problem with making a hole in wood with a knife, besides it being slow, is that you end up making a tapered hole. If all you’re trying to do is make a hole to attach a thong to a walking stick, you’ll have a small hole in the middle of your walking stick, that become wider as you get closer to the surface. That may not work well for some other uses, although it is fine for that walking stick.
Screws
You can make small holes in plywood and boards with nothing more than a screw and a screwdriver. In the process of driving into the wood, the screw’s threads break, bend and otherwise damage the wood fibers. Running the screw in and out of the hole will increase this damage. Done enough, and that screw will make a hole in the wood, where the screw’s threads can no longer gain purchase on the wood’s fibers.
Of course, this happens a lot of times we don’t want it to. When it does, an easy repair is to push a wood matchstick into the hole and then break it off flush with the surface. When you drive the screw in again, the wood fibers from the match stick fill in the damaged wood fibers in the board, giving the screw something it can grip on, once again.
Chisel
Finally, you can make a very respectable hole through a piece of wood with a chisel. That’s what a mortice cut is and that’s done exclusively with a chisel. Chisels make it extremely easy to make squared mortice holes in wood, for tenon’s to be inserted into.
But what if you just need a small round hole? You can make fairly small round holes in wood, with a chisel, by using a smaller chisel that the hole size you are looking for, and pounding the chisel straight down into the wood, turning it as if you are trying to make a star pattern or an asterisk. Continue removing chips and working your way down until you get through the wood.
For larger holes, the chisel can be used to make a hole by cutting around the edges of the hole with the chisel, pounding it down into the wood in each location, as you work your way around the perimeter. The chisel should always be placed with the bevel inward for this, so that the edges of the hole will remain straight, perpendicular to the surface of the board.
Making Wooden Bathtubs Guide by Admin September 19, 2023 DIY Wooden bathtubs require planning, precise construction, and maintenance. However, they are an elegant and unique addition to your bathroom. Guide to Set Started Materials Needed:…