Wintertime for some means a time to sit inside by a nice roaring fire. But for others, it’s the time to get outdoors and partake of winter sports. The big team sport in wintertime is ice hockey, something that I have to confess, people in the south have no concept of.
Unlike other team sports, ice hockey can’t just be played in the middle of the street or in an empty field somewhere; you’ve got to have an ice rink. Those can be pretty expensive to rent. This makes it kind of hard to host a pickup game of ice hockey with your friends; unless you can build an ice hockey rink in your backyard.
Granted, not many people build their own ice hockey rink; but it’s not as hard as you might think. You’ve got to have the space, and it’s going to cost a bit for the lumber; but maybe you can get your friends to pitch in on that, so that you can all enjoy it together. After all, you’re donating the space.
A regulation hockey rink is 85 feet by 200 feet; a bit more than you’re probably going to be able to fit in your backyard. So let’s forget about the idea of building a regulation rink and build something smaller. You’re doing this for fun anyway and you’re probably not going to have a dozen hockey players to form the two teams anyway. We can steal something from basketball and you can play three on three, which works on a much smaller ice rink.
You’re going to need a nice flat area for your rink; but it doesn’t have to be all that flat. It’s just got to be flat enough that the water doesn’t pour out of your rink. The water will take care of leveling it the rest of the way for you.
I had originally thought it would be necessary to level the area of the rink with sand, before thinking it through. That would be true if we were making a roller-skating rink; but we’re not. We’re making an ice rink. That’s a whole other animal. Since water is self-leveling, it eliminates the need to have a level bed of sand to work with.
However, it might be a good idea to mow the lawn, so that you don’t have high grass getting in the way and then go over the area to remove any rocks or other debris. Rocks could put a hole in the tarp, allowing the water to leak out.
You will have to have a large plastic tarp to keep the water in. Obviously, the tarp needs to be waterproof, so avoid canvas and other woven tarps, opting for solid plastic instead. This tarp is going to be the limiting factor for your rink. The largest your rink can be is two feet shorter and four feet narrower than the tarp. So, a 30’ x 50’ tarp can make a 26’ x 48’ skating rink.
Pressure Treated Wood
When building wood projects for the outdoors, it’s often advantageous to use pressure treated wood. This wood has been immersed in a vat of rosin, and had rosin injected into its core. The rosin prevents water from getting into the wood, as well as killing wood-eating bacteria; thereby protecting the wood from rotting.
But it goes farther than that. The treatment of the wood also keeps water from seeping into the wood and freezing, causing cracking of the wood. That process alone could destroy anything built out of normal construction-grade wood within a couple of years.
It is not necessary to paint anything made of pressure treated wood or renew the protective rosin. It can be painted, but must be left sitting in the outdoors for at least six months, to allow the rosin to dry thoroughly, before painting. Failure to give the wood this time to dry will result in the paint flaking off.
Laying out Your Rink
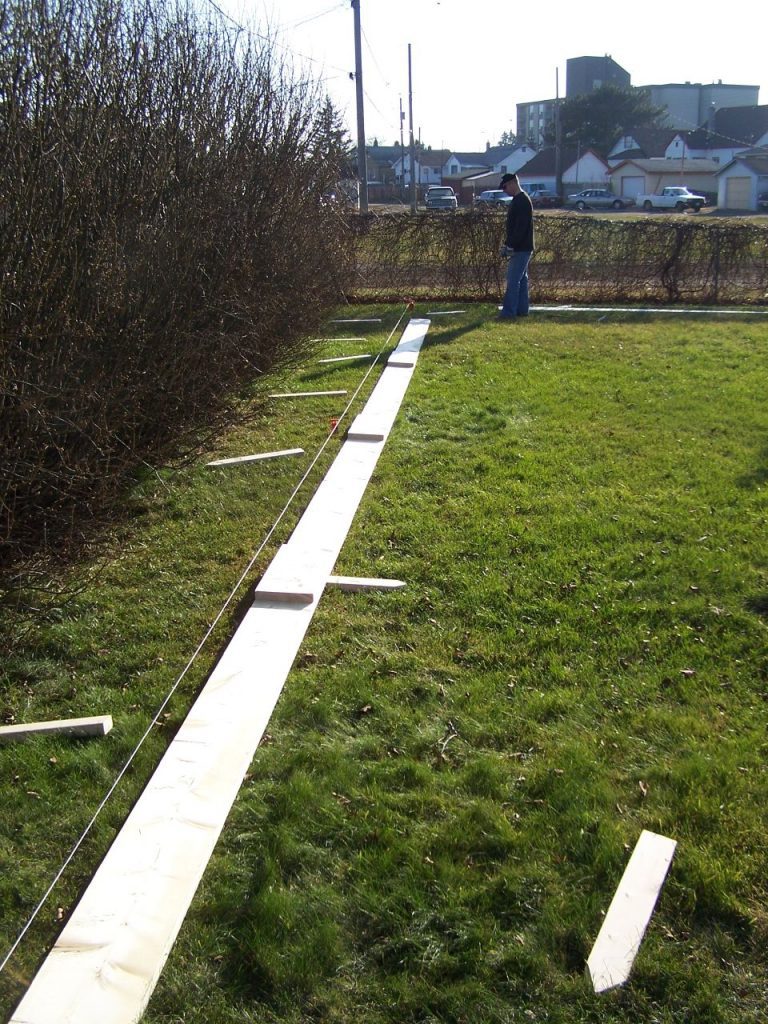
The first thing in building the rink is to lay out the corners and put in the corner posts. For the 26’ x 48’ rink we’re talking about, that means measuring a rectangle that size, then measuring across opposite corners, to verify that you’ve laid it out correctly. If the corners are square, the two diagonal measurements should be equal. If they are not, then your layout is out of square.
Put a 4”x 4” post in each of these corners. You don’t need to dig holes and set the corner posts into cement, unless you want to. Rather, you can use the same sort of spiked post holders that are used for building a deck. Drive them in and attach 4’ long pieces of 4”x 4”, ensuring that they are plumb. This is important, as those corner posts create the baseline that everything else is laid out by. You can sight across the corner posts, from one corner to the adjacent corners, to see if everything is plumb.
With the corner posts in place, run a string on the inside, making it taught. The string needs to be high enough off the ground, so that it doesn’t get caught on the grass and tight enough to create a straight line that isn’t blown about by the wind.
The Sides
The sides of the rink can be much lower than the ends, as players don’t normally run into the sides. But if you’ve ever watched a hockey game, you know that the ends of the rink receive a lot of abuse from skaters running into them. So we’re going to make simple sides and much stronger ends for this rink.
You can make the sides out of either 2”x 10” or 2”x 12” lumber, whichever your lumberyard has available to you. Lower side rails can be substituted; but might be a problem later on in the season, as you add more and more water to level the ice after use.
A 48’ long rink will need four 12’ boards on each side, plus some short, 2’ long pieces to use as splices. The boards should be placed end to end, aligned exactly with the string, so that the inner side is aligned with the edge of the corner posts. Place the splices centered over the joints, on the outside of the boards. Attach them with 2-1/2” exterior deck screws.
Wood stakes are needed to hold the sides in place. Remember that these need to be strong enough to hold the weight of the water put into the rink; 2”x 2” square fence pickets should work fine. You can buy these with them pointed on the ends, making them perfect for stakes. Simply cut them in half to get two stakes out of each picket. Drive them into the ground, alongside the outer side of the side board and screw the two together with 2-1/2” deck screws.
The Ends
The ends of the rink are the part which will take all the abuse, so you’re going to want to make them strong. They’ll also need to be higher, so that when a player runs into the end, it will catch them and they won’t fall out onto the ground.
We can easily do this by cutting sheets of 3/4” thick pressure treated plywood in half (making them 4’x 4’) and building a framework around the edges and across the middle with pressure treated 2”x 4”s. With the rink being 26’ wide, we’re going to need 6 of these for each end, plus one 2’ wide panel, which can be used as a door.
Line up the panels side by side, between the corner posts on the ends and screw them together, screwing through the 2”x 4” frames. Make sure that the line they make is straight, touching the string.
This half-wall will need a lot of support, so drive a 5’ long stake made by sharpening one end of a 2”x 4” into the ground at the juncture between each pair of panels, ensuring that the stake is plumb. These stakes should go a good foot into the ground. It’s better to drive them too far, than not far enough. Screw these stakes and the frame of the panels together with 2-1/2” deck screws.
To provide added support, add 2”x 4” supports, angling from the top of each stake to the ground. Drive 2”x 2” stakes well into the ground and attach the angle supports to the stakes.
Wrapping it Up
With the frame for the rink all done and everything firmly staked to the ground, all that’s needed is to install the tarp and fill the rink with water. The tarp should wrap all the way over the sides and be stapled to the outside of the board. But make sure that there isn’t a curve in the plastic, where the sides meet the ground. If there is, the weight of the water might put too much pressure on the plastic, causing it to tear.
The tarp can be stapled to the face of the end walls, as it is not long enough to go over them. Once again, ensure that there isn’t a curve in the plastic where the end walls meet the ground. At the same time, you must make sure that the plastic tarp comes up the ends, as high as the sides. Otherwise, you might get some leakage at the ends, later on in the season, as you add more water to smooth out the ice.
With the rink’s frame and end walls finished, it’s time to add the water. Grab the garden hose and expect to wait for a long time, even with the hose bib turned on full blast. You’re going to be putting a lot of water in there, something like 1500 gallons; that’s going to take something like a full day; but don’t just leave it and come back tomorrow, it might surprise you.
Fortunately, you don’t need to fill the rink all the way to the top of the side boards. In fact, you don’t want to. Rather, you want to fill it up so that you have at least two inches of water across the entire area. Put your waders on, go out there and check in several places, so you can find the high spot. Then you can just measure there.
It’s going to take a couple of really cold nights to get your rink good and frozen. But once it is, you’re ready to go have some fun.
The reason why we made the sides so high, but only put 2” of water in the rink, is that skating chops up the ice a lot, making a really rough surface for skating on. So you’ll want to add more water every once in a while, allowing it to freeze, so that you have a smooth surface again. But you can only do this so many times, before you reach the point where you run out of usable depth. Not a problem as spring should be around by then.
One Last Thought
You’ve probably noticed that I’ve recommended building with deck screws, rather than nails. There’s a reason for that. It’s so you drain the water and take it all apart when spring comes. Then you can set it aside, having your lawn back for summer sports, until next winter. Being made of pressure treated wood, your rink should last for many years.
Related Posts:
How to Make Cornhole Boards by Admin March 25, 2025 DIY I’ve built a few cornhole boards over the years — mostly for family barbecues and neighborhood game nights. It’s one of those backyard projects that’s…
Rhino Lining Plywood: A DIY Way to Make Plywood Last by Admin January 25, 2026 Grades I didn’t start using Rhino lining plywood because I wanted something extreme or clever. I ended up there because I got tired of replacing plywood…


")


")
