Most basement remodels start the same way: run a hand across the concrete, decide it feels dry, and start framing the next weekend.
Then, a year or two later, the bottom edge of a wall goes soft. Paint bubbles. That faint musty smell shows up and never quite leaves.
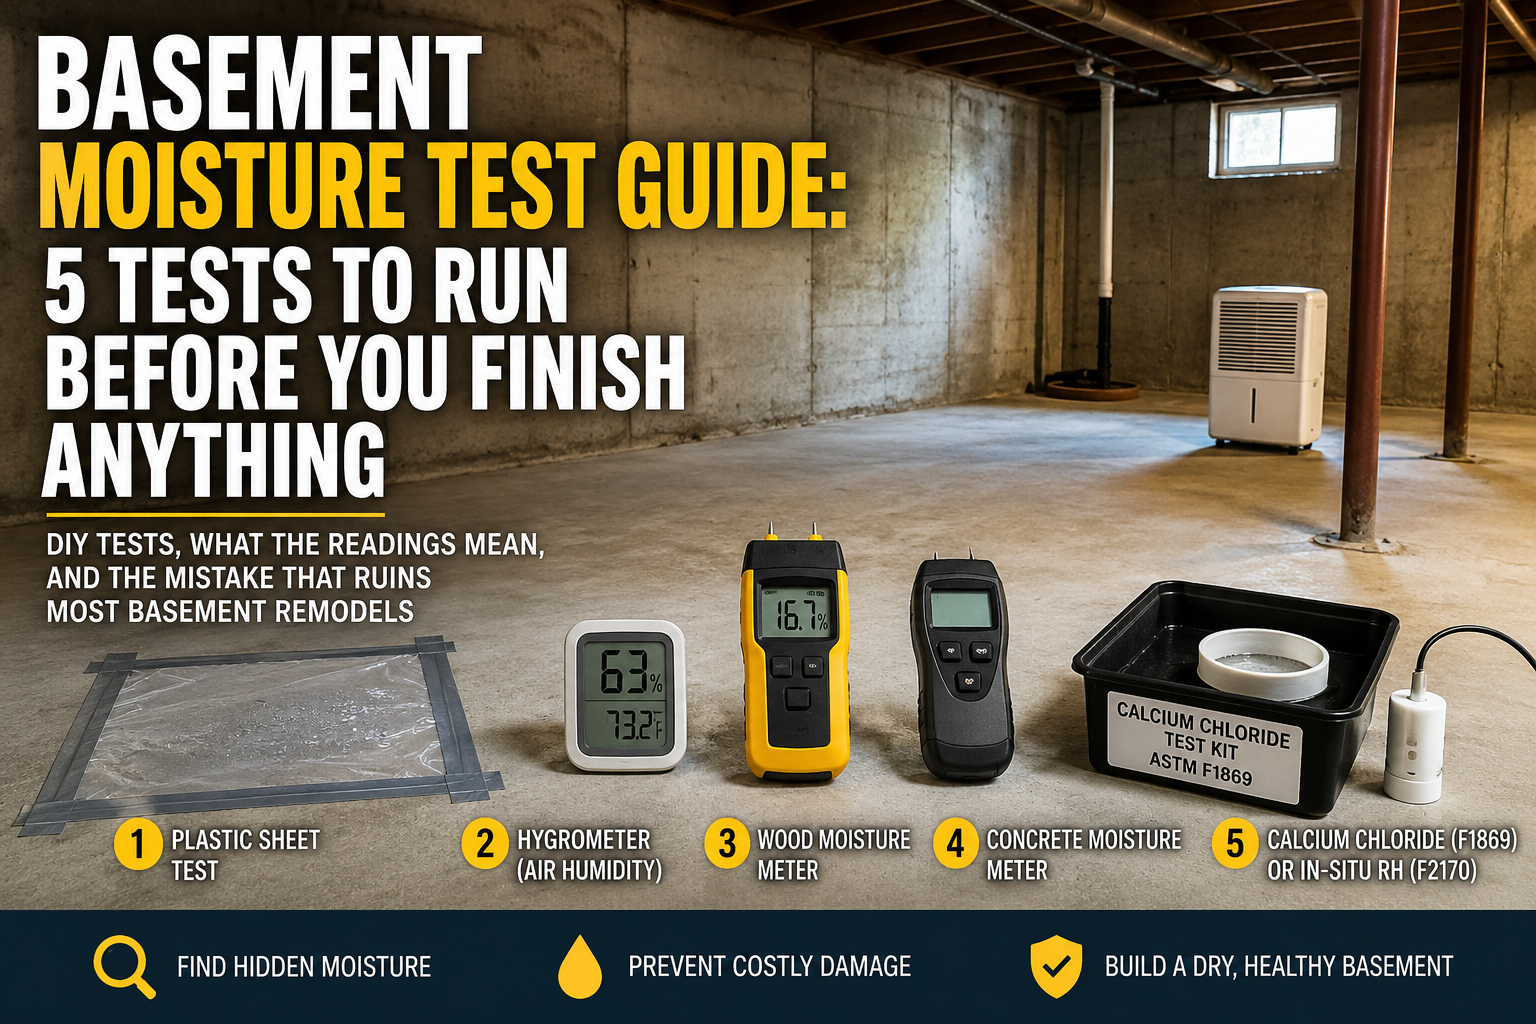
😬 The part that stings: a piece of plastic sheeting and painter’s tape catches the problem in 24–48 hours. Total cost, about six dollars.
Concrete that was never visibly wet can still move moisture into everything attached to it — slowly, invisibly, for years. That’s the failure mode behind most ruined basement finishes, and it’s completely detectable before the first stud goes up.
This guide covers every moisture test worth running before touching a basement — in the order to run them, what the readings mean, and the point where you stop DIYing and bring in a pro.
⚡ Quick Answer: How to Test a Basement for Moisture
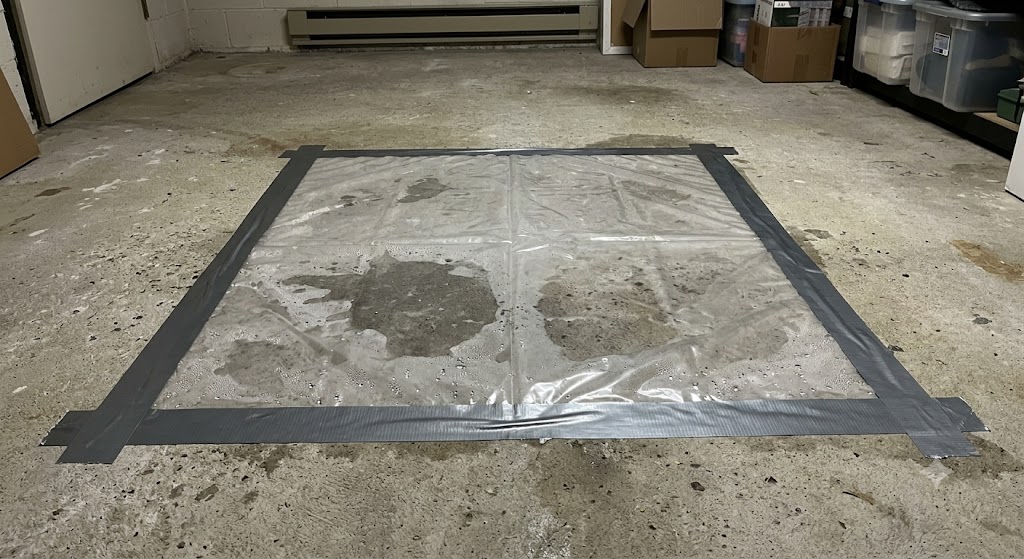
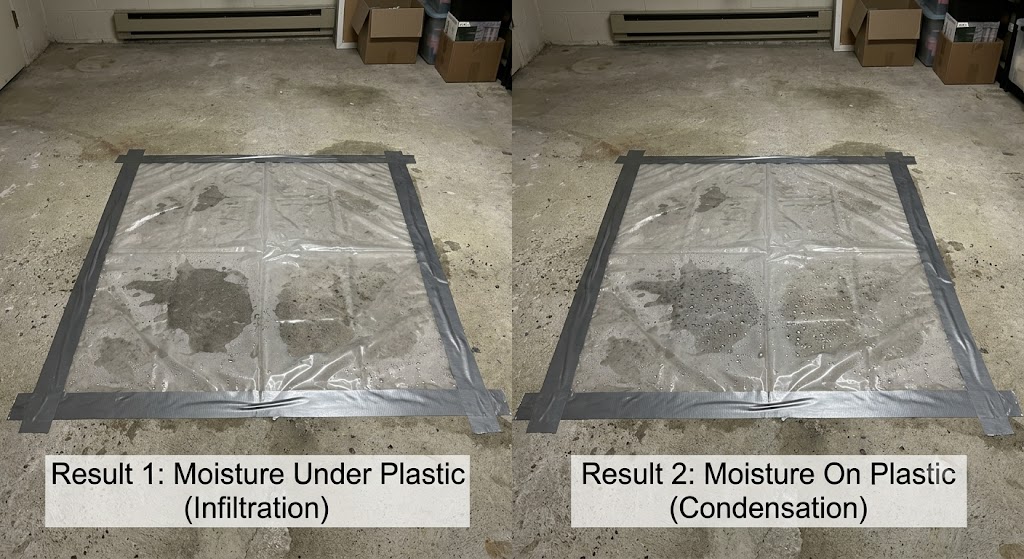
Tape a 2-foot square of plastic sheeting to the concrete floor and wall, seal all four edges, and check it after 24–48 hours. Moisture beneath the plastic suggests moisture is moving through the concrete. Moisture on the room-facing surface suggests condensation from humid air. Treat this as a directional screening test — it points you at the right problem, but it doesn’t quantify anything. Confirm important flooring decisions with the testing your flooring manufacturer requires.
Then check the air with a hygrometer and check any installed wood with a moisture meter. Details for each test below.
Quick Comparison: Basement Moisture Tests
Test or Tool
What It Detects
Cost
Time
Role
Plastic sheet test
Directional: seepage vs. condensation
Under $10
24–48 hrs
Screening
Hygrometer
Air humidity (RH%)
$10–25
Instant
Monitoring
Wood moisture meter
Moisture content in wood, framing, and some wood-based panels
$25–70
Instant
Quantitative (wood only)
Concrete moisture meter
Comparative surface moisture patterns in concrete
$50–200
Instant
Comparative / preliminary
Calcium chloride test (ASTM F1869)
Quantified surface moisture-vapor emission (MVER)
$15–25 per kit
60–72 hrs
Quantitative
In-situ RH test (ASTM F2170)
Relative humidity inside the concrete slab
Kit or pro service
~24 hrs after probe install
Quantitative
🧪 The plastic sheet test and a hygrometer catch most problems for general basement use. If moisture-sensitive flooring is going over the slab, the quantitative tests — calcium chloride or in-situ RH — are the ones flooring specifications are written around.
💧 Why “It Looks Dry” Means Nothing in a Basement
Concrete is not waterproof. It’s a hard sponge.
Ground moisture moves through a slab and foundation walls through capillary action and vapor diffusion. You can’t see it and usually can’t feel it. The concrete pulls moisture from below and releases it into the room air — or into whatever you’ve fastened against it.
That’s why so many basements pass the touch test and still destroy flooring, framing, and wall panels within a couple of years. If you’ve ever wondered why drywall fails so often in basements, this is the mechanism. The material didn’t fail. The moisture test that never happened failed.
⚠️ Warning: Run these tests during or shortly after a rainy stretch if possible, and ideally in more than one season. A basement tested during a dry week in August will lie to you.
👀 Preliminary Audit: The Free 10-Minute Walkthrough
Before any tool comes out, walk the basement with a flashlight and look for:
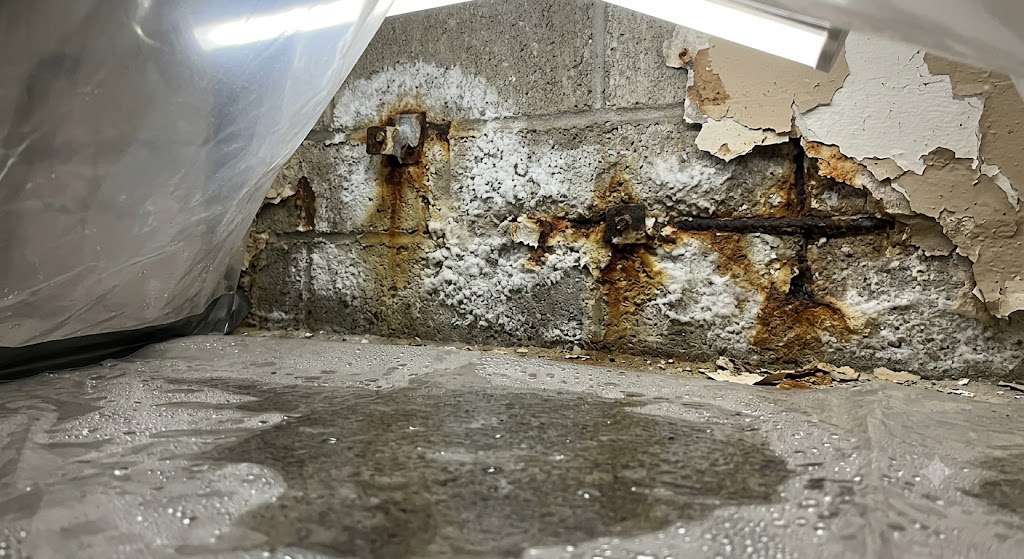
Efflorescence — white, chalky, crystal-looking deposits on concrete. This is minerals left behind by water that moved through the wall and evaporated. It’s not mold, but it’s a confession: water has been coming through here.
Tide lines or staining at the base of walls — evidence of past standing water.
Rust on furnace feet, appliance legs, nail heads, or the bottom of steel posts.
Peeling or bubbling paint on masonry — vapor pressure pushing from behind.
Musty smell that’s stronger near one wall or corner — moisture is rarely uniform; the nose finds the source.
Condensation on cold water pipes and ducts — an air humidity flag.
The sump pit — if it’s uncovered, it’s also a humidity source in its own right. An open pit lets moisture (and radon) migrate straight into the room air, which is why a sealed sump pump cover is one of the cheapest humidity fixes in the whole basement.
None of these is a measurement. All of them tell you where to run the tests below.
🧪 Test 1: The Plastic Sheet Test (Start Here)
This is the classic screening test — a simplified homeowner version of the plastic-sheet method described in ASTM D4263. It answers the first question: does moisture appear to be coming through the concrete, or condensing out of the air?
What you need
Clear plastic sheeting (a 2×2 ft piece — clear beats foil because you can see droplets without lifting it)
Duct tape or painter’s tape that actually seals
Steps
Pick at least 2–3 test spots: the floor near an exterior wall, a below-grade wall section, and anywhere flagged in your preliminary audit.
Tape the plastic down and seal all four edges completely. One open edge invalidates the test.
Wait 24–48 hours. Longer is better.
Check both sides.
Reading the results
Droplets or darkening UNDER the plastic (concrete side): Moisture appears to be migrating through the slab or wall from the ground. Sealers, drainage, and vapor barriers are the conversation now — not paint.
Droplets ON TOP of the plastic (room side): Humid basement air is condensing on the cool concrete. This points toward an air problem — dehumidification, insulation, and ventilation territory.
Both: Common, unfortunately. Address the vapor side first, then the air side.
⚠️ Know the limits of this test. It indicates the presence of moisture and its likely direction — nothing more. It doesn’t quantify moisture, and a dry result doesn’t rule out seasonal seepage, groundwater pressure after heavy rain, or a problem six feet away. Use it to decide what to investigate next, not to approve a flooring installation.
❌ Mistake to avoid: Running this test on one spot and calling it done. Slabs are not uniform. A bone-dry test square can sit six feet from one that looks like a terrarium.
🌡️ Test 2: Hygrometer (The $15 Tool That Should Live in Your Basement Permanently)
A hygrometer measures relative humidity in the air. It’s the cheapest ongoing insurance you can buy for a basement.
50–60% RH: Yellow zone. Musty odors and surface mildew become more likely.
Above 60% RH: Moisture and mold risk increases, particularly when surfaces stay damp or condensation is present.
There’s no exact percentage where mold flips on like a switch — what matters is sustained humidity and damp surfaces. But basements run naturally more humid than the rest of the house because they’re surrounded by cool soil, so an upstairs thermostat reading tells you nothing about conditions downstairs. Put a hygrometer in the basement itself and check it across seasons — a 15–20 point gap between floors is common in summer.
Summer readings are the ones that surprise people: warm humid air entering a cool basement dumps its moisture on every cold surface it touches. That condensation ring at the base of the walls often gets blamed on the foundation when it’s actually the July air.
📟 Test 3: Wood Moisture Meter (For Framing and Anything Already Installed)
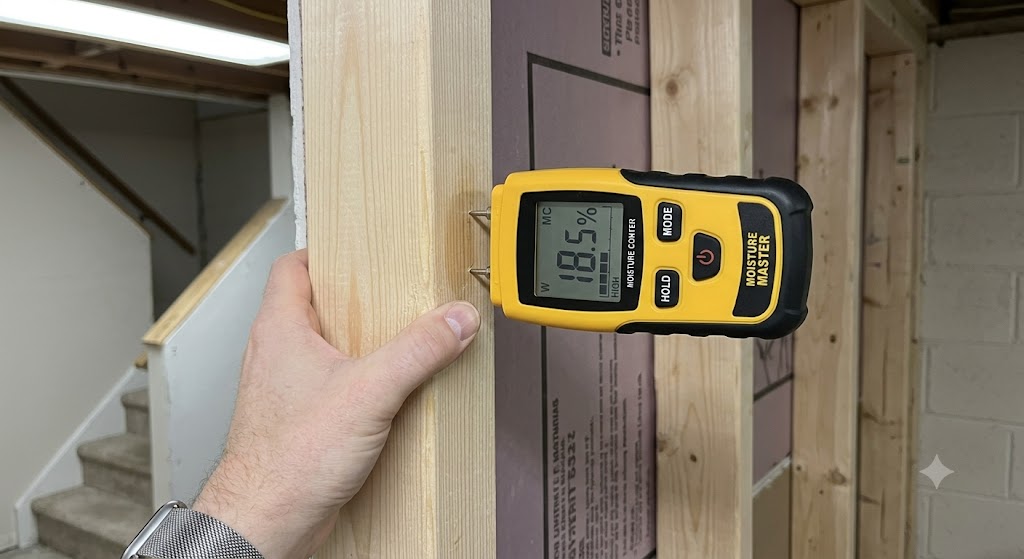
If the basement has existing framing, subfloor, stairs, or stored lumber, a wood moisture meter tells you whether that material is already compromised.
Pin vs. pinless
Pin meters push two probes into the material and measure between them. Most accurate for wood, leaves two tiny holes.
Pinless meters scan through the surface with a sensor pad. No holes, faster over large areas, slightly less precise.
For basement checks, pinless is the faster first pass — scan wide, then confirm suspicious spots with pins.
Readings for wood
6–12% moisture content: Normal for indoor wood. Safe.
13–16%: Elevated. Find out why before covering anything.
17–19%: Trouble. Wood at this level is actively absorbing from somewhere.
20%+: High-risk range. Sustained moisture around or above this level can support fungal decay when temperature, oxygen, and other conditions are favorable — this is how wood rot gets started. Find and correct the moisture source, then inspect the wood for softness, staining, fungal growth, and loss of strength.
💸 Cost difference that matters: a $35 moisture meter versus a rim joist repair. A sustained reading above 20% calls for finding the source and inspecting concealed areas as needed. Wet wood is not automatically ruined, but damaged or structurally weakened material may require replacement. The full breakdown of what’s salvageable is in the guide to saving rotten plywood, and wet lumber that hasn’t rotted yet can often be dried and kept — covered in what to do when plywood gets wet.
⚠️ A wood meter is not a concrete test
Some meters have a “concrete mode,” and dedicated non-destructive concrete meters exist. These are useful for one thing: comparing areas — sweeping a slab to find which sections read wetter so you know where to place quantitative tests. They are a preliminary, comparative tool. Do not use any handheld meter reading as the basis for approving moisture-sensitive flooring over a slab. That decision belongs to the two quantitative tests below.
🧪 Test 4: Calcium Chloride Test (ASTM F1869)
The calcium chloride test — ASTM F1869 — is a quantitative, DIY-friendly slab test that’s been used in the flooring trade for decades.
A small dish of anhydrous calcium chloride is weighed, sealed under a plastic dome on clean, bare concrete, and left for 60–72 hours. The salt absorbs whatever moisture comes off the slab surface. Weigh it again, run the math on the kit’s worksheet, and you get the moisture vapor emission rate (MVER) in pounds per 1,000 square feet per 24 hours.
What counts as a passing number?
There is no universal passing number. Acceptable MVER depends on the flooring, adhesive, underlayment, moisture-control system, and the manufacturer’s warranty terms — current flooring products carry written limits ranging from roughly 5 to 25 pounds per 1,000 square feet per 24 hours, while some older specs reference lower figures. Compare your result with the written limits for the exact flooring, adhesive, underlayment, and moisture-control system you plan to install. If any component has a lower limit, that lower limit controls the installation.
If you’re planning to put plywood or any flooring over that concrete slab, pull the spec sheets for every layer of the system before you test, so you know what number you’re testing against.
How many kits?
A single kit may provide a rough spot check, but an ASTM-style test layout uses three test locations for the first 1,000 square feet and one additional location for every additional 1,000 square feet.
❌ Mistakes to avoid:
Testing a slab that isn’t at normal room conditions. The standard calls for testing at typical service conditions (or roughly 65–75°F and 40–60% RH held for 48 hours before and during the test). A reading taken with windows open or a heater blasting is only a reference number.
Testing over sealers, coatings, paint, or old adhesive — the test requires clean, bare concrete, which usually means grinding the test spot first.
Using this test on lightweight or gypsum concrete — F1869 specifically excludes them. Use in-situ RH testing instead.
🧪 Test 5: In-Situ Relative Humidity Test (ASTM F2170)
This is the second quantitative method — and the one many flooring and adhesive manufacturers now prefer, because it measures moisture inside the slab rather than just what’s evaporating off the surface.
Under ASTM F2170, holes are drilled to 40% of the slab’s depth, sleeved probes are installed, and after the probes equilibrate, they report the internal relative humidity of the concrete. Because slabs dry from the top down, the internal reading predicts what the surface will look like after it’s sealed under flooring — which is exactly when surface tests stop telling the truth.
What you should know as a homeowner
Reusable probe kits are available to buy or rent, and flooring inspectors offer this as a service.
There is no universal passing RH percentage under ASTM F2170. Acceptable internal RH depends on the flooring, adhesive, coating, underlayment, and moisture-control system. Compare the result with the written specification for every component; the lowest applicable limit controls.
F1869 and F2170 measure different things (surface emission vs. internal humidity) and are not interchangeable. If a flooring warranty names one of them, use that one.
For a basement getting moisture-sensitive flooring over the slab, this is the test worth paying for. For epoxy coatings and other moisture-sensitive floor systems, follow the manufacturer’s specified test method and limit — do not assume that a plastic-sheet or calcium-chloride test alone satisfies the product warranty. For wall-only projects, test the wall and surrounding conditions rather than relying only on slab results.
🛠️ The Test Kit: What to Actually Buy
A basic screening setup — plastic sheeting, tape, and a hygrometer — can cost less than $40. Adding a wood moisture meter and multiple quantitative slab tests may bring the total above $100, but that is still minor compared with replacing failed flooring or basement finishes. In order of importance:
And if the tests come back ugly, the first-response tool for the air side is a properly sized dehumidifier with a drain hose so you’re not emptying a bucket twice a day. Check the price on Amazon
📋 What to Do With Your Results
Scenario 1: Plastic test dry, RH under 50%
Good sign — but retest after the next major rain and in a different season before treating it as settled. If you’re choosing wall materials anyway, moisture-tolerant options are still the smarter default in a basement — the full breakdown is in the guide to finishing basement walls without drywall.
Scenario 2: Moisture on TOP of the plastic (condensation)
Air problem. In rough order of impact: run a dehumidifier sized for the space, insulate cold water pipes, seal the sump pit, make sure the dryer vents outside, and add air circulation. Retest RH after two weeks of dehumidifier runtime.
Scenario 3: Moisture UNDER the plastic (seepage/vapor)
Ground problem. Start outside — most seepage traces back to grading that slopes toward the house, clogged gutters, or downspouts dumping at the foundation. Then seal visible cracks and consider a masonry waterproofing coating. Any wood that contacts that concrete afterward should be rated for it — this is where pressure-treated material and genuinely water-resistant plywood grades earn their price difference.
Scenario 4: Quantitative results above your flooring system’s written limit, or water actively entering
⚠️ This is past DIY sealer territory. An MVER or internal RH reading above the limits for your planned flooring system — or active water entry — usually means moisture mitigation or drainage work: a slab moisture-control system, interior drain tile, a sump system, or exterior waterproofing. Get a waterproofing contractor’s assessment before spending a dollar on finishes. Finishing over this problem doesn’t hide it; it just gives the moisture something expensive to destroy.
❌ The 5 Mistakes That Ruin Basement Moisture Tests
❌ Testing once, in dry weather. Moisture is seasonal. Test after rain, and ideally once in summer and once in late winter.
❌ Testing one spot. Slabs and walls vary wildly within a few feet. Follow the quantitative test layout: three locations for the first 1,000 sq ft.
❌ Trusting your hands — or a handheld meter — for flooring decisions. Concrete can emit significant water vapor and feel completely dry, and comparative meters aren’t the basis for approving moisture-sensitive flooring. Quantitative acceptance uses F1869 or F2170 against your product’s written limits.
❌ Fixing the wrong side. Buying a dehumidifier for a seepage problem — or sealer for a condensation problem — treats the symptom you didn’t have.
❌ Skipping the retest. Every fix gets verified with the same test that found the problem. No retest, no proof.
❓ Basement Moisture Test — FAQ
What is the easiest way to test a basement for moisture?
Tape a 2-foot square of plastic sheeting to the concrete floor or wall, seal all edges, and check after 24–48 hours. Moisture beneath the plastic suggests moisture moving through the concrete; moisture on the room-facing side suggests condensation from humid air. It’s a directional screening test that costs under $10 — useful for pointing at the right problem, but not a substitute for the quantitative testing flooring manufacturers require.
What humidity level should a basement be?
The EPA recommends keeping indoor humidity below 60%, ideally between 30% and 50%. Above 60%, moisture and mold risk increases, particularly when surfaces stay damp or condensation is present. Basements run naturally more humid than upper floors, so measure in the basement itself — not from an upstairs thermostat.
How do I know if moisture is coming from the ground or the air?
Run the plastic sheet test. Condensation forming on the concrete side of the plastic suggests ground moisture moving through the slab or wall. Condensation on the room side suggests humid air hitting cool concrete. The fixes are different, which is why this screening test comes first — then confirm with quantitative testing if flooring is going down.
What moisture reading is acceptable for wood in a basement?
Indoor wood should read 6–12% moisture content. Readings of 13–16% are elevated and worth investigating. Sustained readings around or above 20% put the wood in a high-risk range where fungal decay can develop — find the moisture source, then inspect the wood for softness, staining, fungal growth, and loss of strength.
Can I use a moisture meter to test a concrete slab for flooring?
Only as a preliminary step. Non-destructive concrete meters are useful for comparing areas and finding the wettest sections of a slab, but they are not a quantitative acceptance test. Approving moisture-sensitive flooring should be based on ASTM F1869 (calcium chloride) or ASTM F2170 (in-situ relative humidity) results compared against the flooring manufacturer’s written limits.
What is a passing calcium chloride test result?
There is no universal passing number. The test reports the slab’s moisture vapor emission rate in pounds per 1,000 square feet per 24 hours, and acceptable limits depend on the specific flooring, adhesive, underlayment, and moisture-control system — with current products specifying limits from roughly 5 to 25 pounds. Compare your result to the written limit for every component in your flooring system; the lowest limit controls.
What is the difference between ASTM F1869 and ASTM F2170?
ASTM F1869 (calcium chloride) measures moisture vapor emitted from the slab’s surface. ASTM F2170 (in-situ relative humidity) measures humidity inside the slab using probes drilled to 40% of its depth, which better predicts how the slab will behave after it’s covered. They measure different things and aren’t interchangeable — use whichever one your flooring manufacturer’s specification names.
The white chalky deposit itself is harmless mineral residue and brushes off. What it proves is the problem: water has been moving through that wall and evaporating on the inside face. Treat efflorescence as a marker for where to run your moisture tests.
How long should I wait after fixing a moisture problem before finishing the basement?
Rerun the same tests that identified the problem and wait for passing results through at least one heavy-rain event. For slab treatments before flooring, retest with the quantitative method your flooring spec names and confirm the reading meets the manufacturer’s written limit.
🧠 Final Take
The pattern behind expensive basement failures — soft walls, cupped floors, that smell that never leaves — is almost always the same: the space got finished before it got tested.
The basic plastic-sheet and humidity tests cost less than many individual building materials and can prevent a far more expensive failure — and the whole battery takes a weekend, most of which is waiting. Run the plastic test, put a hygrometer on the wall, meter any wood that’s already down there — and if flooring is going over the slab, spend the extra money on the quantitative test your flooring spec actually names.
The basement will tell you the truth. You just have to ask before you build.