The balance bike has been developed as a replacement for putting training wheels on a bike. While there are those who speak against them, one of the strongest points in their favor is that small children naturally try to use their bike without pedaling it, while learning. Allowing them to follow that natural tendency to push the bike with their feet on the ground, while building up the balance necessary for riding a bike, just makes sense.
Basically, the balance bike is a bicycle without the pedals, chain and gears. There are no brakes or other running gear either. Commercially manufactured balance bikes tend to be made a bit closer to the ground than bicycles, as the need for height to allow a full sweep for the pedals isn’t necessary. But considering that seat height is usually adjustable, that’s not really a big deal.
While balance bikes are mostly made for children, there are some companies that make balance bikes which will work for all ages. This allows adults who didn’t learn how to ride a bike as a kid to learn as an adult, following the same natural method that a child would use. After all, riding a bicycle is more about balance than anything else.
Since a balance bike is so similar to a regular bicycle, it’s possible to convert a bicycle to a balance bike. All that’s required is to remove the pedals and arm, along with the chain. The only problem might be in reinstalling the pedal arm, if so desired in the future, as the bearings will have to be cleaned thoroughly and re-greased. Any dirt or grit that would get into the bearings at that time would tend to cause undue wear and might even jam up the bike’s drivetrain.
Commercial balance bikes are often made with a metal frame, just like bicycles are. But there are also a few wood models available on the market for roughly the same price as the metal ones. By and large, the difference in price between a bicycle and a balance bike of the same size are minimal.
DIY Wood Balance Bike
On the other hand, it is possible to make a balanced bike out of wood, specifically out of quality plywood, such as Baltic birch or Applewood. Other plywood varieties can be used, but the advantage that Baltic birch or Applewood will have is their high number of plies and lack of voids. While even low-grade construction plywood would work, the void-free plywood will look better.
A bike’s frame is really not all that complicated and simple hardware allows us to provide steering. Considering that all the “mechanics” of the bike are removed, other than steering and wheels, the bike itself has very few parts. Before starting on the balance bike build, be sure to buy or make the wheels, as they will affect the size of the bike’s frame.
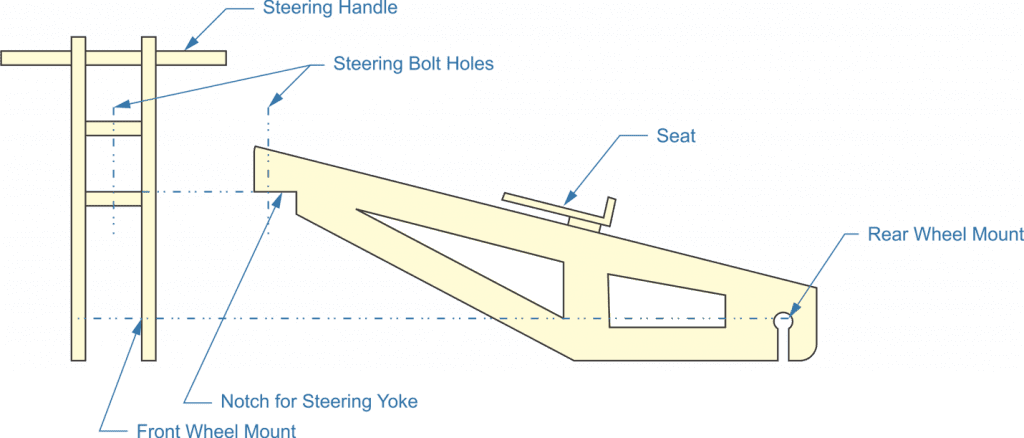
The one thing that has to be done in making any sort of balanced bike is to use a double frame, making it so that the wheels are trapped between the two sides of the frame. This means making the main body of the frame angle out towards the back wheel and come together at the front, where it is set into the front steering yoke. A small wedge of wood will need to be fitted between the two side pieces for the bike, where they come together at the steering yoke. That will then be drilled through for the steering pivot bolt.
The front yoke consists of four pieces, making an “H” with a double crossbar. It is a good idea to round the ends of the verticals for safety, eliminating sharp corner. Drill a hole through the two verticals at the top and glue in a ¾” to 1” diameter piece of dowel rod to function as a steering handle. Again, the ends of this should be rounded to avoid sharp corners.
Rough bike pattern
I have shown a slot leading to the hole for the rear wheel mount. This is essential to allow mounting of the wheel. With the frame built, it would be impossible to insert the wheel into the frame, without this slot. It is not shown cut into the steering fork, for the front wheel, because the drawing is showing the steering fork from the front side. But the same sort of slot is needed there as well.
The bike frame and steering yoke can then be connected together by one bolt, the steering bolt, providing the ability for the front fork to turn and allowing steering of the bike. Other than the wedge where the two side pieces come together at the steering bolt, the only other cross-member needed is about halfway back the body, where the vertical section has been left between the two cutouts. A block between the two sides, at this point, will serve to keep the back of the frame spaced apart, allowing space for the rear wheel. A seat can be simply fashioned out of two pieces of scrap and attached to the top of this cross-brace.
I have not furnished dimensions for the bike, as that will depend a lot on the size and age of the child. The best thing to do is to find a bike that the child sits on comfortably and take the dimensions off of it. The critical dimensions needed are:
Seat to ground
Seat to handlebar (horizontal dimension)
Handlebar to ground
Other than that, the only other critical dimension is the size of the wheels and the width of the wheel hub. The spacing between the two vertical elements of the steering yoke, as well as the spacing between the frame sides in back need to match the length of the hub.
Be sure to round over all edges and sand everything smooth, so as to keep the child using the bike from getting splinters off of it. The finished bike should be either painted or varnished to seal the wood and protect it from moisture.
Although tricycles are typically considerably cheaper to buy than bicycles are, making a wood tricycle is slightly more complex than our wooden balance bike. The main difference is that the rear of the frame needs to be attached to an upside-down “U” shaped piece to hold the axle, rather than the hole and notch that is in the balance bike. Please note that the rear wheel mount needs to be wide enough to provide stability. The tricycle frame is notched out on the bottom side at the rear to admit the mount, which consists of a 1”x 4” horizontal member, with two rounded mounts for the axle to go through. Other than that though, the design can remain the same.
Making a Wooden Spoke Wheel
If we want to make wooden wheels for the balance bike, things get much more interesting. Wooden wheels can be challenging to make, so much so that in the times of horse-drawn carriages, those wheels were made by specialists, referred to as “wheelwrights.” Someone who does this all the time would probably have a jig for fitting the wheel together, but we’ll have to do without that. Nevertheless, it’s possible for the average DIY’er to make wood wheels in their workshop. It just takes a bit of time.
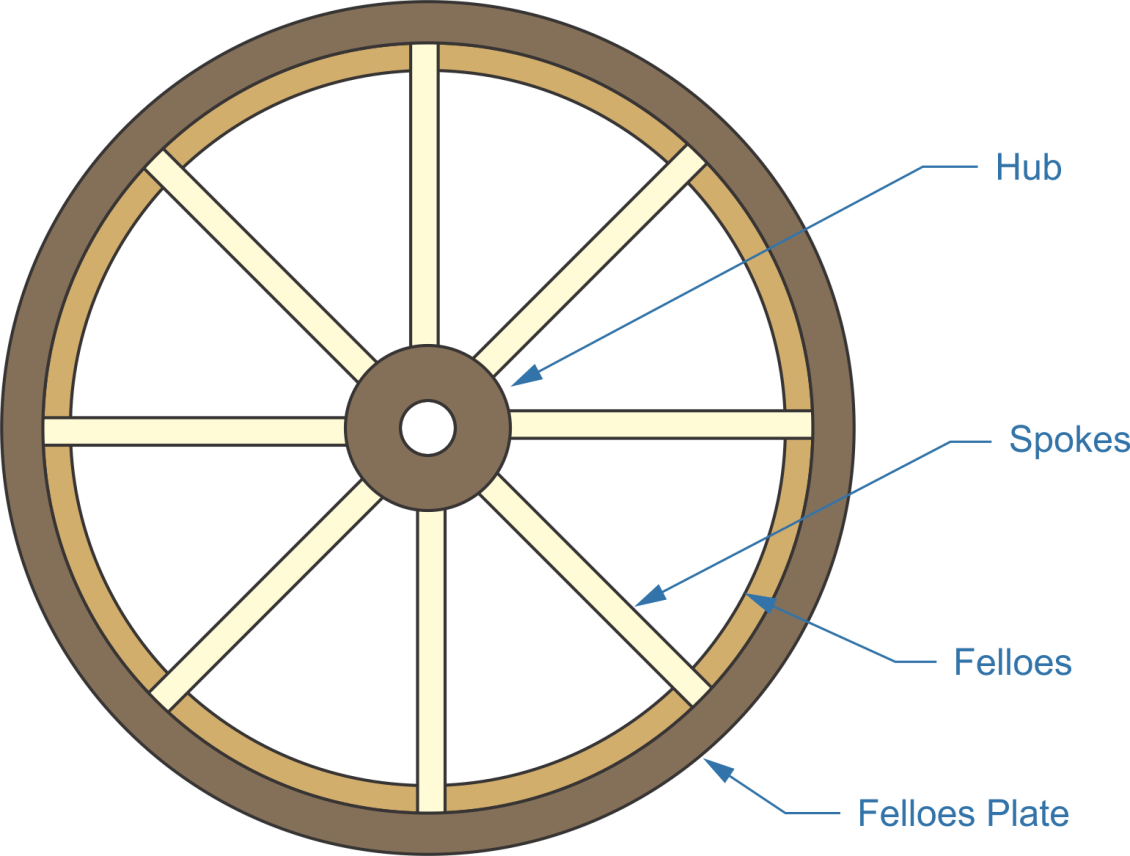
The drawing below shows the basic parts of the wheel. A full sized drawing will be needed, whether that is made on the computer and printed out or drawn on butcher paper.
Wooden wheel
One of the first decisions that has to be made is what sort of tire is going to be used on the wheel. Back in the day of horse-drawn wagons, the tire was a band of metal, welded together by a blacksmith and then shrunk onto the wood wheel. It not only served to be the part of the assembly that wore from contact with the ground, but also served to hold the wheel together.
Today we use rubber tires, but those are mounted to a metal wheel. A strip of rubber can be wound around the wood wheel and stapled in place, but that will not do much to hold the wheel together. Therefore, we’re going to have to make the wheel in such a way that it holds itself together.
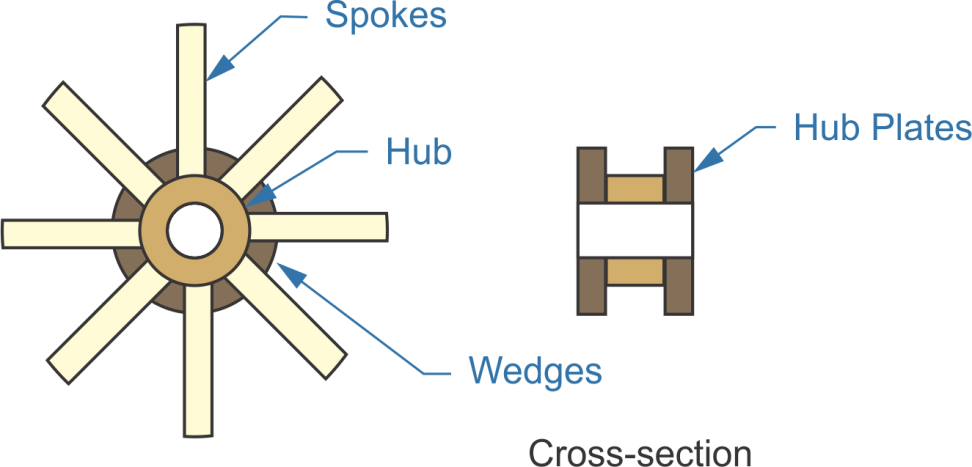
The wheel starts with a hub, which consists of a round piece of wood or metal, with a hole through the center. It’s a good idea to drill that hole so that a piece of metal pipe will fit snugly in it, as the metal won’t wear as quickly as wood will.
The spokes can either be round, square or a combination of the two, depending on the wheelwright’s preference. This is where wheelwrights of old could show off their skills, turning elaborate spokes for fancy carriages. As these wheels are rather small, square cross-sectioned rods will work. Those will be easier to work with than round spokes. The spokes need to be cut so that they will fit snugly between the hub and the rim of the wheel (the outer edge of the felloes plate in the diagram above). To accomplish this exactly, it is probably best to start out with the spokes a touch long and trim them to fit.
The spokeshave was originally developed for the purpose of shaping the spokes used in making of wood wheels. Factory-made dowel rods were not readily available, so the wheelwright would make the spokes out of cut pieces of wood, with a square cross-section. The hub end of these spokes would stay square, even if the spokes were round or turned on the lathe. The rim end of the spokes might also be square, although it could be round and set into hole in the felloes.
Attach the back hub plate to the hub and set them on the drawing. Then set the spokes in place, snug up against the hub. Finally, add the other hub plate, attaching it to the hub as well. The space between the spokes needs to be filled in with wood wedges, holding the hub end in place.
Wooden wheel hub
Then cut the felloes to fit between the spokes, using the drawing as a pattern. Note that the felloes extend under the felloes plates in the drawing above, all the way to the rim of the wheel. For consistency sake, it would be best to create a wood pattern and use a router bit with a bearing on it for this. These felloes act as spreaders between the axles, holding them apart at the appropriate angle. In this case, since the wheel has eight spokes, that means holding them at 22.5 degrees from each other.
The spokes and felloes are all held together by thin felloes plates that are attached on both sides of the wheel. There are four felloes plates per side, each covering ¼ of the wheel’s circumference. Note that I have offset the seams between them (shown in yellow in the drawing) so as to ensure that they meet up in the middle of one of the felloes, so that the two can support each other. Once again, I would recommend using a template and router to cut these out, so as to ensure that they are the same.
It is the felloes plates that actually hold the rim of the wheel together. So these parts are extremely important and need to be made of strong wood or plywood, even while they are relatively thin. When they are glued and nailed to the felloes and spokes, they will hold the wheel together.
The only thing left for the wheel is a tire. About the only way that normal bike tires could be used is if a bike wheel was cannibalized to get the metal rim from it, removing the spokes and hub. In that case, the wheel could have been made to fit inside that rim. But without that, the only way to make a rubber tire for the wheel is to use a thick rubber strap, wrapping it around the wheel’s rim and nailing or stapling it in place. Multiple layers will provide longer life.
Related Posts:
Making Wooden Bathtubs Guide by Admin September 19, 2023 DIY Wooden bathtubs require planning, precise construction, and maintenance. However, they are an elegant and unique addition to your bathroom. Guide to Set Started Materials Needed:…
How to Make a Wooden Sword by Admin July 14, 2025 DIY 1. Why I Still Make Wooden Swords I wasn’t planning to make a wooden sword that day. I just needed something—anything—for my kid’s last-minute costume.…
How to Make Wooden Gears by Admin April 2, 2025 DIY Building Wooden Gears — My No-Nonsense Notes from the Garage If you've ever thought about building wooden gears for a clock, a jig, or just…