Wood File Organizer Designs In 1978, a company named Micronet, Inc. promised us what they were calling the “paperless office.” Since then, that catchphrase has been taken up by many others, promoting its imminent arrival. Yet after over 40 years, our offices are still filled with paper. In fact, according to one study by Microsoft, the use of e-mail in an office increases the amount of computer printing by 40%. So much for the paperless office.
But what do we do with all this paper? In many cases, paper piles up on our desks. Eventually we find time to sort through it, throwing much of it away. The rest ends up in a file somewhere, because it’s just too important to get rid of.
But here’s the sad thing; we often need that paper for something, during the time it is sitting in the pile on our desks. We dig through, trying to find it; but then when we can’t, we just print another one. So, rather than making our offices paperless, the computer has actually increased the amount of paper that we use. If we could only have a way of temporarily organizing those papers, until the time when we finally file them away, we’d be much more likely to be able to find them when we need them. That’s where a wood file organizer comes in.
Wood file organizers are an upgrade to the metal or plastic file organizers that sit in offices everywhere. While metal wire and screen organizers can be purchased for a reasonable fee, wood ones are rather expensive, as well as being hard to find. Many of the wood ones are actually MDF, rather than wood boards, so they’re not exactly what would be found on an executive’s desk. They’re more like what would be found in the mail room.
Nevertheless, making wood file organizers isn’t all that difficult, although it does require a bit of patience. Most of the time, thin hardwood plywood is used for the dividers, with slightly thickerplywood used for the ends; but the ends can also be made of edge-glued panels, making the organizer a truly nice accessory for any office.
Wood File Organizer Designs
While there are literally an unlimited number of different design possibilities, wood file organizers fall into four basic categories:
Magazine Files – Wide files for holding magazines or other similar sized items upright on a shelf. They can also be used for other things, such as dividing the area up and storing sandpaper in it.
Wall Organizers – Hanging pockets that cascade down the wall. Most often in offices to hold forms that are used frequently or for outgoing mail.
Horizontal Organizers – Stacks of narrow shelves which are great for organizing different types of paper and other office supplies. Can also be used for categories of things that it makes sense to keep together.
Vertical Organizers – Designed to hold a number of file folders in a cascading way, so that the file folder labels can be read, making it easy to grab the right one.
Granted, any of these can be used to hold any type of paper one desires. Those descriptions are merely given merely to help identify what the different types are. As mentioned, I use a magazine file for storing sandpaper and I have file folders in a horizontal organizer, to hold the papers for various different projects I’m planning on doing.
There are several different ways to do any of these designs, especially to do the joinery in them, not just the methods that I’m going to mention. The point is to end up with something that is both practical and functional, as the woodworker that is making the project defines it.
Magazine File
A magazine file is essentially a narrow box without a top. Typically, they are made out of 3/8” to 1/2” plywood, although they can be made of edge-glued pieces of the same thickness. The back of the file is typically 11” tall and the front is 4”, with the file being 9” deep to accommodate the size of the magazines. These files can be made any width desired, but they are usually 3” to 7” wide. Depending on the woodworker’s preference the top edge of the sides can either be a straight angle between back and front or curved.
Magazine file
What looks to be the easiest way to construct the file is to butt the corner joints together; but if that is done, chances are pretty high that the corners will not line up neatly and the finished project will not look all that good.
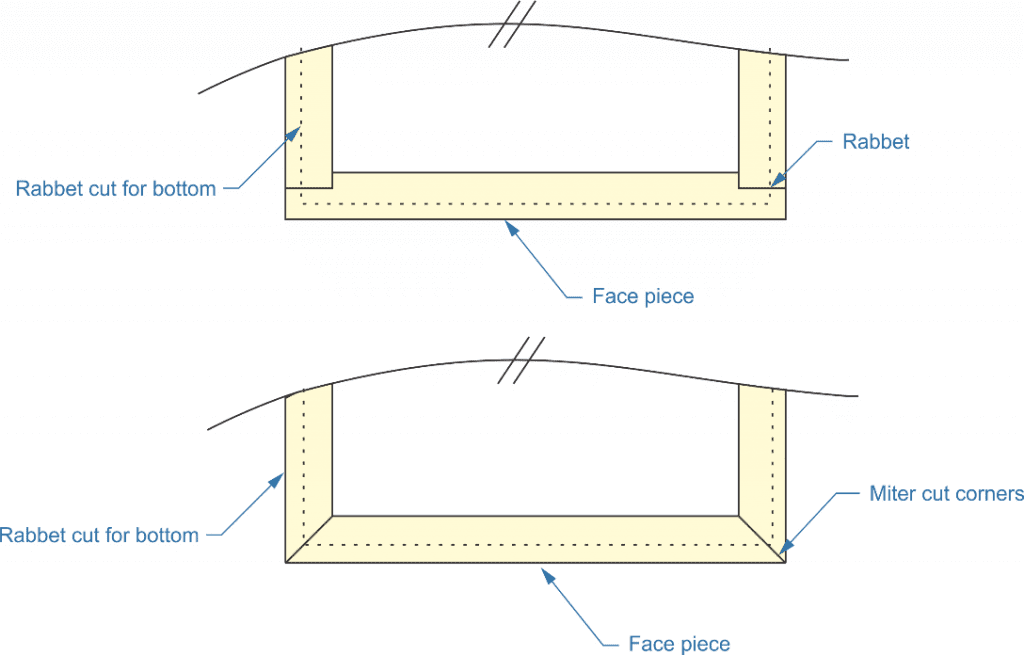
A better way is to put the entire thing together with rabbet joints, providing a positive edge for the pieces together and ensuring that the corner come out nice and even. For the best results, the rabbets should be cut into the back side of the face piece, allowing the sides to sit into it and hiding the joinery from the front side of the file. The rabbets can be cut with a table saw, a router or a rabbeting plane.
For those who have a table saw available, it would actually be easier to build the file with mitered corner, totally hiding the joinery. Rabbets would still be needed on the bottom of each side, to fit the bottom of the file into. But this gives the cleanest appearance of the three options.
Building the magazine file
To attach the mitered sides together, ensuring the alignment, use masking tape to align the sides, attaching them to the tape. When the sides are folded into the box, the tape holds them together, clamping them. There is actually quite a bit of long grain contact when mitering plywood together, so the joints should be solid if they are properly glued.
With either style of construction shown, the rabbet for the bottom will need to be cut into the sides, before they are attached together. Cut the bottom slightly small, so that it can slide in and out; then glue it in place.
As with the magazine file, this organizer can be made with any plywood or edge glued panel from 3/8” up to 1/2”. Joinery is extremely simple, as the angled outer panels, as shown in the drawing below, can cover the side pieces and the small bottom pieces for each pocket. The trickiest part is laying out and cutting the two sides. They need to be 9-1/4” apart, so as to have adequate space for filers in-between them.
As can be seen in the diagram below, the sides are a sawtooth design. I’ve made them 7-1/2” tall, so that the tops of the papers or files can stick out of them. They are angled out at 10 degrees, although they could be angled out as far as 20 degrees, if that much space is needed. In most cases, a slight angle, making for a shallower pocket is better. Once laid out, the sides can be cut with a band saw or a jigsaw. Attach the two sides to the back first, gluing and nailing them, making them overlap the back, so that the edges of the back are not visible.
The next pieces to put into place are the bottoms for the three pockets. These are 1” strips of the same material used for the rest of the file. They are cut to fit snugly between the sides, without pushing out on them. glue and nail these in place, before putting the fronts on the pockets.
Three pockets magazine file
The pocket fronts are the last part to be installed and are simple rectangles cut from the same material. They are cut the same width as the back and as mentioned earlier, 7-1/2” tall. While I’ve shown them coming up to the bottom of the pocket above, they can actually overlap it slightly. These parts are attached to the front edge of the sides, hiding any saw marks from cutting the sides.
Horizontal Organizer
Making a horizontal file organizer is more an exercise in cutting dados or grooves. The shelves or dividers in the organizer are usually made of very thin material, 1/4” thick. To fit them into place, dadoes or grooves have to be cut into the vertical sides of the frame box.
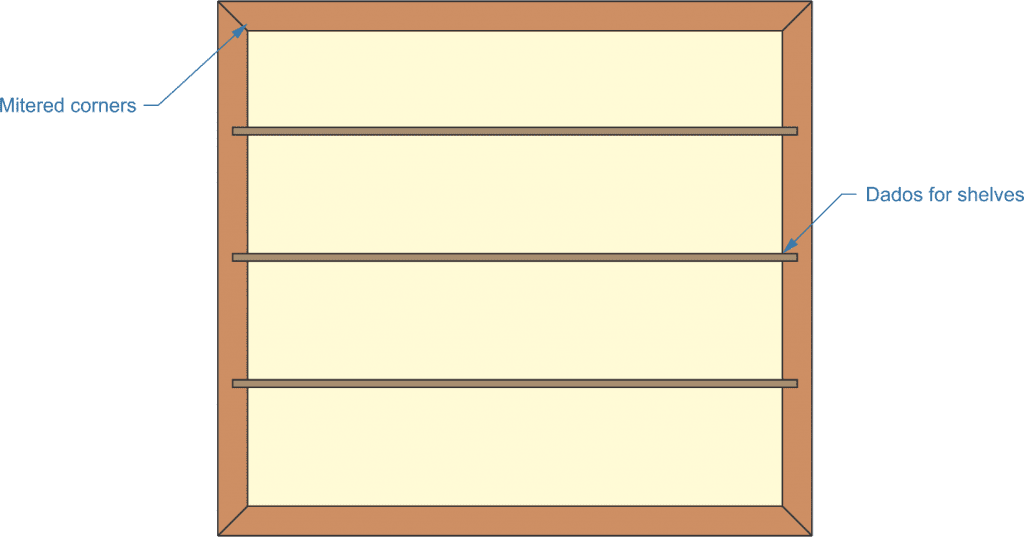
The design starts with a five-sided box, with the front left open. The interior dimensions need to be at least 9-3/4” wide and 11-3/4” deep. It can be as high as wanted, taking into consideration that the slots for the files or papers are usually 2” to 3” tall. Since dadoes will be cut into the sides of the box, they should be at least ½” thick. The same three construction techniques we discussed for the magazine file. Essentially, the outside box is the same thing, only a different size and with the open side facing out, instead of facing up. Ideally, the four sides should be cut so that the outer facing edge is long grain, rather than cross grain.
The real difference is making the slots on the inside for the shelves or dividers. Since these will be going across the grain, they are considered dadoes (if they were with the grain, they would be called grooves). The key here is to cut them just the right thickness, so that the shelves will fit snugly, but not tightly into them. They should be ¼” deep. Depending on the woodworker’s preference, they can either be only cut where the shelves are going or they can be cut every 1”, allowing shelves to be moved. Ideally, the shelves should not have to be glued into place.
Don’t forget that the back end of the organizer needs to be rabbet cut to fit the backplane in, insetting it so that it is hidden when looking at the organizer from the side.
Horizontal organizer
If more slots are needed than can be fit into the vertical space available, additional units can be set side by side or even connected together to make one larger unit. If the units are going to be permanently attached together, the dado slots can be cut into the dividing pieces from both sides; but thicker material would need to be used (3/4” thick) so as to keep the dados from cutting through.
Vertical Organizer
Perhaps there is no other type of wood file organizer where more variety can be found than in vertical organizers. While the other types of organizers are pretty straight-forward, all it takes is a search on the internet to see that there’s a lot of variety in vertical ones, where they are made of wood or the more commercialized metal ones.
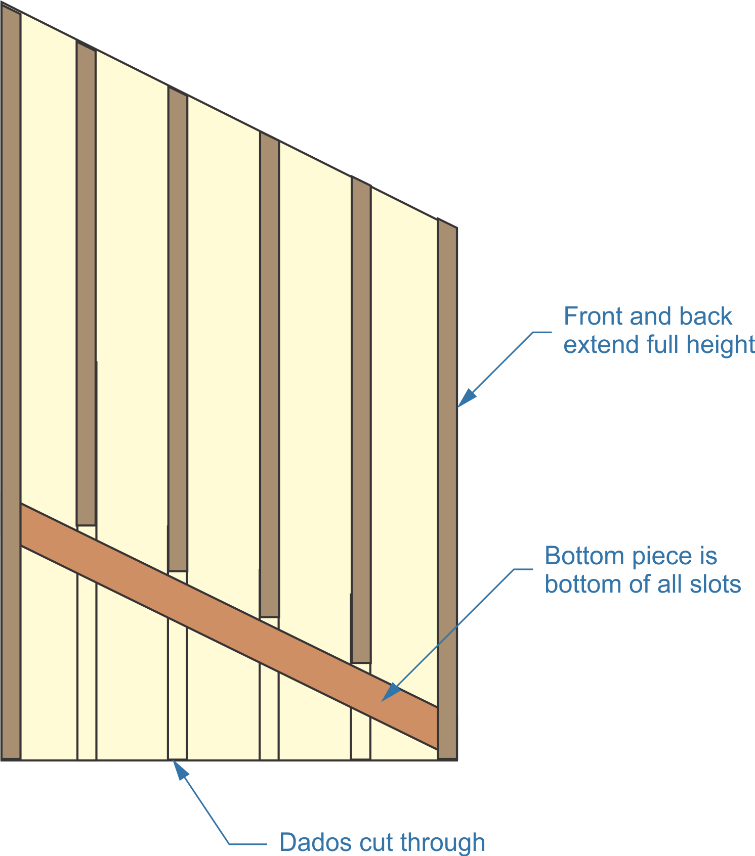
A basic vertical organizer consists of sides, a base and a series of dividers. As with the horizontal organizer, it is best to set the dividers into a series of grooves (the same as dados, except they are running with the grain). Notice in the drawing below that the grooves are cut all the way to the bottom of the sides, even though the dividers don’t go all the way down. The back piece is fit between the sides and can either be rabbeted or simply glued and nail in place. The front should either overlap the sides or be mitered, so as to provide a clean front surface, without seams. The angled bottom piece eliminates the need for individual bottoms for each slot.
The hardest part of this design is fitting the bottom piece in. The best thing to do is to cut a dado at an angle that the ends of the bottom will fit into. This provides a positive location and will prevent the bottom from slipping, if it doesn’t get attached well. The entire unit is held together by the front and back being connected to the sides.
Vertical organizer
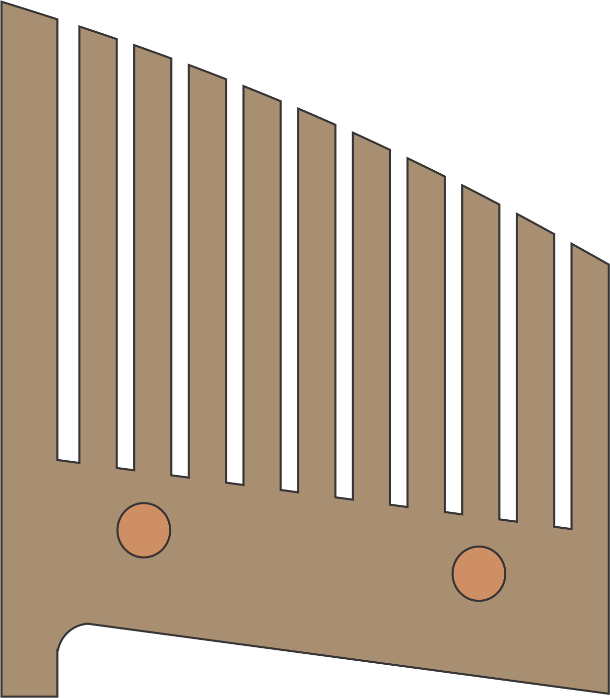
For a more modern design, start out with two edge-glued panels and cut a series of ¼” wide slits in them. Cut along the grain, so that the pieces retain some strength. These slots will be wide enough for one folder each, but no more. The top and bottom can be curved, something like the drawing, angling things downwards so that the labels at the tops of the folders can be read. The two pieces can be attached together with dowels, at the bottom, leaving the two sides about six inches apart.
Modern design vertical organizer
Related Posts:
Drying Wood in Oven: A Complete DIY Guide by Admin September 23, 2025 More About Most people don’t give a second thought to drying wood in an oven until something goes wrong. I didn’t either. I slapped together a pine…
Best Practices for Using Mineral Spirits on Wood by Admin May 20, 2025 Finish . Looking to clean old wood or prepare it for stain? Mineral spirits offer an easy, safe, and effective method for refreshing wood without damage.…
Sandblasting Wood: How to Clean & Restore by Admin May 17, 2025 Finish There’s something satisfying about bringing old wood back to life. Whether it's barn siding, an antique door, or a weathered cedar plank, wood has a…