Over a century ago, a physician and educator in Italy came up with a new concept for educating children. Her idea was to utilize children’s natural curiosity and teach them the way they learn naturally. So Maria Montessori opened her first Montessori school on January 6th, 1907, helping children to learn through doing ordinary, everyday tasks.
Many parents use the same basic educational philosophy with their toddlers, without even knowing it. They get their little ones involved in baking cookies, washing the dishes and a host of other everyday activities, allowing them to discover and explore things we all take for granted.
Yet many of those activities happen above a toddler’s head and out of their reach. That doesn’t always stop the toddler though, as many will drag a chair over to the countertop, so that they can climb up on it to see what’s going on. While that works, it’s not the safest way of doing things. If adults can fall off a kitchen chair, changing a light bulb, what makes anyone think that a toddler is safe standing on one?
The solution is to have something specially made for that toddler to stand on; what’s known as a “toddler learning tower,” sometimes known as a “standing tower” or a “kitchen helper tower.” These not only provide a platform for the child to stand on, but they’re also easier for them to get up onto and safer for them to stand on, with a guard rail all the way around the child.
The basic ingredients for such a chair include:
- A platform for the child to stand on; ideally the height of this platform will be adjustable
- A step to make it easier for the child to get up onto the platform
- A railing around the child, once they are up, to help prevent them from falling off
It should be noted that this is mostly about safety. Even so, there is no guarantee that such a tower will keep a child from falling. Parents working with the child must be constantly aware of what the child is doing and any danger that they might face, especially that of falling.
There are two basic ways of making a toddler learning tower, out of sticks of wood or out of plywood. It all depends on what the woodworker prefers and which they are more comfortable working with. In both cases, the tower should end up about 36” tall and about 18” square to provide the toddler with the space needed. If possible, it’s a good idea to make the platform adjustable, so that it can be lowered as the toddle grows.
Making a Toddler Learning Tower From Plywood
The advantage of making a toddler learning tower from plywood is that all the edges and corners can be rounded, reducing the chance of the child being hurt on it. Plywood also lends itself towards painting projects in bright, kid-friendly colors.
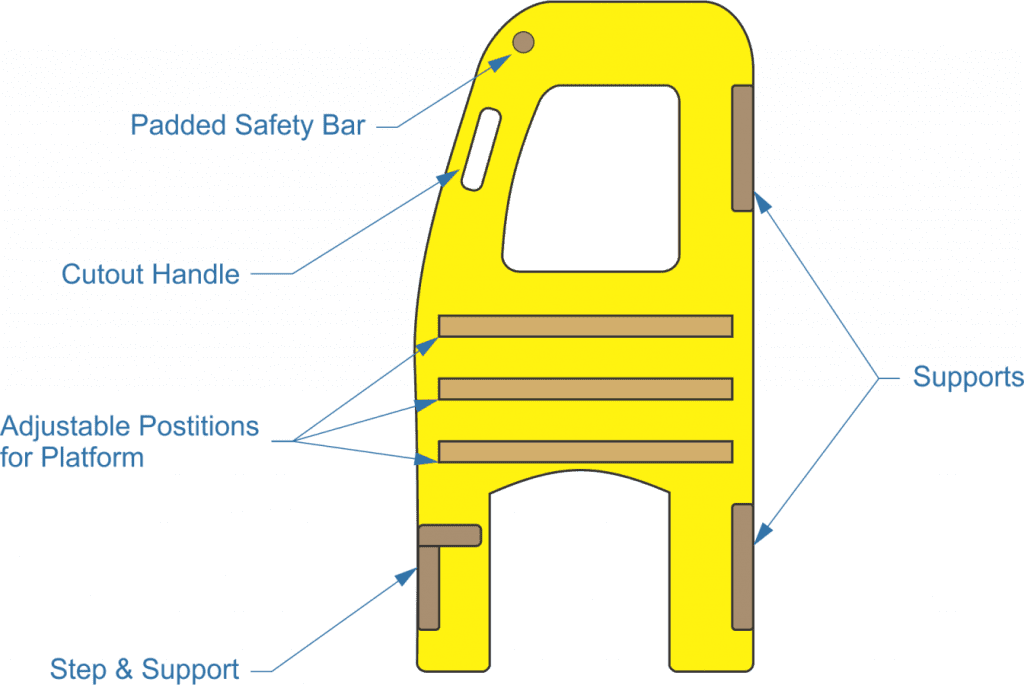
This tower consists of two matching sides, with some crossbars to provide support. The crossbars can be cut out of leftover plywood from the sheet that the sides are cut from or standard 1” dimensional lumber can be used. An adjustable platform provides room for growth, as the platform can be adjusted to the toddler’s height. A padded safety bar can be added to the outer side, providing something to catch the child if they lose their balance.

It’s important to select the right plywood for this project, as it’s important to avoid having any sharp edges, splinters, or anything else that can scratch little hands. I’d recommend either using MDF or some birch plywood for it. Even then, all the edges should be cut slightly oversize, and then sanded down to the line. After that, round the edges with a 1/8” or 1/4” roundover bit and sand the edges smooth.
Dimensions can vary, depending on the builder’s desire and the size of the child the tower is being built for. All that’s really important is the overall size. Even so, it’s a good idea to put two or three different supports for the platform, as children tend to grow fast.
The lighter brown areas in the cross-section diagram above are the supports for the platform, while the darker brown ones are the crossbars for holding the tower together and the step for the child to use for climbing up the tower. The upper crossbar also serves as a means to help keep the child from falling out. Install these by gluing and screw or nailing them in place. Use nails or screws that are at least 2” long, as the core of the MDF doesn’t grip fasteners as well as plywood does.
In addition to that upper crossbar, it’s a good idea to put a padded safety bar across the outer side of the tower. All that’s needed for this is a piece of ¾” or 1” dowel rod, glued in place. But it should be covered with something to pad it, in case the child falls against it. One easy way to accomplish that is to use a pool noodle, then cover it with fabric.
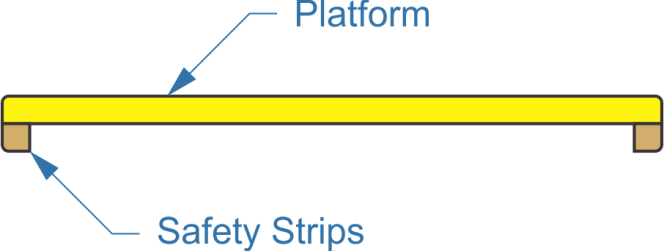
The three adjustable positions for the platform are nothing more than ¾” x ¾” strips of wood, ripped on the table saw and cut to length. These should be attached firmly to the inside of the tower’s side pieces, gluing and screw them into place. The platform itself is just a piece of the same plywood used for the sides, with two ¾” square strips of wood glued and screwed to the ends to catch on the ends of the supports and keep it from slipping off to one end or the other.

Before painting the tower, be sure to fill all nail and screw hole, as well as any voids in the edge of the plywood. A smooth surface is needed everywhere. Then paint the finished tower with a couple of coats of semi-gloss enamel, so that it will be easy to clean.
Making a Toddler Learning Tower from Dimensional Lumber
If the toddler learning tower is to look like a nice piece of furniture, perhaps matching the other furniture in the home, then plywood might not be the way to go. Rather, the tower can be made out of hardwood dimensional lumber, perhaps oak or poplar, both of which are available from the local building materials center.

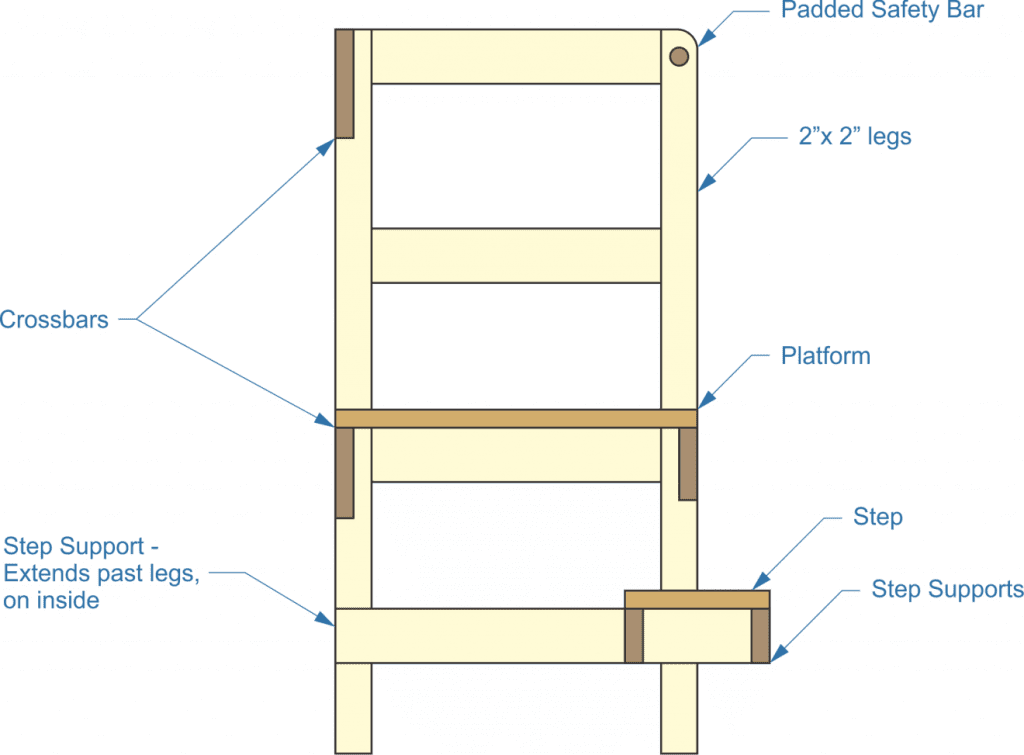
In the diagram above, everything but the step, platform and padded safety bar is made from either 1” dimensional lumber (mostly 1”x 2”s) or 2”x 2”s, keeping the design to materials which are easy to come by. All the crossbars and supports are visible in this cross-section.
The big challenge in this design is connecting all the pieces together. Ideally, all the crossbars should be attached to the wider legs with mortise and tenon joints. However, that’s a lot of mortise and tenons to cut, especially for a woodworker who isn’t yet comfortable cutting them. In that case, pocket screw could be used to connect them together, saving time and labor.
If pocket screw are being used for assembly, the legs can be replaced by the same 1”x 2” material being used for other parts of the tower. This will provide a smooth joint on the outside, which is popular with pocket joinery.
When using pocket screw on something like this, where the holes for the screws can be visible, the holes should always be drilled on the inside of the board, where it is at least somewhat hidden. Still, on this design, it’s obvious that those holes would still be visible. To solve that problem, assemble the tower, then glue dowel rods of the appropriate diameter into the holes. Once the glue has dried, the dowels can be flush cut with the wood.
The one unusual thing about this design is that the step supports extend past the frame, even though they look like crossbars on the drawing. But actually, they are inside the legs, rather than butted up to the legs. That’s how we get way with extending them past where the legs are located.
As with the plywood version of the tower, it’s a good idea to round over the edges of the various pieces of wood, to protect little hands. Before rounding any pieces over though, make sure that the edges being rounded don’t but up to another piece. This is especially important in cases where pocket joinery is being used to assemble the parts, as the edges of the boards are to like up flush with one another. A rounded edge could mess that up.
While this style can also be painted, that’s somewhat defeating the purpose of making it go with the home’s furniture. Instead of that, it would be best to stain and/or varnish the surface of the wood, providing a smooth surface that food won’t stick to and which will be easy to clean. Be sure to apply the varnish in a dust-free environment and to sand lightly between coats, to remove any bumps caused by sand or other particles getting into the finish.

