Wood serving trays have been in use for thousands of years, ever since mankind started serving food on wood. While the style and material of those trays have changed considerably, modern wood trays still maintain the same sort of functionality as they did in ancient times, even though the shape may have changed. Modern trays are thinner than the wood slabs that were used back then, with the addition of handles to make them easier to carry.
But what about plywood trays? That depends on several factors. Plywood is not a good choice for trays that are going to have to be submerged in water, as most plywood that is not made with waterproof adhesives. Nor is it good for uses where the tray might have to be inserted into a hot oven, like a pizza paddle. Again, while the wood itself might survive that, the adhesive probably won’t.
Nevertheless, most wood trays don’t end up being used where either of those constraints exist. They are serving trays, either actually used for serving or for some decorative purpose. In either case, plywood is a good choice for making at least the bottom of the tray out of, even if solid wood sides are used.
Before designing the tray, think about the purpose that it will be used for. This will affect how strong the tray needs to be made; but more than that, it will affect the finish you decide to use. If the tray is likely to become damp, you’ll want to use a waterproof coating, whether that is oil, varnish or epoxy.
There might be three different things that are considered to be a serving tray:
- A normal serving tray, used to carry things to the dining table or coffee table
- An ottoman tray, which is usually shaped to match the ottoman, allowing the ottoman to be used as a coffee table
- A bed tray, used for eating in bed; it will have legs, which can go over the user’s legs to support the tray
A Basic Plywood Serving Tray
The basic tray consists of a bottom, with four low sides. How low they are is a design decision that has to be made. If a tray is going to be used to carry drinks, it would make more sense to go for slightly higher sides (2” to 3”), but if it will mostly be used to carry plates, then low sides are better (1/2” to 1”), because they allow the edges of the plates to go past the edges of the tray.
Tray Bottom
For a basic tray, the bottom can be just cut out of plywood, whatever dimensions are desired. Thin plywood, from ¼” to 7/16” thick is used, mostly to reduce the weight of the tray. The thicker the bottom, which contains the most wood, the heavier the tray will be. Quarter inch thin plywood is actually strong enough to support anything that might be put on a plywood serving tray.
While plywood could technically be used for the sides and handles of the tray, few people do. The main reason is that it is hard to find plywood without any voids in the core veneers, unless marine or aviation plywood is used. Even hardwood plywood, intended for furniture making is likely to have some voids in the core veneers.
Tray Sides
Other than using plywood, the other option for the sides of the tray is to use hardwood. Using a hardwood which matches the plywood, or which is stained to match the plywood, can give the appearance that the entire tray is made out of the same wood, while the plywood makes the largest piece in the tray less expensive.
The sides of the tray consist of four pieces of wood, cut to fit around the bottom. Depending on the look wanted, the corners can either be mitered, finger-jointed or left square. However, leaving them square, with the end grain exposed, doesn’t provide a high quality appearance; the tray would be more rustic.
Mitering the corners is the simplest, as the miters can be cut on a miter saw, a radial arm saw or on a table saw with a miter gauge. Cutting the miters a touch proud, then using a shooting board with a plane to bring them right up to the line provides a smoother, more even surface on the miter, reducing chances for there to be any space between the pieces when they are assembled. The plane will clean up the saw’s marks on the miter surface, giving a much smoother surface to glue.
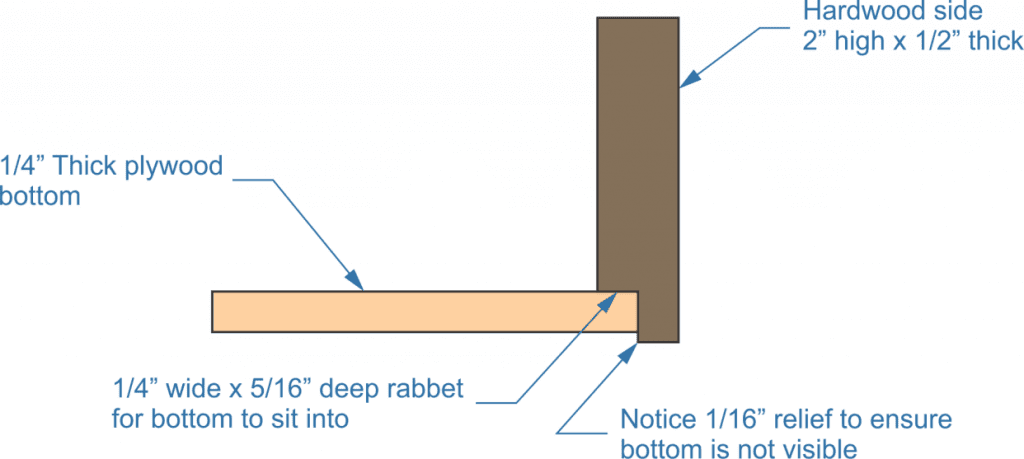
In addition to mitering the ends of the side boards, they all need a rabbet cut into them, for the bottom to be inserted into. If the tray is assembled without this rabbet, either the edges of the bottom need to be visible, which isn’t attractive, or the bottom needs to fit perfectly into the frame made by the sides, so as to not leave any gaps. This doesn’t make for a strong tray though, as it is difficult to fasten it together.

Handles
Before assembling the tray, a decision needs to be made about the handles. There are two basic ways of providing handles for the tray. The first is to cut them out of the frame’s end pieces. Alternatively, wire, metal or wood handles can be attached to the tray. Drawer pulls or gate pulls work well for this, especially on rustic tray.
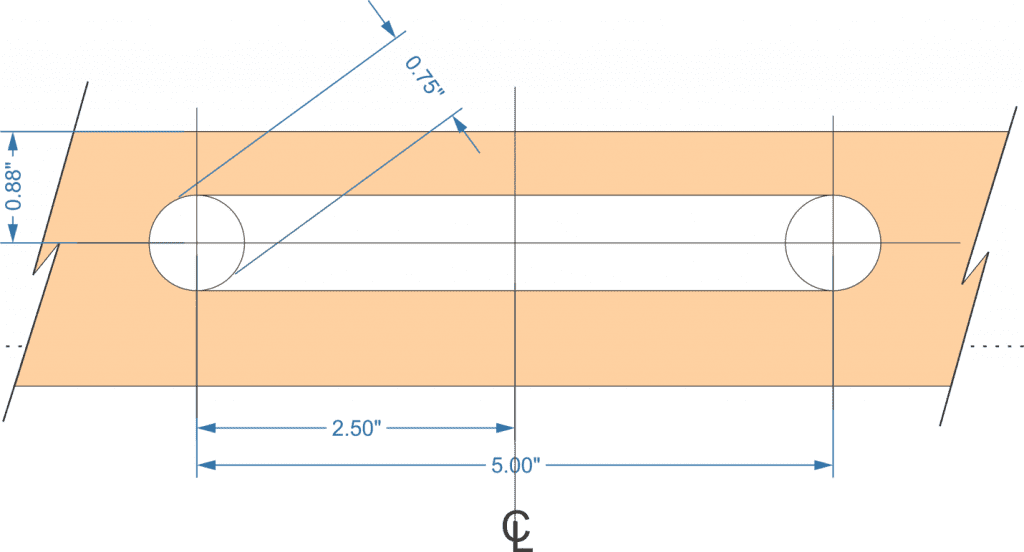
In order to cut the handles directly into the wood, use the pattern below. Start by drilling through the ends with a ¾” Forstner bit. Then cut the lines between the holes, using a jigsaw and turning them into an elongated oval, as shown in the pattern. Smooth out the edges and round them over, so that they won’t cut into someone’s hands, while carrying the tray.

If a lot of trays are going to be made, even if it is over time, it would be beneficial to make a template for this cutout and use a flush cut router bit, with a bearing. This would provide a much smoother hole, giving the tray a more finished look.
Turning the Tray into a Bed Tray
In order to turn any tray into a bed tray, legs of some sort need to be added. There are a number of ways of doing this, including making legs that will fold flush with the bottom of the tray. But the easiest way of doing it is to make the ends of the tray longer, so that the ends are also the legs. Instead of mitering the corners, the sides would butt up against the ends.
In this case, the decision has to be made whether to laminate several pieces of hardwood together for the ends or make them out of plywood. Plywood ends, with hardwood edging, would hide the edges of the plywood, providing the appearance that the whole thing is made of hardwood, especially if hardwood plywood is used.
Making an All Plywood End-grain Tray
Another option to consider is making a tray that is all plywood, taking advantage of the edge grain of the plywood. This is a style that has become popular in some circles. It requires finding plywood with no voids, and it is helpful if there are a high number of plies in the sheet.
To make a tray of this kind, the first requirement is to make edge-grain boards. This is done by cutting the plywood into strips, then laminating them back together with the edge grain showing, as if it were the surface of the board. Typically, a thicker board is glued together, something like ¾” thick, then it is thinned down on the planer to the desired thickness. Trying to laminate thinner material together can be problematic, as the thin surface area makes it hard to glue and easy for the panel to curve when clamp pressure is applied.
Once a plywood panel is created in this manner, it can either be used as is or can be cut and the pieces rejoined to create a pattern in the bottom of the tray. One such way would be to angle cut the panel in four pieces, in such a way as to make a rectangular pattern around the center. Another might be to make a herringbone pattern out of the end grain.
Regardless of what’s done design-wise for the bottom of the tray, the sides would typically be made out of solid pieces of the same plywood, allowing the edge grain to show decoratively on the tops of the edge, with the sides being the solid face veneer of the plywood.


