Attic sealing is an important part of controlling heating costs. As we all learned in elementary school, heat rises. So without proper attic heating, all the money we spend trying to heat our homes can effectively be going up in smoke, just as if we lit a fire in a fireplace, allowing the hot smoke to go up the chimney, where it doesn’t help heat the home.
But sealing an attic doesn’t really mean what it sounds like. Sealing an attic doesn’t mean sealing the attic itself, so that air can’t pass through it; but rather, sealing the attic off from the rest of the house, so that the heat we are generating isn’t lost into the attic. This is more about insulating than making an air-tight seal, although there is an element of air tight sealing that’s a distinct part of attic sealing.
The attic itself needs to have proper ventilation, so that hot air and humidity aren’t trapped in it. Homes typically have vents in the soffits, which work in conjunction with other vents mounted higher up on the roof. When working properly, air comes in the soffit vents, is heated in the attic and passes back out through ridge or other roof vents. As it does this, it helps shed excessive heat from the attic, as well as removing unwanted moist. If too much insulation is added to the attic, blocking the soffit vents, this natural convection action cannot continue to operate properly.
According to estimates by the EPA, most homes have enough air leaks in them to constitute the equivalent of leaving one window open all day long. Of those air leaks, the most serious are into the attic, because they allow heat to rise out of the living areas of the home by simple convection. Once in the attic, the heat dissipates into the atmosphere, through the uninsulated roof.
A lot is at stake here, as it is possible to lose as much as 30% of the cost of home heating through the attic. But just adding more insulation isn’t always the answer, especially if the home wasn’t properly insulated in the beginning. Additionally, it is possible to actually add too much insulation, to the point where moist is being trapped between its layers, leading to the growth of mold. As some types of mold are toxic, this is a dangerous situation; one best to be avoided.
Hiring someone to seal the attic can cost anywhere from $1,500 to $4,000 depending on the size of the attic. Yet the materials to do this job are not costly, totaling less than $200 if one does the work themselves. It’s the type of job that can be done in a day.
Finding the Leaks
Finding leaks in the attic is much easier than one might expect, especially in an older home. As air rises into the attic, it carries dust with it. This dust will then be filtered by the insulation on the floor of the attic, making it dirty. So all that’s needed, to find most leaks, is to look for areas where the insulation is dirty.
It is possible that these areas may be hidden under any flooring that is in the attic. Even if the attic is not used for storage, it’s not unusual to have some flooring, usually just enough to make a pathway. This is there more for access to the HVAC air handling unit and ductwork, although it might have been put in place to access other home systems, such as electrical wiring.
Some of the more common places to find these leaks are at the tops of walls, holes drilled in the top plates of walls for electrical wiring, around the perimeter of the attic, recessed lighting, bathroom vent fans, chimney flashing, dropped soffits, such as those over kitchen cabinets, and plumbing pipes. All of these cause penetration of the home’s ceiling, into the attic. If not properly sealed during construction, they can remain for the entire life of the home, causing heat loss.
It may very well be necessary to push the insulation aside, in order to find the actual leaks. Use the indication of dirty insulation to show where the leaks are, then push aside the insulation to gain access to where these items pierce the ceiling of the rooms below. The insulation can always be pushed back in place, once the leaks are sealed.
Sealing the Leaks
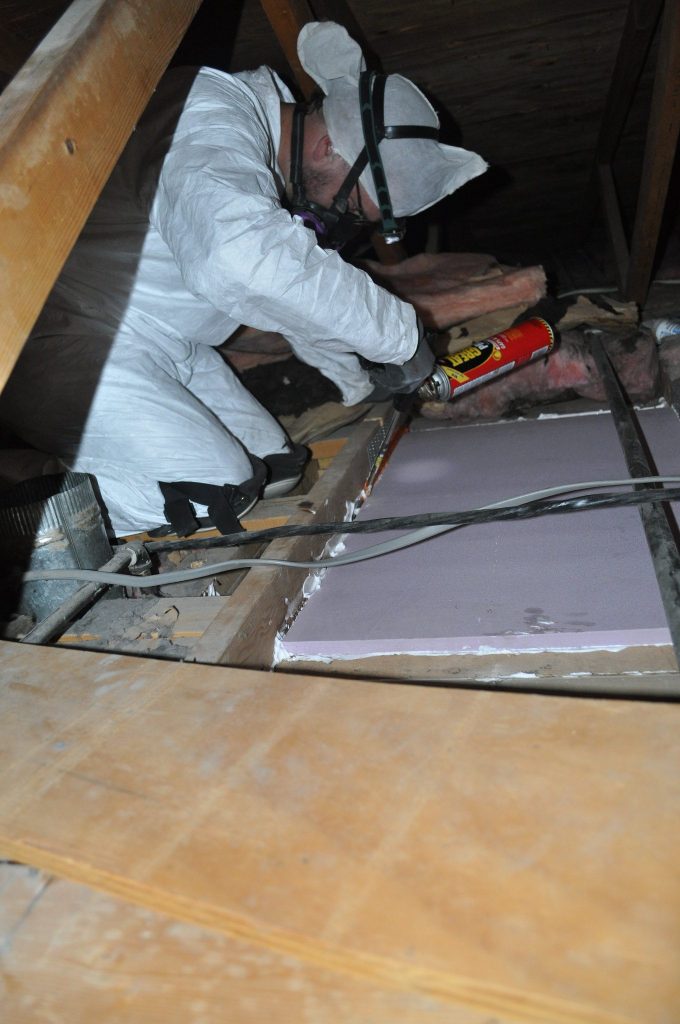
The number one tool in sealing these leaks is spray foam insulation. This can be purchased in cans from any lumberyard or home improvement warehouse. The newer ones now come with reusable nozzles, which eliminates the old problem of having to dispose of cans that haven’t been fully used.
The idea isn’t to put the foam into the leaks that are found, but rather to use it to make a cap on top, sealing off the leak. Don’t stick the nozzle down into a crack or hole, no matter how big it is; rather, use the nozzle to construct a layer or dome of the urethane foam on top of the ceiling and/or anything that is sitting on the ceiling, such as light fixtures, which can be part of the air leak. Remember that the foam expands considerably, so don’t over-apply. Too much foam can actually cause problems.
Recessed Light
Some things, such as recessed lighting, will require covering the lighting can entirely. However, not all recessed lighting can have direct contact with the insulation. The lighting cans should be marked as either IC for insulation contact or Non-IC for non insulation contact. In the case of Non-IC, don’t use the foam insulation, but rather make a cover out of rigid foam board insulation. The foam board pieces can be put together with duct tape and the cover can be glued in place with the expanding foam insulation.
Electrical Boxes
Electrical junction boxes are another thing that should not be covered with expanding foam insulation, although there may be a real temptation to do so. While it is fine to fill hole with wires coming through them with foam insulation, it is not a good idea to cover electrical boxes with it. Doing so may make it difficult to impossible for an electrician to gain access to those boxes for some future repairs. At the best, this would drive up the cost of the repair, while at the worst, they would refuse the job.
It is difficult to make a rigid foam board cover for such a situation, but there is a rather simple solution, which combines spray in foam and rigid foam board. That is to make a wall of foam around the electrical box, yet several inches away from it. This provides a means for insulating around the wires. Then cut a piece of rigid foam board to cap this, covering the box. If access is needed to the box in the future, the rigid foam can be easily cut, giving access and then put back in place with duct tape.
Plumbing
One of the more common leaks into attics comes from plumbing vent pipes. These are required by building code and are extremely easy to spot, as they go vertically up through the attic space, piercing both the ceiling below and the roof above.
Typically, plumbers will just shove some of the insulation into the space left around the vent pipe, leaving gaps. If this is the case, it will require more than just foam insulation or even fiberglass batts to fill the hole. Pull or cut out what they have shoved in there, to gain a smooth surface at the top of the ceiling. Then either drywall or rigid foam board can be used to make a collar around the pipe, sealing it in place with foam insulation.
While there, check to see if any light is coming in around the collar where the vent pipe goes through the roof. That collar should fit snug enough that no light comes through, so as to ensure that it does not allow water to leak through. If there is any visible light, it will be necessary to go on the roof and seal the vent to the pipe with caulking.
Before caulking the seal, check to verify that it is pushed down all the way. Sometimes roofers miss this, making for a poor seal. If that’s the case, push the rubber seal down all the way. If it seals properly, there will be no need to caulk.
Bathroom Vent Fan
It’s not uncommon to find bathroom vent fans which are installed improperly, venting the air into the attic, rather than outside. This is especially common when people do remodeling projects, as most do-it-yourselfers don’t know the building code. The problem with this is that the vent fan will dump moist laden air into the attic, where it can cause damage, both to the insulation and the wood sheathing that makes up the roof.
If the fan is not vented to the outside, then it needs to be, using a 6” round insulated duct. The duct can either go to a vent in the soffit, to the gable vent (if the house has one) or be vented through the roof, with an appropriate roof cap installed.
Attic Access Door
Rarely is an attic access door sealed in any way. It’s normally just the plywood door, being held against the wood frame for the opening by spring pressure. While this does a fair job of blocking off airflow, it is not perfect. It is best to seal around the perimeter of the access hatch with the same sort of adhesive-backed foam that is used for sealing around doors and windows. If a thicker foam strip is used, then a latch may be required to pull the access door against the foam and compress it. While that is more work and harder to work with when attic access is needed, it will provide a better seal.
“Hot” Penetrations
There might also be hot penetrations into the attic, specifically chimneys for gas-fired furnaces and hot water heaters, as well as a fireplace chimney. In any of these cases, spray in foam insulation should not be used, as it is not fire-rated for this application. Rather, it is best to use metal flashing to cover the joint, along with flame-retardant high-temperature caulking. Don’t use regular painter’s caulk or silicone caulk, as they are not rated for high temperatures either.
Another area that typically needs to be sealed, especially in homes that are more than 20 years old, is the ductwork for the home’s HVAC system. This was probably properly sealed when the home was built, but there’s a good chance that the sealing has become less effective through time, perhaps even separating from the ductwork. There’s also a chance that flexible ductwork has become torn by things being moved around the attic, especially if the attic is used for storage.
Inspection of the ductwork should be both visual and tactile. By tactile, I’m referring to turning on the system fan and running your hands over the ductwork, especially around any seams and areas which aren’t visible. The air pressure in the ducts is high enough so that any leaks should be easy to feel.
For places where the adhesive on duct tape has dried up and the tape is no longer sticking, clean off the bad tape and as much of the adhesive as possible. Clean off any dust around the seam as well with a household cleaner. Then apply new duct tape or aluminum duct sealing tape. Be sure to make the new joint wider than the old, overlapping pieces of tape until it reaches an area with no adhesive residue. The adhesive residue can prevent the adhesive on the tape from sealing well. Taking the precaution of making a wider joint will help ensure that the tape remains stuck to the ducts.
There may be places where a mastic sealer is used for sealing the ducts to the air handling unit, rather than tape. That can also dry over time and crack, although it doesn’t usually do that. However, if it does, it is not necessary to use mastic to make the repair; tape can be used. But just like the ductwork itself, it is important to clean the surface well, so that the tape can adhere properly.
Flexible ductwork can be rather fragile, easily pierced by sharp objects as they are moved around the attic. Should such a hole occur, the hole in the duct can be repaired by applying aluminum tape over the hole. More than one layer should be used, with the second layer overlapping the first by 50 percent, so that there is enough tape adhered to the surface of the duct to equal the width of the tape.
Adding More Insulation
Once all the air leaks have been sealed, be sure to put the insulation back in place. Then it might be a good idea to add more insulation. Most homes are only insulated to R-19, which is six inches of insulation thickness. Over time, the insulation crushes down, especially if it has become damp; so it isn’t even R-19 anymore. At a minimum, an attic should have R-38 insulation. That’s 10 to 14 inches of insulation, depending on the type.
Before adding any insulation, find the soffit vents on the home. If there aren’t any baffles installed in the attic, above the vent, there should be. These baffles are simple plastic or aluminum channels that can be stapled to the bottom side of the roof sheathing, above the soffit vent, ensuring that the insulation doesn’t cover up the vent and block airflow. While they are most necessary when using blown-in insulation, they can also be used with fiberglass batts.
The easiest and cheapest way to add additional insulation to an attic is to use blown-in insulation. If you buy 10 bales of blown-in insulation from any of the major home-improvement centers, they will waive the rental fee for the machine, providing it for free.
It takes two people to install blown-in insulation; one adding bales of insulation to the machine below and the other in the attic, directing the nozzle of the blower. I have found that it helps to tape an eight foot 1”x 2” to the side of the nozzle, effectively allowing an extended reach. That makes it easier to get the insulation into areas which are either far from the walkway or areas which are hard to reach, such as behind the air handling unit.
Fiberglass batts can also be installed. If they are used, they should be the type which doesn’t have a paper moist barrier. That is designed for use in walls, but in the attic it can trap moisture in the insulation, causing the aforementioned mold growth.
In either case, avoid insulating over any walkway that is installed in the attic, as it needs to remain visible to avoid walking on the drywall ceiling and putting a foot through the ceiling of the room below.
The Ultimate Guide to Attic Flooring: Expert Tips and Advice by Admin June 27, 2024 Installing Transforming your attic into a functional space begins with strategic flooring choices that balance practicality and safety. Whether you're aiming to create additional storage, a…


")


")
