In our modern age of power tools, the wood mallet has all but been forgotten in the home workshop. Yet this is still a common tool for professional furniture makers and other woodworkers who are skilled in the use of wood chisels. I’m not just talking about wood carving either. Most forms of fine joinery, especially dovetail joints and mortise and tenon joints, require the use of chisels, meaning that they also require the use of a wood mallet.
While it is easy to misunderstand the difference between the two, mallets and hammers are not the same. All hammers, regardless of the type, are made with a metal head. Mallets, on the other hand, can be made of a variety of different materials, but are never made with a metal head. Rawhide mallets are used for leatherwork and jewelry making, while machinists often use a plastic-headed mallet for assembly of delicate parts. Rubber mallets are more common than either of these and are used for a wide variety of assembly tasks, where it is necessary to use force, but care must be taken to avoid damaging a finished surface.
Woodworkers use wood mallets at least in part because in olden times, carpenters and cabinetmakers were able to make their own. While we can buy a variety of different commercially manufactured wood mallets, there’s just something special about being able to use a tool that one has made in their own workshop.
But the main reason why woodworkers use wood mallets is because chisels, other than low-cost commercial ones, are generally made with wood handles. If a hammer were to be used with those chisels, it would tend to crack the wood, especially if a hearty blow were given to it. Both the wood of the chisel handle and the wood of the mallet will give a little, helping to ensure that nothing breaks.
There are three basic styles of wood mallets used in woodworking, with two of them close enough in style that the casual observer is likely to think that they are the same. The joiner’s mallet has a beefy, roughly rectangular head, which gives it more weight for pounding chisels and driving parts into place. In contrast, both wood carving and log riving mallets are round, looking something like an inverted wine glass. The one obvious difference between the two is that the wood carving mallet has a removable head, while the log riving mallet is turned (on a lathe) from one solid piece of wood.
All three of these mallet types will work with chisels, the prime way that mallets are used. The advantage of the wood carving and log riving mallets is that the woodworker doesn’t have to be careful about making sure that the mallet head is facing the chisel in order to avoid a glancing blow. On the other hand, when a lot of force is needed, the joiner’s mallet is the better choice.
While the main reason to use a mallet is for driving a chisel, there is one category of chisel with which they should not be used; that’s paring chisels. This type of chisel has a much narrower blade, which is almost flexible. It is intended to be pushed by hand, slicing off only a small shaving of wood, when fitting joints, especially for mortise & tenon joints. Precision is needed, so one hand pushes the chisel, while the other guides the blade. Striking the handle would make it nearly impossible to maintain the necessary accuracy.
The biggest question that anyone is likely to have about making their own mallet is what type of wood should be used. A quick search online will come up with just about as many answers to that question, as there are forums where it is discussed. The truth is that any high density hardwood will work. My log riving mallet was turned on the lathe from a piece of oak branch out of my firewood pile.
Making a Joiner’s Mallet
For those that don’t have a lathe, the joiner’s mallet is much easier to make. There are two ways that I’ve seen these made, both of which produce essentially the same tool; but the assembly techniques for the head are somewhat different. One method involves cutting a mortise for the handle to sit into, while the other one cheats a bit and makes the mortise by judicial cutting of the wood used to make the head.
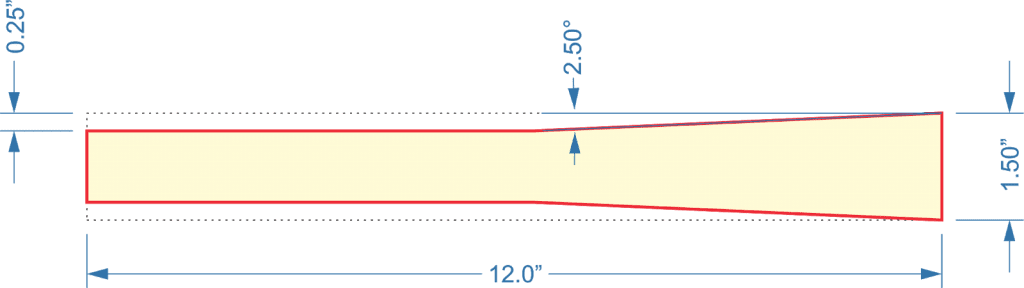
In either case, it’s best to start out by making the handle for the mallet. This needs to be cut from a single piece of hardwood, 1”x 1 ½” x 12” long. It will then need to be tapered slightly. That taper is what will hold the handle into the mallet head, keeping it from slipping out, without having to drive a wedge into it.
Handle
Lay out the pattern above on the wide side of the handle blank and cut it out with a band saw, smoothing the lines, as necessary with either a block plane or a belt sander. The bulk of the wedged section will be hidden within the mallet head, but it’s a good idea to chamfer or round the corner of the narrower part of the handle to make it more comfortable to hold.
Mortising the Head
Originally, these mallet heads were made out of one solid block of wood. There is no ideal size for this, but something like 3” high by 2.5” wide by 4” long is pretty much average. Some woodworkers have several mallets of different sizes, allowing them to pick a mallet which is appropriate for the work they are doing at the moment. For the sake of this article, we’ll go with the measurements I just gave, but you are welcome to adjust them as necessary.
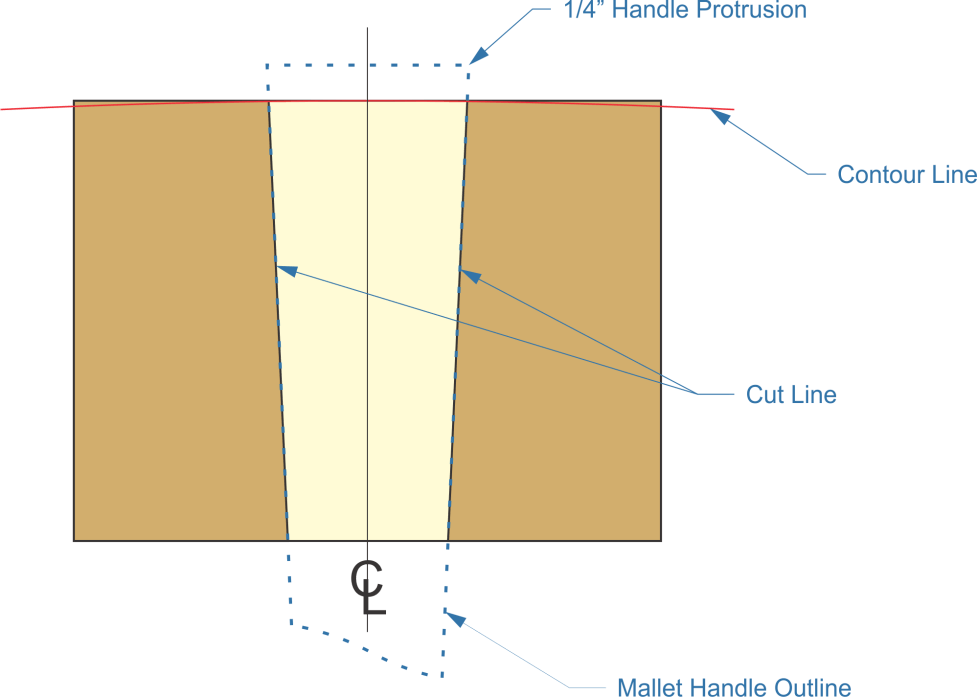
Cut the head from one solid piece of wood, ensuring that all four surfaces are perpendicular to each other. Then cut the ends on a miter saw again, with the saw set to 87.5°, giving the ends the same 2.5° bevel that is being used for the handle’s taper. This slight bit of angle helps ensure that the mallet makes a square connection with the handle of the chisel when it is swung. While cutting, cut a scrap piece of material to the same angle. It will be used as a guide block.
Lay out the mortise, centered in the top and bottom sides of the head, taking the dimensions right off the handle (this is why we made the handle first). That means taking the measurements ¼” below the widest end of the handle and another 3” below that (unless the head is a different size).
Before turning to the chisel, it is easier to hog out the majority of the material inside the handle with a forstner bit, drilling half way through both sides on the drill press. This will save time chiseling, as well as help reduce the bottleneck of wood chips inside the mortise, making it hard to chisel it all the way through.
With the hole drilled, start chiseling out to the edges of the mortise; taking care to ensure that the chisel is staying inside of the finished cut angle. Once again, this needs to be done from both the top and bottom of the mallet head. That finished cut will be made with the help of the guide block cut earlier. At this point, the main focus is on cutting out to the line drawn for the outline of the mortise. The actual taper will be cut next.
Once the hole has been widened out to the scribed dimensions in all directions and on both sides, align the guide block with one of the edges and clamp it in place. Then use it, with a mallet and chisel, to cut the mortise as deep as possible. Please note that the guide block is used on both the top and bottom of the mallet head, with the angle tapering away from the hole on the top of the chisel head and with the angle tapering towards the hole on the bottom of the mallet head.
As the mortise deepens, it will no longer be necessary to use the guide block, as the sides of the mortise itself will be able to guide the chisel. It may be necessary to fit the handle a few times, putting it in to see how the mortise is progressing. There’s a possibility that using a rasp to finish out the mortise would be useful as well, especially for those who are not accustomed to cutting a mortise.
When properly made, the handle should stick in the mortise, with only about ¼” protruding out the top. There will be no need to glue the handle in place, as friction will hold it and using it will tend to wedge the handle tighter into the head. But once the handle fits properly and before it is finished, remove the handle one final time to finish shaping the head.
While not absolutely necessary, it’s a good idea to round the top of the head slightly on a belt sander. It’s also a good idea to round all the edges and corner, to help prevent marring of the surface, when using the mallet to drive pieces of wood together, especially on tight joints.
Finish the mallet by wrapping the handle either with cotton string or leather thongs to improve the grip on the handle. If string is used, dip the handle in varnish or shellac, soaking the string with it.
Laying Up a Head
For those who aren’t accustomed to cutting a mortise with a chisel, cutting the mortise into the chisel head can be a bit daunting. Those people can use an alternate construction, making the mallet head out of three layers of wood and all but eliminating the need to cut the angled mortise.
This changes the dimensions of the head slightly, as three layers of ¾” thick hardwood boards come out to 2 ¼”. But it would actually be better if the center board could be 1” thick, as that makes the project even easier. In that case, the overall thickness of the head would be 2 ½”.
Start by cutting three 3”x 4” rectangles out of hardwood boards. Take one of those and lay the handle centered on it, leaving ¼” of handle stuck out of what will be the top. Scribe the outline of the handle and then cut the piece in both those locations, splitting the piece into three pieces. The center one can be discarded, but the outer two will be used.
Laid up head 1
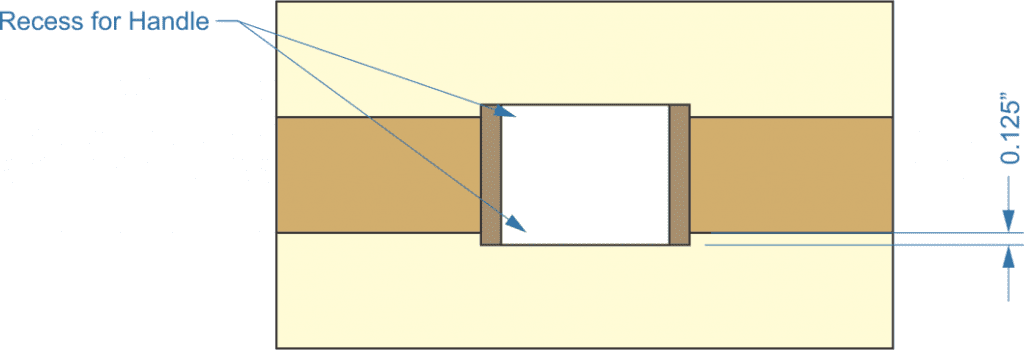
With the center one cut, the two pieces can be used as a template for marking the two outer pieces, unless 1” thick stock was used for the center piece. In that case, there is no need to cut any of the material out of the center piece to make the handle fit. But if normal 1” stock, which is really ¾” thick, is used, a 1/8” deep recess will have to be made into both pieces for the handle to sit in as shown in the diagram below.
Laid up head 2
These recesses can be cut with mallet and chisel, but they can also be routed out. In either case, it makes sense to first cut the outline with a back saw, cutting just inside the line and then cleaning it up with a chisel. This will create a clean line to mate up with the center pieces.
Laminate the four pieces together; taking care to make sure the outer edges align properly. This not only will make it easier to finish out the outer line, but also help ensure the integrity of the hole in the middle for the handle to go through. Either wood glue or epoxy can be used, as either one provides a stronger bond to the wood than the wood fibers have with themselves. However, if there is any unevenness in the surfaces of the pieces, which could cause gaps, it’s better to use epoxy, as wood glue really doesn’t have any gap filling capability, but epoxy does.
Once the glue has had ample time to dry, unclamp the head and check the fit of the handle. It may be necessary to clean out any glue that squeezed out of the joints, as that will prevent the handle from going in all the way. But if your cutting and gluing were accurate, the handle should fit in just right, sticking ¼” out of the top of the head.
Remove the handle and sand the curve at the top of the head and radius the corner, just as we discussed for the mortised head.
Making a Log Riving Mallet
To make a log riving mallet or wood carving mallet with a fixed head, requires the use of a lathe. Those who do not have a lathe are stuck with having to buy one. But for those of us who have a lathe, turning a mallet is one of the earlier projects we should take on. It’s a fairly easy project, which gives us the opportunity to experiment with our chisels. Since there is no interior part of the mallet, like there is with a bowl, it’s essentially a “spindle” project, which any wood turner can tell you is easier than turning a bowl.
As with the joiner’s mallet above, any hardwood can be used, whether in log form or in board form. I’ve seen mallets which were turned out of the hardwood version of a 4”x 4”, as well as out of logs. As I mentioned above, my personal mallet was turned out of a chunk of oak log, which was sitting in my wood pile, waiting to be burned in the fireplace before I decided I had a better use for it.
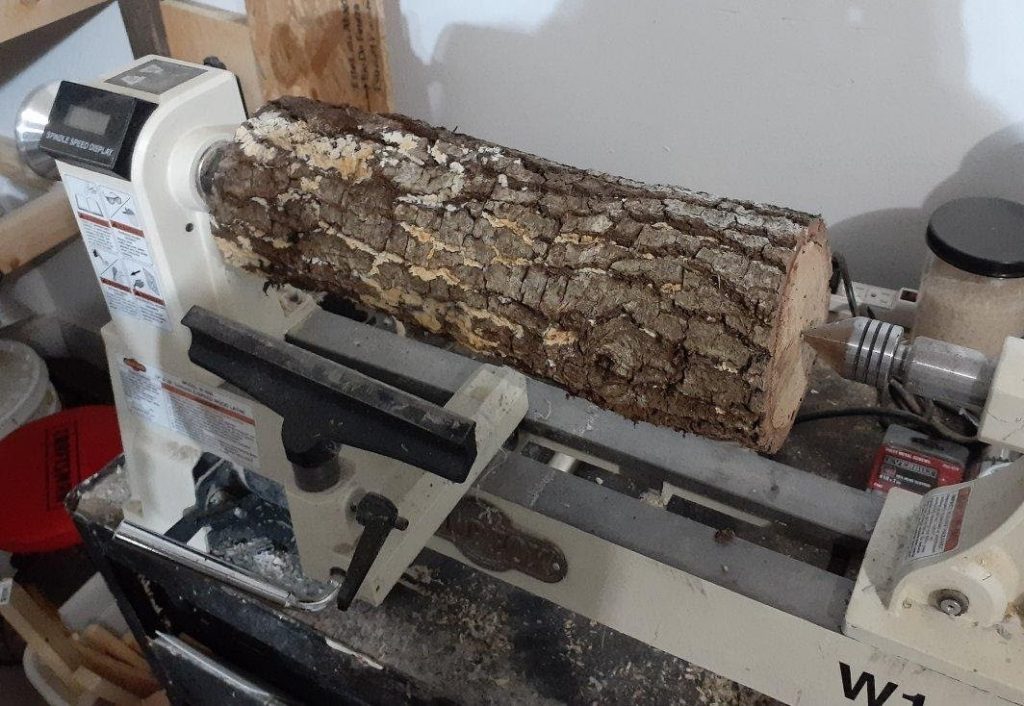
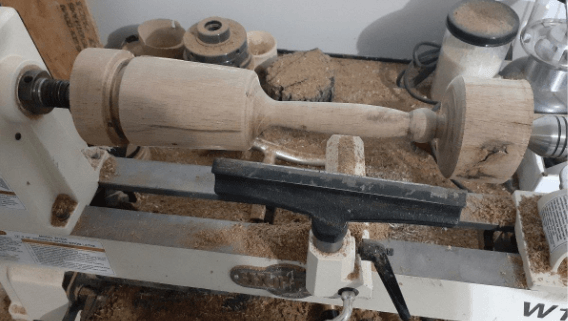
As this is not an article about turning wood, I’m not going to go into a lot of detail here about the process of turning a log riving mallet. But there are a few things that should be mentioned. First, as with any wood turning project, be sure that the piece of wood selected to make the mallet is large enough for making the mallet. The log shown below, mounted on my lathe, was about 6” in diameter when I put it on the lathe; but by the time I peeled off the bark and trued up the log (made it consistently round), it was only 3 ¼” in diameter, barely big enough to make the mallet I wanted to make.
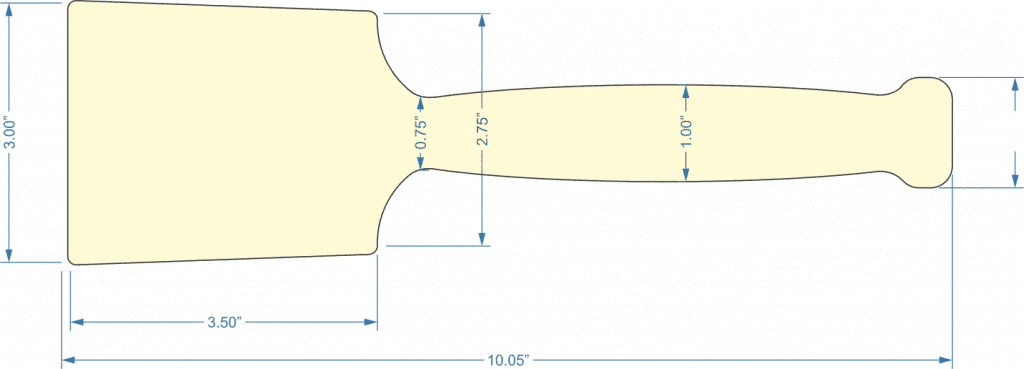
While a mallet can be made to any size the woodworker desires, carving mallets are typically 3” in diameter, tapering down slightly towards the handle, with a head that’s 3 ½” long. The overall size of the mallet is roughly 10”, with the rest of the mallet being the handle. The drawing below gives dimensions for a typical carving mallet. Please keep in mind that these dimensions are approximate and don’t have to be followed exactly.
Carving mallet dimensions
There are some cases where it would be desirable to have a mallet with a much larger head, such as a mallet that would be used with a large chisel, such as a framing chisel. In that case, the larger head is needed for its mass, which will convert directly into a greater amount of force being conveyed into the chisel. That force is necessary to cut into beams or logs, such as when building a log cabin.
The curvature shown for the handle is typical of most carving mallets, as it fits the hand well. However, some carvers prefer a handle that is narrower in the middle and wider at the ends. Mallets are very personal items and each woodworker will gradually determine what works best for them.
Finished mallet
Related Posts:
Vinyl Stencils for Wood by Admin April 30, 2021 Tools Stenciled signs on wood are one of the trendy home décor items we find everywhere from knick-knack shops to truck stops. Some carry witty or…
Wood Floor Inlay by Admin May 1, 2021 Installing Wood floors have made a comeback, with many people preferring them over other flooring options. That’s not surprising, considering wood flooring’s natural beauty and durability.…
Kiln Dried Wood by Admin June 30, 2021 More About When lumber is sawn from logs, its moisture content can be as high as 100%. That’s not to say that the whole board is water,…