When you encounter punky, rotted wood on a vintage window sill, a porch column, or a timber framing member, your immediate instinct is to save it rather than rip it out. However, choosing the wrong stabilization method is a recipe for total failure.
The debate between standard water- or solvent-based wood hardeners and professional-grade, two-part liquid epoxy consolidants isn’t just about price—it’s about the chemistry of polymer preservation. Using the wrong product can trap moisture, accelerate rot, or leave a critical structural component completely hollowed out beneath a shiny surface shell.
Here is exactly how these two restorers stack up, backed by shop testing, chemical realities, and hard-learned job site lessons.
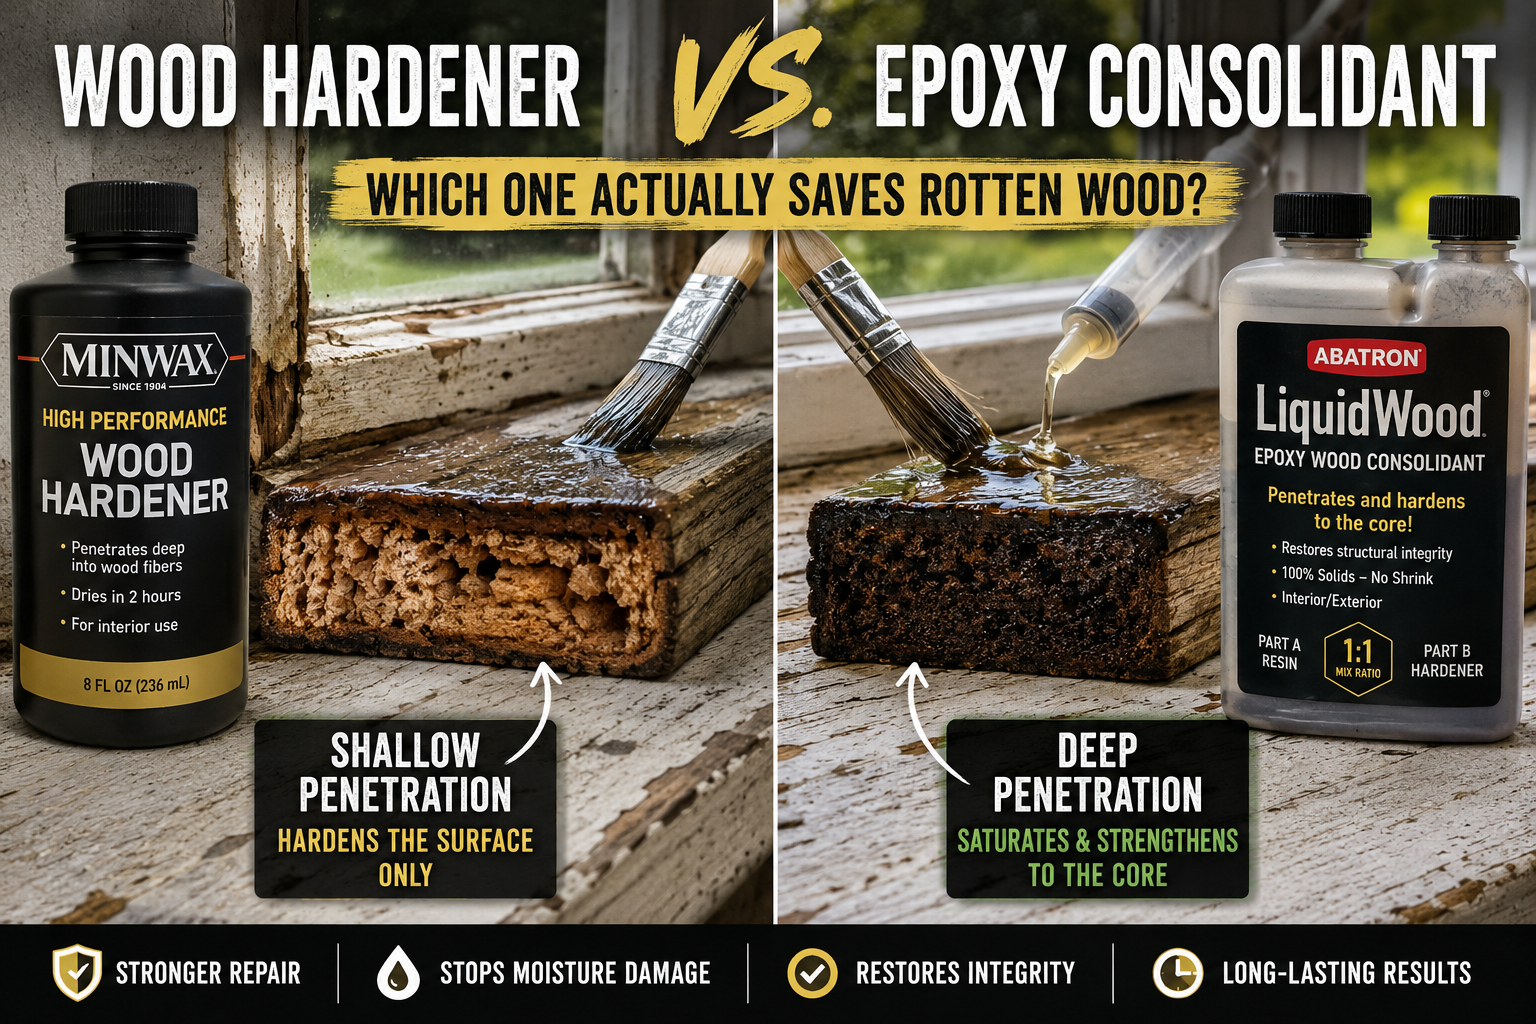
Wood Hardener vs. Epoxy Consolidant: The 60-Second Verdict
If you are dealing with a small, cosmetic interior repair—such as a dinged baseboard or a soft spot on a piece of furniture that will be filled with standard putty—a one-part wood hardener is an affordable, quick-drying choice. If you are dealing with exterior elements, window sashes, architectural columns, or framing members with minor to moderate decay, a two-part epoxy consolidant system is generally the preferred solution.
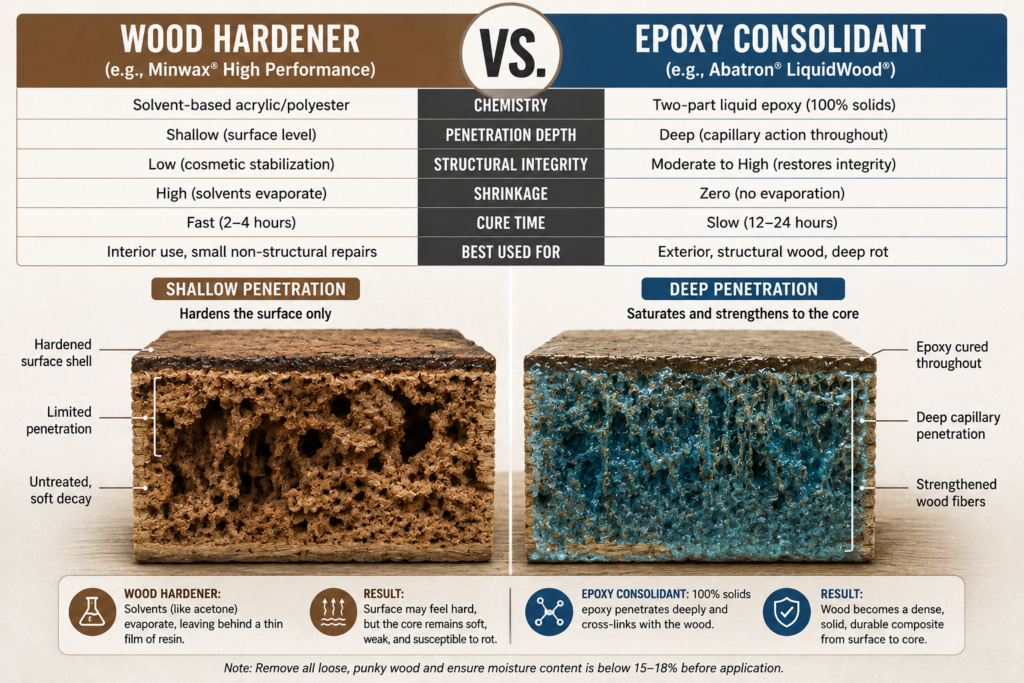
Feature
Wood Hardener (e.g., Minwax)
Epoxy Consolidant (e.g., Abatron LiquidWood)
Primary Chemistry
Liquid acrylic or polyester resins carried by volatile solvents (like acetone)
Two-part fluid epoxy resin system (100% solids Base + Hardener)
Penetration Dynamics
Primarily shallow (stabilizes the outer layer; restricted by rapid solvent evaporation)
Deep capillary action (remains liquid long enough to saturate deep into porous wood cells)
Structural Integrity
Low (Cosmetic stabilization; fragile to mechanical stresses)
Moderate to High (Can restore significant structural integrity in partially deteriorated members)
Volumetric Shrinkage
High (Significant volumetric shrinkage occurs as carrier solvents evaporate during curing)
Zero (Cures via chemical cross-linking with no evaporation)
Cure Time & Usability
Fast (Dries to the touch in 2 to 4 hours via evaporation)
Slow (12 to 24 hours to fully cross-link and cure)
Best Used For
Interior trim, furniture prep, hobby crafts, small non-structural voids
Window sills, exterior millwork, porch posts, and stabilizing sound wood surrounding old rot
The Science of Penetration: How They Actually Work
To understand why these two product classes perform so differently, you have to look past the marketing text and analyze how they cure at a molecular level.
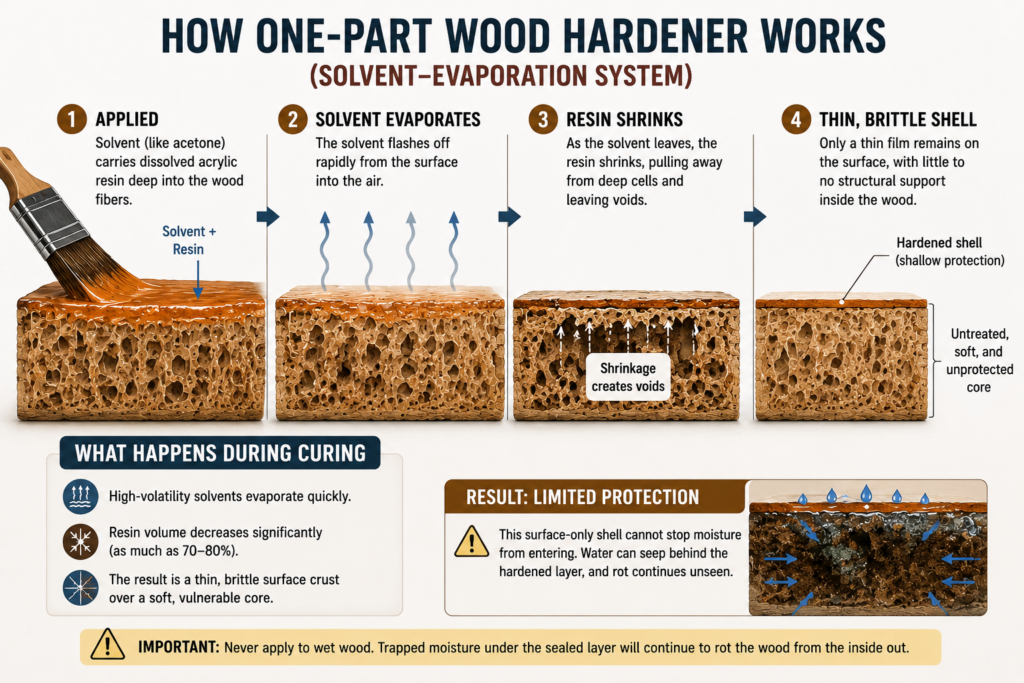
Standard retail wood hardeners rely on high-volatility solvents—most commonly acetone or methyl ethyl ketone (MEK)—to carry dissolved acrylic or plastic resins into the wood fibers.
When you brush or inject this fluid onto rotted wood, the carrier fluid evaporates almost instantly. As the solvent evaporates into the atmosphere, the carrier solvent shrinks significantly during curing, leaving behind a thin, brittle film of plastic coating the wood cells.
Because the acetone evaporates so rapidly from the surface, it often seals the outer pathways before the resin can travel deep into the core of the decay. This leaves an outer “crust” of hardened wood over a core that remains soft, punky, and unprotected.
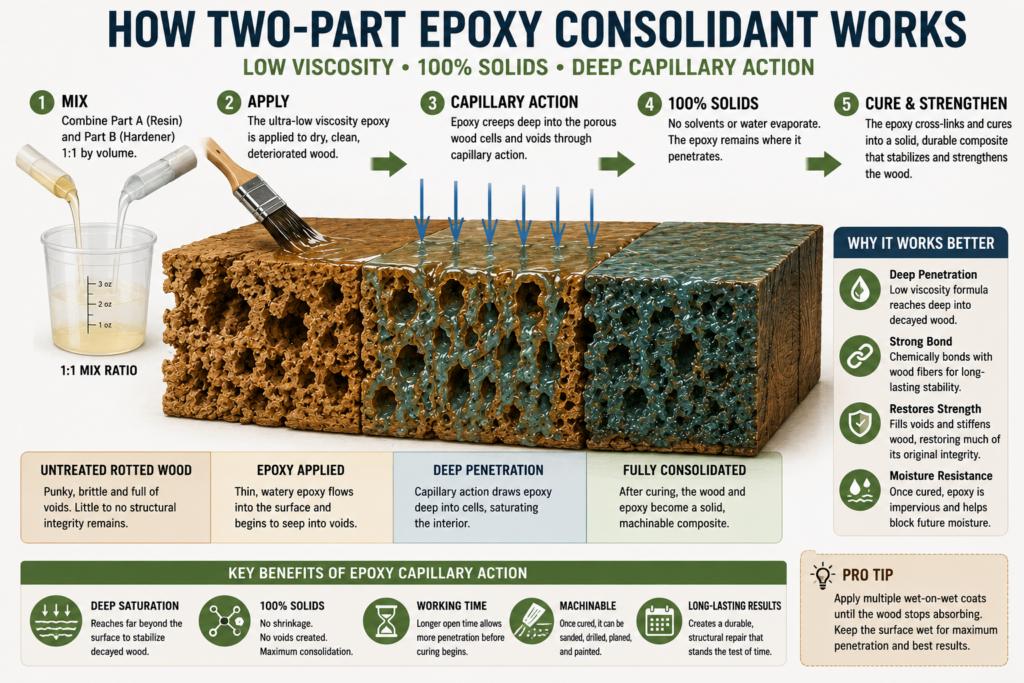
An epoxy consolidant, conversely, is formulated with 100% solids and an ultra-low, water-like viscosity. The term “100% solids” means there are no solvents, water, or carrier fluids designed to evaporate out of the mixture.
When you mix Part A (the resin) and Part B (the hardener), an exothermic chemical reaction initiates cross-linking. Because nothing evaporates, the volume of liquid you pour into the wood equals the volume of solid polymer that remains after the cure is complete.
The extended open time of these systems allows the fluid to creep deep into the porous, decayed cells via capillary action. It fills the micro-voids entirely, transforming spongy wood fibers into a dense, solid, machinable wood-epoxy composite.
Real-World Testing & Shop Notes
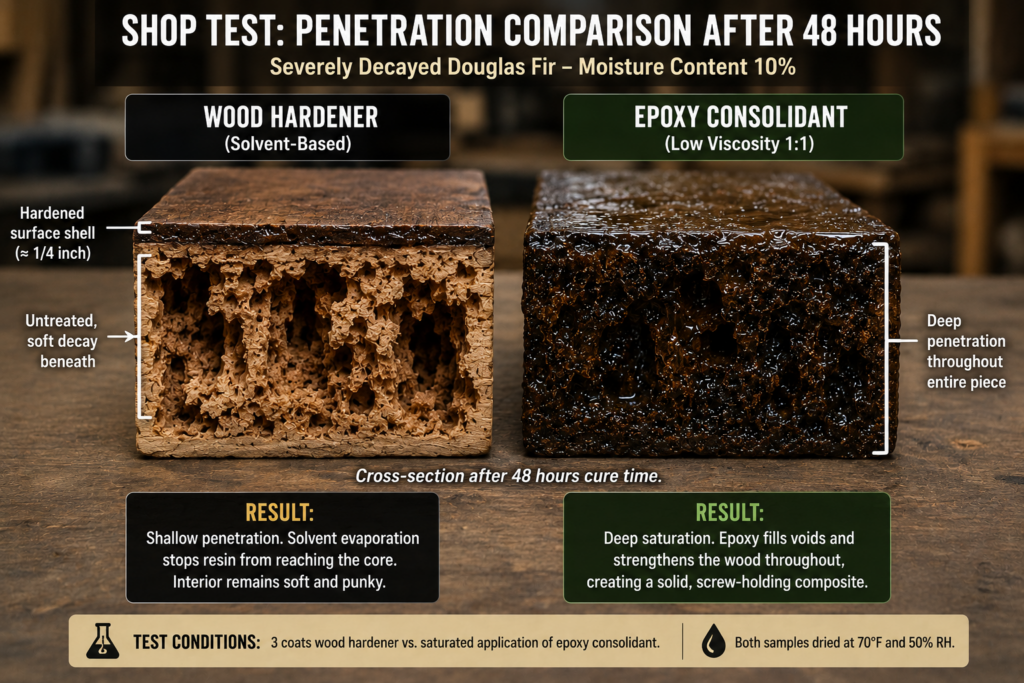
🧪 The Absorption Test
In our shop test, we took two identical blocks of severely decayed Douglas fir punk harvested from an old porch joist. Both blocks were dried to a uniform moisture content of 10%.
Block A was treated with three heavy, successive coats of a standard solvent-based wood hardener applied per the manufacturer’s directions.
Block B was treated with a 1:1 low-viscosity epoxy consolidant system, fed into the wood until it refused to drink any more.
After allowing both blocks to cure completely for 48 hours, we cross-sectioned them along the midline with a band saw to measure the actual penetration depth.
The results were stark. In our test, the solvent-based hardener penetrated only the outer layer of the decay, forming a hard shell roughly the thickness of a coin before the rapid evaporation of acetone choked off its own pathway. The wood beneath that shell remained soft enough to scrape away with a fingernail.
Block B, treated with the epoxy consolidant, achieved significantly deeper saturation, filling the entire porous interior of the decay and fusing the surrounding sound wood into a solid block that could easily hold a screw.
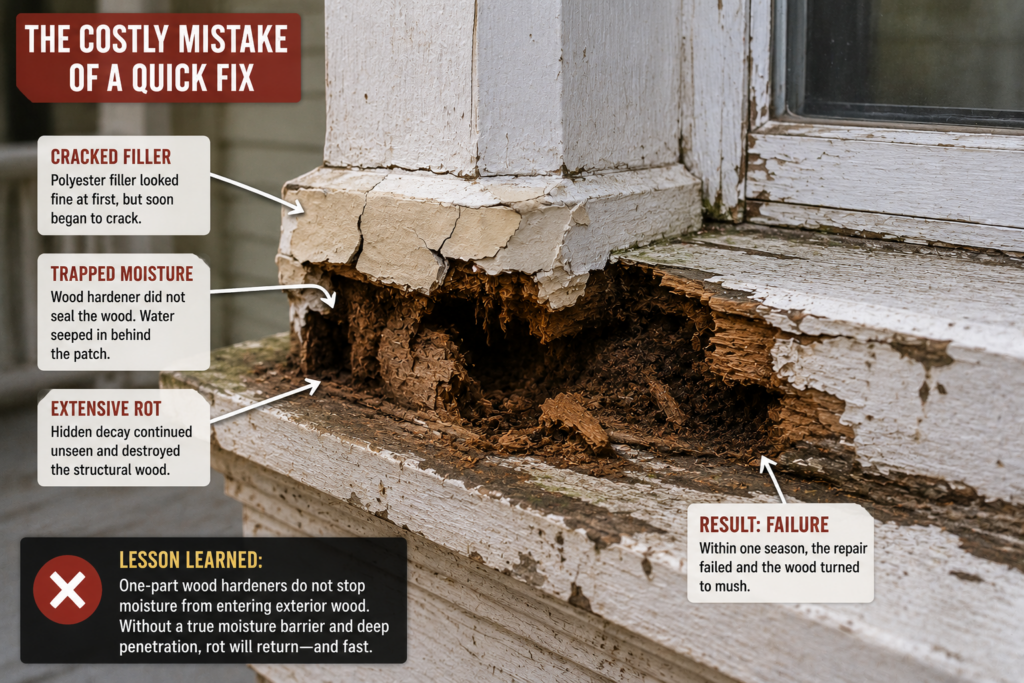
“A few years back, I tried to save a few bucks on a historic porch column repair. I opted for a cheaper retail wood hardener and slapped polyester auto-body filler over it. It looked great for six months. But because standard hardeners don’t stop moisture ingress on exterior joints, water seeped behind the patch. By the next spring, the entire base of the column had turned to mush. I ended up having to replace the entire architectural post—a 💸 costly mistake that cost ten times what a good pint of epoxy would have.”
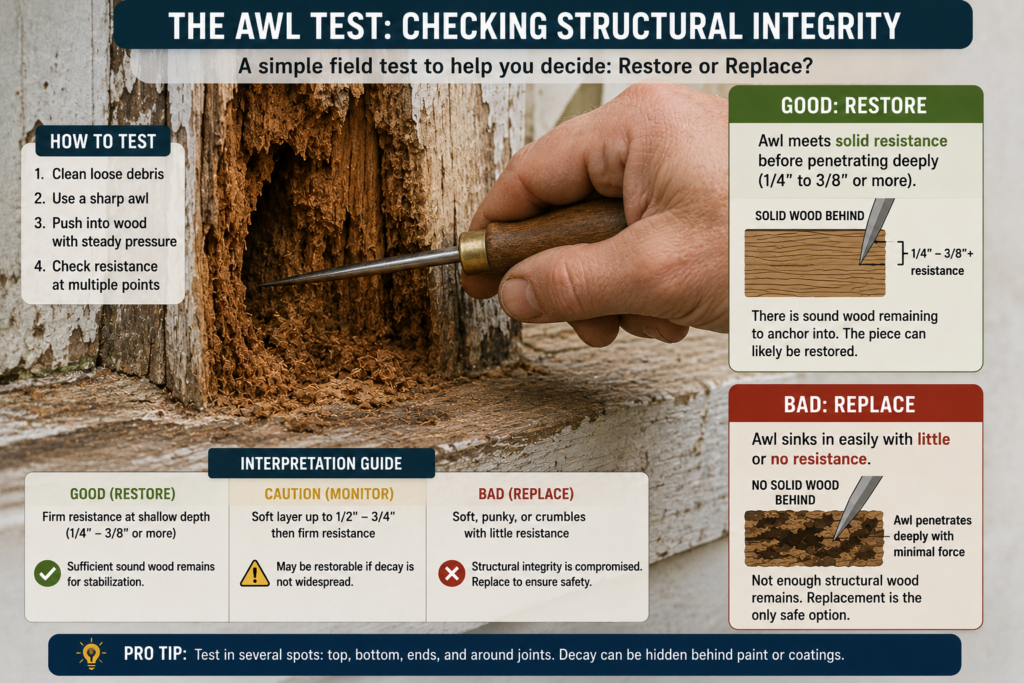
When to Restore vs. When to Replace
While epoxy consolidants are incredibly powerful, they are not a magical cure-all for structurally compromised buildings. A critical part of preservation is knowing when a piece of timber is too far gone.
⚠️ Warning: Epoxy consolidants can restore much of the lost rigidity and compressive strength in sound surrounding wood, but they do not automatically restore full structural load capacity to an entirely rotted beam. If a structural framing member (like a floor joist, header, or sill plate) has lost more than 20% to 30% of its cross-sectional area to rot, it should be physically replaced or sistered with new timber. For any critical structural framing, engineering approval and building code compliance are mandatory.
Use this checklist to determine your path:
The Awl Test: Jam a sharp awl or screwdriver into the wood. If it penetrates more than a third of the beam’s total thickness, or if the wood crumbles like wet cake mix, the structural integrity is compromised beyond the point of consolidation. Replace it.
Load-Bearing Status: If the wood supports live loads (like a deck ledger board or a roof rafter), err on the side of replacement. If the wood is semi-structural or decorative (like a window casing, a decorative corbel, or a door jamb), consolidation is highly effective.
Historical Value: If you are dealing with old-growth timber in a registered historic home where original materials must be preserved at all costs, meticulous consolidation, along with epoxy wood-replacement fillers, is the standard professional methodology.
Choosing the Right System For Your Project
When prepping your materials, match the hardener to the scope of your woodworking or restoration project:
For Light Plywood Trim & Crafts: If you are working on superficial interior repairs before painting or finishing, a quick-drying liquid hardener works beautifully. For extensive base stabilization, read our comprehensive guide on how to treat and seal plywood edges properly to prevent separation over time.
For Marine & Heavy Moisture Exposures: If your wood faces heavy elements, bypass retail shelves entirely. You need a marine-grade system. Learn more about structural waterproofing in our breakdown of the best epoxy resins for marine plywood applications.
Product Recommendations & Monetization
If you purchase through the links below, we may earn an affiliate commission at no extra cost to you.
Best Budget / Quick Prep:Minwax High Performance Wood Hardener (Amazon) – Excellent for quick, non-structural interior furniture fixes, stabilizing small soft spots before applying wood filler, or protecting crafts.
Best Professional / Structural:Abatron LiquidWood Epoxy Consolidant Kit (Amazon) – The gold standard for historic restoration, rotted window sills, and heavy structural timber stabilization. Zero shrinkage, deep penetration.
Step-by-Step Application Guide for Epoxy Consolidants
To ensure your epoxy repair lasts for decades rather than seasons, follow this professional application protocol.
Step 1: Mechanical Prep and Cleaning
Before mixing a drop of epoxy, you must remove any completely loose, loose-flaking, or completely pulverized wood fibers. Use a stiff wire brush, a paint scraper, or a rotary tool with a carving bit to clean out the void. Use a shop vacuum to suck out all loose dust. If you leave loose dust inside, the epoxy will simply glue the dust particles together into a floating clod rather than binding to the solid wood beneath.
Step 2: Test the Moisture Content
⚠️ Warning: Never apply either product to wet wood. Moisture content should generally be below roughly 15% to 18% before consolidation. Trapping moisture behind epoxy repairs is one of the most common causes of premature failure, as the underlying damp wood fibers will continue to rot unseen, completely undermining your repair from the inside out.
If the wood is damp, set up a heat lamp, a fan, or a heat gun to thoroughly dry the area over a few days before proceeding.
Step 3: Mixing and Temperature Control
Epoxies are highly temperature-sensitive chemical systems. Ideal application temperatures range between 60°F and 80°F (15°C to 27°C). If it is too cold (below 50°F / 10°C), the chemical reaction can stall entirely, leaving you with a sticky, uncured mess. If it is too hot, the epoxy can undergo a “hot pot” reaction, generating intense heat, smoking, and hardening inside your mixing cup before you can apply it. Mix Part A and Part B precisely according to the manufacturer’s volumetric ratio, stirring thoroughly for a full three minutes, scraping the sides and bottom of the cup.
Step 4: Saturation via Capillary Action
Apply the mixed consolidant to the soft wood using a cheap natural-bristle brush (a “chip brush”), an eyedropper, or a plastic syringe for deep structural cracks. Keep applying the liquid as long as the wood continues to soak it up quickly. For deep vertical timbers, you can drill a series of downward-angled 1/4-inch holes into the wood just above the rot zone and use them as ports to pour the consolidant deep into the core of the timber.
Step 5: The Tacky Technique for Fillers
If your repair requires an epoxy putty or wood filler to rebuild a missing section (such as the nose of a window sill), do not wait for the liquid consolidant to fully dry and harden.
For maximum adhesion, apply your structural epoxy filler (like Abatron WoodEpox) while the liquid consolidant layer is still slightly wet or tacky. This allows the two materials to chemically cross-link at the interface, forming a monolithic bond that is highly resistant to delamination.
Frequently Asked Questions (FAQ)
Can Minwax Wood Hardener be used outdoors?
Yes, Minwax Wood Hardener can be used outdoors, but it must be immediately top-coated with a high-quality exterior paint, primer, or solid stain once dry. Because it is highly prone to volumetric shrinkage and leaves micro-voids in deep rot, it should be used only for small, superficial exterior repairs (such as trim work). It should not be trusted on high-exposure surfaces or structural elements, such as exterior decks or window sills.
Yes, epoxy consolidants are substantially stronger and tougher than traditional solvent-based wood hardeners. Epoxy consolidants cure via a chemical cross-linking reaction into a 100% solid, rigid polymer that offers high compressive and tensile strength. Solvent-based wood hardeners leave behind a thin layer of dried acrylic resin that is brittle and lacks structural mass.
Can you screw into epoxy consolidated wood?
Yes. Once a low-viscosity epoxy consolidant has fully cured inside a piece of soft wood, the resulting composite material can be drilled, sawed, planed, and sanded just like natural dense hardwood. It holds wood screws and fasteners exceptionally well because the epoxy fills the surrounding cellular structure, preventing the wood fibers from stripping out under mechanical load. It is a good practice to pre-drill your pilot holes, as cured epoxy-infused wood can be hard enough to snap thin or cheap brass screws.
How wet is too wet for epoxy repair?
Any wood with a moisture content between 15% and 18% is too wet for an epoxy repair. Because 100% solids epoxy resins are completely hydrophobic, they cannot displace water molecules trapped inside the cellular structure of damp wood. If you apply epoxy over wet wood, the resin will fail to bond, float on the surface moisture, and permanently trap that water inside, creating a localized greenhouse effect that accelerates fungal rot underneath the repair.
Related Posts:
Best Wood Hardener for Rotted Wood by Admin June 25, 2026 DIY The best wood hardener for rotted wood depends on the severity of the damage. For light surface rot, a single-part penetrating wood hardener is usually…
How to Make an Epoxy Resin River Table by Admin March 18, 2025 DIY How to Make a DIY Epoxy River Table (Step-by-Step Guide) Creating an epoxy river table may look like an expensive and complex project, but with…