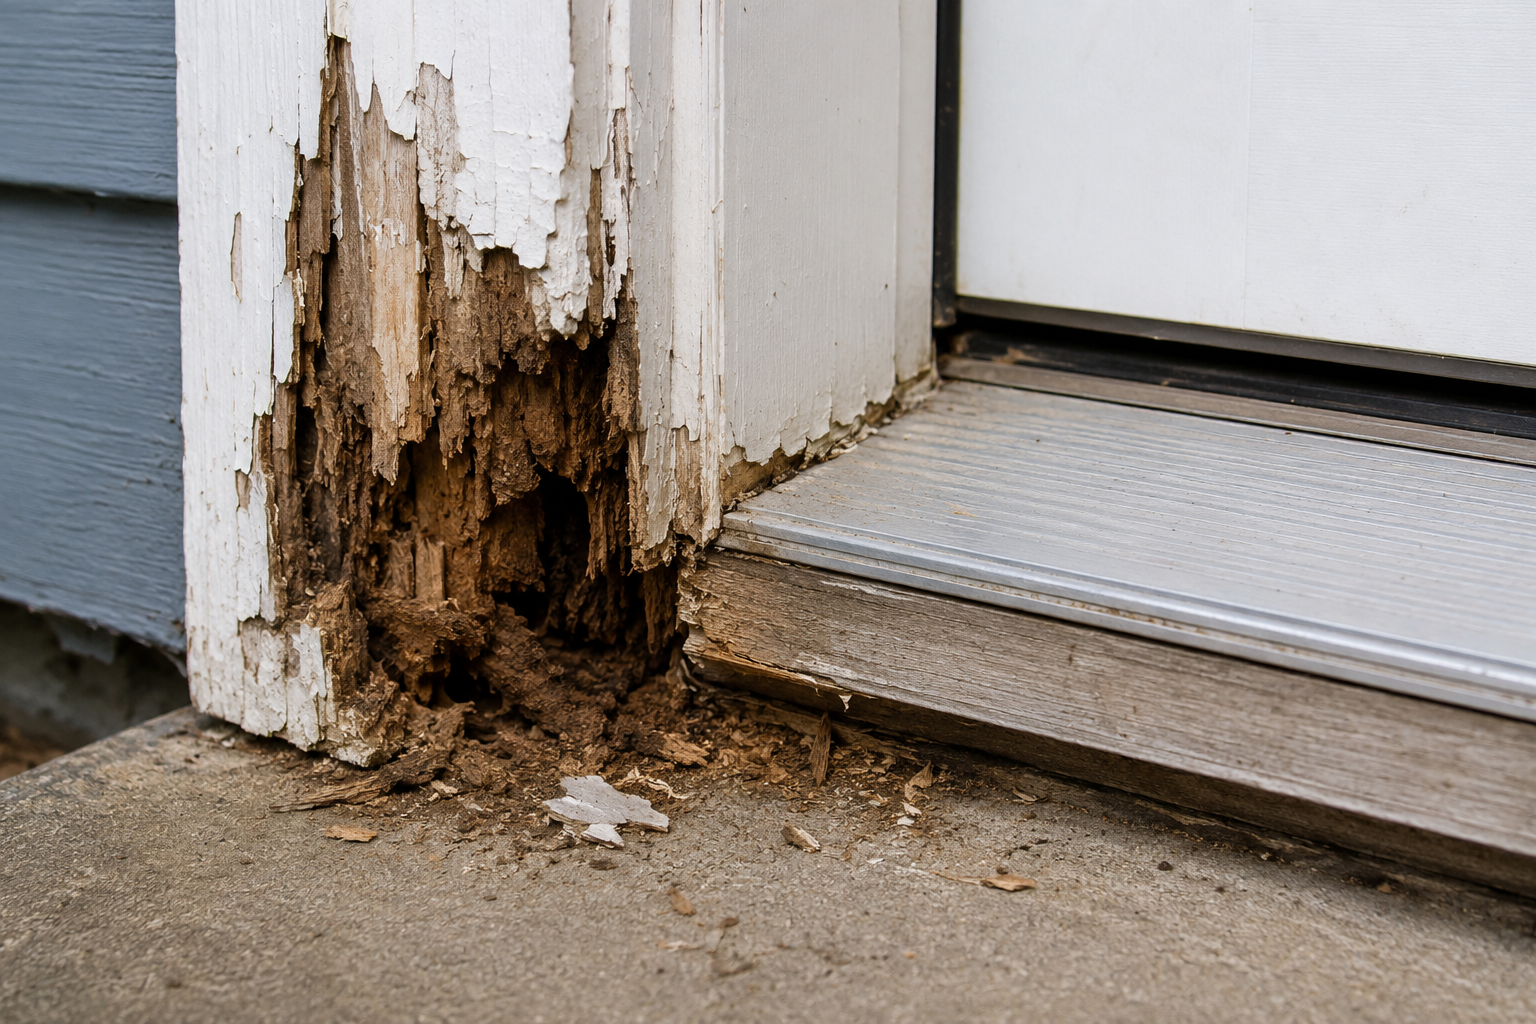
If you’ve poked a screwdriver into the bottom of your door frame and it sank in like wet cardboard, you’ve got rot — and the good news is, in most cases you don’t need to rip the whole frame out to fix it.
Repair Method Comparison
Method
Best For
Cost
Time
Skill Level
Lasts
Wood Hardener + Epoxy Filler
Small to medium soft spots
$25–$40
1–2 hours
Beginner
Often a decade or more
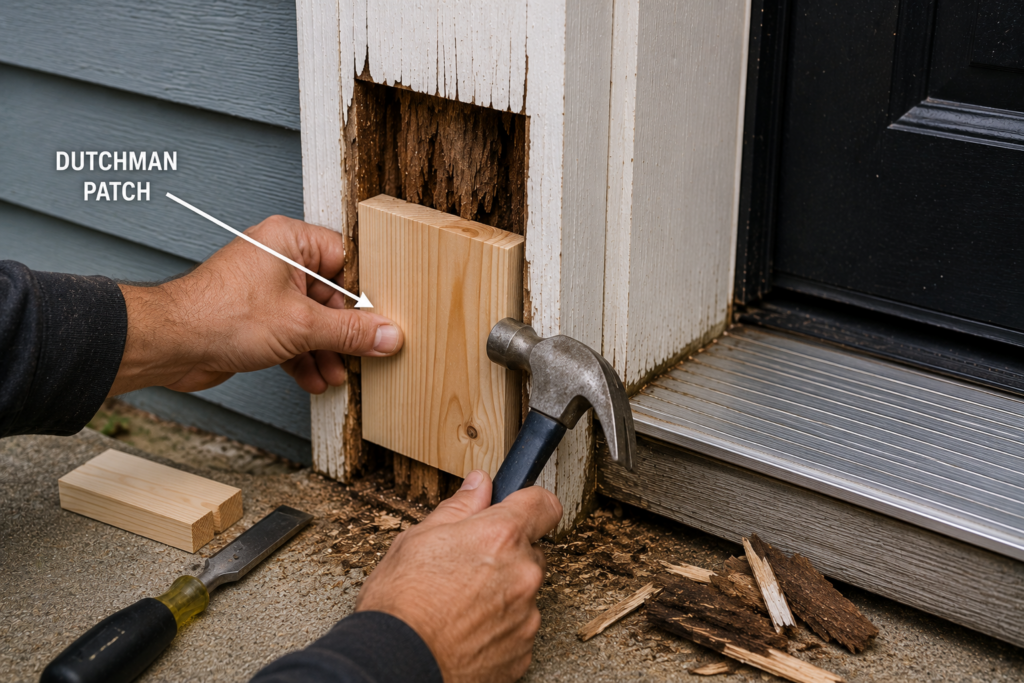
Dutchman Patch (wood splice)
Larger rotted sections, full jamb legs, corners
$40–$80
Half day
Intermediate
15+ years
Two-Part Epoxy Wood Putty Rebuild
Deep rot, decorative trim
$50–$90
2–4 hours
Beginner-Intermediate
Often a decade or more
Full Frame Replacement
Structural rot, multiple rotted sides
$200–$600+
1–2 days
Advanced/Pro
20+ years
For a broader breakdown of what different rot scenarios cost across a whole house — not just door frames — our Wood Rot guide covers causes, severity, and typical repair costs so you can budget the full job, not just this one spot.
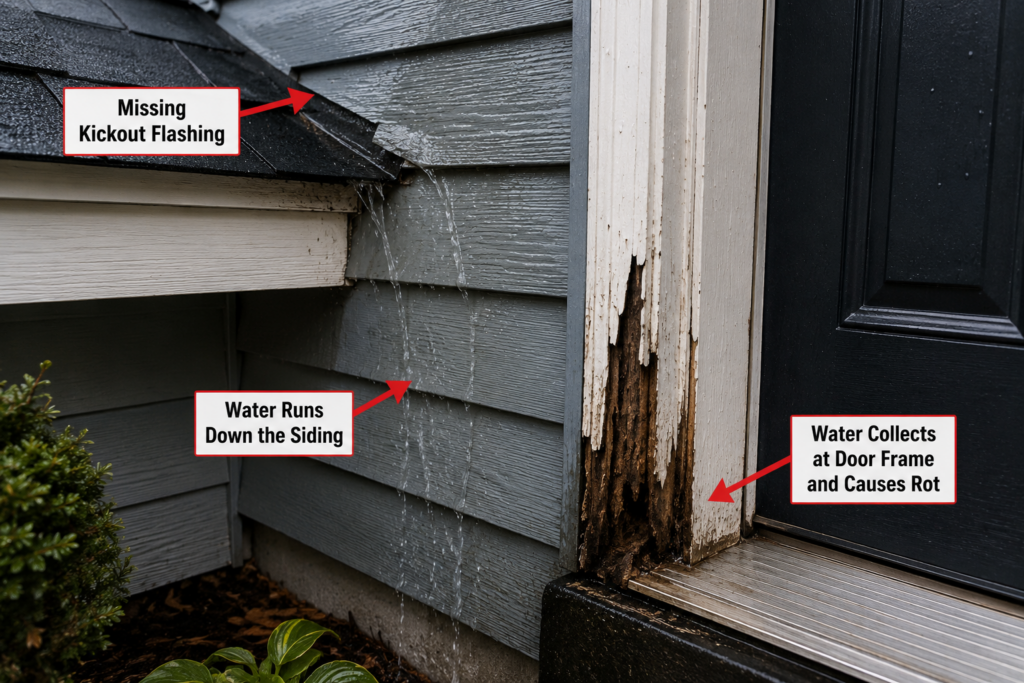
Find the Moisture Source Before You Repair Anything
This is the step most guides skip, and it’s the reason so many “fixed” door frames rot again within a year or two. Epoxy and wood hardener repair the wood — they don’t stop water from getting in again. Before you touch a chisel, check for these common moisture sources:
Missing or failed kickout flashing where a roofline meets a wall above an entryway, which dumps roof runoff straight down the side of the door frame
Leaking storm doors that trap condensation and rain against the frame instead of shielding it
Failed or missing sill pans under the threshold, which let water that gets past the door sit against the bottom of the jamb instead of draining out
Sprinkler overspray hitting the frame daily — a surprisingly common cause on the side of a house facing the lawn
Downspouts discharging right next to the entryway, soaking the base of the frame every time it rains
Deteriorated fascia or roof edge trim above the entry, which lets water track down behind the frame instead of off the roofline
Spend ten minutes during the next rain (or run a hose along the eaves and entryway) and watch where water actually goes. If you fix the rot but not the source, expect to be back here in a season or two — our Wood Rot guide goes deeper on tracking down a moisture source before any repair.
Test the Wood With a Moisture Meter Before You Start
Eyeballing “soft” wood is a good first pass, but a pin-type moisture meter takes the guesswork out and tells you exactly how far the damage extends.
Below 15% moisture content: Wood is dry and structurally sound. No active rot risk.
15–20% moisture content: Borderline. Wood may be drying out from a past leak or actively absorbing moisture from a current one. Re-test after a dry week before deciding.
Above 20% moisture content: This is the threshold most building professionals use to indicate where decay fungi can actively grow. Wood reading above 20% is either currently wet or already breaking down; it should be treated as part of the repair rather than left in place.
Test in a grid pattern, starting at the visibly damaged area and moving outward in increments of a few inches each. Stop digging out wood once your readings drop back under 15% in solid material — that’s your boundary for sound wood. This is also the fastest way to catch a problem the screwdriver test misses: wood that looks fine on the surface but is already saturated beneath the surface, often the first sign that rot is heading toward the framing rather than staying contained to the trim.
Signs Your Door Frame Has Rot (Before It’s Too Late)
Door frame rot — sometimes described as a rotted exterior door jamb or just soft wood at the bottom of a door frame — almost always starts low, where rain splashes back off the threshold and the wood never fully dries. Look for:
Paint that’s bubbling, cracking, or peeling near the base of the jamb
Wood that feels soft or springy when you press it
A screwdriver or awl sinking in with light pressure
Dark staining or a musty smell around the frame
Visible gaps where the frame meets the threshold
If you’ve already dealt with similar damage on a windowsill, the diagnosis process is nearly identical — we cover that in our guide to repairing rotten wood window frames, and the same moisture sources usually explain both problems.
❌ The Mistake Most Homeowners Make With Rotted Door Frames
The most common mistake isn’t skipping the repair — it’s painting over the rot. Fresh paint on a soft spot looks like a fix for about a year, then the rot keeps spreading underneath where you can’t see it. By the time it shows again, it’s usually doubled in size and now includes the surrounding area that was previously solid. Treat the rot, don’t just hide it — and don’t repaint until you’ve also addressed whatever is letting water in to begin with.
When Epoxy Is the Right Call — and When It Isn’t
Epoxy wood filler is excellent for soft spots, small voids, and decorative trim. But there’s a middle category that many repair guides gloss over: rot that’s eaten away a large portion of a jamb leg — say, the bottom 8 to 12 inches — without reaching the framing behind it. In that situation, rebuilding the entire section out of epoxy filler is possible but isn’t always the best use of your time or money.
A Dutchman patch (cutting out the rotted section and splicing in a new piece of matching wood) holds up better over the long run in a load-bearing area like a jamb leg, because you’re replacing wood with wood instead of asking a few inches of epoxy to act structurally. Reach for a Dutchman patch when the rot covers more than roughly a third of a jamb leg’s height; stick with epoxy filler for smaller, shallower damage.
If your moisture meter readings show the rot continuing past the jamb into the wall framing itself, that’s no longer a door frame repair — at that point you’re into structural territory, similar to what we cover in our sistering joists guide for reinforcing rotted or damaged framing members.
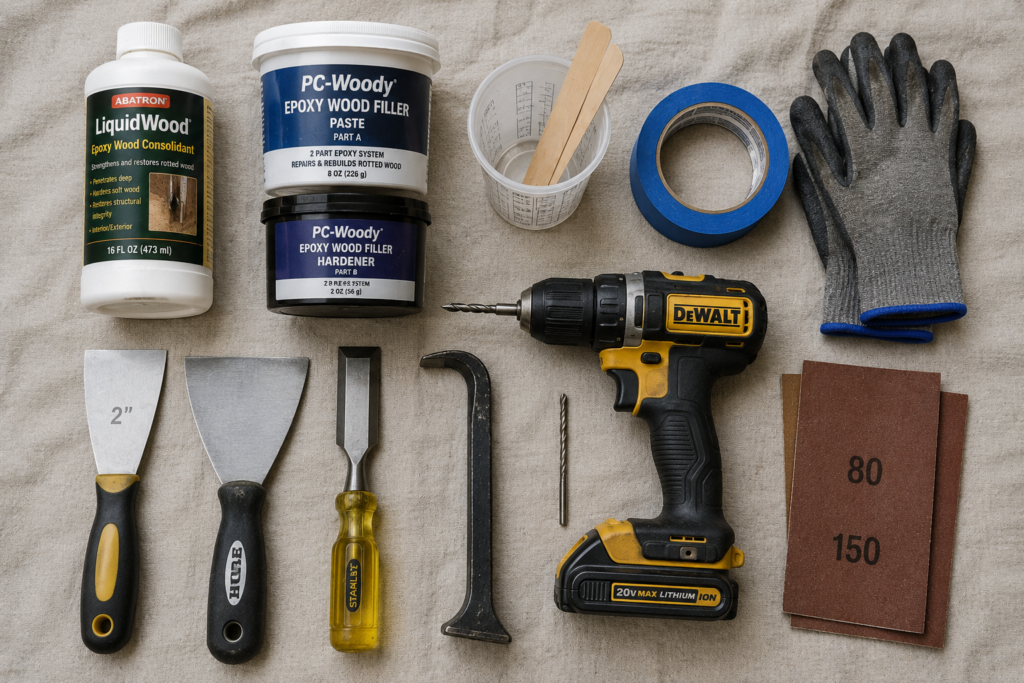
Use the moisture meter to find where readings drop under 15%. Mark that line — it’s your cutoff for how far you need to remove material.
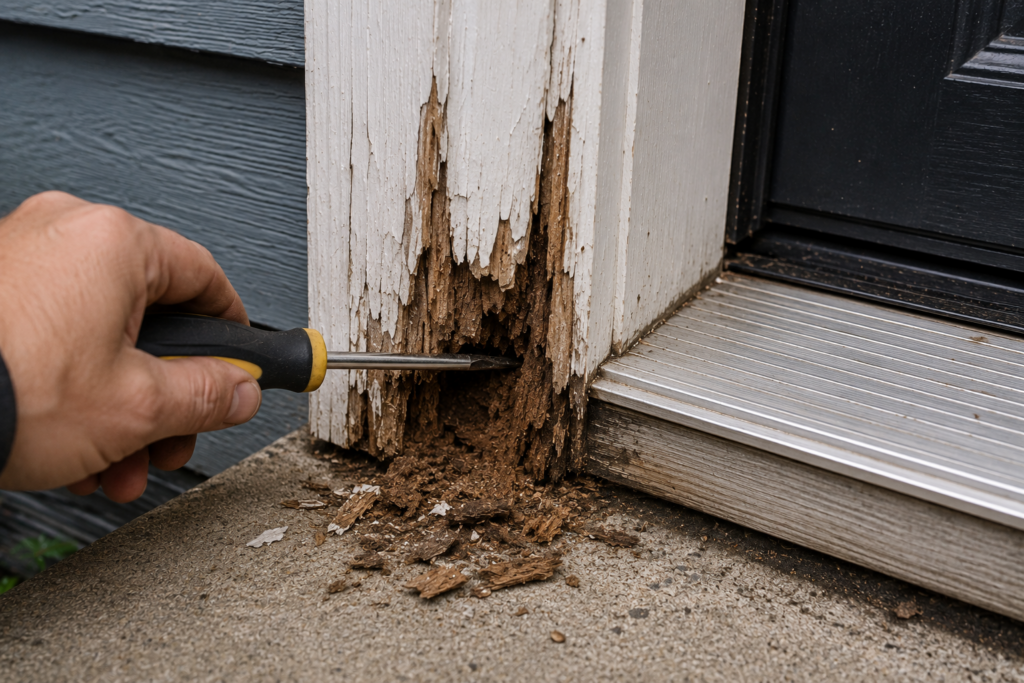
Step 2: Dig Out the Soft Wood
Use a chisel, screwdriver, or oscillating tool to remove all the soft, spongy wood to the line you marked. Don’t stop at “mostly solid” — keep going until you hit wood that resists the chisel and reads dry on the meter. Leaving even a small soft pocket behind is the #1 reason these repairs fail early.
Step 3: Let It Dry Completely
If the area is damp, give it 48–72 hours of dry weather (or use a fan/heat gun on low) before moving forward. Re-check with the moisture meter — don’t proceed until readings are back under 15%. Epoxy products won’t bond properly to wet wood.
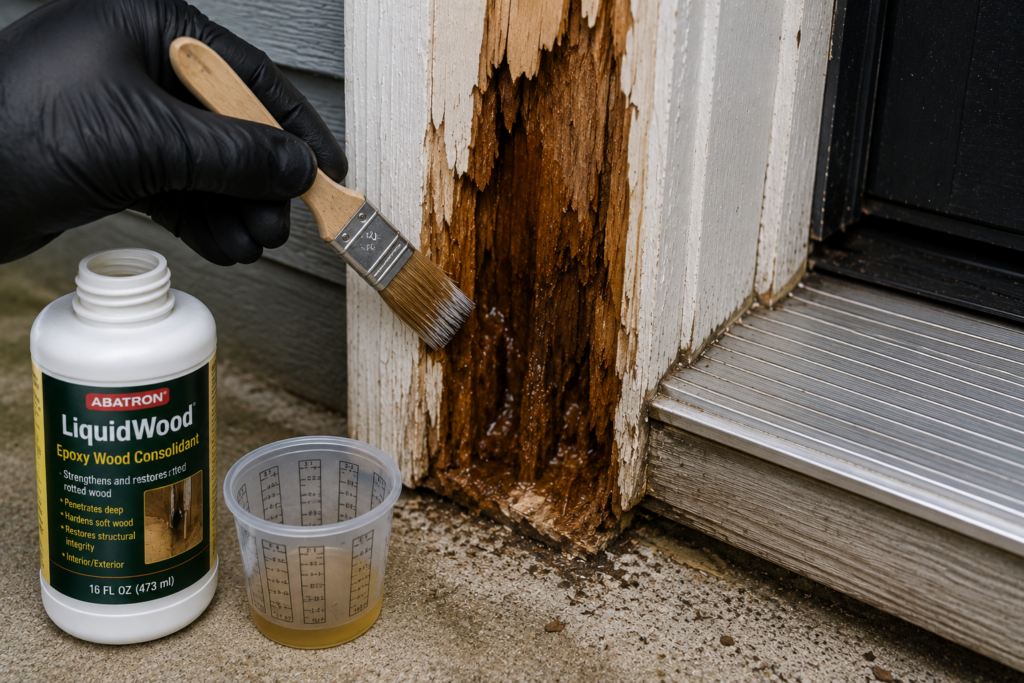
Step 4: Apply Wood Hardener
Brush or inject wood hardener into the remaining wood fibers around the repair area. This soaks into the surrounding wood, giving the epoxy filler something solid to grip rather than crumbly fibers.
Step 5: Fill With Epoxy Wood Filler
Mix the two-part epoxy filler and pack it into the cavity, slightly overfilling since it will need sanding. Work it into corners and edges with the putty knife so there are no voids.
Step 6: Shape and Sand
Once cured (check product timing — usually 24 hours), shape the filler to match the original profile of the frame, then sand smooth starting with 80-grit and finishing with 150-grit.
Run a bead of paintable exterior sealant along the top seam where the frame meets the siding or trim, and consider adding a strip of flashing tape over any horizontal joint above the repair to prevent water from tracking back in the same way. Then prime with exterior-grade primer and finish with two coats of exterior paint. This step isn’t optional — an unsealed repair will absorb moisture again within a season.
💸 Repair vs Replace: The Real Cost Difference
A full epoxy repair on one rotted section runs $25–$90 in materials and a weekend afternoon. A professional carpenter replacing the same section of jamb typically charges $300–$500 once you factor in trim removal, matching molding, and repainting. Full-frame replacement — jamb, casing, and threshold — typically runs $800–$1,500 per door when a contractor handles it.
These figures reflect typical U.S. pricing as of 2026 and vary widely by region. Northeast and West Coast markets frequently run above these ranges due to higher labor rates; rural Midwest markets often come in below them.
Get a local quote before assuming any of these numbers apply directly to your area. If you’re dealing with rot in more than one spot on the house, our Wood Rot guide breaks down typical severity and repair costs so you can plan the full scope rather than pricing each spot separately. Unless the rot has spread into the structural framing behind the jamb, epoxy or splice repair yields a comparable outcome at a fraction of the professional replacement cost.
😬 What Happens If You Ignore Door Frame Rot
Rot doesn’t stay contained to the frame. Left alone, moisture tracks into the wall framing behind the jamb, then into the subfloor underneath the threshold. At that point you’re not patching a door frame anymore — you’re looking at framing repair and subfloor replacement, which is a different category of cost and a different category of contractor. The same progression shows up with neglected window sills, which is why catching it early matters more than the repair method you choose.
⚠️ Warning Signs You Need a Professional (Not a DIY Fix)
Call a contractor instead of reaching for epoxy if you notice:
Rot extending into the wall framing or door header, not just the jamb
Moisture meter readings above 20% in the framing behind the jamb, not just the trim
The frame has shifted, racked, or the door no longer closes/latches properly
Soft or sagging subfloor underneath the threshold
Rot present on more than two sides of the frame
Any sign the rot has reached structural framing members
These point to a load-bearing or structural issue, and epoxy is a cosmetic and moisture-sealing fix — not a structural one.
🧪 What Determines Whether an Epoxy Repair Actually Holds Up
Manufacturer testing and field experience from contractors point to a consistent pattern: epoxy wood filler repairs fail early for one of two reasons, almost always — incomplete rot removal, or skipping the wood hardener step and going straight to filler on bare, untreated wood fibers. Hardener-only treatments tend to perform worse over time, particularly at the seam where treated wood meets untreated wood, since that boundary is where moisture re-enters first.
The combination — full rot removal, a hardener to firm up what’s left, then epoxy filler to rebuild the missing wood and seal the seam — consistently holds up best in freeze-thaw climates and high-exposure entryways. Skipping the filler step, or trying to stretch a small amount of hardener over a large repair, is the most common reason these fixes don’t last as long as expected.
How to Prevent Door Frame Rot From Coming Back
Keep gutters and downspouts directing water away from entryways — runoff discharging within a few feet of a door is one of the most common causes of repeat rot
Re-caulk the gap between the frame and exterior siding/trim every 2–3 years to keep that seam watertight
Repaint at the first sign of cracking, not after it’s peeling
Make sure the threshold has a slight outward slope so water doesn’t pool against the frame, and consider a sill pan if you’re ever replacing the threshold outright
Replace worn weatherstripping around the door — gaps here let wind-driven rain reach the jamb directly
Check the fascia and roof edge above any entryway once a year for early signs of deterioration before it becomes a door frame problem
If you’re replacing any trim near the door, consider marine plywood for backer pieces in high-moisture entryways — it resists exactly this kind of water damage long-term
Keep a moisture meter on hand and spot-check problem areas once a season — catching a 17% reading beats catching a 25% reading
FAQ
Can you repair a rotted door frame without replacing it? Yes, in most cases. If the rot is contained to the jamb or trim and hasn’t reached structural framing, epoxy wood filler and wood hardener — or a wood splice for larger sections — will restore the wood’s strength and shape without removing the frame.
How do you know if door frame rot has reached the framing? Check the wall area directly behind and above the jamb with a screwdriver and a moisture meter. If readings are above 20% in the framing itself, or if the door has started sticking, sagging, or misaligning, the rot has likely moved into the structural framing and needs a contractor.
What moisture content is too high for wood around a door frame? Most building professionals treat 20% moisture content as the threshold where decay fungi can actively grow. Readings above that mean the wood is either currently wet or already decaying and should be addressed as part of the repair.
What’s the best filler for a rotted door frame? Two-part epoxy wood filler is the most durable option for exterior door frames because it’s fully waterproof once cured, unlike wood putty or standard fillers that can reabsorb moisture.
How long does an epoxy door frame repair last? A properly done repair — full rot removal, hardener, filler, and paint sealing, with the original moisture source corrected — often lasts a decade or longer. Repairs in harsh freeze-thaw climates or on frames with ongoing water exposure won’t last as long, which is why addressing the moisture source matters as much as the repair itself.
What causes a door jamb to rot in the first place? Almost always sustained moisture exposure: poor flashing above the entry, a failed or missing sill pan, gutters or downspouts discharging nearby, sprinkler overspray, deteriorating fascia above the entryway, or a storm door that traps moisture rather than shedding it.
Is it better to repair or replace the bottom of a door jamb? If less than roughly a third of the jamb leg’s height is affected and the framing behind it is solid, repair (epoxy or a Dutchman splice) is more cost-effective. Replace the full jamb when rot is extensive, has reached the framing, or affects multiple sides of the frame.


")
")

")
")