Clean, tight joinery is how to tell any woodworker’s experience level. Those who can make nice, tight joints have obviously been practicing their craft for some time. Others, who don’t have that level of experience, usually try to get by with machine cut joints, which are never quite as tight as they can be made with a plane and a chisel.
Many think of dovetail joints as being the epitome of quality joinery, but those aren’t the only type of complex joinery that exists. In fact, there are many kinds, including traditional Japanese joinery used in assembling beams used in temples.
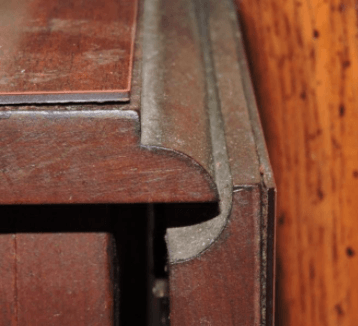
Joinery takes on all manner of appearances, not all of which are meant to merely join pieces of wood together. Some are also designed to allow that wood to move. Perhaps the simplest form of this is the wood drawer slide that’s found in most dressers. At the other extreme, we have the wood knuckle joint, a hinge made out of the wood parts themselves and used since the 1600s for drop-leaf tables.
Furniture-makers in the 1600s didn’t have the ready availability of a vast assortment of hardware, such as we have today. So, while some hardware was used, furniture makers had to be more creative. This resulted in them creating the knuckle joint for use on those drop-leaf tables. While the knuckle joint was largely replaced by the rule joint and the inset hinge to go with it, some woodworkers still made the knuckle joint as a sign of superior craftsmanship.
Rule joint
The knuckle joint is an all wood joint, with the exception of the hinge pin. If one takes a good look at the barrel of an ordinary door hinge, that’s what needs to be cut into the ends of the two pieces of wood being hinged, normally the table top and the drop leaf. Highly accurate cutting is required to make the hinge work.
Today the knuckle joint is largely ignored, mostly due to the difficulty in making them. Nevertheless, for those who want a real challenge in their woodworking, it’s still a beautiful example of superior woodworking. The high precision needed to make a successful knuckle joint makes it a challenge for experienced woodworkers. For the rest of us, it’s perhaps too big a challenge.
Making a Knuckle Joint
No knuckle joint is going to work out, unless the edges to be joined together are properly prepared. This means they need to be the same width and thickness, as well as square to the board. Using a shooting board and a plane is an excellent way to make sure that the edges to be joined are properly prepared.
Start with the Layout
With the edges ready to go, set the board’s thickness on a marking gauge, by setting the blade’s point or edge against one side of the board and the fence snug up against the other. For this type of joint, it’s better to use a marking gauge and knife, rather than using a pencil. Even the sharpest of pencils is going to create a thicker line than a sharp blade can. Since precision is of the utmost importance, it makes sense to use a marking knife and gauge, rather than a pencil.
Using the marking gage, scribe a line around both board ends which will be used to make the joint. Everything that is being done to make the joint will be done within this area of both boars.
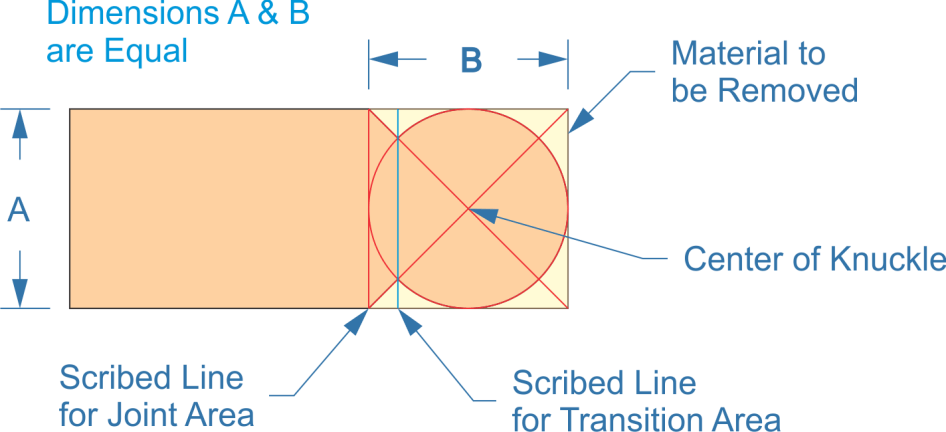
It will be necessary to find the center of this area on both boards. So using a 45° square and a marking knife scribe the diagonals out from the two corners at the edge of the board. Accuracy here is critical, so to help ensure that the line is right at the corner, set the edge of the blade on the corner and bring the miter square up to the blade, rather than placing the miter square on the corner and expecting to get the blade set right at the corner.
Using the center given by the intersection of those two lines, scribe the largest circle possible on both edges of the board with a pair of dividers. The size of this circle must be the same for all four places it is scribed, so if it doesn’t appear to be fitting the same, check the dimensions and that the diagonal lines are starting right in the corners.
The final thing to mark at this point is a line across the circle, truncating it. If we try to cut the circle all the way around, we’ll end up separating the hinge from the board. This line will serve as the transition point from the board to the knuckle joint; so, like the other lines, the position is critical.
Scribed pattern
The last thing that has to be measured is the fingers for the knuckle itself. As with any other hinge, these must fit together rather exactly. For that reason, it’s best to measure and mark both pieces together, clamped in a vice and with the edges flush.
Ideally, all the fingers of the knuckle should be the same width, although they don’t necessarily have to be. One could choose to make some wider and some smaller for decorative purposes. It could also work out that the width of the joint doesn’t divide out evenly, making it hard to get all the sections the same width. Nevertheless, for traditional knuckle joints, all the sections should be equal. That’s most easily done by using a pair of dividers to measure and mark their width, rather than trying to do it by dividing the space and using a ruler.
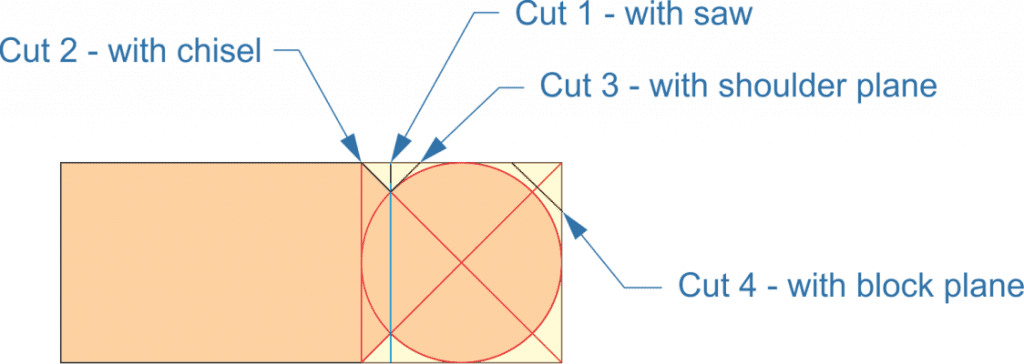
Cut the Bevel
The first part of the knuckle joint to be cut is the transition. With a back saw, cut the line identified as “Scribed line for transition area” in the drawing above. All four cuts need to be of consistent depth, all the way across. But don’t cut quite all the way down to the circle. Rather stop just short of it, so that the final cut can be made with a chisel. That’s necessary to create a crisp, 90 degree corner. The saw would leave an angle with a flat at the end.
Using a wide sharp chisel, cut the angle from the surface of the board, down to the point where the scribed line truncates the circle. This should be a very accurate 45° cut, ending up with a clean line at the bottom. In order to make that cut consistent, it can be helpful to have a block of wood, cut at 45° to support the chisel, especially on the last cut down to the finish depth.
The same cut and then bevel needs to be made on both sides of both boards.
Once one side of the bevel is cut, it’s necessary to cut the other side, where it starts going up the curve. Rather than using a chisel for this part, it’s easier to use a shoulder plane. But there is some risk in doing that, as the far end of the board might splinter. To prevent that splintering, it’s best to pare away some of the material, at the end of the cut with a chisel. The shoulder plane can then be used, with no risk of damaging the board and causing splintering at the end. Repeat for both sides of both boards.
Make the Cylinder
With the notch fully cut, it’s time to start making the barrel. This is best done with a block plane. The smaller size of the block plane will make it easier to control, and the low angle of the blade will help keep any of the grain from tearing out.
If you’ve ever hand cut a dowel from hardwood, this is much like doing that, with the exception that the cuts of the plane are across the grain, rather than along the long grain. Start by shaping to an octagon, paring the remaining two corners down to the scribed circle. Check regularly to ensure that the cut is even and that one end isn’t ending up deeper than the other. Both ends must come down to the scribed circle, without going any farther.
Cutting order
From this point, continue with the block plane, varying the strokes to round the knuckle. If the octagon was cut perfectly with the plane, the corner of the knuckle will be 45 degrees. Use the next set of cuts to turn those into a series of 22.5 degree angles. Then from there, knock it down to 11.25 degree angles. Finally, make the part fully round.
It can be useful to cut a pattern or gauge out of plastic or sheet metal for use in checking that the knuckle is actually round and not out of round. The same gauge will help ensure that the diameter is equal all the way down the knuckle.
Cut the Individual Fingers
Before cutting the other half of the knuckle joint, use the second piece to find where the ends of each finger will be on the first half and transfer the dimensions there. Once again, this is best done with a marking gauge, rather than with a pencil and rule. Make a mark on the sections which will be removed to help prevent any errors.
Once the dimensions are marked for the length of each finger in the knuckle, the knuckle on the other board can be cut. The first knuckle can then be used to provide the dimensions for the second, once again using the marking gauge for accuracy.
Typically, there are an odd number of individual fingers on a knuckle joint of five; three on one piece and two on the other. However, in the case of a full-length knuckle joint used for a drop-leaf table, any number of fingers can be used. Just remember that the more fingers there are, the more complicated it will be to cut and fit the fingers for a smooth-operating hinge.
To cut the fingers, start by cutting down next to the line on the waste side at each line that has been scribed in the knuckle. This is a great place for the adage of “measure twice, cut once” with the exception that it is “check twice” rather than measure twice. The perfect cut will come exactly down the scribed line, with the scribed line becoming the edge of the cut. There’s no room for extra material in the knuckle joint or any desire to leave any gaps.
Removing the material in the fingers that have to be removed requires a combination of additional cuts at an angle and the judicious use of chisels. Care is needed to prevent cutting out too much; but at the same time, the bottom of these cuts needs to be pared out in a curve, deep enough so that the other half of the knuckle joint can sit in the space given, without rubbing unnecessarily. A specially shaped scraper can be helpful for making the final cuts and smoothing out the bottom of the cut, especially in the corner.
The same procedure must be completed on the other half of the knuckle joint, keeping in mind that opposite fingers are being removed. As the cuts are coming closer to completion, stop and check their fit with each other, rotating the two boards as if they were already hinged, checking for any place where they do not fit together and allow movement. Sand the finished parts smooth, using progressively finer grades of sandpaper.
Clamp the two pieces of the knuckle joint tighter, so that they can sit vertically on a drill press table. Double check that the parts are aligned perfectly, with the fingers from one barrel side fitting fully into the other; they shouldn’t be loose, but they shouldn’t be tight either. Then drill a hole halfway through the knuckle joint, from the edge, right at the intersection of the two diagonal lines scribed earlier. A brad point drill bit will help with accuracy here.
Flip the knuckle joint over, clamp it again and check that everything is still in alignment. Then drill the hinge pin hole halfway through from the other side. Drilling halfway through from each side allows you to hide any mistakes that might come from the drill press table not being perfectly perpendicular to the drill bit in both planes.
Knuckle joint – pin hole
The final thing to do, to complete the knuckle joint is to push the pin into the joint. While any material can be used for this, brass rod is traditional. The pin is usually made a bit on the long side and one end is bent to 90 degrees, allowing the pin to be removed if it is ever necessary to remove the drop leaf from the table.
Related Posts:
🪚 Mortise and Tenon Joint: Woodworking Explained by Admin October 6, 2025 Joints When you look at a well-made wooden chair that’s still solid after fifty years, or an antique cabinet that hasn’t wobbled once, you’re probably looking…