Boat building is normally a whole different side of woodworking, with its own skills, tools and specialties. Most woodworkers never attempt to build a boat, because of the complexity and the techniques that they’ve never used. Yet boat ownership is something that many people enjoy and others aspire to, even if it is just a small boat. As with many other woodworking projects, a DIY boat can save a lot of money over buying, as well as being an enjoyable learning process.
Of all the boats out there, one of the simplest designs is the Jon Boat. What makes it simple is the minimal curve to the hull, eliminating the need to bend and fit individual boards to make compound curves. While there is some curve, especially curving the bottom of the boat upwards towards the front, it’s nothing like planking a hull. The amount of curvature required is simple enough, that a sheet of plywood can be curved to meet it, without having to wet the plywood.
This is a small craft, designed for use on calm waters, like the local fishing pond. It can be rowed, but most people power them with a small outboard or even an outboard trolling motor. The boat does not handle rough water well, as it is flat-bottomed. There is no V hull to cut through the water and hold the boat straight in the direction it is pointed, nor is there a keel. The only directional control whatsoever comes from the outboard motor.
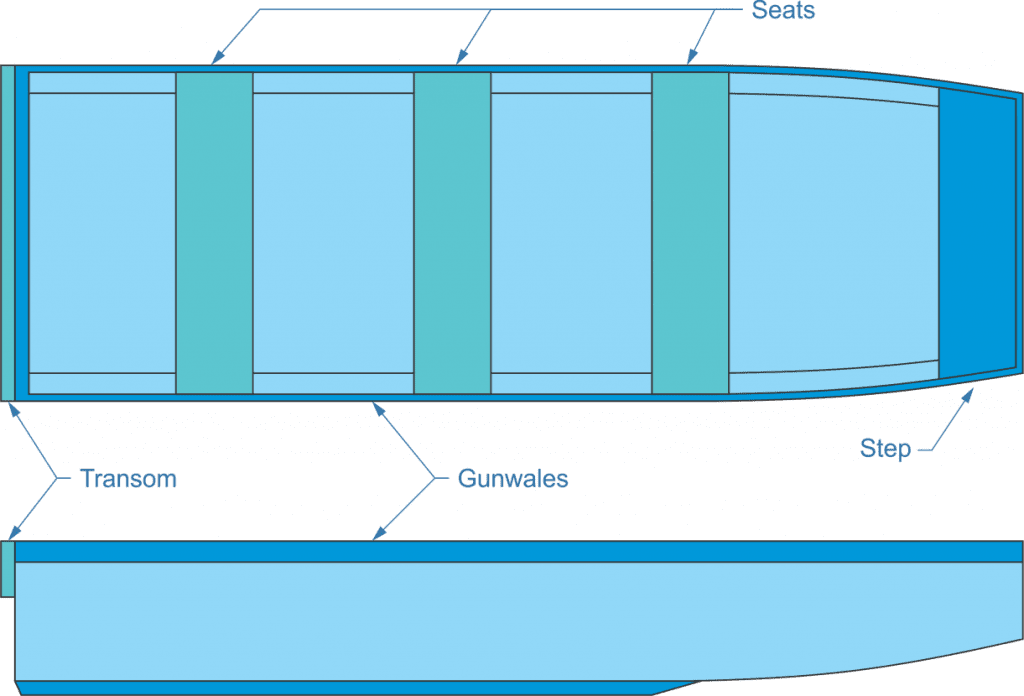
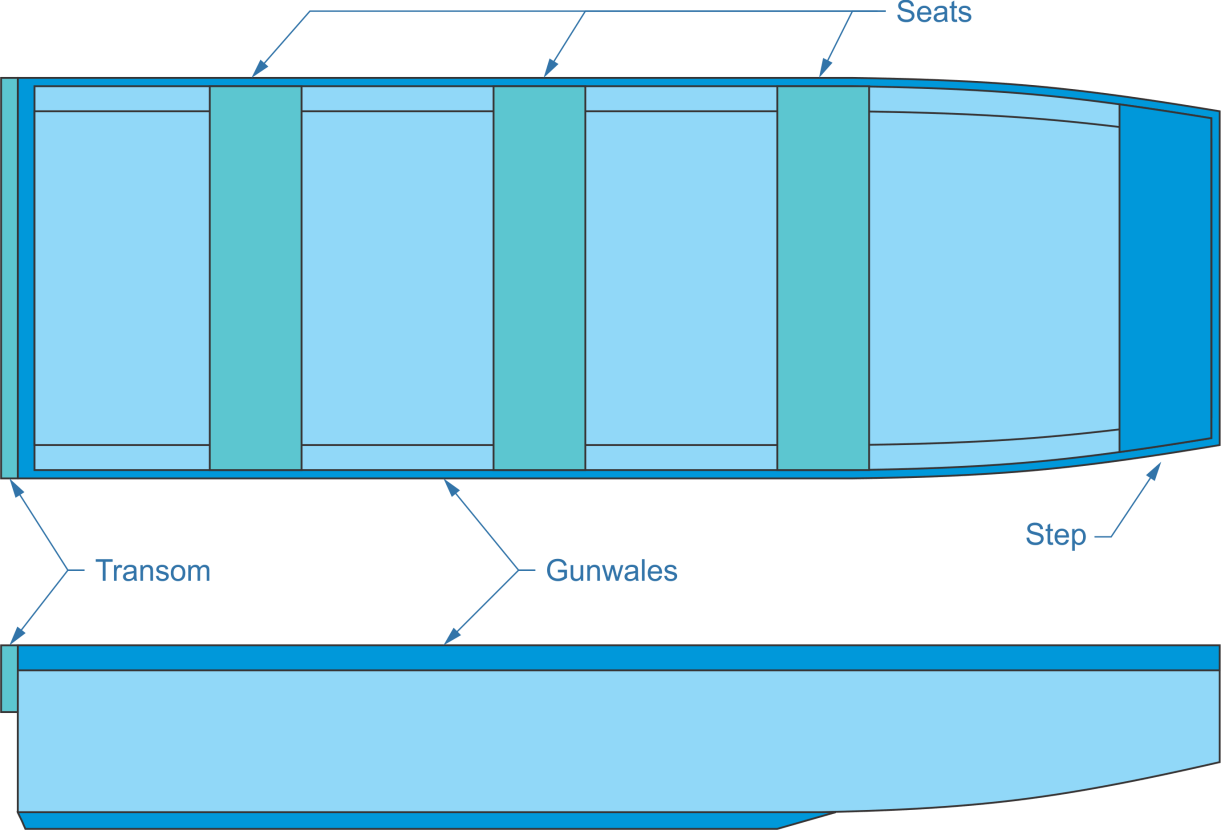
Essentially a Jon Boat is a flat-bottomed rowboat, without a pointed bow. The sides are flat, although they are slanted outwards vertically at about a 10 to 15 degree angle. Some people make them taper slightly throughout the boat’s length, but in other cases, only the front third of the boat tapers, and that’s to a flat nose. The drawing below was done with only the front third tapering.

It is possible to make a Jon Boat out of plywood, using three to four sheets of plywood, depending on how high the sides are made. Since plywood typically comes in 8 foot sheets, a 15 foot, 10 inch long boat is fairly easy to make. This puts it in roughly the same size range as most commercially manufactured Jon Boats. Depending on the owner’s preference, the boat can be made with two or three seats.
There is little structure required to make a homemade Jon Boat and what is needed can be provided by the seats, stern board and the step (or foredeck) at the bow. If so desired, the seats can be boxed in, allowing them to be used for storage.
Joining the Plywood Together
Probably the most important part of constructing the boat is joining the pieces of plywood for the sides and for the deck together, converting 8 foot long sheets of plywood into 16 foot long sheets. This is an important joint, as it is susceptible to breakage if not done sufficiently strong. The bottom of the boat is typically four feet wide, as that’s the width of a sheet of plywood; larger boats are wider.
There are a number of different ways of doing this, but regardless of the method, it is still a butt joint, which requires some other piece of plywood scabbed over it, giving it added strength. Cutting the butt ends of the plywood at a 45 degree angle can help to make a stronger joint, as it increases the available surface area for gluing. Regardless of whether that is done or not, the piece which overlaps the joint should extend a minimum of 3” past both sides of the joint and up to 6”. The wider it is, the stronger the joint will be; but how the sides and bottom of the boat will curve needs to be taken into consideration. In the drawing below, the edges of the butt joint have been tapered to eliminate sharp edges that people can scrape their legs against.

The entire hull can be made of 3/8” thick plywood, although some people use ½” thick for the bottom. Ideally, marine grade plywood should be used, as it has no voids, even in the core veneer layers. That helps prevent any possibility of moisture trapped in those voids causing delamination. However, if the budget for the project is tight, even CDX plywood can be used. Just keep in mind that the boat cannot be left stored in the water or with water in it, as that might accelerate any problems caused by the voids.
Considering that 3/8” thick plywood is actually 11/32” or 0.344” thick, it is essentially impossible to screw these joints together. It will be necessary to glue them together, ensuring that the entire joint area is covered with glue and then clamp the pieces until the adhesive is fully set. A little bit of glue squeezing out around the joint is not a problem, as it can be sanded smooth when dry.
Be sure to use a waterproof glue to assemble the boat, as that glue will be the main thing holding the boat together. Titebond III wood glue is waterproof once set, as is epoxy. So both can be used. However, they should not be used in cases where they need to bond together, as they do not bond together well.
Assembling the Boat
Once the pieces of plywood for the sides have been ripped and then butt jointed together and the sheets of plywood for the bottom have also been butt jointed. Although it might seem like it makes more sense to work from the bottom up, the boat is actually built upside down, so the sides are built together, along with the seats (which act as cross-braces) and then the bottom is attached.
Cut the profile of the sides, before assembly. Before making the curve for the bow, cut a couple of inches off one end. This will allow for the extra material needed on the bottom, to allow for the curve of the bow. Then, to determine the amount of curve on a boat with 12” high sides, think in terms of putting a 2”x 6” across the bow as the brace to hold the two sides together. Starting from that, draw a curve that extends back 1/3 the overall length of the boat and then cut the sides together, so that they come out the same. Sand the edges smooth with a belt sander, to ensure a smooth, even curve.
Everything will end up attaching to these two sides. They need to be spaced exactly 48” apart, measuring outside to outside, on the bottom side. That’s critical. To help keep things that way, cut two to three blocks at a 10 to 15 degree angle for each side and attach them together with a longboard, so that they can be used to hold the sides upright while the other parts are attached.
Speaking of attaching, the easiest way to attach everything together is to use 1”x 2” blocks in all the corners, along the bottom and the stern. Spend the extra money to buy clear lumber, without any knotholes or take the time to cut the knots out of common boards and use what’s left. The bow will be held together by the aforementioned 2”x 6”. Another piece of the 2”x 6” is used as a transom, attaching it to the tailboard and 1”x 2”s are also used to make the gunwales.

Remember that the boat is built upside-down, while the sketches in this article are drawn right-side up. It works best to start at the stern, cutting and installing the stern board, and then work towards the bow. Each crosspiece will need to be angled, so that it makes solid contact with both sides. The sideboards are then attached to these pieces. All pieces are both glued and screwed together, although it is the glue that is providing most of the holding power.
The stern board doesn’t need to be thicker than the rest of the boat, but it does need a strong cross-brace attached to the top of it, to act as a transom. This transom can extend past the end of the sides, but it needs to be attached to the stern board and the joining blocks in the corner.
For the seats, build a framework out of 2”x 2”s, covering both the fore and aft sides with plywood. The seat itself can be ½” thick plywood. As long as it makes solid contact with all sides of the frame, it will be strong enough. The fore and aft plywood sides function as the cross-braces for the boat’s hull.
At the bow, three sides of the 2”x 6” being used as a cross-brace will need to be cut at an angle. The bottom will need to match the curvature of the bottom of the boat and the ends will need to be cut to match the narrowing of the bow. Attaching this is one place where nails should be used. Ideally, use 8d coated finishing nails and don’t be stingy with them. Nails will hold better into the end grain of the 2”x 6”, but the plywood sides will fight against it, as it will be forcing them to curve inwards.
Once the bow is connected together, add the step, attaching it to the bow. It would be a good idea to attach a piece of 2”x 2” lumber across the back of the step, as that’s a natural point for grabbing the boat to pull it up out of the water.
With all that put together, it’s time for the bottom of the boat. Again working from the stern, attach the bottom to the joining blocks, the full length of the boat, ending at the bow. If everything was measured correctly, there should be enough material to go the full length, attaching to the 2”x 6” at the bow.
Attach three strips of 1”x 2” along the bottom of the boat, the full run of the flat part of the bottom. These will serve to protect the bottom from damage, when beaching the boat or loading it on a trailer.
Finishing the Jon Boat
The entire inside of the boat should be caulked with a quality caulking. Don’t use silicone caulk, as paint will not stick to it. Another option is to sawdust into epoxy, making an adhesive putty to caulk with. Fiberglass the outside of the hull at all seams to provide a better seal and add strength.
The entire boat, inside and out, should be coated with a few coats of epoxy to waterproof the wood. This will work better than paint and will not come off like paint will. However, it can still be scraped off, leaving bare wood exposed, so take care not to scrape it off.
Once the epoxy has had adequate time to cure, the boat can be painted with a couple of coats of whatever type of paint is desired. Be sure to leave adequate time for that paint to fully cure, before putting the Jon boat in the water.


