Decorating with aged wood adds warmth and character to any space. However, authentic antiques can be expensive, leading many to create distressed looks. Distressing wood is a simple and affordable way to give furniture, picture frames, or home décor a vintage charm.
There are many ways to achieve a weathered effect, including sanding, dry brushing, staining, and adding intentional dents or scratches. Layering different paint colors, using a wash technique, or applying a homemade vinegar-based stain can give the appearance of years of natural wear.
Want to make your wood projects look timeless? Learn step-by-step distressing methods to transform new wood into stunning rustic pieces!
A generation or two ago, people went to rummage sales and antique stores, looking for antiques to decorate their homes. But times have changed, and people are much more aware of the value of those antiques today than they were. That has raised the price of antiques to the point where most people can’t afford them. We now differentiate between antiques and vintage items, in that the antique ones are valuable, whereas vintage items are just old.
This increase in the price of old stuff hasn’t lessened people’s desire to have it. Instead, it has led people to look for period reproductions. Whether those are factory-made furniture reproductions or something made in smaller shops, there is a fascination with the look of that old stuff. Look in any furniture store today, and you’ll find several examples of these reproductions.
One way of coming up with period pieces is repurposing old wood. The problem here is finding enough aged wood to make a project from. Forty years ago, barnwood became so popular that people were tearing down old barns to get it. That became expensive, as part of the cost of getting that barnwood was replacing the barn for the farmer. Today, few barns are available to tear down, so the most common source of used wood to repurpose is cedar fences. But that isn’t necessarily the best wood to work with, as it can fall apart.
Today, most reproductions are artificially aged to look more authentic. How the aging process is accomplished depends largely upon the material being aged. When we’re talking about wood objects, whether furniture, picture frames, or other decorative items, the process is referred to as “distressing the wood.” While a seemingly complicated process that takes time to learn, it is simple and can yield amazing results from the first try.
Several methods are used in distressing, which we will discuss in this article. However, the best pieces use a combination of different techniques. If you think about an old door on an abandoned house, you will probably see an image of a door with peeling paint, showing different colors in different spots and even having bare spots in places. Chances are the wood will be cracked, the edges will be chipped and worn, and there will be small holes or dents in the surface, either from things hitting the door or insects boring into the wood. That’s the look that we want to reproduce by distressing wood.
To achieve those different colors, you obviously need to apply different colors of paint. But the coats of paint don’t necessarily need to be applied well. In fact, it is best if they are not, using a combination of washes, dry brush techniques, and washes. Each additional layer adds to the artificial aging process, adding character and beauty to the finished piece.
Start with a Base Coat
Any distressed piece starts with a base coat on the wood. Generally, two coats of finish are applied. This can be standard latex paint or what is known as “chalk paint,” which differs in that it is designed to dry with a chalk surface appearance, as if the paint has oxidized. If regular latex paint is used, only use a flat sheen, as one of the things that aging does is destroy the sheen on any paint.
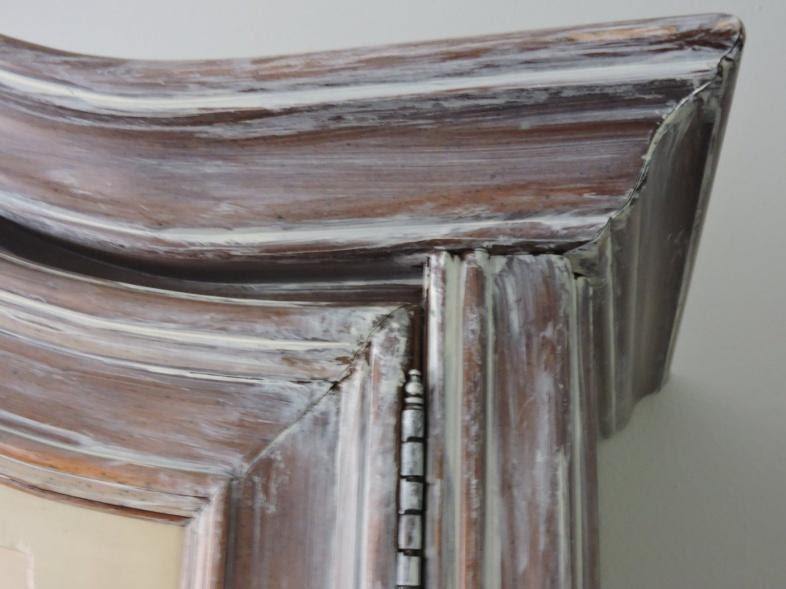
If existing furniture is to be distressed, there is no need to paint it unless the piece’s base color is to be changed. Stained and varnished furniture can also be distressed in the same way, although it is less common. The armour below was distressed with a wash over the original stained and varnished finish.
Wash over stain
Generally speaking, the base coat needs to completely cover the wood, even if it is going to be sanded later. While wood can be left exposed, it will not look as if it has worn but rather like it has never been fully finished. To expose the wood through the base coat, it’s best to sand off the edges.
Using Washes, Stains, and Dry Brush
The most common method of distressing wood is with paint. This can be done using a wash or a dry brush. While similar, the basic difference is that the wash doesn’t leave distinct brushstrokes, as seen in the picture below.
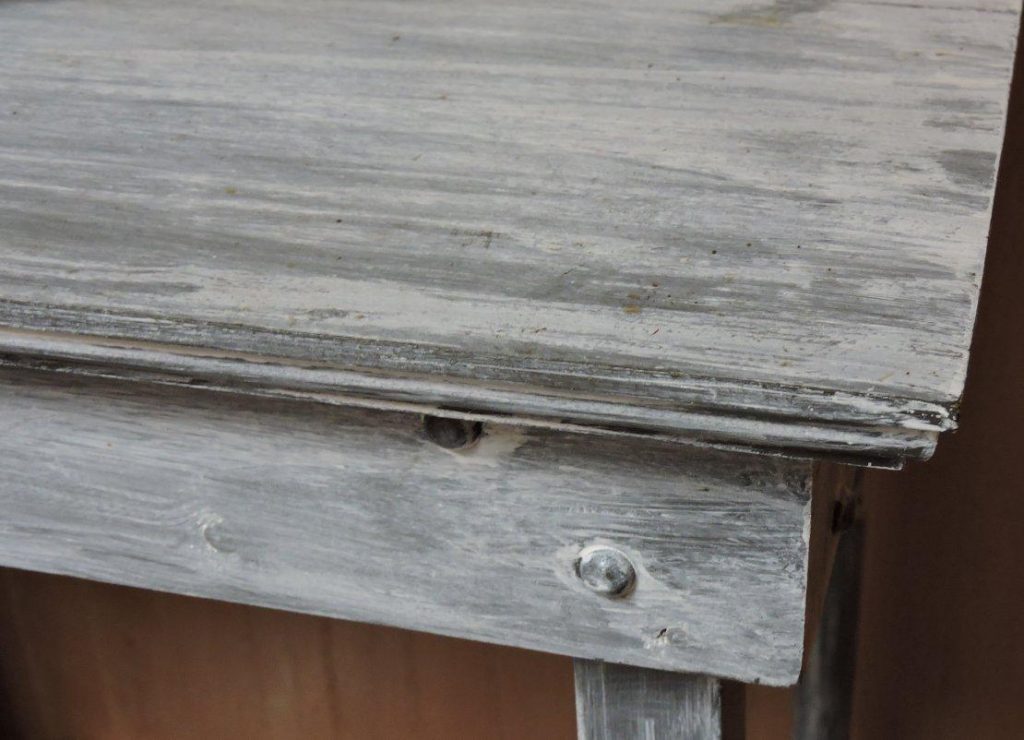
Wash over paint
This is of a table I made, which was distressed right from the beginning. One of the giveaways I used to wash on it is the paint buildup around the dome-headed dowel pins that I used to hold the table together. The same sort of buildup shows in the inside corner of the armoire above.
To use a paint wash for distressing furniture, water down the paint used for the distressed coat. Everyone uses a light color, even white, over a darker basecoat. For this, I watered the paint about 1:2, with more water than pint. A little experimentation is usually in order. I supposed it would be possible to do the opposite, but if it was done, the wash should be watered down even further, as dark colored paint covers light colored paint much more quickly than light colored paint covers dark.
Apply the paint sloppily with a nylon bristled paintbrush. Work in sections, covering that entire section with the wash. Allow the wash to sit on the piece for a couple of minutes, and then lightly wipe off the excess wash with rags or paper towels. It will take a lot of them, so unless the rag box is overflowing, it might be best to use paper towels. A scratchy paper towel is better than a soft one.
If the wash hasn’t covered the base coat as much as desired, an additional coat can be applied and wiped off just like the first. As I said, a little experimentation is always in order.
Dry brush may seem like using a wash, but it is applied differently. While any latex paint can be used, applying a dry brush finish is more manageable if some old paint that has become thick is sitting around.
It doesn’t take a lot of paint to do a dry brush technique. Instead, the idea is to use as little paint as possible to get the desired effect. So, start by dipping just the tip of the paint brush into the paint, no more than ½” deep. Then wipe the paint off on the edge of the paint can. Finally, dry most of the paint off the brush with a paper towel or rag, leaving just a little paint. It should be possible to see the individual bristles of the brush with the paint on them.
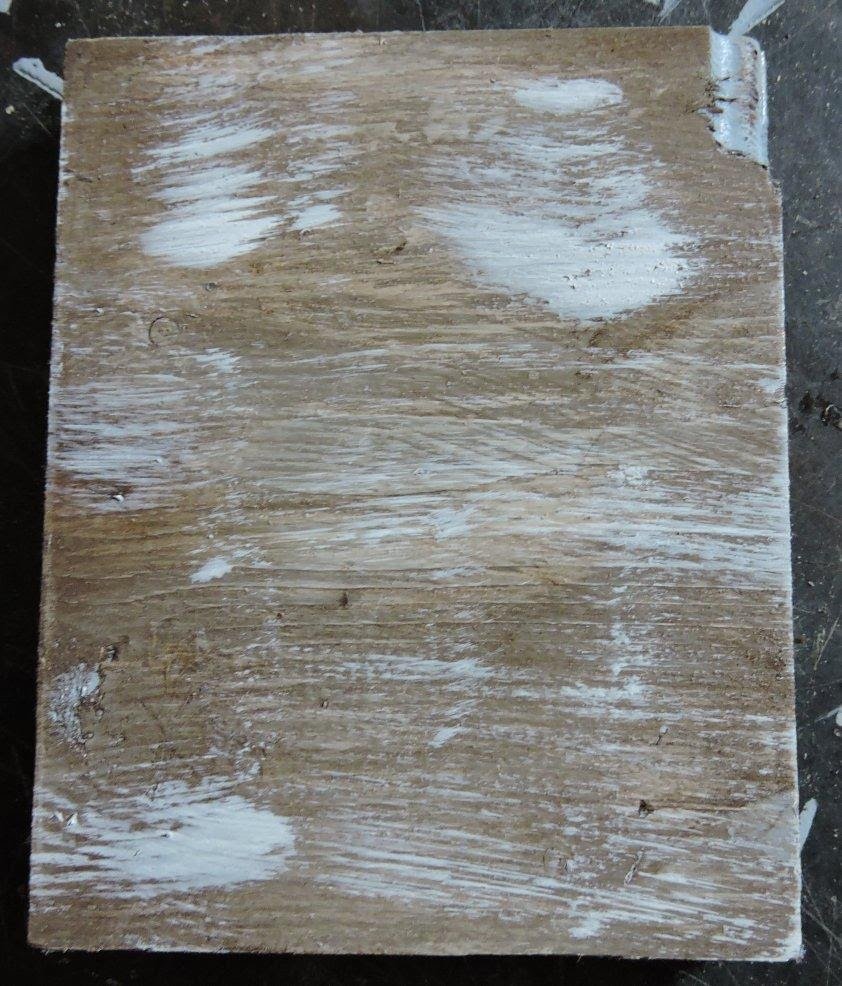
Use this dry brush to paint streaks of paint onto the base coat, resulting in a look like the sample below. Because there is so little paint on the brush, only small areas can be done at a time with short strokes. To make the piece look good, overlap brushstrokes so that there are no obvious dividing lines between areas. Even though the piece below is only 4”x 6”, overlapping strokes was needed.
Dry brush
The paint used for this was a light blue-grey, with a white dry brush over it. The dry brush paint is thin enough that the blue from the base paint color affects the color of the white paint applied over it.
Additional layers of different paint colors could be applied, giving the appearance that the piece has been painted several times through the years.
Using Stain
Wood stains can add another dimension to the distressed finish, not so much adding a wood tone to the underlying wood as giving the appearance that the paint has become dirty. In the sample below, I took the sample piece and brushed on a medium-brown stain, immediately wiping most of it off. It is still possible to see some of the white dry brush paint through the stain, although it is no longer white. Using the same dry brush technique, I added more white paint over the stain. At this point, it is more or less impossible to tell how many layers of paint have been applied.
Dry brush – stain
Vinegar, steel wool, and tea can be used to make an effective stain. This stain naturally gives the appearance of being old, giving it a distinct advantage over most wood stains. Start by soaking clean steel wool for 24 hours in white vinegar. This must be done in a glass jar, as the acid in the vinegar will attack anything metal. A longer soak time can be used and will provide a darker stain.
Once the steel wool has soaked, make tea in hot water. Then, remove the steel wool and mix the vinegar and tea together. This will allow the tannins in the tea to react with the steel wood in the vinegar, creating a darker finish.
Apply this stain just like any other, wiping off excess. The stain will continue to darken as it dries, so if the first coat doesn’t give the desired color, allow it time to dry well before applying a second coat.
Adding Some Damage
Although the finish above provides an excellent distressed look, making the piece look old, it still lacks something. That’s the damage a door or furniture would receive through the years. This is hard to reproduce accurately, but we can do a few things.
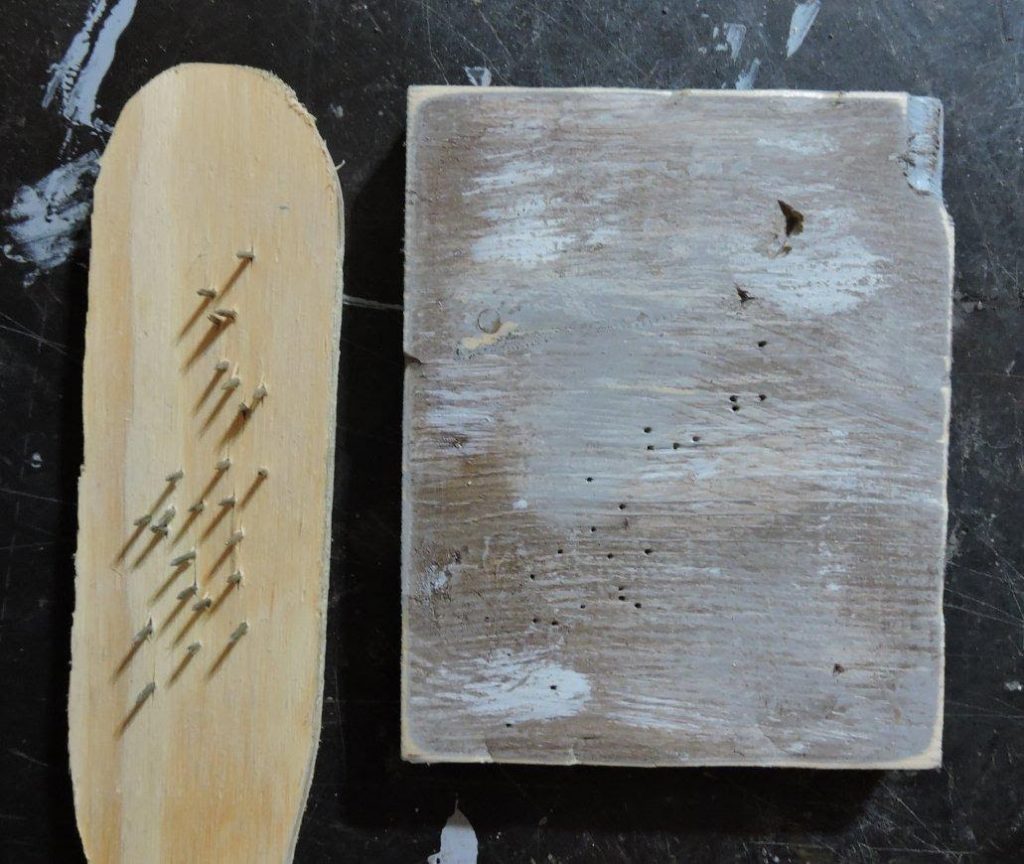
The most common way of adding damage to a distressed piece is by sanding it. The sample in the photo below has been sanded with 180 grit sandpaper, paying particular attention to the edges. While not as severely sanded as the picture frame earlier in this article, the sanding provides the same effect.
Damage
After sanding, the edges of the board were struck randomly with a hammer, denting them as a normal piece of furniture would become dented over time. There is one larger dent in the upper right-hand corner of the sample (not the edge), which was made by flipping the hammer around and using the claws to strike the wood. Looks like I might have hit it a bit too hard.
Finally, hole from burrowing insects were simulated by use of the special tool shown to the left of the sample. This is a piece of scrap plywood, through which I have randomly driven small ¾” long finishing nails. The key here is to keep the pattern random, as insects aren’t going to lay out their holes with geometric precision. The unique tool was set on top of the piece and struck on the back with a hammer, allowing the points of the nails to penetrate the wood. Some people prefer to hit the piece with their nail-encrusted tool, but I like to do it this way.
Making Distressed Beams
Making distressed beams differs from distressing furniture because beams will have been made differently. Rather than being made of sawn wood that has been planed smooth, beams in olden times are rarely lovely and neat. That’s because they are often cut with an axe or an adz. While a skilled carpenter can work with either of these tools, truing up a log and turning it into a beam is truly amazing; it doesn’t provide a smooth, planed finish. In most cases, that wasn’t necessary.
Few of us have the tools and skills to reproduce this finish properly today, and the beams we are usually working with are nothing more than one-inch-thick dimensional lumber formed into a box. Nevertheless, we can do a lot to make our S4S lumber appear more like those original beams by damaging the wood.
In addition to those mentioned above, several different techniques can be used to damage the beam. One good tool for this is a grinder, which will allow scooped indentations on the edges and surface of the beam. The same can be accomplished using chisels, but it is harder to maintain the random appearance when using a chisel, especially for woodworkers who are accustomed to doing accurate work with their bench chisels.
How to Make Plywood Look Nice: 6 DIY Finishes by Admin March 31, 2025 Finish Most people think of plywood as just cheap, utility-grade wood. For years, I thought the same—until I started working on weekend furniture builds in my…