Weddings are steeped in traditions, some old, some new. One of the keys to the wedding planning process is deciding which of those traditions will be incorporated into the ceremony and reception. Not everyone does the same, as there are different understandings of those traditions and their importance.
One small but important tradition is the giving of gifts. I’m not referring to attendees giving wedding gifts to the couple being married, but gifts given by that couple. While not as widely talked about, it is customary for brides and grooms to give gifts to the wedding party, with the bride giving something to her bridesmaids and the groom giving something to the groomsmen. Often, these are gifts that are used in conjunction with the wedding, which then serves as a reminder of their participation in the ceremony.
Amongst the many gifts that have become part of this tradition are bridesmaid hangers. This one makes sense, because bridesmaids typically wear a particular dress, picked out by the bride. Giving the bridesmaids a special hanger for the dress is not only functional, but becomes a reminder of the wedding, even after the dress has been donated to the Salvation Army.
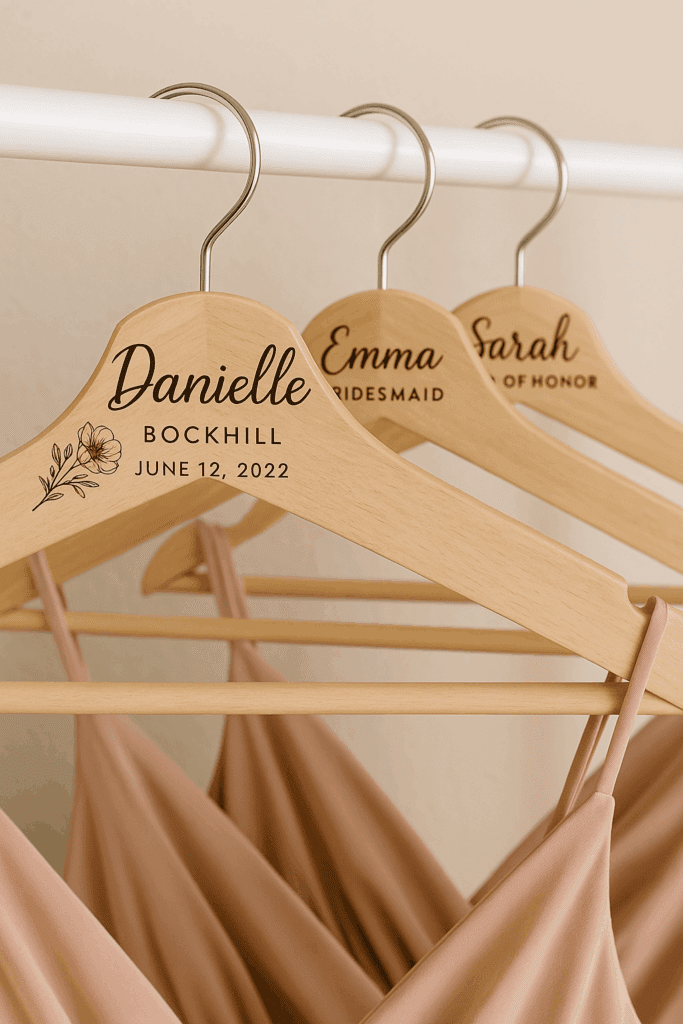
Bridesmaid’s hangers are pretty much always made of wood, as finer hangers generally are. Other than that, their most defining characteristic is the name of the bridesmaid, painted or otherwise engraved onto the hanger. This is usually done in a fancy script font, as those tend to look more feminine. However, any font will do, as long as it matches the theme of the wedding. For a more modern wedding, a sans-serif font might be better than script. In addition to the bridesmaid’s name, the hanger can also include:
The name of the couple getting married
The date of the wedding
The participant’s position in the wedding party (bride, maid of honor, bridesmaid)
Some floral decoration
While several companies will provide custom bridesmaid hangers at a reasonable cost, there’s just something special about a handmade gift, including a bridesmaid hanger.
Making a Basic Bridesmaid Hanger
Most people don’t bother making their hangers, but instead buy wood hangers that they can turn into bridesmaid hangers. Considering the cost of commercially manufactured wood hangers, this makes sense for those who don’t want to bother making their hangers. The hangers are either used in their natural color or painted white before the design work is added.
There are several different ways of adding the name and other decorations to the hanger. Perhaps the easiest method is to use a laser engraver. That’s the way most custom-made bridesmaid hangers are produced. While that can produce an attractive product, it kind of kills the idea of handmade hangers.
Another simple way of making customized bridesmaid hangers is to use cut vinyl, such as is commonly used in sign making. The Cricut vinyl cutter has brought sign cutting into the home, as a peripheral that can be attached to any computer. If it can be drawn in the computer’s software, it can be cut in vinyl. But while that looks good, cut vinyl lettering doesn’t stick to wood well. Considering that clothes will be placed on the hangers and taken off repeatedly, chances are pretty high that the lettering will eventually come off.
This leaves two methods that can be done without much in the way of special equipment: painting and wood burning. While a fair amount of money can be spent on wood-burning tools, a basic tool, which will do the job, can be purchased for as little as $10, complete with an assortment of bits. That makes it just about as cheap as painting.
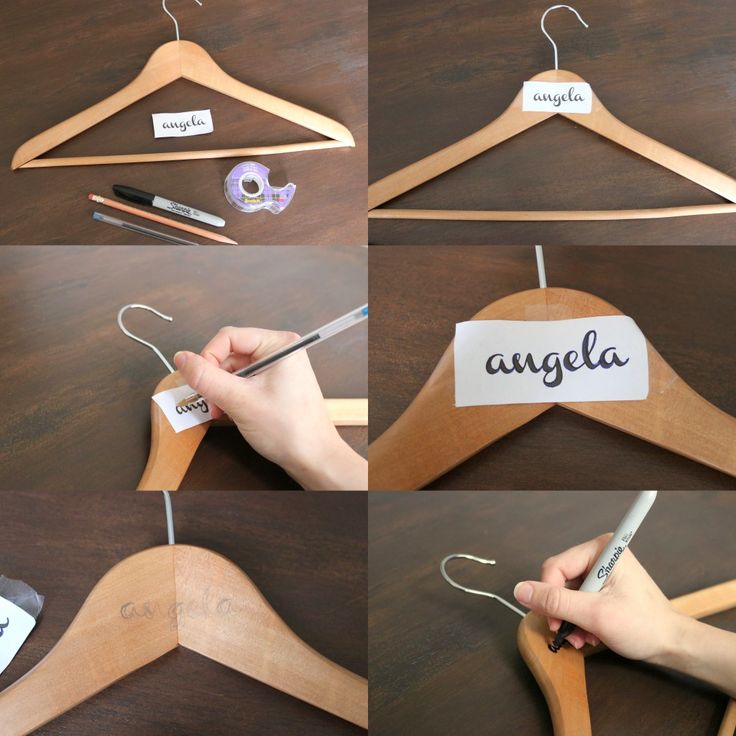
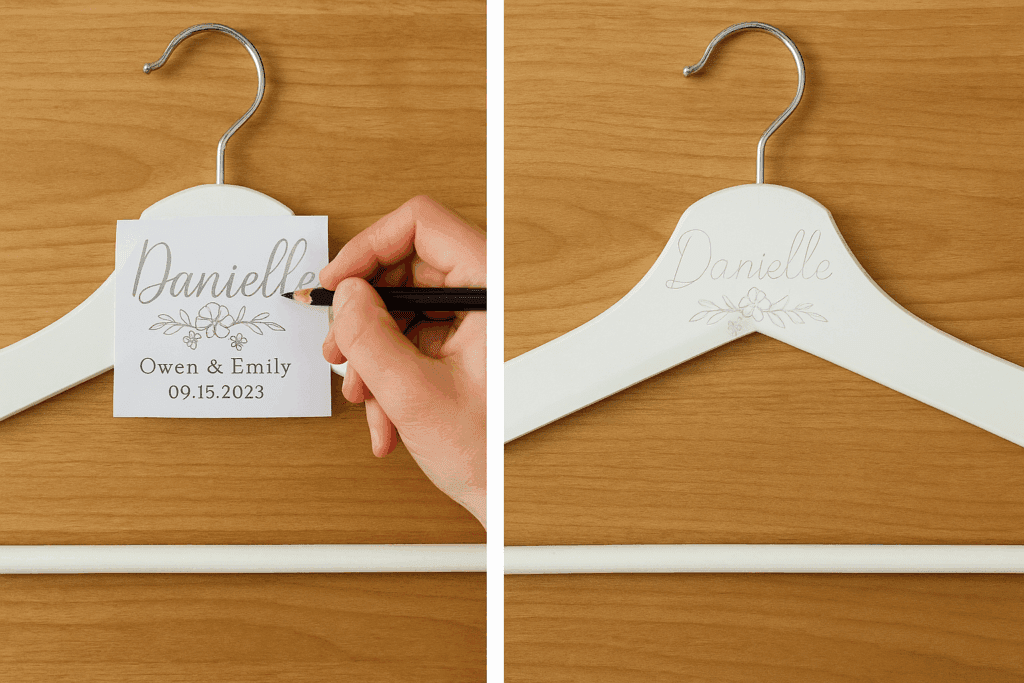
The key to either painting or wood burning is coming up with a pattern for the lettering and other design work that can be transferred to the hanger. This can be done fairly easily with any computer. Just pick an appropriate font and lay the design out in a word processing, graphic design or publishing software; whatever is available on the computer. It is a good idea to start with the longest name that must be done, so that sizing and spacing can be worked out to fit. If the longest name fits, all the rest will too.
The main area to be customized is what can be considered the head of the hanger, the area where the two arms come together. That’s the largest area, as well as being visible when there is clothing hung on the hanger. That visibility means that the bridesmaid’s name should be in that prime spot. After all, part of the idea is to make the dresses easily identifiable, as they are all the same design. Don’t forget the arms, though, which can be used for the names of the bridal couple or the date of the wedding.
To transfer the pattern to the hanger, first print it out from the computer, making sure the size is as desired. Cut off excess paper, so that the pattern is easier to work with. Then rub across the back side of the paper with the side (not point) of a 2B or softer lead pencil, building up graphite there that can be transferred to the hanger. We used to use carbon paper for this, but with the advent of the personal computer, there is no longer a market for carbon paper, and it is all but impossible to find. However, if carbon paper is available, it will transfer the design better than graphite will.
Place the pattern centered on the hanger and tape it in place. Use a sharp pencil and firm pressure to trace the outline of the letters. This will cause at least some of the graphite to transfer from the back side of the paper to the hanger, giving an outline to work with. Once the pattern is transferred, it can be removed.
For a painted bridesmaid hanger, all that’s needed is to paint in the outline with acrylic craft or artist’s paint and a small paintbrush. If the design is to be burned into the wood, a wood burner is used to trace over the pattern lines, burning the design into the wood.
Don’t Forget
One of the problems with dresses and hangers is that the dresses tend to fall off the hanger. This is especially true of strapless dresses or dresses with spaghetti straps. Wood hangers are often made with a notch near the end of the hanger. That should be looked for when the hangers are purchased. But if the hangers do not have that notch, it can easily be added with a router and a round nose router bit. If a router is not available, a Brad-pointed drill bit can be used to drill a hole close to the edge. A small saw or file can then be used to cut the wood out to the top edge of the hanger, turning that hole into a U.
Another option, for those who don’t want to make a hole in their hangers, is to wrap the arms of the hanger with pipe cleaners down near the ends. This provides something for the dress straps to be gripped by, keeping the dress on the hanger.
Taking it Up a Notch
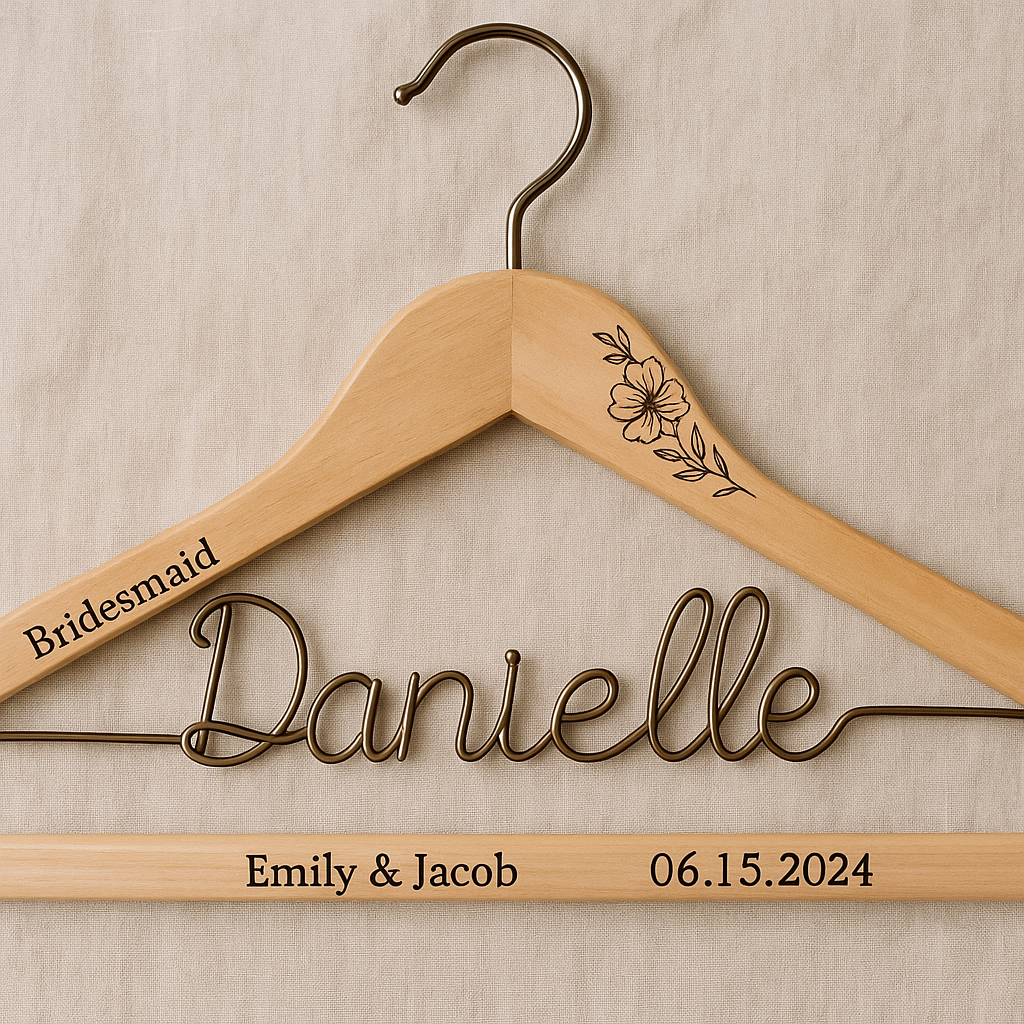
It is possible to make fancier bridesmaid hangers as well. This is accomplished by making the bridesmaid’s name larger, out of other materials. Two fairly common styles appear over and over on the internet, for fancying up the bridesmaid’s name: wire and scrolled.
Wire Bridesmaid Names
Rather than just painting the bridesmaid’s name on the hanger, the name can be made by bending soft wire. Such wire is readily available through craft stores and is used for a variety of projects. The idea here is to make a larger pattern that the wire can be bent to. All the areas between the arms of the hanger are available, so letters can be about 1-1/2” high. Once printed, follow the pattern for the name, bending the wire with needle nose pliers, mimicking the path that would be taken if a pen were used to write that name.
Only script styles will work for this, as it is necessary to connect the letters. However, even with script fonts, it may be necessary to add some connections between the letters, as computer fonts don’t always make the connections we need.
Once the lettering is bent out of wire, it can be connected between the two arms of the hanger by drilling a small hole into the inside of the arms and gluing the ends of the wire into those holes.
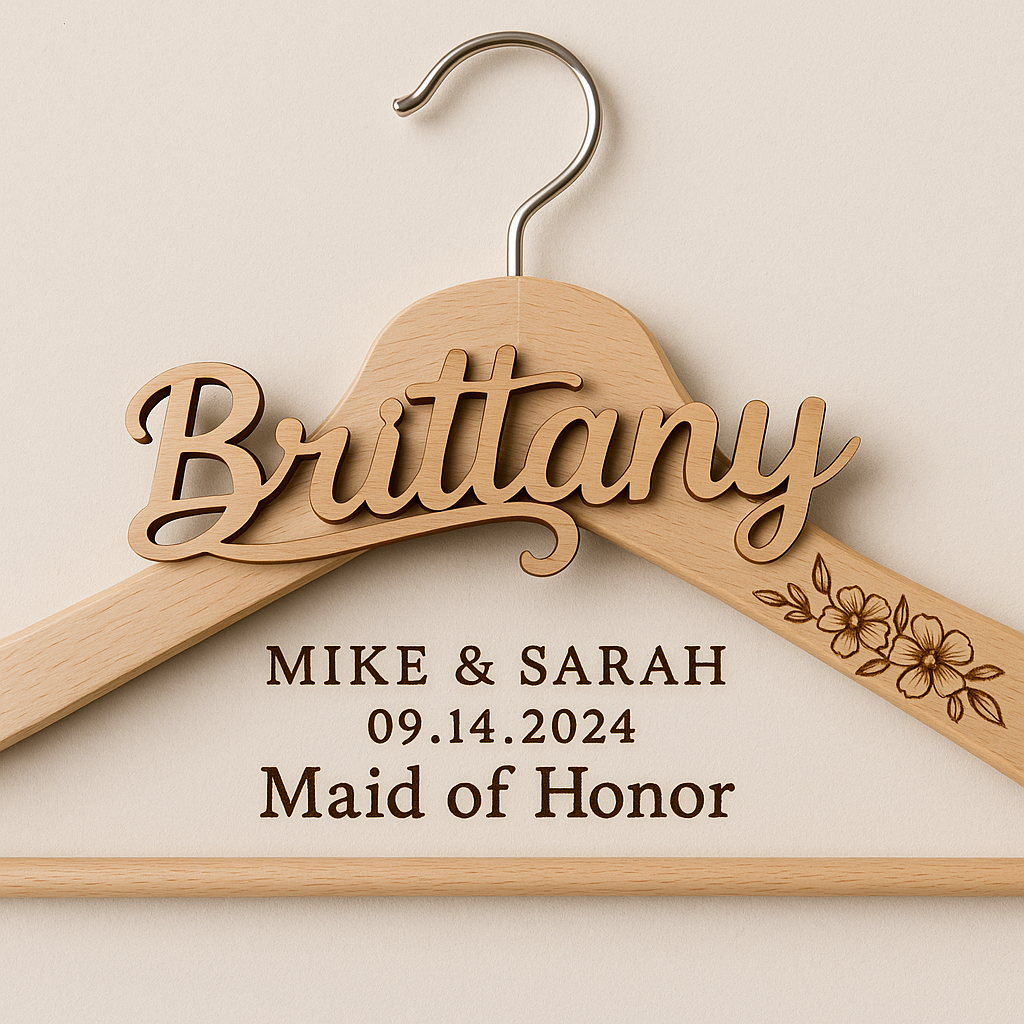
Scrolled Bridesmaid Names
Another option for the name is to cut it out with a scroll saw. Scroll saws are designed for cutting tight curves, making them an ideal tool for cutting out names. This sort of thing is often cut out of ¼” thick plywood, but probably shouldn’t in this case. Plywood tends to leave rough, splintered edges, which can catch on the fabric. It is better to use a straight-grained hardwood with a fine grain, like beech or maple.
In this case, the pattern can be printed and glued directly to the wood being cut, using rubber cement, rather than transferring it. That eliminates the step of having to make the transfer, while providing a very clean outline to work with. It is easy to remove the pattern once the cutting is completed.
As with the wire names, scrolled names can be larger, taking up the entire space between the arms of the hanger. The design should include some sort of underline, which can be carried past the name and be used to attach the name to the hanger.
Is it Possible to Make Wood Hangers?
For those who are a bit more ambitious, it is possible to make the wood hangers, rather than buying them. The process of making wood hangers commercially is rather complex, involving a lot of steps. Most of the time, the two arms are made separately and connected at the head. This is necessary to allow the hook to be inserted between the two halves. The enlarged area at the bottom of the hook and the hook above make it impossible to insert the hook through a hole in the hanger.
Making a wooden hanger consists of cutting out the two arms, which are a mirror image of each other. It is easier to cut one arm out of ¾” thick material and then resaw it to make two thinner arms. Beech is a common wood, as it is fine-grained and doesn’t splinter much. An existing hanger can be used to trace the overall pattern, which should be 16” wide, with the head being two inches wide. Once cut out, the edges of the arms should be rounded with a router bit, with the exception of where the two arms come together at the head.
The two halves of a homemade hanger are connected with a spline at the head, roughly ½” high by 1-1/2” long. Commercially manufactured hangers use metal fasteners, which require special equipment to install. When cutting out the hanger, cut space for two splines, as the bottom one will be used for the spline itself, while the top one is needed for the button on the bottom of the hook, which keeps the hook from pulling out of the hanger. This button is critical for the hanger to work.
To make the hook, a fairly stiff wire is needed. Otherwise, the hook will unbend when people pull on the hanger. Clamp that wire into a vice, with about 3/8” exposed; then heat the end of the wire with a torch. Hit the end of the wire with a hammer, disturbing the metal and causing it to bulge outwards, forming the button. If that proves to be too difficult, simply bend the end of the wire at 90 degrees.
The rest of the hook can be bent on a bench vise. The easiest way to do so is to use a cross-peen hammer, propping the wire between the anvil portion of the vice and the vice jaws. Use light taps to bend the wire gradually, making a circle to go around the closet bar.
With the hook bent, clamp the two arms of the hanger together and drill a clearance hole down through the crown of the head, along the seam, down to the first spline cavity. Remove the hanger from the vice, place the hook in this hole, and glue the two arms of the hanger together, with the spline set in place. The majority of the holding power comes from the spline, so its size and tight fit are critical.
How to Make a Wooden Sword by Admin July 14, 2025 DIY 1. Why I Still Make Wooden Swords I wasn’t planning to make a wooden sword that day. I just needed something—anything—for my kid’s last-minute costume.…

")
")

")
")
