Barn doors are coming back in style, but not on barns. Today we’re seeing barn doors used in homes, much like the pocket doors of yesteryear, in places where a standard swinging door might not fit well. They’re also an option for sliding closet doors. The barn door style fits in nicely with the industrial style that some people are adopting for their homes and offices.
Either sliding or swinging barn doors can be installed with existing trim in place. The only consideration is whether there is enough clearance behind the door, so that it can pass the trim, without making contact. Since most architectural trim is ½” thick, it’s questionable whether or not that will be an issue, as most barn door hardware is made to give a ½” clearance. When buying it, check for this and if necessary, install a thin piece of wood as a spacer behind the track as it is being mounted.
One of the nice things about barn style doors is that they are one of the few styles of doors a homeowner can make for themselves, easily. Whereas true panel doors are complex and require special router bits to make, barn doors are simple, using standard construction-grade dimensional lumber. There’s really nothing needed, which the average do-it-yourselfer won’t already have in their workshop.
Barn doors are also inexpensive to build, partially because they’re usually made from #1 or #2 common boards. These have some knothole and other defects in them, which tend to give the doors more character. If a finer, more polished look is desired, select boars can be used, but that’s not the norm.
A number of different companies make barn door hardware kits, providing the track and all the hardware necessary to hang the door. Typically these are painted black, but they are also available in a brushed stainless steel finish. prices vary, depending on how heavy-duty the hardware kit is. But they all do the job.
Hinged or Sliding?
The first question that has to be asked, before the barn door is built, is whether it is going to be hung on a track and made sliding, or if it will be hung on hinges, so that it will swing open like a typical door. Most barn doors are installed on a track, although some people do use hinges for them.
When hinges are used, they are the same sort of strap hinges that are typically used on gates, along with the same sort of hardware for latches and handles. These are mostly reserved for outdoor applications, while barn doors hung inside the home are typically sliding, mounted on rails.
How the doors will be hung affects their dimensions. Doors mounted with hinges must be made to fit the door opening, much like any other swinging door. But sliding barn doors are intentionally built oversize, at least two inches taller than the door opening and typically four to six inches wider. This allows the door to cover the opening, even if it is not aligned perfectly.
Making the Barn Door
Making a barn door is relatively simple, compared to other doors. It is not made from plywood, but rather from common dimensional lumber; typically 1”x 6”s or 1”x 8”s. The table below gives general guidelines for how wide a door can be made with how many boards. Keep in mind that for sliding barn doors, the doors should be four to six inches wider than the door opening.
5
6
7
8
1”x 6”
27.5”
33”
38.5”
44”
1”x 8”
37.5”
45”
52.5”
60”
In addition to the 1”x 6”s used for the door panel, one additional board will be needed for the top and bottom rails, as well as 3 – 1”x 4”s for the door’s framing. Two of those 1”x 4”s will need to be cut to the door’s height.
Most barn door hardware kits will handle a door up to 60” wide, so that’s not a problem, if a door that wide is needed. However, most home door openings are 36” wide, so door made from 7 – 1”x6”s or 5 1”x 8”s are about the best, without having to mix board widths or rip any boards (both can be done, if so desired).
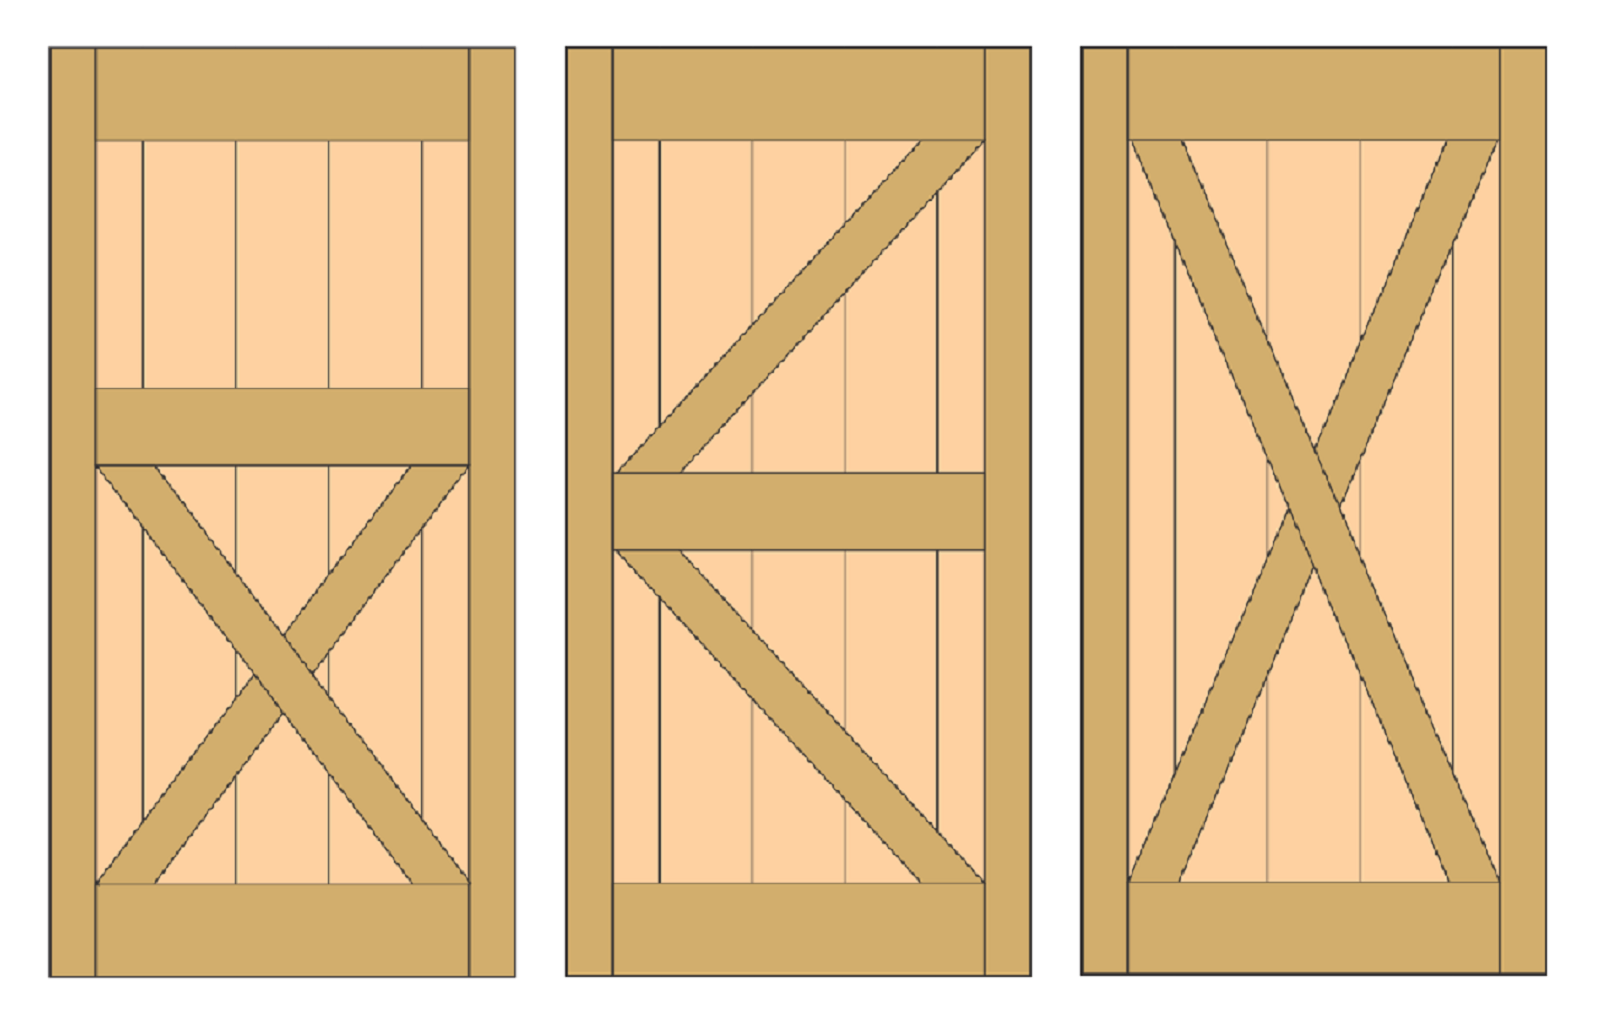
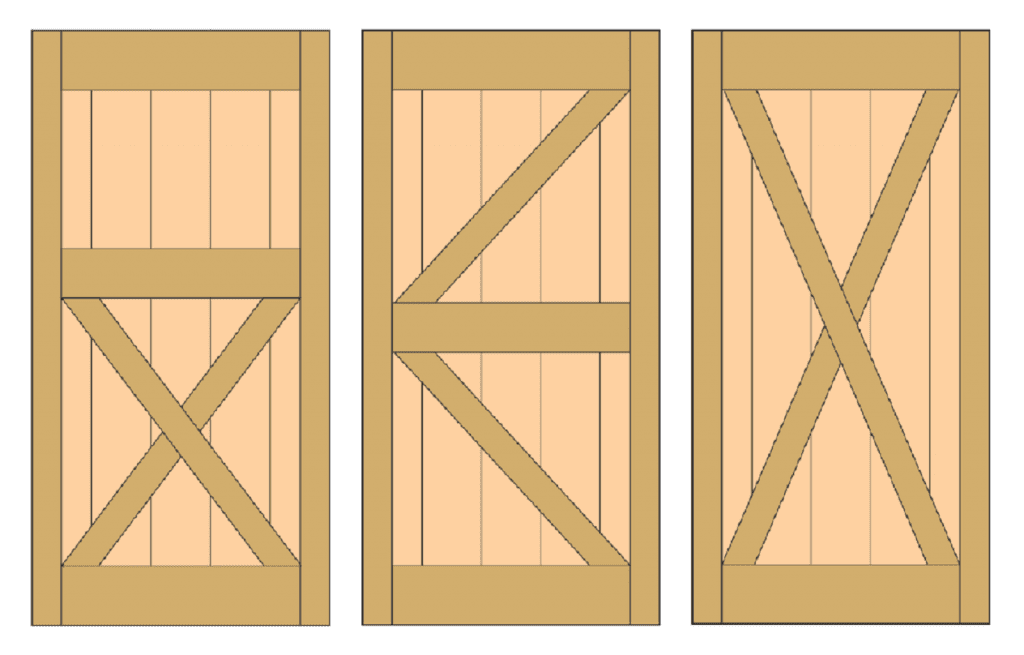
A number of different styles of barn doors can be made. The basic design difference is in how the crossbars making up the frame are. These crossbars, especially the diagonal ones, are important, because they are what keeps the door from sagging over time. If no diagonal bracing is used whatsoever, the door will probably sag and eventually need to be trimmed, because one side will be rubbing on the floor.
Barn doors
The boards need to be cut to be slightly taller than the door frame, but not so tall as to not leave enough room for the track to mount to the wall above the door. Generally speaking, 84” tall is a good height for most sliding barn doors being used indoors.
Be sure to use straight boards, with no twists, cupping or warping. Straightening these defects will be extremely difficult, leaving a door that has a surface which isn’t flat. One twisted board can cause the entire door to twist, keeping it from laying flat against the wall. While it is possible to work some warping or cupping out of a board, allowing the other boards to hold it straight, it’s not easy.
Lay the boards for the door panel on a flat concrete or wood floor, with the face side up, being sure to align the ends evenly, without any slant. Then glue and screw the two cut 1”x 4”s to the outer edges of the door panel, using pairs of 1-1/4” long screw every eight to twelve inches.
Measure the distance between these two 1”x 4”s and cut the remaining piece of 1”x 6” or 1”x 8” into two or three pieces to fit that dimension. That will make the top, middle (if applicable) and bottom rails of the doors. glue and screw this to the boards making up the panel, using at least four screws per board. That may seem a bit excessive, but it will help prevent the door from sagging or twisting.
Finally, cut the remaining 1”x 4” to fit as the diagonal cross-bracing, depending upon the design you decide upon. This is the main board preventing sagging and twisting of the door, so it’s a good idea to use the best 1”x 4” available for this.
Allow the adhesive to dry, and then paint, distress or stain the door.
Making Fake Barn Doors
Even though barn doors are easy to make, there might be some people who want to make “fake” barn doors. This may be in order to save money on materials, use materials they already have or because they have a lack of confidence in their ability to make a good door.
One way to make a fake barn door is to use plywood as the door panel, rather than using boards. The problem with this method (and the next) is that the natural lines, made by the edges of the boards, aren’t going to exist. They can be faked, making a shallow narrow slit either with a circular saw, a router or a utility knife. Or they can be painted. But it will never look perfect.
As an option, T-111 siding can be used, instead of plywood. This will provide the vertical strips that simulate boards, making the project even easier. T-111 is normally rough grained, so the end result would be a rough looking door; but it would work.
The other way to make a fake barn door is to use an existing panel door, attaching wood strips to the door, as a fake door structure. This can be done with strips of ¼” plywood, ripped to the same dimensions as the 1”x 4” and 1”x 8” which would normally be used. Another option is to resaw1”x 4” lumber on a band saw, making it thinner.
Hanging the Barn Doors
As mentioned earlier, barn doors can either be hung on a track or with strap hinges. If hinges are to be used, the same sort that are used for hanging a gate are installed on the door, generally at the top and bottom, where the cross-braces for the frame are. A third hinge can be installed at the middle cross-brace, but that is not necessary.
Hanging a barn door as a sliding door is a bit more complex. While each kit has its own peculiarities, the basic installation is more or less equal. A 1”x 4” mounting board is normally attached to the wall, horizontally above the door frame, for the track to mount on. This piece is usually screwed through the drywall, into the wood studs behind, then painted to match the wall, puttying in the screw heads.
The track mounts to this board. It is extremely important to ensure that it is mounted level, so that the door will move smoothly and will not make voyages on its own. There is usually one mounting hole per foot and lag screw are used. So holes will need to be pre-drilled into the backing board for the lag screws to go into.
With the track mounted to the wall, the other major requirement is attaching the track wheels to the door. These come mounted to brackets, with a pattern showing how to mount them. Be sure to use a square to ensure that they are mounted straight and even. Once attached, the door can be lifted up and placed on the track.
A few other pieces of hardware need to be installed, such as stops at the end of the tracks and an anti-jump bumper, to keep the door from jumping off the track. If handles are provided, they should be mounted centered 36” off the floor.
Check to make sure that the door slides smoothly and that there is no interference from trim or other objects as it is opened and closed.
How to Install Door Trim (Step-by-Step DIY Guide) by Admin November 18, 2025 DIY Beginner-friendly instructions, real-world tips, and the tools I actually use. Installing door trim looks simple from a distance—just a little molding around the doorway, right?…
How to Make Barn Quilts by Admin June 3, 2025 DIY Walk through rural America and you’ll start noticing a charming trend on barns, sheds, and even garages—large, colorful quilt block patterns painted right onto the…

")
")
")
")
