If you’re wondering how to make a floating desk that won’t sag, wobble, or pull out of the wall, the answer comes down to three things: hitting studs, choosing the right desktop thickness, and using brackets rated for real desk loads. I learned this the hard way — my first floating desk used 3/4″ plywood on 16″ brackets with drywall anchors, and within four months the front edge had a visible dip, and the brackets were pulling forward every time I leaned on it while typing. The rebuild below fixed every one of those mistakes, and it’s still flat and solid three years later.
Floating Desk Material Comparison
Material
Max Span Between Brackets
Typical Load Capacity
Cost
Best For
3/4″ Birch Plywood
30″
75–100 lbs per bracket pair
$$
Most home offices
1″ Baltic Birch Plywood
36″
100–130 lbs per bracket pair
$$$
Dual monitor / heavy desks
3/4″ MDF
24″
50–60 lbs per bracket pair
$
Light use, budget builds
Solid Hardwood Slab
30″+
120+ lbs per bracket pair
$$$$
Statement pieces
If you’re deciding between thicknesses generally, not just for desks, theplywood.com’s Plywood Thickness vs Strength breakdown is worth a look before you buy sheet goods — it changes which thickness actually makes sense for a 24″-deep desktop versus a shelf. And if you’re torn about which plywood grade to start with, the Baltic Birch vs Birch Plywood comparison explains why one yields a flatter, more void-free face for a visible desktop surface than the other.
❌ The Mistake Almost Everyone Makes
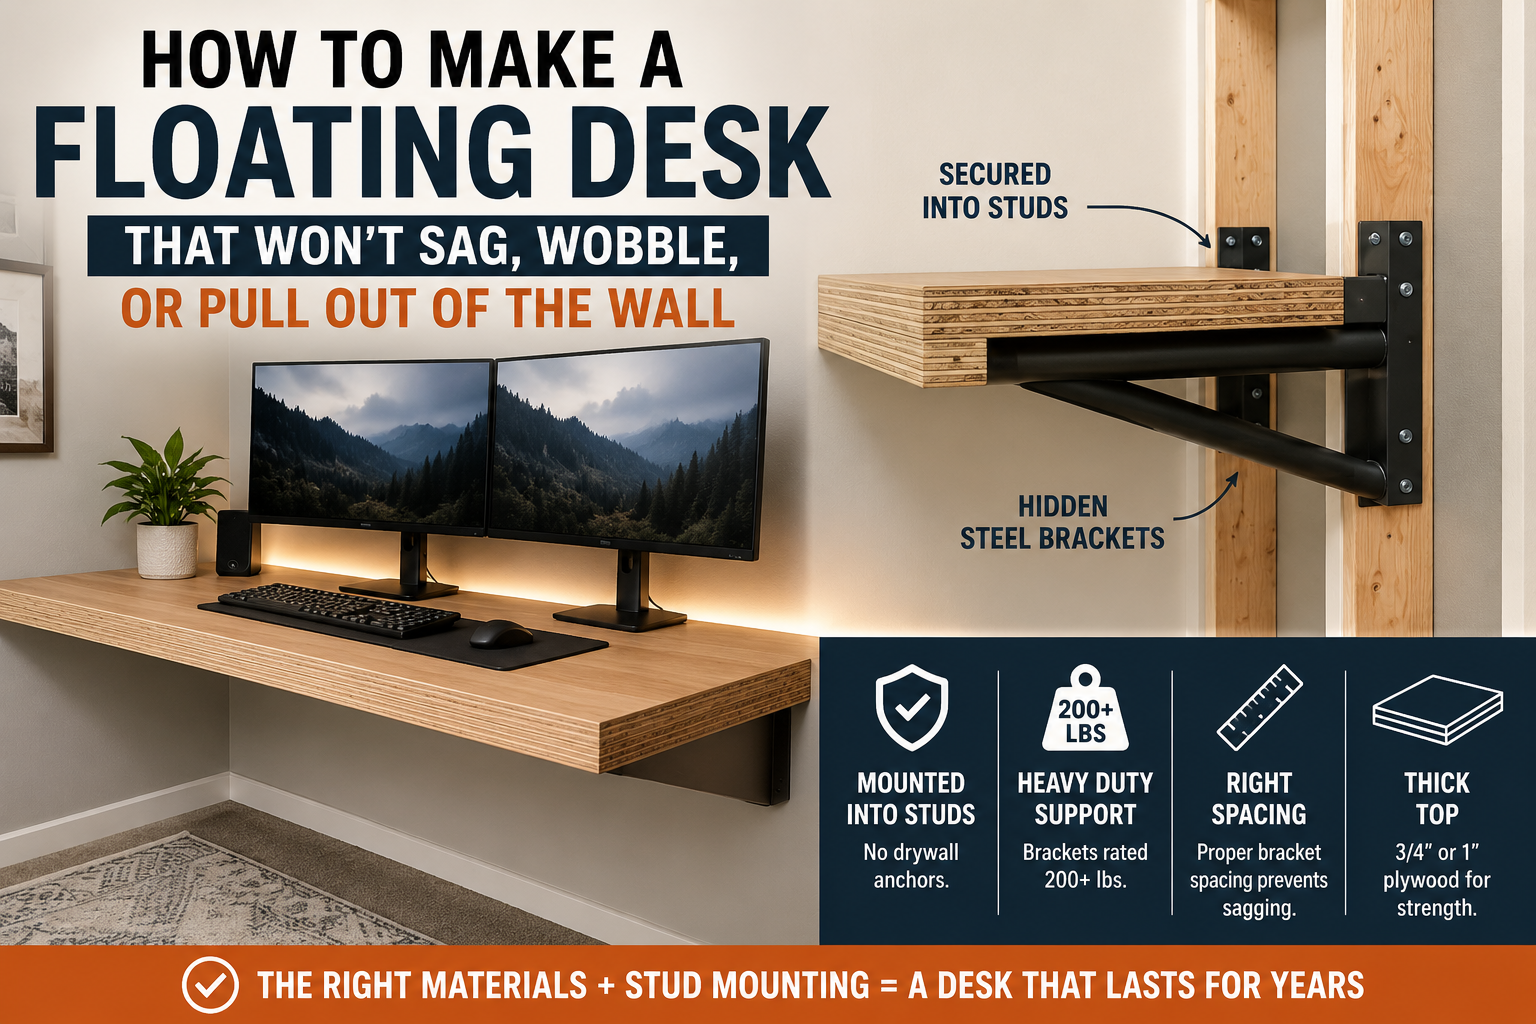
People treat a floating desk like a floating shelf. It isn’t. A shelf holds static weight distributed evenly. A desk experiences a constant downward and forward load whenever someone types, leans on an elbow, or pushes back from the surface. That forward-leaning force is what pulls brackets out of drywall over time — not the static weight of the desk itself. If your plan is “drywall anchors and a level,” stop. You need to hit studs, full stop. The same forward-pull failure keeps showing up — I break down the why and the fix in “Floating Desk Sagging?” Causes and Fixes That Last — and it almost always traces back to this exact mistake.
What You’ll Need
Desktop material (see table above — I used 1″ Baltic birch plywood for rigidity over a 30″ span)
Heavy-duty floating desk brackets rated for at least double your expected load
Stud finder
1/4″ lag bolts (not drywall screws) if mounting into studs
Wood glue and edge banding or iron-on veneer for plywood edges
Sandpaper (120 and 220 grit)
Polyurethane or hardwax oil finish
Level and pencil
Drill/driver with appropriate bits
Step 1: Find Your Studs (Don’t Skip This)
Run your stud finder across the full width of where the desk will sit and mark every stud center, not just the edges. Most rooms have studs on 16″ centers, which means a 48″ desk should hit three studs. If your wall layout only gives you two studs across your span, you need brackets engineered for two-point mounting with a reinforced lip — not a third floating anchor point hoping drywall compound holds. This is also where floating shelf weight capacity logic and desk bracket logic diverge — shelf brackets are rarely rated for the dynamic, forward-leaning load a desk sees daily.
Bracket Spacing by Desk Width
Desk Width
Recommended Brackets
36″
2
48″
3
60″
3
72″
4
As a rule, once you cross 48–54″ of width, add a center bracket rather than stretching two brackets further apart — that’s the point where most sag starts to show up over time.
Step 2: Mount the Brackets Into Studs, Not Drywall
This is the step that separates a desk that lasts from one that sags in a year. Lag bolts into studs, minimum 1/4″ diameter, sunk at least 2 inches into solid wood. If your bracket spacing doesn’t line up perfectly with stud spacing, that’s normal — use the bracket’s mounting plate to shift slightly rather than forcing a stud-less anchor point.
💸 The Cost Difference That Actually Matters
A basic bracket kit runs $15–25 a pair. A genuinely heavy-duty pair rated for real desk loads runs $40–70. That $25–45 difference is the entire gap between a desk that holds a monitor arm and keyboard tray for a decade and one that needs re-anchoring within a year. I learned this the expensive way — buying cheap brackets twice before spending once on the right ones.
If you’re using plywood, the edges will need attention — raw plywood edges show ply lines and don’t finish cleanly without treatment. Iron-on edge banding or a thin solid-wood edge strip glued and clamped to the front edge gives a much more finished look and also stiffens that exposed edge, which matters more than people expect on a 30″+ span.
If your desk is going in a basement or near a window, Marine Plywood vs Pressure Treated explains how different cores handle moisture and humidity over time. For the desktop surface specifically, Best Plywood for Desktops breaks down which grades give you the flattest, most finish-friendly face.
😬 The Regret I Hear Most Often
The single biggest regret people message me about isn’t the brackets — it’s depth. They build an 18″- deep desktop because it looks sleek in photos, then realize there’s no room for a keyboard tray, a monitor arm clamp, and elbow space at the same time. Go with a 24″ minimum if you’re doing any real desk work, not a laptop perch.
Recommended Desktop Depth by Use Case
Use Case
Recommended Depth
Laptop only
18–20″
Single monitor
24″
Dual monitors
26–28″
Monitor arm + keyboard tray
28–30″
Step 4: Sand, Finish, and Let It Cure Fully
Sand through 120, then 220 grit, working with the grain. Apply your finish in thin coats — two to three coats of polyurethane, or a hardwax oil if you want a more natural look with easier spot repairs later. Let each coat cure per the product’s full recommended time, not just touch-dry time. Mounting a desktop before the finish has fully cured is a common cause of scuffing or denting a brand-new surface.
[AMAZON AFFILIATE BLOCK: Insert hardwax oil finish, polyurethane finish, iron-on edge banding kit, and stud finder as a grouped “what I used” product set]
Step 5: Attach the Desktop to the Brackets
Most heavy-duty bracket systems use a top-mounted plate with pre-drilled holes — screw up into the underside of the desktop from inside the bracket arm so no hardware is visible on top. Check the level across the full width before final tightening, and recheck after a week to see if any wall-anchor settling has occurred.
⚠️ Warning: Don’t Trust the Listed Weight Rating Alone
Bracket weight ratings are usually tested under static, evenly distributed load — not the dynamic forward-leaning force of someone actually using a desk. As a practical rule, buy brackets rated for at least double what you think you’ll put on the desk (monitor, laptop, books, your own leaning weight included). A single monitor arm can place more stress on brackets than two monitors sitting directly on the desktop because the load is concentrated near the front edge. Cheap insurance against a slow, sagging failure six months in.
🧪 The Real Test I Use Before Calling It Done
Before I trust any floating desk, I do the lean test: stand at the front edge, place both palms on the desktop near the front, and push down with real body weight for a full ten seconds. If there’s any flex, creak, or visible give, the brackets aren’t seated into studs correctly, or the span between mounting points is too wide for your desktop thickness. A desk that passes this test cold will handle years of normal typing and leaning without issue.
[IMAGE: Photo or short illustration of the lean test — hands pressed on the front edge of a mounted floating desk]
How Far Can a Floating Desk Span Without Support?
For 3/4″ plywood, keep spans under 30″ between bracket pairs to avoid visible sag over time. At 1″ thickness, you can push to 36″ safely. Beyond that, add a third bracket at the center or step up to a thicker, denser core material — the same load-span logic that applies to shelves and countertops, just applied horizontally instead of vertically.
Frequently Asked Questions
Can I build a floating desk without hitting wall studs? Not for anything beyond a very light laptop stand. Real desk use involves forward-leaning force that drywall anchors aren’t rated for. If your stud layout doesn’t cooperate, use brackets designed for partial-stud mounting with a reinforced plate rather than skipping studs entirely.
What’s the best plywood thickness for a floating desk? 3/4″ works for spans under 30″ with light-to-moderate use. For wider spans, dual monitors, or daily heavy use, 1″ plywood holds its shape far better over time.
What is the best depth for a floating desk? 24″ is the practical minimum for real desk work — anything shallower looks sleek but leaves no room for a keyboard tray, a monitor arm clamp, and elbow space. 26–28″ gives more breathing room if your space allows it.
How much weight can a floating desk hold? 100–150 lbs of usable load across the desktop is realistic with proper stud mounting and heavy-duty brackets. The limiting factor is almost always the bracket-to-stud connection, not the desktop material itself.
Do floating desks sag over time? Yes, if the span is too wide for the material thickness or the brackets aren’t anchored into studs. Sag from a stud-mounted, properly thick desktop is rare; sag from drywall-anchored installs is common within the first year.
Rev-A-Shelf Cabinets: Best Pull-Outs & Prices by Admin April 18, 2026 DIY What is Rev-A-Shelf? Rev-A-Shelf is a cabinet organization system that adds pull-out drawers, trash bins, and storage inserts inside existing cabinets, improving accessibility and storage…