I mounted my floating desk on a Sunday afternoon, stood back, and loved it. Clean lines, no legs in the way, way more room to move my chair around. For about three weeks, it was everything I wanted.
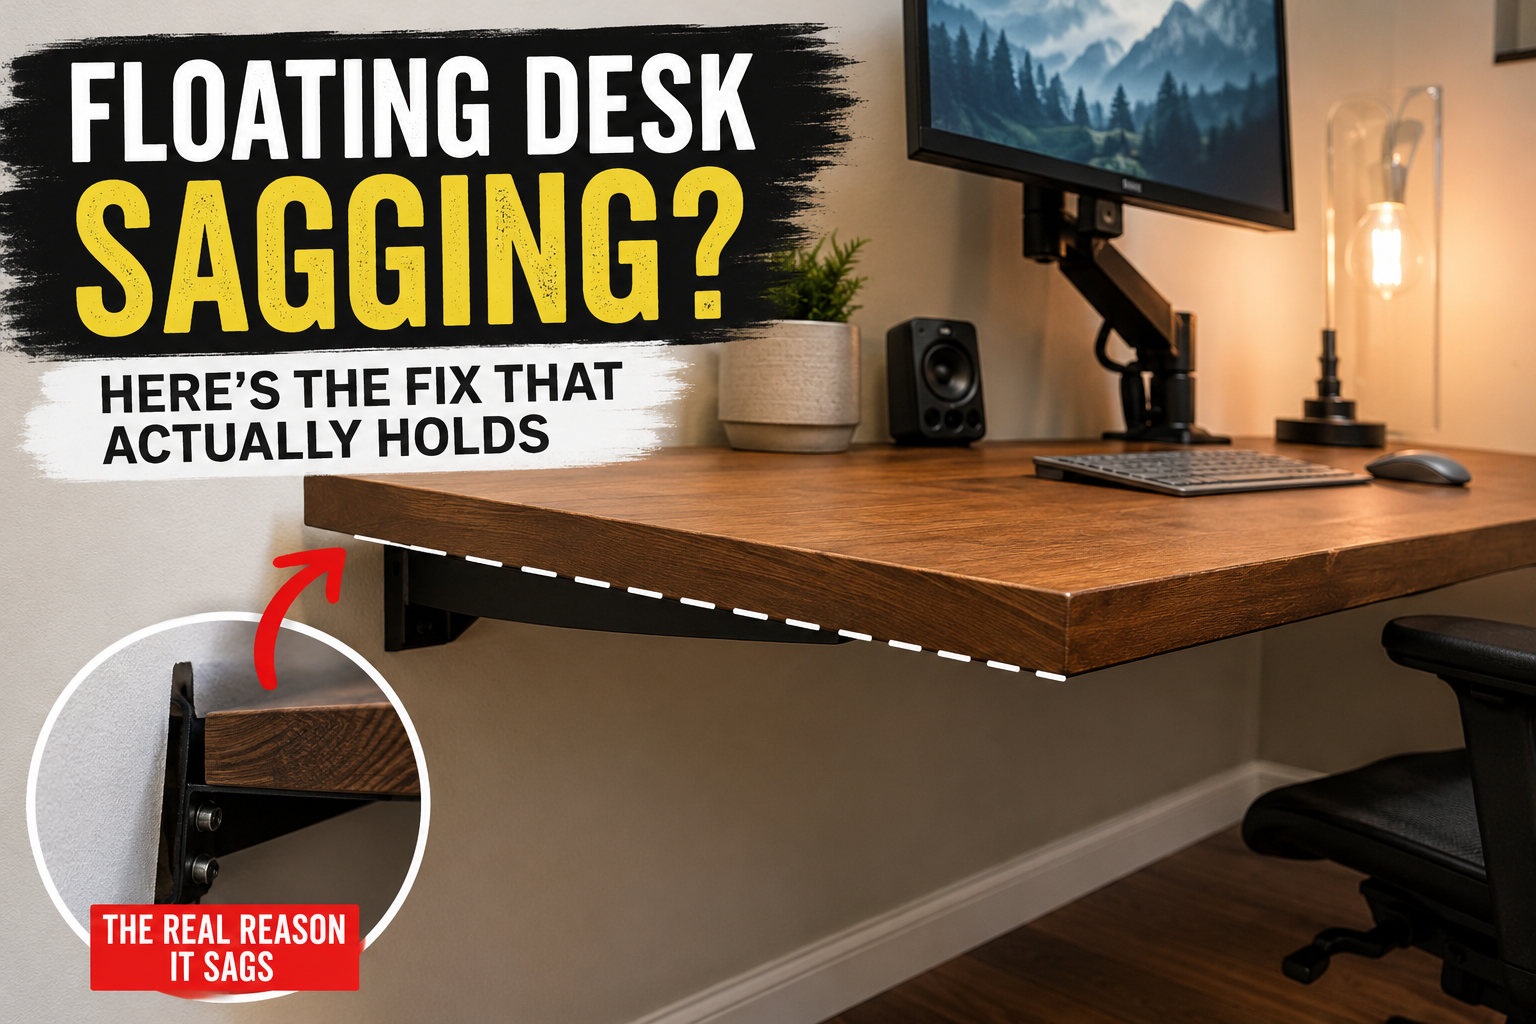
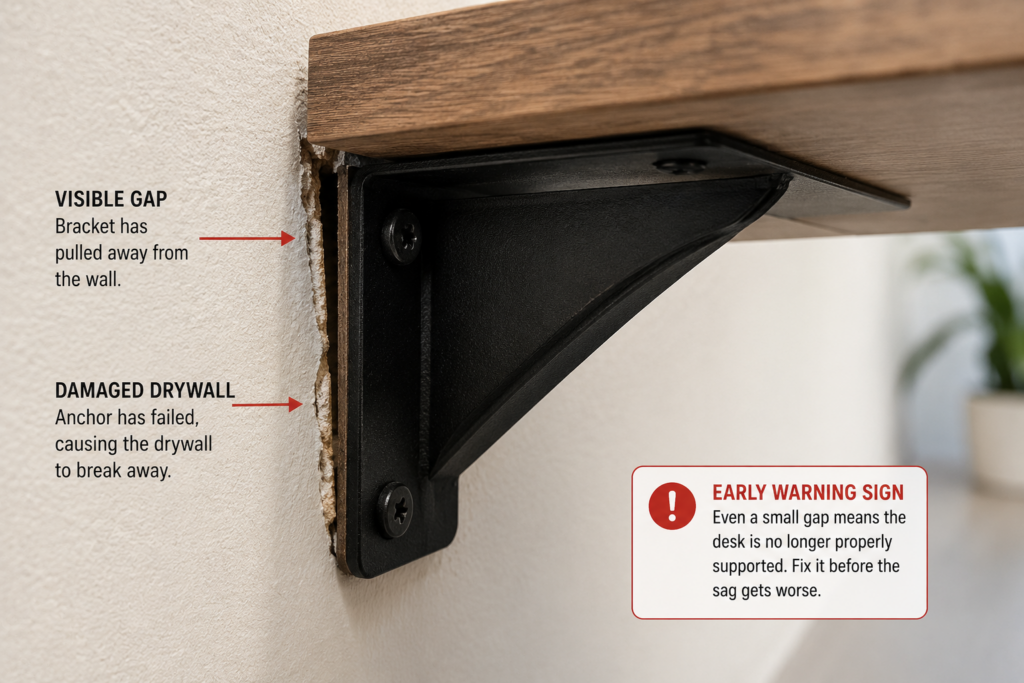
Then I noticed the front edge wasn’t level anymore. Just a little. Enough that my coffee mug started sliding toward me if I set it down without thinking. That’s the moment I knew something behind the wall had given up.
My desk was 72 inches wide and 24 inches deep, which is a pretty standard size, so if yours is in that range, what happened to mine is very likely to happen to you too.
If your floating desk is starting to dip, pull away from the wall, or just feels less solid than the day you installed it, you’re not imagining it, and you’re not alone. Here’s what actually happened to mine, why floating desks sag for almost everyone at least once, and the fix that’s held steady for over a year now.
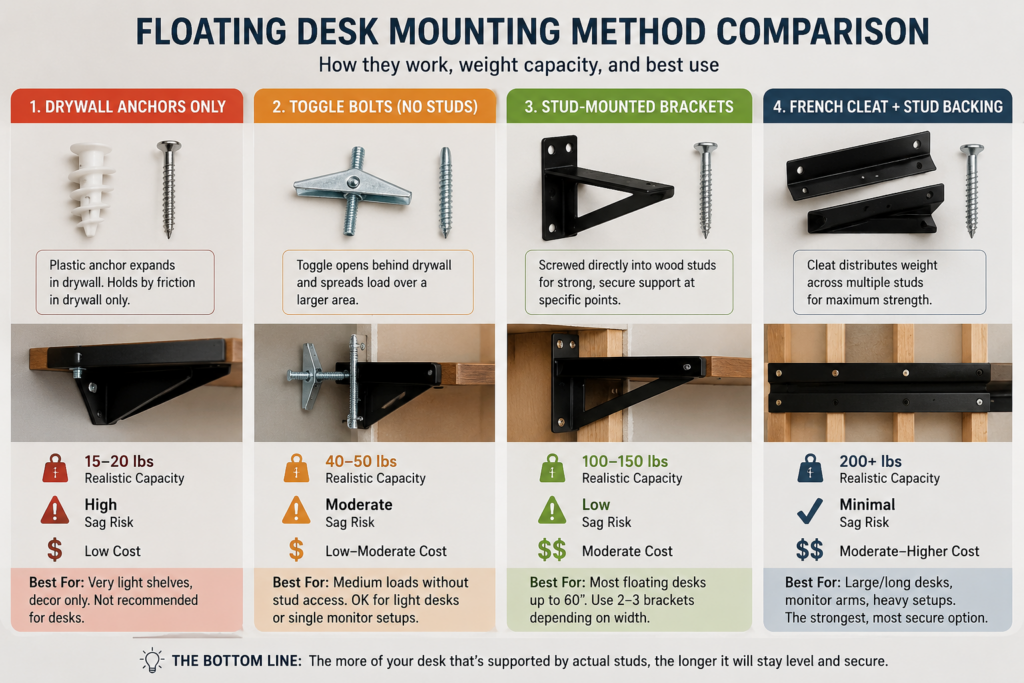
Mounting Method Comparison
Mounting Method
Realistic Capacity
Sag Risk
Cost
Drywall anchors only
15-20 lbs
❌ High
$
Toggle bolts (no studs)
40-50 lbs
⚠️ Moderate
$
Stud-mounted brackets
100-150 lbs
😬 Low
$$
French cleat + stud backing
200+ lbs
✅ Minimal
$$
What Causes Floating Desk Sagging? Hardware Comparison
Drywall Anchors vs Toggle Bolts vs Stud Mounts
A sagging floating desk almost always traces back to one of these three mounting methods, so it’s worth knowing exactly where yours falls before you decide whether to fix it or replace it. Drywall anchors alone are fine for a shelf holding picture frames. They are not fine for a desk you’re going to lean on, type on, and eventually pile a monitor, books, and a coffee habit onto. Toggle bolts spread the load better and can get you into the 40-50 lb range, but that’s still cutting it close once you add a second monitor or a printer.
Stud-mounted brackets are where things start to feel genuinely solid, and a French cleat that’s screwed into studs along its full length is the strongest version of that idea, since the weight gets spread across the whole cleat instead of concentrated at a couple of bolt points.
Desk Size vs. Mounting Recommendation
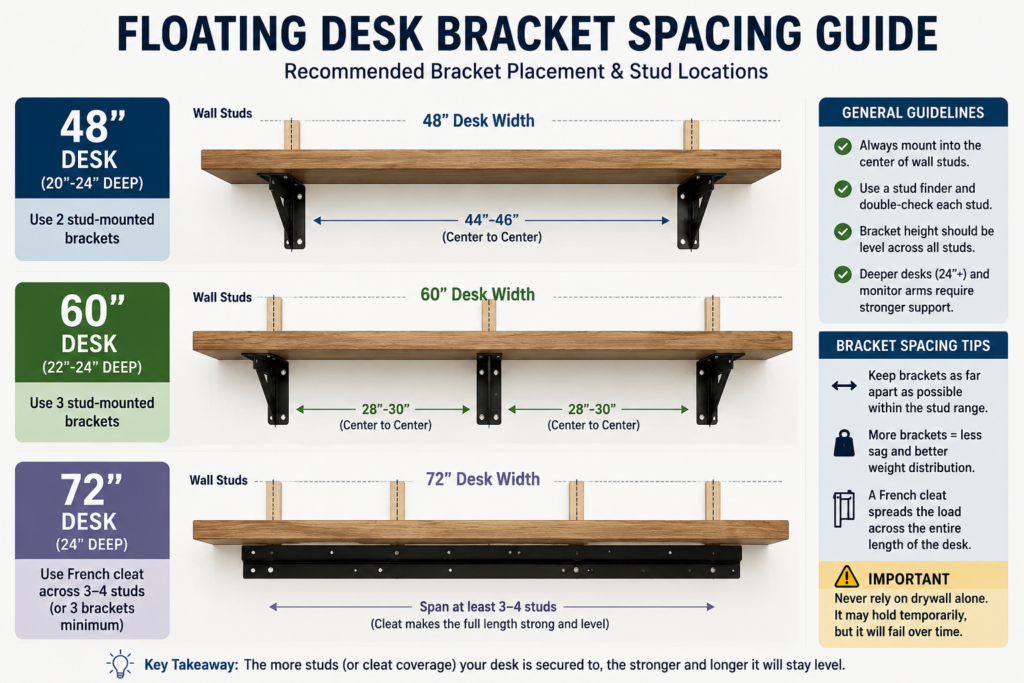
The bigger and deeper your desk, the more leverage gravity has on your brackets, so sizing your hardware to your actual desk (not just “a desk”) matters more than most people think:
Desk Size
Minimum Mounting Recommendation
48″ x 20″
Two stud-mounted brackets
60″ x 24″
Three stud-mounted brackets
72″ x 24″
French cleat across 3-4 studs
72″+ with monitor arms
French cleat + secondary support bracket
A 48-inch, 20-inch-deep desk is genuinely safe with two solid, stud-mounted brackets for most home office setups. Once you’re at 60 inches, the math changes enough that I’d want a third bracket in play. At 72 inches and 24 inches deep — my exact setup — a French cleat stopped being a “nice to have” and became the only option I trusted, especially with a monitor arm in the mix. That extra 6 inches of depth compared to an 18-inch desk doesn’t sound like much, but it creates noticeably more leverage on the brackets every time something heavy sits toward the back.
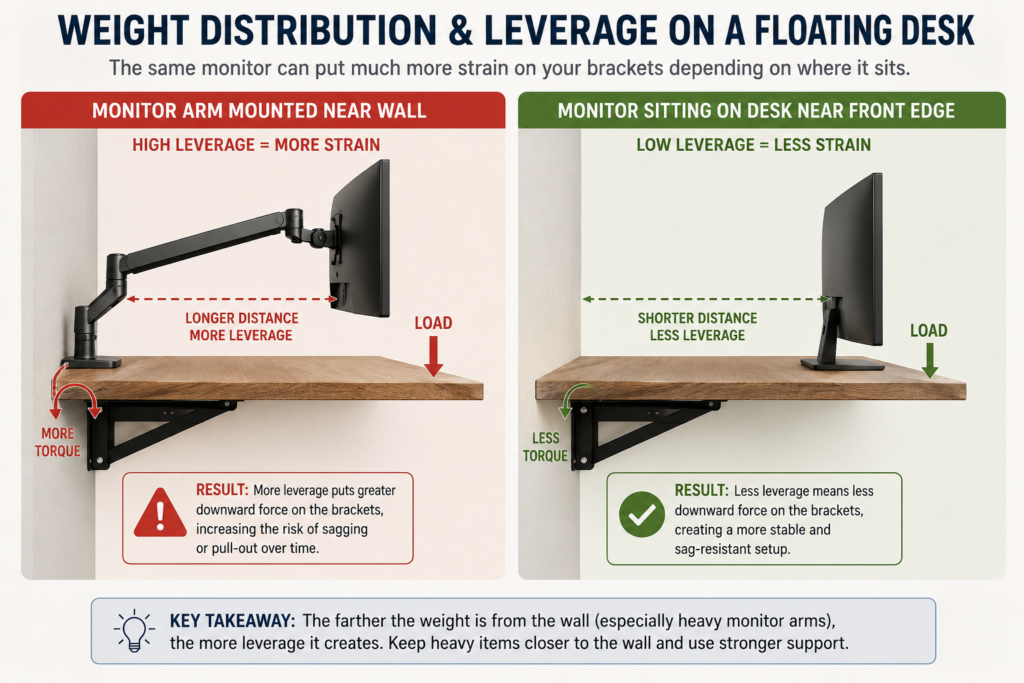
Why Weight Distribution Matters More Than Total Capacity
Here’s the part that tripped me up the first time. It’s not just about how much weight the hardware can hold during a straight pull test. It’s about where that weight sits on the desk. A monitor pushed toward the back, near the wall, puts way more leverage on your brackets than the same weight does when it’s at the front edge. My setup had the monitor arm clamped near the back, right where the unsupported bracket was already struggling. That combination is what sped up the sag.
The desktop material itself plays a bigger role than most people expect, too. A 3/4-inch plywood desktop spanning 72 inches can flex noticeably under concentrated loads, while a 1.5-inch butcher block behaves more like a structural beam and distributes loads more evenly across the mounting system, rather than bouncing or twisting slightly with everyday use.
If you’re sourcing the desktop yourself, it’s worth reading through our breakdown of plywood thickness for furniture before you buy, since the same span-and-flex logic that applies to a desk applies to shelving and tabletops generally.
How I Noticed the Sag (Before It Got Worse)
The mug-sliding thing was my first clue, but once I started looking, I found a hairline gap between the bracket and the wall on the side that wasn’t in a stud. If you want to check yours right now, set a level on the desk surface front to back. A sag of about 1/8 inch is your early warning — annoying but not urgent. Once you’re seeing 1/4 inch or more of drop, or the gap behind the bracket is visible without squinting, that’s no longer a “fix it eventually” problem. It’s a “fix it this weekend” problem.
Cost Difference: Doing It Right vs Doing It Twice 💸
What I Spent the First Time
My original install was cheap on purpose. Basic brackets and drywall anchors ran me under $30 total, and at the time that felt like a win.
What the Fix Cost Me
The French cleat hardware, lag screws, and a stud finder added up to roughly triple my original spend. Add in drywall patching compound, sandpaper, and paint to fix the anchor holes, and the “cheap” install ended up costing more than just doing it right the first time would have. If the wall damage had been worse, it would have started to look like the kind of repair covered in our wood rot repair cost breakdown, especially where moisture had already been an issue near the mounting area.
It’s easy to underestimate how much weight stacks up on a “simple” desk. A rough tally for a typical home office build:
Item
Typical Weight
3/4″ plywood desktop (72″ x 24″)
15-20 lbs
Monitor + arm
15-25 lbs
Laptop + dock
5-8 lbs
Books, lamp, miscellaneous
5-10 lbs
Realistic total
40-65 lbs, concentrated unevenly
Run those numbers against the mounting comparison table above, and it’s clear why drywall anchors and even basic toggle bolts get overwhelmed fast, especially once that weight is sitting toward the back near a monitor arm instead of spread evenly across the surface.
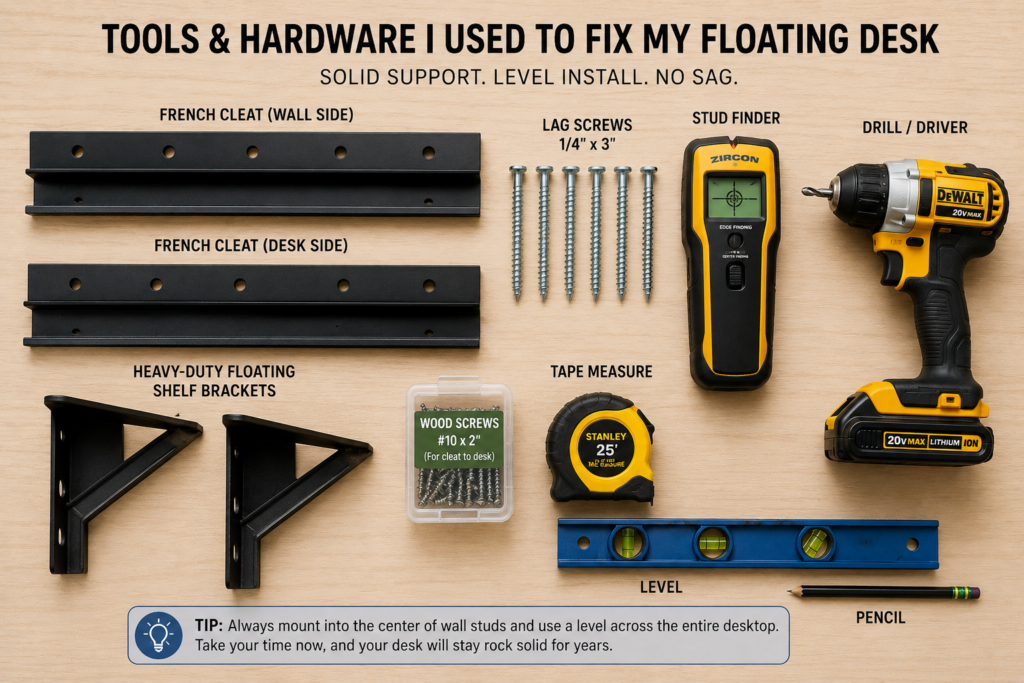
Found and marked every stud across the full width of where the desk would sit, not just two points.
Cut the cleat to span at least 3 studs, not 2.
Pre-drilled and lag-screwed the wall-side cleat directly into each stud, no anchors involved.
Attached the matching cleat to the underside of the desk.
Hung the desk on the cleat and checked level front-to-back and side-to-side.
Added a rear support bracket near the monitor arm’s mounting point specifically, since that’s where the leverage was highest before.
The whole re-mount took about two hours, most of which was patching and repainting the old anchor holes.
How to Avoid Floating Desk Sagging From the Start
Finding Studs the Right Way (Not Just Knocking on Walls)
Knocking on the wall tells you roughly where things sound different. It does not tell you exactly where the stud center is, and being even an inch off means your screw bites the edge of the stud instead of the middle, which barely improves on drywall alone. A decent stud finder, used slowly and double-checked from both directions, will save you from my exact mistake.
Bracket Spacing Guidelines
Studs are typically 16 inches on-center, and your bracket spacing should follow that rhythm rather than fight it. For a 72-inch desk, that means landing brackets or cleat screws on at least 3-4 stud centers across the span, not just at the two ends. Skipping a middle stud is exactly what creates the kind of single-point failure that started my own sag.
Choosing Hardware Based on Desk Weight + What You’ll Put On It
Don’t size your hardware for the empty desk. Size it for the desk, plus monitor, plus monitor arm, plus whatever you’ll inevitably pile in the back corner within a month. If you’re using furniture-grade plywood for the desktop itself, it’s worth checking the panel’s actual weight before you even get to what sits on top of it, since a thick plywood slab alone can be 15-20 lbs before you’ve added anything. If you’re deciding between plywood types for the build, our comparison of Baltic birch vs. regular birch plywood covers which one holds up better under a span like this. And if a floating desk isn’t quite what you need, the same stud-and-leverage logic applies almost identically to floating shelves, just at a smaller scale.
FAQ
How much weight can a floating desk hold? It depends entirely on the mounting hardware, not the desk itself. Drywall anchors alone top out around 15-20 lbs, while a properly installed French cleat into studs can support 200+ lbs.
Do floating desks need to be mounted into studs? For anything beyond a light laptop setup, yes. Drywall alone isn’t rated for sustained weight plus the repeated pressure of daily use, leaning, and bumping.
Why is my floating desk sagging or pulling away from the wall? The most common cause is hardware anchored into drywall rather than studs, especially when only one side of the mount caught a stud, and the other didn’t.
What’s the best bracket for a floating desk? A French cleat spanning multiple studs is the strongest option for desks holding monitors, monitor arms, or other heavier equipment.
Can you mount a floating desk on drywall alone? You can use it for very light use, but it’s a matter of when, not if, it starts to sag once any real weight or daily pressure is added.
Can a floating desk support dual monitors? Yes, but dual monitors on articulated monitor arms create much more leverage than monitors sitting directly on the desktop. For dual-monitor setups, a French cleat attached to at least three studs is strongly recommended.