Artwork does a lot to make a home attractive. The thing about artwork though, is unless we want our homes to look like a collage dorm room; those pictures need to be properly framed. But framing, especially custom framing, can be as expensive as the artwork itself.
Fortunately, it’s not necessary to go with a fancy gilded frame to make a piece of artwork look good. That gilded style was popular during the Victoria era, but today’s styling is much simpler, with most artwork framed in minimalistic frames, which are easy for the average woodworker to make themselves. Even a more traditional wood frame is fairly easy, with the right tools and buying molding to make the frame out of.
It’s even possible to cut the molding in a home workshop, using a router table. There are a number of router bits that will cut moldings, mostly for architectural uses, but some can work for picture frames as well.
Stretching the Canvas
When a painting is bought, it is already on a frame of sorts, because it is stretched on a canvas. Some artists will extend their painting around the edges of the canvas, painting the sides as well, so that a frame is not needed. But that is not always the case.
Artists often buy pre-stretched canvases, but as they gain in experience or start working on larger projects, many will switch over to stretching their own canvases. This saves money and it takes a whole lot less room to store the unassembled frames and unstretched canvas in their studios, which are often small and crowded.
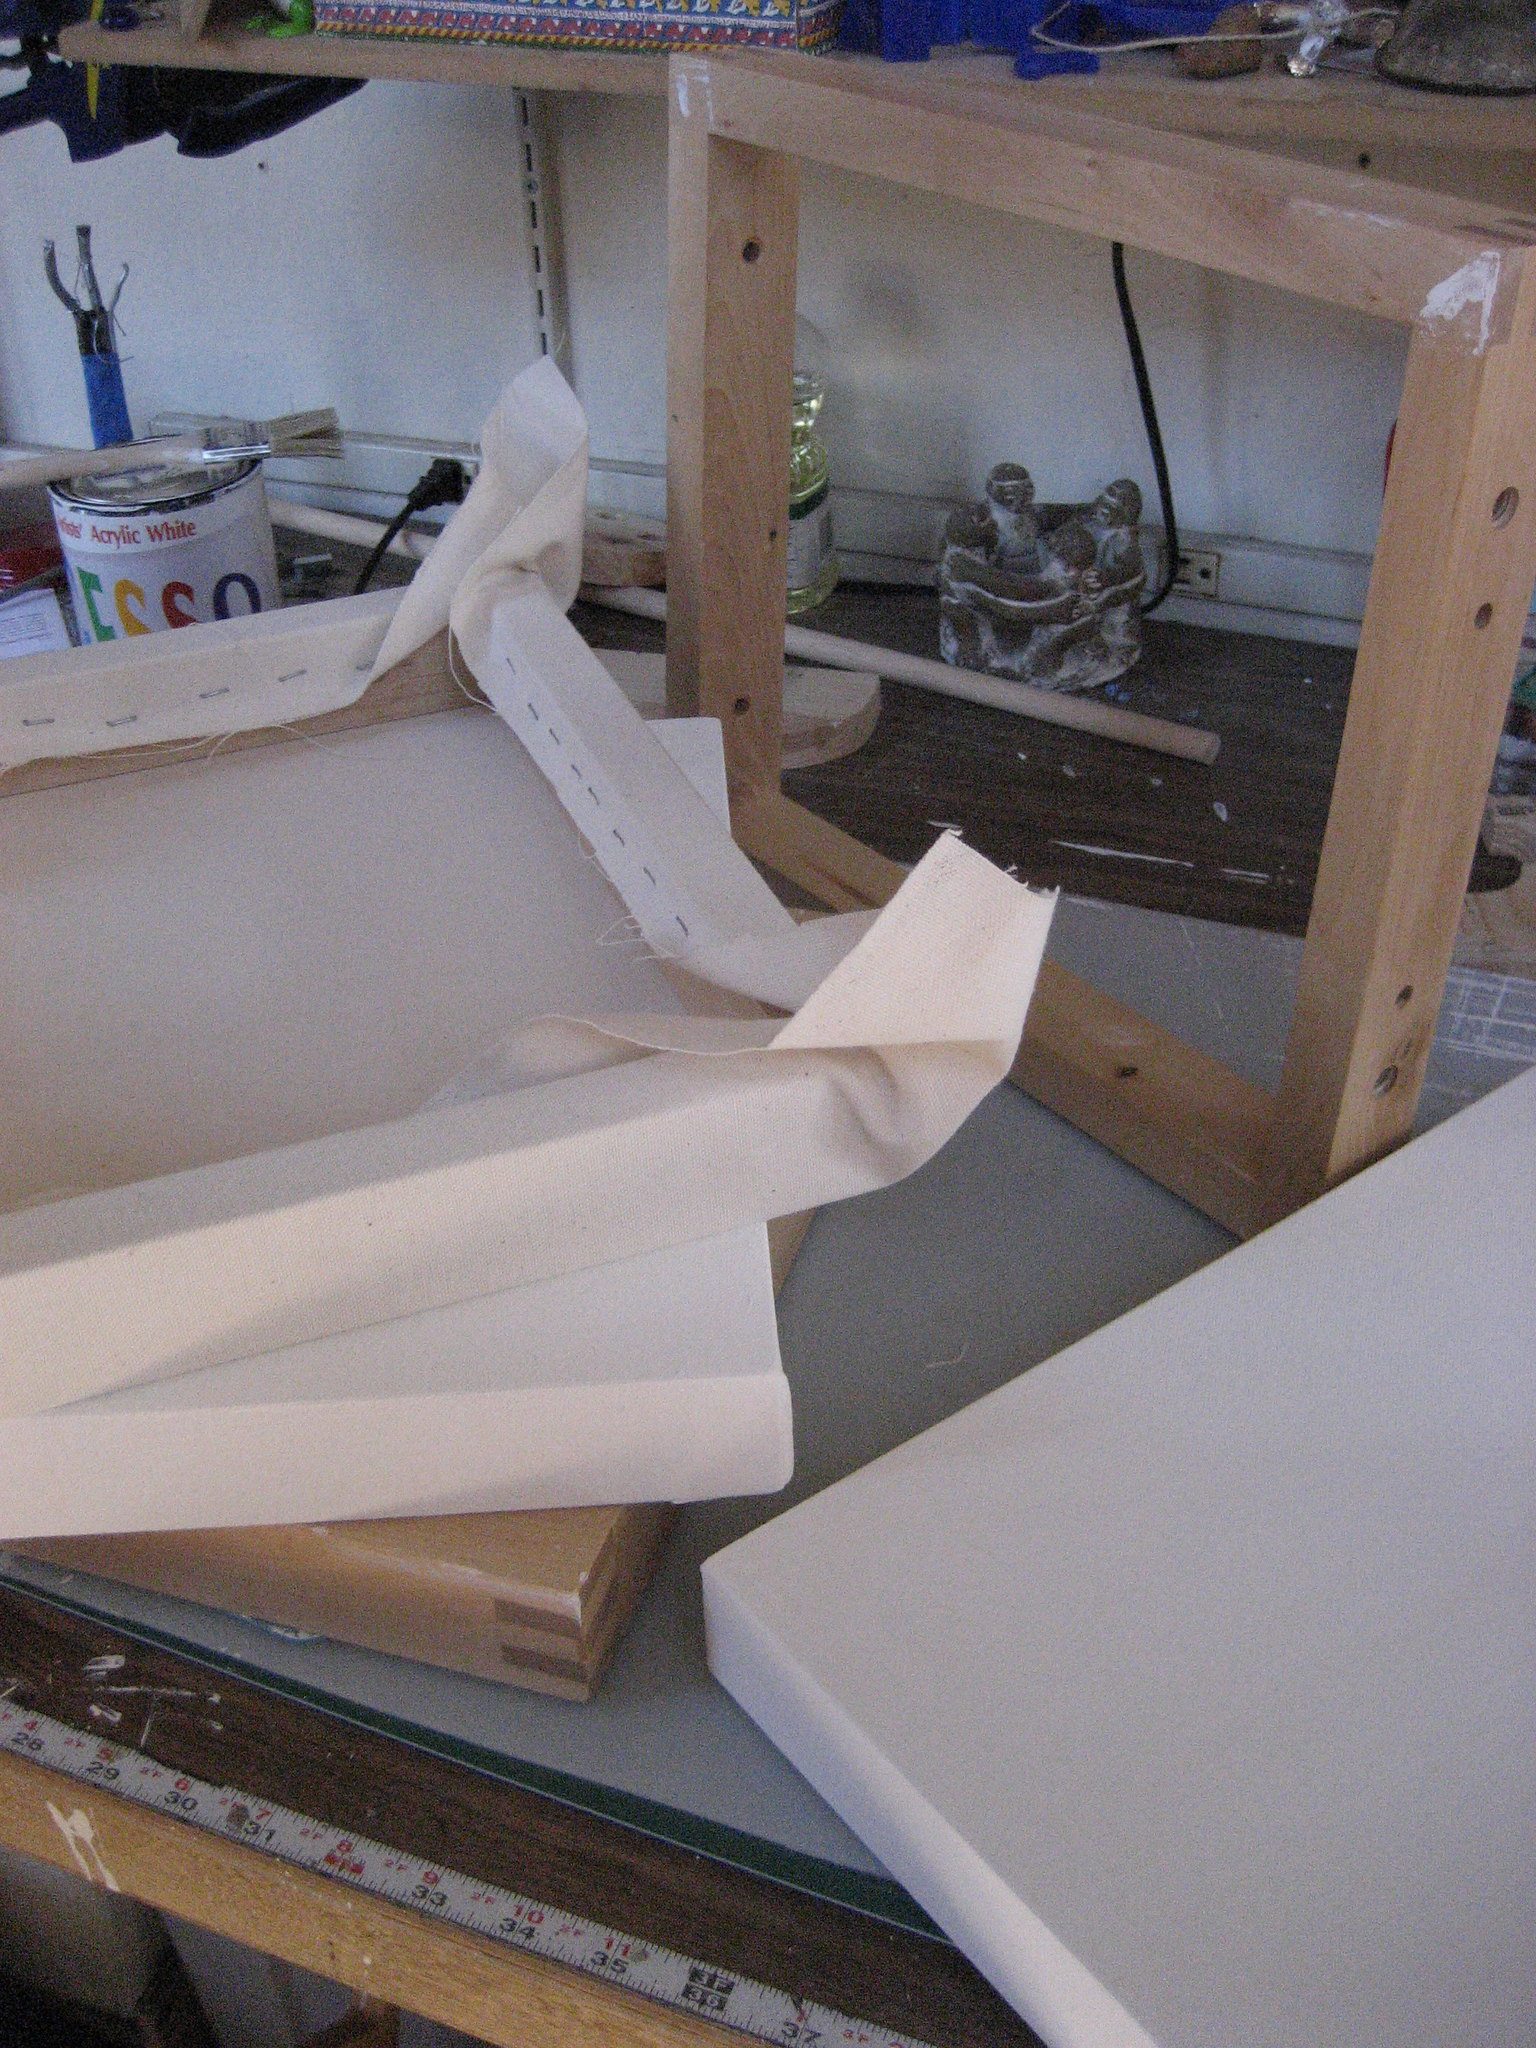
To stretch a canvas, start by assembling the frame. It consists of four pieces, one per side and the corner will be miter finger jointed. They slip together easily, but should be driven together with a couple of light raps with a rubber mallet.
Lay unprimed painter’s canvas face down on a clean work surface and place the frame on top of it. Frames will usually have one side that is flat and the other that is inset, with only the rim at the full height. This is the side that should be facing the canvas. Adjust the canvas and frame so that they are square to each other, with enough canvas all the way around to fold over the edge and cover the frame, but no more.
Starting in the middle of one side, fold the canvas over and staple it to the visible back face of the frame with one staple from a staple gun, right in the middle. Turn the canvas around 180 degrees and add another staple in the middle of the opposite side, stretching the canvas slightly in the process. Repeat this process for the two ends.
At this point, the canvas will be held in the middle of all four sides. Go back to the first side and add two more staples, 1-1/2” to 2” on either side of the first one. Be sure to keep the canvas straight, without becoming wavy. The weave of the fabric along the outer edge of the frame is a perfect gauge for this.
Do the same for the opposite side, again stretching it, as well as the ends. Repeat in this manner, crossing over the canvas until the corner are reached. Keep stretching the canvas evenly at all times.
The canvas will then need to be folded at the corner, like folding the top sheet at the corner of a bed. Staple the flap of fabric down, stretching it like everything else. Cut off all excess canvas which extends past the inner edge of the frame on the back side.
Canvas frames are sold with wedges, designed to go into the finger joints in the corner. This is what does the real stretching of the canvas, as they are driven in. They can be driven in individually; however, it is a good idea to go back around a second time, making sure they are all the way in.
Once the canvas is stretched, it is normally primed with gesso, before painting.
Framing a Canvas with Molding
Molding for framing differs from most architectural molding in that it has a rabbet cut into the back, for the canvas to set into. For those who don’t know what a rabbet is, it’s the same as a dado, with the exception that it is on the edge of the trim. Some frame moldings only have a very shallow rabbet, as they are designed for use with flat paintings or photos, while moldings which are designed for use with canvases are deeper to accommodate the thickness of the stretched canvas.
Some framing moldings can be purchased retail, either from a framing store, art supply store or online. In addition, there are a number of architectural moldings which can be made into effective picture frame moldings, by cutting a rabbet into the back of the molding, either with a router table or rabbet plane. Another option is to attach a strip of wood to the back side of the architectural molding, to create a rabbet without having to cut it.
Picture frames are made by mitering the corner and then fastening them together with both glue and brad nails. It is easier to use a brad nailer, although they can be hand nailed with brads as well. A corner clamp should be used to hold the parts in position, whenever nailing a picture frame together.
Making Molding in the Workshop
It is possible to make a variety of different framing moldings in the workshop for use in framing stretched canvases. The simplest form of this is to take a piece of dimensional lumber, such as a clear 2”x 2” and rabbet out the back with a dado blade on a table saw or on a router table. This provides a molding with a square cross section. That can then be modified on a router table, either by rounding the face edges or chamfering them.
Much fancier moldings than this can be created in the home workshop, using a router table. It all depends on the router bits one has available. Multiple bits, with multiple runs through the router table, can be made, adding the profile of various bits together to make a more complex profile.
As mentioned earlier, there are also router bits available, which allow the cutting of more complex molding, both for picture frames and for picture frames. These will not be available at the local lumberyard or home improvement center, but are available from woodworking supply companies.
Paintings on canvas are not installed with glass, as watercolor paintings on paper, photographs and documents are. The canvas is left uncovered. Oil-based and acrylic art paints are durable and do not need the protection of glass.
If the molding is deeper than the thickness of the stretched canvas, then the canvas can be held into the frame with regular framing points or glazing points. But if the molding isn’t as deep as the framed canvas, as it is in most cases, then offset clips are normally used. These are a Z-shaped clip, with one hole in it. The flange with the hole is set onto the back of the frame, with the other leg overlapping the stretched canvas. A short wood screw is then run through the hole in the offset clip, into the back of the frame.
Typically, only one to two offset clips are needed per side of the painting. However, large works might require a third. The frame itself and the stretched canvas are both stiff enough that they should sit tightly together, without needing a lot of offset clips.
Framing a Floating Canvas
A more recent style, which has become quite popular, is to frame the canvas in a way that makes it appear like it is floating inside the frame, without making contact with it. A small gap is left between the frame and the stretched canvas, giving this appearance. The canvas is attached to the frame in the back, where it is not visible. This is an extremely easy frame to make, giving an attractive appearance.
The frame is made of 1”x 2” lumber, although 1”x 3”s can be used as well. Depending on the look desired, normal grade 2 construction lumber can be used, premium or select pine, without knots, or hardwoods.
The frame is made slightly oversize, so that there is a 1/8” to ¼” gap all the way around the painting, providing the floating effect. Other than that, the frame is merely mitered at the corner, then glued and brad nail together. Diagonal braces, made of slightly thinner ½” material, are added a few inches out from all the corners, providing something to attach the picture to.
Fill the nail holes with putty and finish the frame by staining and varnishing it or by painting. Then paint the diagonal braces with flat black paint, to help them disappear. If paint the color of the wall that the painting will be hung on is available, that can be used instead of the flat black. However, if that is done, the braces may be visible if the painting is moved and hung on another color wall.
The last step is to attach the painting to the frame. Lay the painting face down on a clean surface, and then lay the frame over it, using cardboard spacers to ensure that all four sides are even. Then run screw through the four diagonal braces, into the corner of the canvas frame, permanently attaching the two together.
Related Posts:
How to Frame a Basement Wall by Admin June 17, 2023 Installing Average home ownership today is a mere eight years. That's up, as in the decade from 2000 to 2009, it was only four years. According…


")

")