
Adding greenery to any home creates a much more relaxing, livable atmosphere. Plants not only add oxygen to the air, but provide beauty and a touchstone with nature. Some plants go beyond that, providing food or at least herbs to flavor our food.
Many people don’t really have room for a garden. Living in apartments doesn’t exactly provide much space for gardening. Even using the balcony doesn’t provide for much space, assuming the apartment has a balcony. This has led to the idea of vertical gardening, but before there was vertical gardening, there were tiered gardens. Tiered gardens go back centuries, with examples found around Medieval Castles in Europe and throughout Japan.
Tiered planters provide a better way of utilizing the available space for plants, either indoors or out. They add a third dimension to a garden, so that everything isn’t flat, making the overall effect more attractive. Not only that, but like any other home project which shows attention to detail, they can make a home, or more specifically the home’s garden, look richer and more elegant.
So, what’s a tiered planter?
Tiered planters can take on many forms. Typically, they are a bunch of containers, mounted together in some sort of rack or stand, to hold them in place and make them all accessible at the same time. That’s a key, because the plants all need space above them, as well as plenty of sunlight to grow.
Tiered planters can be made out of existing containers or wood, all depending on the material available and the results desired. More than anything, it depends on your imagination, coming up with an idea that you think will work.
A couple of important considerations for any tiered planters:
- Planters need to be made out of a material that won’t decay, or at least won’t decay too fast. A wood planter may last a few years, but eventually will rot. As long as replacing it every few years isn’t an issue, then it’s not necessary to use pressure treated wood.
- Drain hole are a requirement. More potted plants seem to die of root rot, than any other reason. That root rot comes from overwatering. Adding drain holes allows extra water to drain out of the planter, helping prevent that root rot.
- It’s best if the planters are a minimum of 8” deep. While some plants will grow in shallower soil, 8” allows enough depth for most things that people grow in a tiered planter. It’s not enough for root vegetables though.
- Don’t allow the tiered planter to get so tall, that it becomes top heavy. Soil can get quite heavy, making it extremely hard to move a tall planter.
- To protect the wood, planters should be painted or stained with an oil-based exterior stain. In either case, take special care to cover the ends of the boards, before assembly, as that is the place water is most likely to seep in.
Raised Bed Tiered Planter
Raised beds naturally lend themselves to being converted into a tiered planter, as they are already containerized, forming the bottom tier of the system. All that’s needed to turn the planter into a tiered planter is to add a couple of layers on top.
One nice thing about this sort of tiered planter is that each layer is bottomless. That eliminates the worry about the soil not having adequate drainage, greatly reduces the amount of rot in the wood and also means that each tier really doesn’t have to be eight inches deep, as the roots can go down into the next layer down.
The basic design is a series of boxes, growing gradually smaller as they stack on top of each other. Setting them at 45 degrees angle to each other, allows the corner of one box to sit on the edge of the next lower layer. However, that’s not all that’s supporting it, as the soil in each tier supports the box and soil in the tier above it. The boxes are there mostly to keep the soil in place, while the soil itself provides the majority of the structural strength needed.
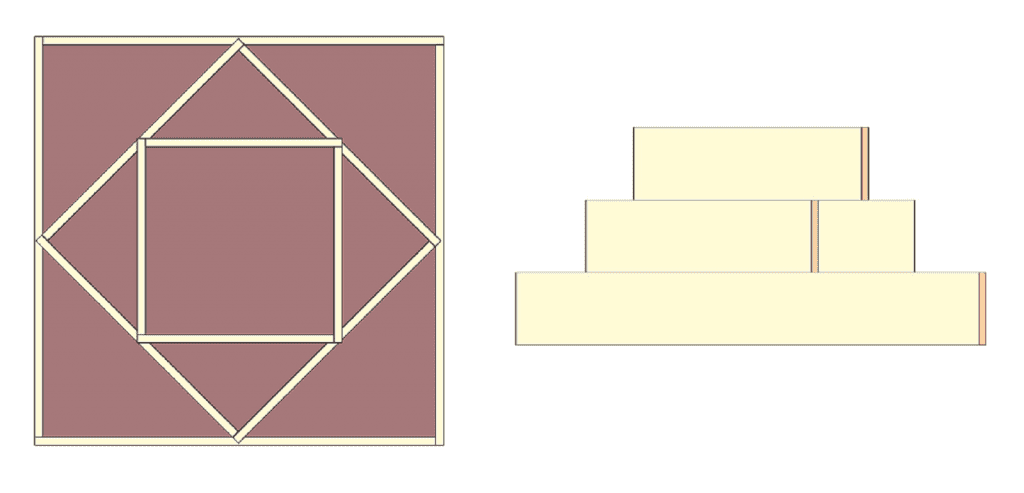
The two diagrams above show the same planter. The left diagram is how the planter looks from above, providing 9 growing areas, while the right diagram shows the three layers stacked (it’s also twisted 22.5 degrees), with each successive layer being smaller than the one below.
Ideally, the planter would be made from 2” x 10” dimensional lumber, but it could be made from anything from 1”x 6” to 2” x 12”, depending on the project budget. Thicker material will obviously be stronger; but that’s only an issue if the soil packs down and starts spreading the planter out. In cases where budget is an issue, 1” thick material can be used.
The cutting list for this planter is extremely simple:
- 4 pieces 48” long
- 4 pieces 34” long
- 4 pieces 24” long
As is visible in the leftmost diagram, the corner of each square are made with the right piece overlapping the left in all cases. That allows a square to be made of pieces the same length. Since this requires nailing into the end grain, added strength can be imparted to the squares by using angle brackets on the inside of the angle (where they will be hidden) or a piece of 2”x 2”, cut to length. Screws or nails through the boards into this piece of wood will make the squares stronger.
The three tiers don’t even need to be connected together. However, it would be a good idea to attach the corner of each tier to the tier below, to help keep the tiers from shifting while filling them with soil and while the soil is settling.
Then all that’s needed is to stack them up, filling the tiers with potting soil. With the bottoms of all the layers open, the soil will go down from one tier to the next, filling all available space. Keep in mind that the soil will pack down with time, so more soil will need to be added.
Ladder Tiered Planter
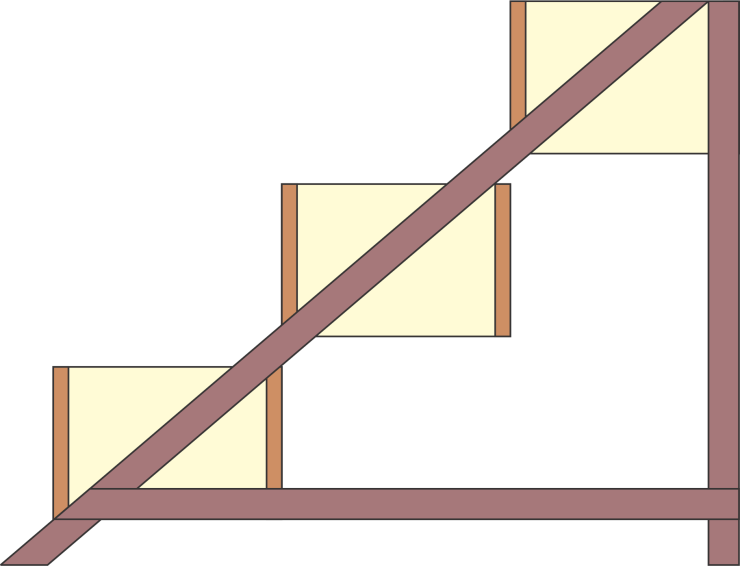
A very common style of tiered planter takes its name from the common stepladder. The basic idea is to have a number of planter boxes stacked in such a way as to look like the steps of a ladder.
Making this sort of planter starts with making a series of wood boxes, all the same size. The actual size the planter is made will depend on how much space is available, more than anything else. In the diagram below, the front and back of one of these boxes overlaps the ends, so that the end grain won’t be so obvious.

Once the boxes are made, it’s just a matter of connecting them together, forming the ladder, as shown in the diagram below. This can be done with 1”x 2” boards, although I would recommend buying finish grade boards for this, which do not have any knots. Most 1”x 2” boards are weak, because there are knots that go more than halfway across the material.
It’s important to attach the frame together solidly and to attach it to the planter boxes solidly, as moist will attack the joints. Ideally, these joints should be doweled or pegged, rather than put together with screw, for long life. With a wood to wood connection, there is no risk of rusting of the hardware causing deterioration of the joint.
Galvanized Bucket Tiered Planter
Tiered planters don’t have to be made out of wood. a wide variety of other materials can be used; essentially whatever is available. One very simple way of making a tiered planter is to use galvanized steel buckets or tubs. These are available in a variety of sizes, making it easy to find one larger one and one smaller one.
The idea is to nest one bucket inside the other. But in order to do this, it’s also necessary to provide a base for the smaller bucket to sit on, rather than sitting on dirt. The weight of it sitting on dirt would gradually cause the smaller bucket to sink into the larger. That problem was avoided on the raised bed planter by having the corner sit on the tier below. In this case, it can be avoided by making a stack of bricks in the bottom tub, as shown in the cutaway drawing below.
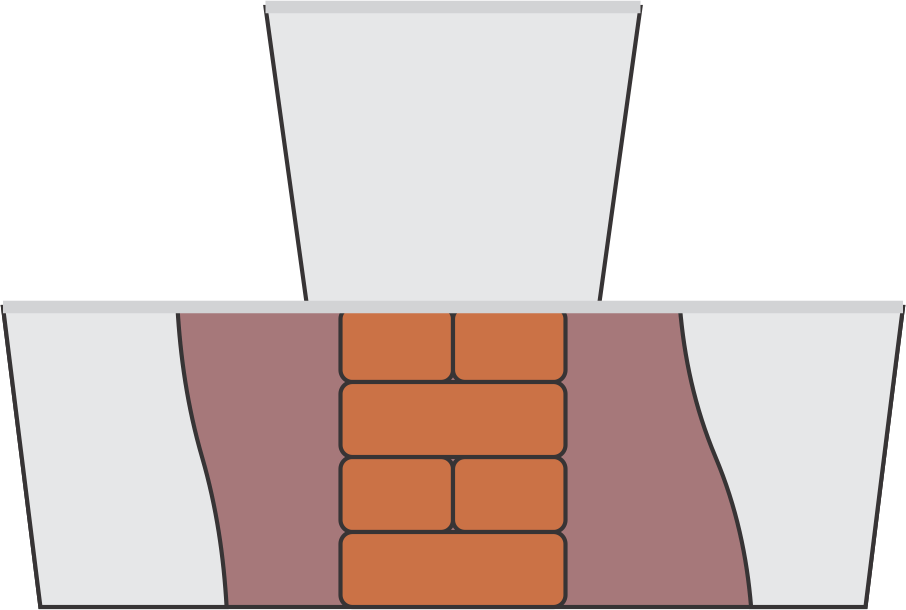
Don’t forget to put drainage hole in both containers before assembly, and make sure they won’t be covered by the bricks.
Good potting soil will go a long way towards making any garden venture successful. Spending a few dollars for enough potting soil to fill the planter is a good investment, which will help to make sure that the project is a success and any plants which are potted in the planter thrive. Adding additional fertilizer, at least twice a year, is also necessary to keep the plants growing strong.