Wood bed frames are generally more attractive than metal ones. While a few styles of metal bed frames have a headboard and footboard, making them much more beautiful, most metal bed frames merely support the mattress without providing any decorative elements. While these can be convenient, buying a bedroom set will most likely include a wood bed frame, complete with a headboard and possibly a footboard.
While wood beds are much more attractive than metal ones, they are not without their failings. Metal frames are stronger than wood, so a metal bed frame may eventually fail. This is a real risk with older beds, especially antique ones where horsehide glue was used for assembly rather than our newer, synthetic adhesives. While excellent for its time, horsehide glue does dry out and become brittle, eventually failing, especially in mortise and tenon joints, which are subject to a lot of movement stress.
Few people would want to throw away an antique bed that has been in their family for generations just because the frame is starting to fail. Unfortunately, many of these people don’t know how to repair the bed properly, so either add metal brackets or run screws through the side of the frame. If either of those are done in a way that keeps the repair hidden, it’s not a problem, but that’s rarely the case. All too often, the repair is noticeable, destroying the antique charm of the furniture.
But it is possible to repair almost any damage to a wood bed frame without destroying the look of that piece of furniture. All that’s required is doing the work in such a way as to keep it hidden by making all the attachments from the inside or the bottom.
This usually requires removing the mattress and box springs, which shouldn’t be a problem anyway, as they would be in the way of any repair. But it’s essential to think of timing so the glue can fully dry before the bed is used again. This makes repairing a bed frame a Saturday morning project rather than something that can be done in the evening.
Once the mattress and box springs are removed, it’s possible to inspect the frame and determine the extent of the damage. While inspecting, it might help to put some weight on the frame, as that can cause cracks to open up. Try moving the frame as well, as that will show where loose joints are. Several different things can go wrong, each of which we’ll discuss separately.
Cracks in the Wood
One of the more common forms of damage is finding cracks in the wood, especially the legs, although it might not be a straightforward failure. For those cracks to appear, weight and motion may have to be applied to the leg to make them visible.
Before gluing the cracks, dry-clamp the break together to ensure that the clamping scheme selected will close up the crack. As legs are often curved in one way or another, it can be difficult to find a good way to clamp the crack closed where enough force can be placed upon it to close it up. Wood blocks between the clamp and the piece being glued might be necessary.
Cracks are fairly easy to repair, requiring nothing more than glue and clamps. Force the crack open and apply glue, either using a toothpick or a needlepoint bottle, to ensure the glue gets into the crack. Then, clamp the crack shut, allowing it sufficient time to dry.
If necessary, there are several ways to add strength to the cracked piece of wood. If the separation of the crack is severe, it can be helpful to run some screw into the piece, working from the inside, so that the screw heads will remain hidden. The same can be done with dowels, drilling holes inside and then gluing dowels into them.
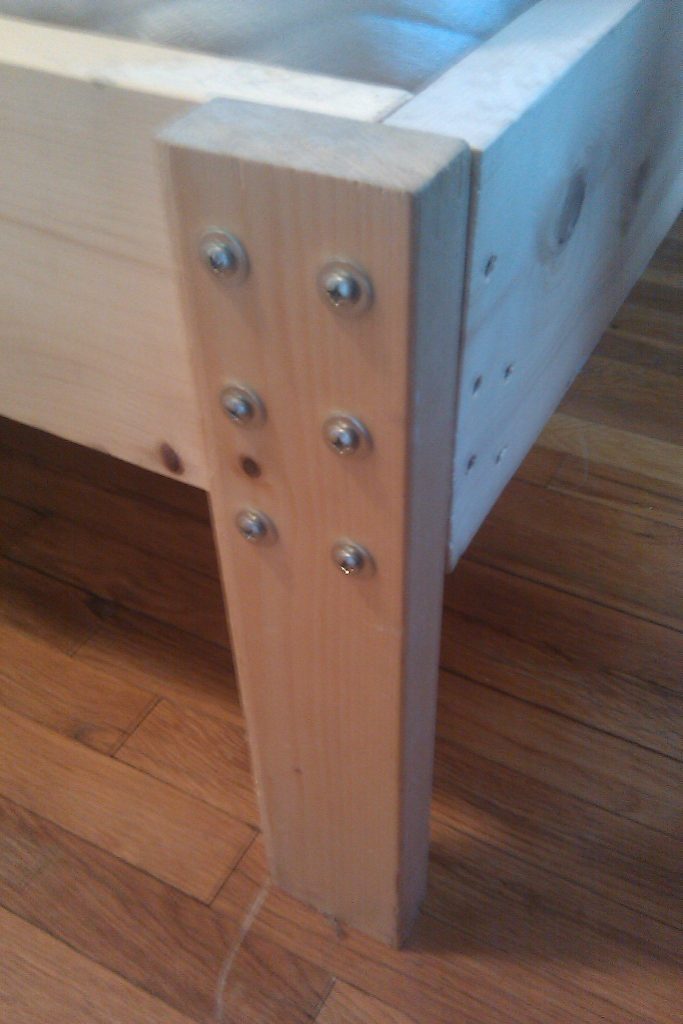
In severe cases, it may be necessary to “sister” another piece of wood or metal onto the existing one, again working from the inside. A thick piece is usually not needed, just something thick enough to hold the screw which will be attaching the sistered piece to the existing part of the frame.
Loose Joints
Loose joints are ubiquitous in antique furniture, usually made with mortise and tenon joints. The wood often shrinks over time, causing separation. Once that starts, joint movement can cause extensive wear on the mortise and tenon.
Depending on the extent of the damage, there are several different ways of repairing a damaged mortise and tenon.
If the only problem is that the glue has come loose, a chisel can be used to cut the glue off the tenon and out of the mortise. Then, new glue can be applied, putting the joint back together. If the tenon has shrunk to the point where it is loose in the mortise, a thin piece of wood can be used as a shim, making the joint tight once again.
If the mortise and tenon are damaged, filling the area with a thick piece of wood or wood matchsticks may still be possible. Another option is to fill in the damage with epoxy-based wood putty and then cut it to fit snugly, reassembling it with epoxy rather than wood glue.
Finally, the tenon can be cut off and glued into the mortise in extreme cases. Then, both pieces can be drilled, and the joint can be put back together with dowels.
Fixing damaged slats is the easiest repair for an old bed frame. It’s not uncommon for the ends of the slats to become damaged through use, making them easier to fall through.
To repair this, remove and throw away the old, damaged slat (or at least relegate it to the scrap bin) and then cut a new slat, using the measurements of a good slat to know how long to make it.
Always check the condition of the rail the slats sit on when it is necessary to replace a slat. The process that damaged the slat may also damage the rail. In that case, the rail must be removed from the inside of the bed rails and replaced. This is usually glued and screwed in place, so it will be necessary to break off the rail, clean up the excess glue and then attach the new one.
Damaged Side Rails
The side rails of a bed frame rarely become damaged, but they can become bent or even broken. If they become bent, the slats won’t sit properly on them. In that case, the first indication of a problem might be that the slats fall out and need to be replaced. Always check the side rails for bowing whenever replacing slats.
If the side rails are bowed out, it’s easy to fix. All that’s needed is one or two stringers, which can be screwed into the bottom of the side rails, from one rail to the other, pulling them together. This may require the help of a friend to pull the rails together while the screws are being put through the stringer and into the bottom of the frame rails.
The problem occurs when the side rails are broken or even cracked. If the cracks are only cracking, they can be repaired, as discussed earlier about fixing cracks in the wood. But what if the rails are broken?
In that case, it is often best to make all new rails if possible. However, doing that presents a number of challenges, including trying to match the finish and style. That alone may make it impossible, but there are ways around that.
One such way is to run the existing rails through a planer, turning them into nothing more than a thin outer coating to be glued onto the new rails. With that done, the new rails can be made out of dimensional lumber, and that thin veneerlaminated onto the outside. This allows the existing color and style to be maintained, without problem.
Another option, if that can’t be done, is to sister the existing rail from the inside, adding another layer of material. The problem here is that there usually isn’t enough extra room on the inside of the rails to add a ¾” thick board or piece of plywood. Since ½” plywood is often used for I-joists, that’s a possibility or a 1/8” thick steel plate can be screwed onto the inside of the rail.
Any time that wood is sistered onto an existing piece, it is essential that the patch go at least six inches on either side of the break and that sufficient fasteners are used. In cases where it is being done to provide structural strength, at least three screws or nails should be used on either side of the break, in addition to gluing the pieces together.
Finally, there is the problem of broken or otherwise structurally compromised legs. This could be from cracking or from the legs breaking off. I had one four-poster bed in which half of the base of the leg peeled off when the headboard was being drugged down a ramp. The wood peeled off in layers.
In most cases, the best thing to do is sister another piece of wood inside the existing leg, where it will not be seen. Sistering can be done to repair a broken leg or to strengthen it. In either case, the idea is to attach another piece of wood on the inside of the leg, where it won’t be seen but will still provide structural strength. If it is patching a break, make sure there are at least two fasteners on each side of the break.
Taking that idea a step further, the piece being added on might be able to be hidden if the leg is sufficiently large to allow material to be removed from the inside of it, making a groove for a piece of supporting material to be installed. It doesn’t take all that big a piece of wood to support the weight on a bed, as all the weight is on the end grain. One inch will do. The main reason that larger pieces are used is for stability and style.
If the pieces of a broken leg are cut out, making a groove on the inner side where a one-inch square piece of hardwood can be installed, the entire leg can be glued back together, making it just about as strong as it originally was. The thicker leg provides stability, while the added piece provides the needed strength to support the load.
Hanging Bed- Full Guide How to Make It by Admin August 18, 2025 DIY Have you ever climbed into a hammock and thought, “This is great, but man, I wish I had more room to stretch”? That’s pretty much…


")
")

