Stenciled signs on wood are one of the trendy home décor items we find everywhere from knick-knack shops to truck stops. Some carry witty or humorous messages, while others are simpler messages, like “Welcome.” Regardless of the words on the sign, the simply country charm of these signs adds to a casual motif and a homey environment, while also having the ability to express the personality of the person whose home it is.
While there are a large variety of these signs available on the market, finding just the one wanted for the home can be a bit challenging. One might have a personal saying, favorite scripture verse or a joke they’d like to have on a sign; but can’t find one available. In that case, they can make their own.
Making these signs is actually rather simple, but requires the use of a vinyl cutting machine. That doesn’t mean that it’s necessary to go out and buy one of these machines though, as any sign shop can cut custom vinyl stencils for a fee. Their machines are much larger than home stenciling machines, so it’s possible to make much bigger signs using their services to make the stencil.
One side note that I’d like to throw in here is that this technique is actually what’s used by professional painters, for painting design work onto a large number of items. A couple of decades ago I worked as an engineer in a city transit bus manufacturing plant. We had our own stencil shop, which could make vinyl decals for custom graphics or stencils as long as 40 feet for painting the custom graphics onto the busses. The same equipment cuts both vinyl graphics and vinyl stencils.
It Starts with the Wood
Any sign of this type is going to start out with a piece of wood. Most signs are painted onto boards, but the same technique can be used for painting onto boxes, columns, and furniture. Barn wood or other weathered wood is poplar and works well, although it takes a little more work to get the stencil to stick to the wood and prevent bleeding. The rougher the wood’s surface is, the more of an issue this can be.
Before using any reclaimed wood for a project of this type, it’s necessary to clean the wood thoroughly, removing any dirt, loose paint and loose wood fibers. At the same time, care should be taken to prevent overdo scuffing of the surface, removing the very texture that is desired from the reclaimed wood.
If any painting of the wood, other than the stenciled graphics, needs to be done, it should be done and allowed to dry thoroughly, before the vinyl stencil is applied. Multiple colors of paint, creating a distressed look are popular, although considerably more work.
There are two potential problems if the paint does not dry thoroughly, not just to the touch, before applying the stencil. The first is that the stencil might not stick well and the second is that the stencil might peel the paint off. So before applying the stencil, check that the paint is dry by applying tape to it and allowing it to sit for a while. If the paint is not fully cured, the tape will not stick well.
The Vinyl Stencil
There are many designs for vinyl stencils available online or custom ones can be made. If a sign shop is making the stencil, then they will have to make the stencil or the graphics will have to be provided in the form of a vector file. A bitmap format will not work.
Manufacturers who provide vinyl cutters generally provide design and layout software with them. There are also a few different layout software packages available online, either as a download or as an online software service. Any of them allow a considerable range of creativity, including modifying text and adding clipart to the design. Their output is an electronic file that is fed to the vinyl cutter.
There is actual stencil material which can be purchased for use on these stencil cutters. In addition, heavy-duty vinyl, with a permanent backing can be used. The width of the vinyl used limits the overall size of the sign being made, as that becomes the short dimension on the sign. In most cases, the long dimension is limited only by how much material there is in the roll.
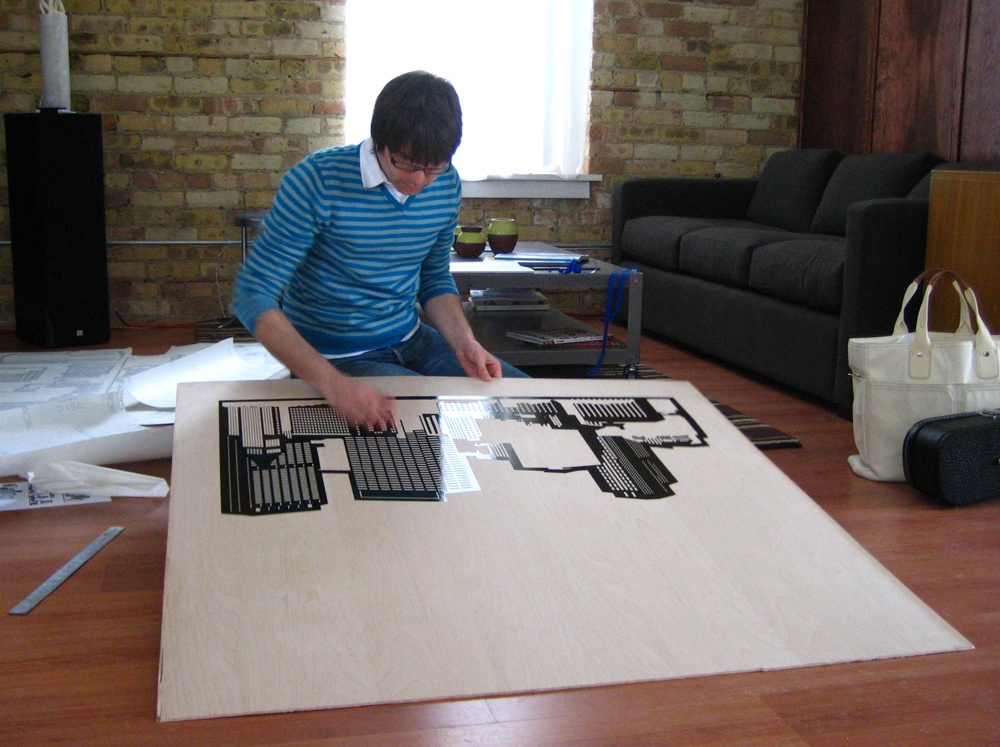
Once the vinyl stencil has been cut, it needs to have the positive image removed. In other words, the cutout vinyl letters and graphics need to be removed from the stencil, leaving just the stencil behind. A “weed tool”, which looks like a pick is used for separating the parts to be removed. Take care not to damage the stencil and only remove the part which will later be painted.
With the image removed, apply transfer tape to the stencil, pressing it down to the vinyl well. Some people recommend taking the transfer tape and sticking it lightly to clothing first, which has the effect of reducing the stickiness of the adhesive, making it easier to remove the transfer tape when the time comes. The stencil is now ready to use.
With both the stencil and the board ready, it’s time to make the sign. Remove the backing film that covers the adhesive on the vinyl (not the transfer tape). Take care not to remove any small pieces of the stencil with it, such as the pieces for the insides of letters. Position the stencil on the board and press it down all the way around, taking special care to stick the edges around the letters well.
Even a well-adhered vinyl stencil on smooth wood can end up with paint bleeding under the edges of the stencil; so it’s important to seal the stencil to the wood, before painting it. The product normally used for this is called “Mod Podge.” This is a glue and sealer product commonly used for arts and crafts projects. It is essentially watered down white glue, which can be applied by spray but is best applied by brush in this application. Use the matte version of the product, so that any bleed won’t be as visible.
Paint the Mod Podge into the opening of the stencil with a paint brush. A light coat is sufficient in most cases. If the wood is highly textured, it may be necessary to press down the vinyl stencil, while painting, so as to ensure that the edges are sealed. Allow the Mod Podge to dry and then check for any unsealed areas around the edges of the stencil.
Painting can be done with normal house paint or artist’s acrylic paints. To paint the wood, it’s best to use a dabbing action, what some people refer to as a “pounce.” This is where the tip of the brush is hitting the wood, not being brushed across it. There is an actual type of “stenciling” paint brush made for this, which is available at art supply stores. The brush has straight, stiff bristles, and a square cut tip, making it ideal for dabbing.
A single coat of paint will probably end up somewhat transparent, which is great if a distressed look is desired. For a solid finish, it’s best to use two or even three coats, especially if white paint is being used over wood that has darkened from weathering.
Allow the paint to dry and carefully remove the vinyl stencil. In some cases, a little bit of the paint may come up with the stencil, especially in sharp corner. This can be minimized by pulling the stencil up from wider points in the design to thinner sharper ones, leaving those sharp corners to come up last, as the stencil pulls away from them, rather than pulling up on them.
Some people do additional freehand design painting on their signs, after the stenciling, such as painting flowers or shadowing the letters. The possibilities are only limited by the imagination of the person making the sign.
Related Posts:
Vinyl Shake Siding: Durable, Stylish & Low-Maintenance by Admin July 20, 2023 Installing Home maintenance can be challenging, especially when buying a used home from someone who hasn’t paid as much attention to their home as they should…
Drying Wood in Oven: A Complete DIY Guide by Admin September 23, 2025 More About Most people don’t give a second thought to drying wood in an oven until something goes wrong. I didn’t either. I slapped together a pine…
Best Practices for Using Mineral Spirits on Wood by Admin May 20, 2025 Finish . Looking to clean old wood or prepare it for stain? Mineral spirits offer an easy, safe, and effective method for refreshing wood without damage.…