Any student does better when they have a specific place set aside to study. This has been proven by scientific study. It doesn’t take a pandemic to make them need a study desk or table, all it takes is homework. While the COVID-19 pandemic did cause millions of students to have to study from home, the idea of studying from home existed long before the pandemic struck.
Having a specific place to study helps students focus on studying when they are in that place. While it is not a perfect solution, when it is properly done it can help eliminate distractions. It can also help increase efficiency, as they won’t have to look for a place to study every single time, nor will they have to look for their books, school supplies, laptop, etc.
So, what makes a table a study table? Can we use just any old table for this? Is there anything needed to go with the table or to make it more efficient to use.
One might naturally think that an office desk would work for a study table, and it will. But in reality, students don’t need a full-blown office desk. They don’t need the drawers that a desk typically has, nor do they need as much desktop surface to work on. However, it can be useful for a desk to have some storage for school supplies and books. It’s also necessary in today’s education environment to make sure that the student can plug in their laptop or tablet, as much of their work these days is accomplished on those devices.
So just what makes a table a study table?
Literally any table can be used for this, whether a dining room table or a card table. But tables which are actually designed to be used as study tables or student desks are usually four to five feet long and two feet deep. Like other tables, they are typically 30” tall, making them a comfortable height for working when sitting in a normal height chair, such as a dining table chair or folding chair. They don’t necessarily have a keyboard drawer on them anymore, like they used to, because most students use a laptop, rather than a desktop computer.
Although laptops have gained considerably in popularity as their price has dropped, students are actually better off working on a desktop computer, if they don’t need the ability to take it to school with them. Not only does a desktop computer provide the opportunity for a larger screen, using a keyboard in a keyboard drawer is considerably better, ergonomically speaking. I have two computers on my desk, one of which has its keyboard in a keyboard drawer and the other which has its keyboard on the desktop; it’s much easier to type on the keyboard that’s in the drawer.
According to experts, it’s best to make a study table in a light color, whether that is a light-colored wood, such as pine or painted in a light color. In either case, the light color reflects more light, making for a better study environment.
Adding a desk riser provides the student with a place to put books, videos and knick-knacks that express the student’s personality. The ability to have a study area express the student’s personality is an important part of making them comfortable in using it and desiring to spend time at their desk.
Another important aspect here is the sense of ownership. Children like having their own bedroom, rather than a shared one, because of it being theirs and them having the ability to do what they want (within reason) in their room. When a child studies at the dining room table, it’s the family’s table, so there’s no sense of personal ownership. On the other hand, when they have a study desk in their room, it’s something that they identify as their own, helping to encourage their engagement with that desk… in other words, doing their homework.
Building a Simple Study Table
There are many models of study desks currently on the market, with a wide range of prices. But those are for the people who don’t want to make their own. For those of us who are woodworkers, the idea of spending hundreds of dollars to buy something we can build in an afternoon just doesn’t make sense. We’d much rather build it ourselves, even without the bragging rights of having done it.
Building a study table is much like building any other sort of table. By and large, they are built with a MDF top, rather than a laminated hardwood one or a plank one. Making it out of MDF helps to keep the price low and MDF readily accepts a painted finish, so that it can be painted in a light color. Another option is to cover it with kitchen countertop laminate, providing an easier to clean, more durable finish.
Since this is a plywood website, we’re going to make a study table out of either MDF or hardwood plywood alone, ¾” thick, with no hardwood parts. Hardwood legs are nice, but can be costly. Using all plywood or MDF will help keep the cost down, while making the table easy to build. To give the legs strength, they will each be made out of two pieces of material, cut and glued together at a right angle. This is, by no means, the only way of making the legs, I merely offer it as an easy to make, attractive option.
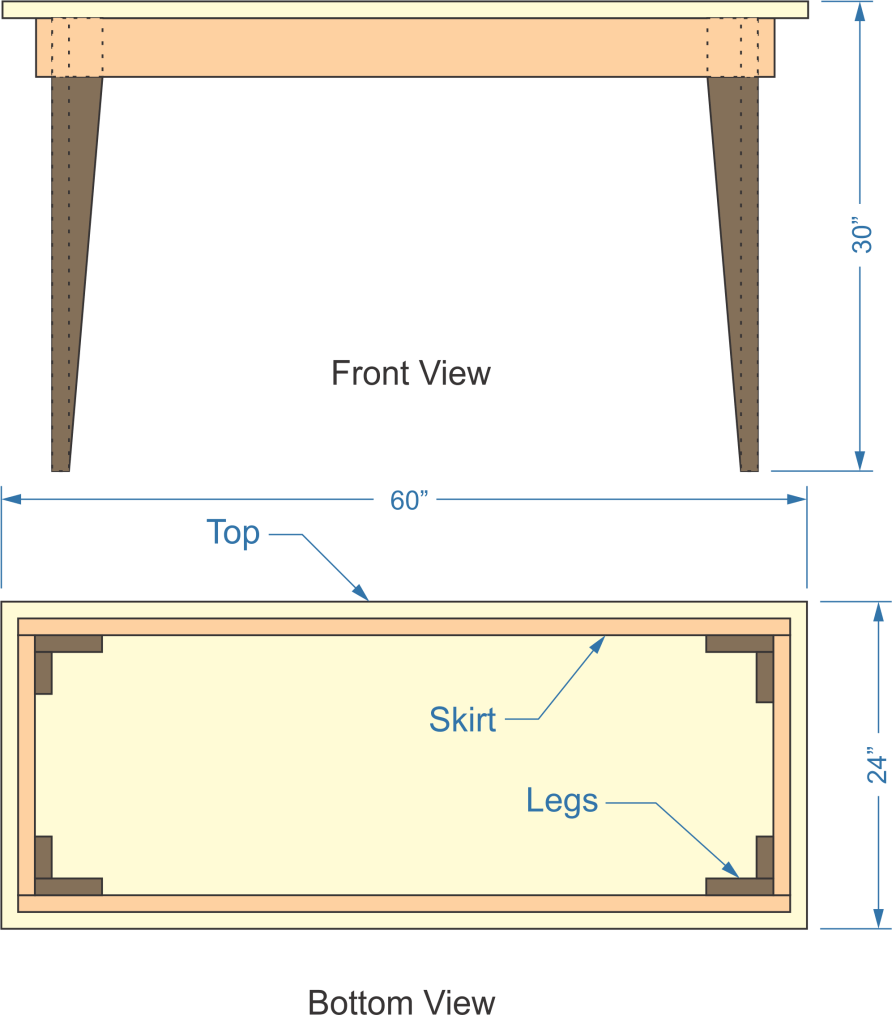
I’ve colored the various components in the diagram above for clarity, but in the actual table they would all be painted or stained the same color. The entire thing can be made with a single sheet of either MDF or plywood, with material left over (perhaps for a desk riser). Start, as always, by cutting the largest piece, the table top, which is a single layer of ¾” thick material. Then attach a skirt to it, cut from the same material. The skirt should be 2” to 3” high. A shirt any higher than 4” might infringe on having enough leg room. This can be attached to the bottom side of the table top with glue and pocket screws.
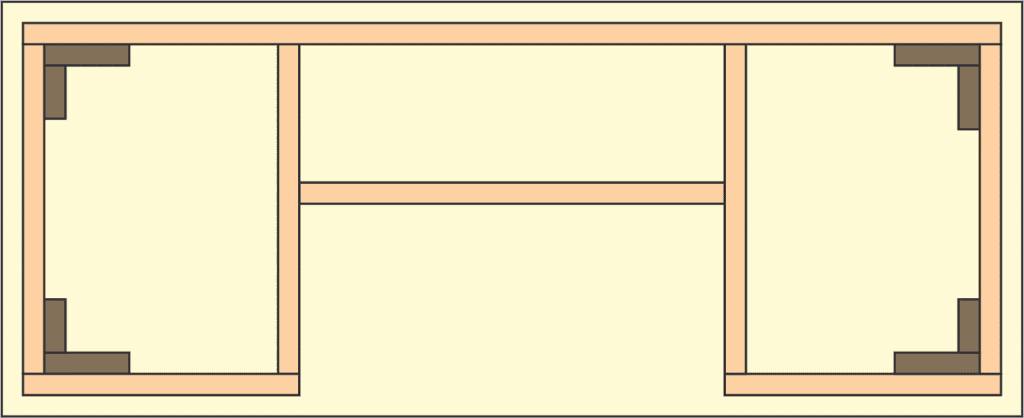
In the case of study desks where the keyboard drawer is to be installed the skirting needs to be left off the area where the drawer will be. To help keep the desk’s strength (kids will do the craziest things), it would be a good idea to add additional stringers, such as shown in the diagram below. Commercially manufactured student desks won’t be made this way, as they are trying to save money. Still, by doing that, you can be sure it won’t collapse if they’re using their desk as a springboard to dive into their bed.
For the legs, cut one rectangle of material as long as the leg is high and four to six inches wide. Then mark the ends of the legs 1 ½” from opposite corner, as shown in the diagram below. Draw a line between these two points and cut it, making the two pieces of the leg. The two pieces can then be glued and nail together to make one leg.

Attach the leg to the inside of the table skirt, as shown in the top drawing, bottom view. The leg should be both glued and nail to the skirt, providing for a strong leg, at low cost.
Since we’re working with plywood products, it’s going to be necessary to cover the edge of all the pieces with shelf edging to hide the grain. This is an easy way to finish out the edge.
What About Drawers?
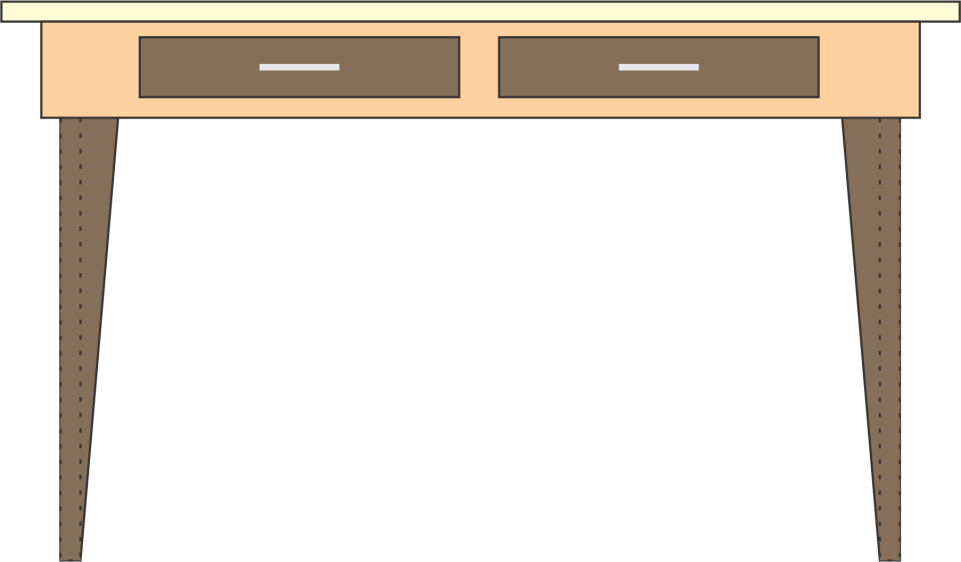
It is possible to add drawers to any study desk. All that’s needed is to make the skirt high enough to accommodate the drawers, say about 4” high, and cut openings for the drawers. In order to maintain the strength of the desk, it would be a good idea to either have the web of the skirt include a stringer below the drawers, as shown in the drawing below, or to use a similar structure to that shown for the keyboard drawer and then skin over the bottom of the drawer space with a thin layer of plywood. This will essentially turn the desktop into a beam, making it quite strong, even with the hole in the front of the skirt.
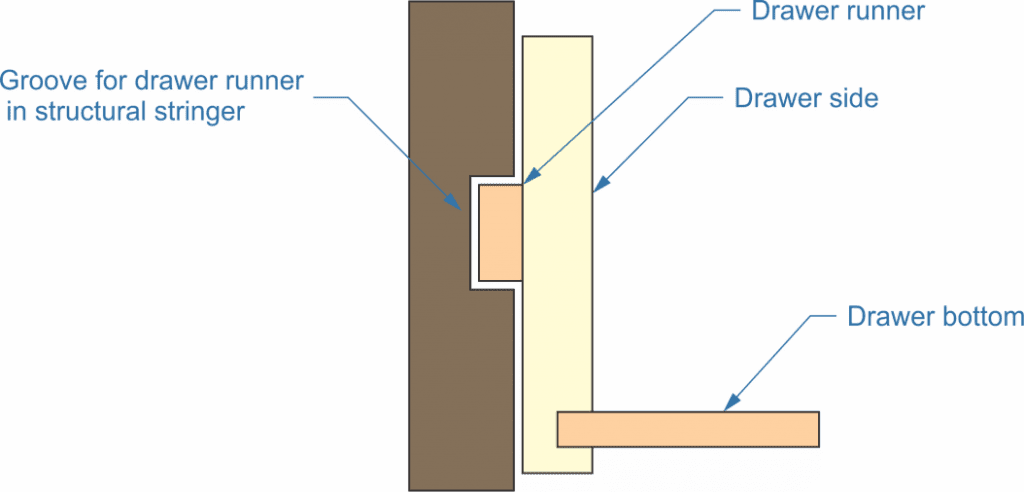
Typically, drawers of this type are installed without using ball-bearing drawer glides. Rather, a wood runner is attached to the side of the drawer, which fits into a groove cut into the structural stringer, as shown in the drawing below. The secret to making these so that the drawer doesn’t stick is to wax the runner by rubbing it down with beeswax.
Adding a Desk Riser
While a simple student desk can be used by itself, adding a desk riser can add a lot of functionality, providing space for storage of books and the display of knick-knacks. Without a riser, those items either sit on the desktop, cluttering it up or are stored elsewhere. Actually, the books are more likely to be stored elsewhere, while the desktop is used for the knick-knacks.
The actual design of the riser will depend a lot on the size of the desk and the size of the computer’s monitor. It is necessary to leave enough room for the monitor to fit comfortably, so that the riser doesn’t make the whole desk awkward to work with. Besides those constraints, what is needed are shelf space and possibly some cubbyholes to put papers in.
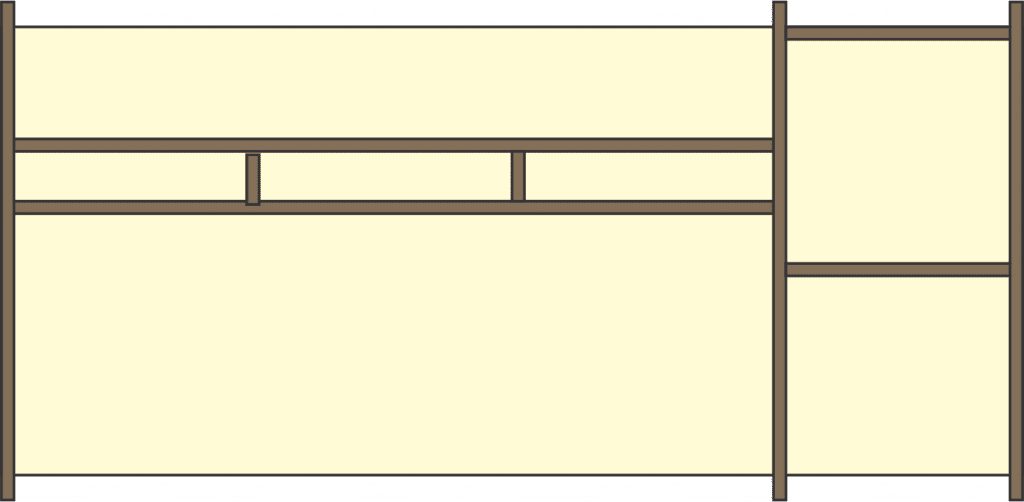
When making such a riser, the back is essential, even if it is made of very thin material, like 1/8” Luan. Without the back in place, the riser has much less structural integrity, as a square really isn’t a structurally strong shape. squares need some sort of diagonal brace to keep the horizontal and vertical members aligned properly. As the drawing shows, the back doesn’t have to fill the entire area and in fact it is a good idea to leave a gap at the bottom for cords to go through.
A Study Chair
The normal temptation is to use just any old chair with a student desk; but that’s not a good idea. A folding chair or wood chair isn’t going to be comfortable, which will be just one more excuse not to use it. Rather, a study chair needs to have some padding, making it easier to sit in. On the other hand, this is a working space, not one to relax in. So the kind of padding found in a living room chair is going too far.
When picking a chair to go with the desk, think in terms of office chairs. Ergonomics is important, especially for college students who might be spending hours at their desk. Comfort is important, but what’s more important is that the chair provides lower lumbar support and proper dimensions. Armrests that help hold the arms at the right position for keyboard work can be helpful, but are not a requirement. On the flip side of the coin, a chair that is too comfortable doesn’t encourage the student to work, but rather, might cause them to go to sleep.
Can you make an appropriate study chair to go with the desk? Yes, you can. The best sort of designs for making in the home workshop is something akin to a dining-room chair. This can also be made out of plywood or MDF, without having to use any hardwood. To do so, cut the sides as solid pieces, with the legs integral to the sides. Then deck across for the seat and back.
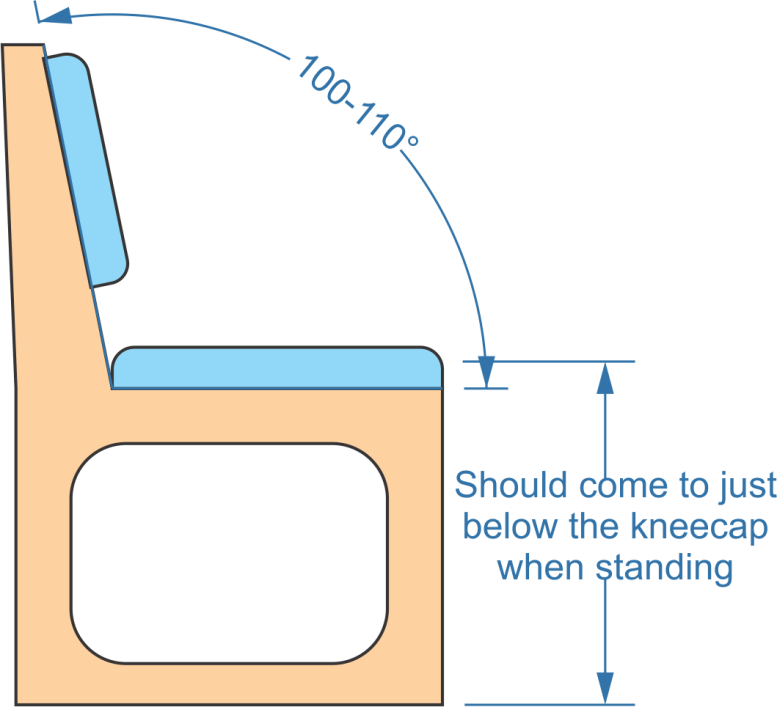
A seat made to this design has the advantage of being able to slide across carpeting easily, without catching, just as long as the bottom edges are rounded. In order to keep the design ergonomic, pay close attention to the seat height and the back angle. The lack of arms on the chair isn’t as much of an issue, as those key dimensions are.


