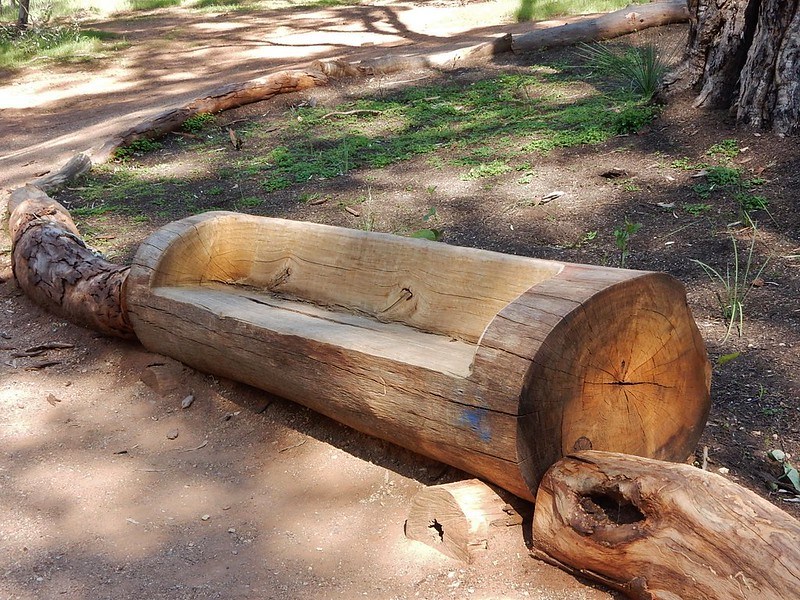
Log benches provide a great rustic accent, wherever they are used. Hearkening back to a time when people built log cabins not for the nostalgic style, but because that was the only way they could build with the primitive tools they had available, a log bench looks good with any sort of casual décor or architecture. They are especially popular for use in gardens and on patios.
What makes log benches unique is that regardless of how the bench is made, it is still logs. As such, it retains much of the natural beauty of the tree that it is crafted from. Whether the log is used with the bark off or on, it will provide a beautiful, durable addition to any home.
While it might seem on the surface that all log benches are the same, there is actually quite a bit of room for variations in the design, especially when the design is broken down into the basic parts. Each of those can be done in a number of different ways, making for a wide variety of different log bench designs. It’s all up to the imagination and woodworking skills of the individual.
Traditionally, log benches were made of green wood, as it would take several years for fresh cut logs to dry to the right moist content. This means that there is always a possibility of the logs splitting, after the bench is made. However, by splitting the log while it is still green, the likelihood of it splitting is actually lessened, as that helps remove some of the stress in the wood, caused by drying.
Working with Logs
Before talking about log bench design, it would be useful to talk about methods of working with logs. Unlike other woodworking projects, working with whole logs puts the woodworker in the position of having to machine wood which is larger than the capacity of their tools, unless they have some pretty big tools. Nevertheless, there are several useful tools and methods for working with logs, at least some of which will need to be used, in order to accomplish the project.
Sawmill
The most obvious means of splitting a log is with a sawmill. However, even the Lowest cost sawmills, intended to be used with a chainsaw, cost about $1,000, putting them out of the reach of reality for a single project. Unless one has regular use for a sawmill, the investment is too much.
There is a low cost “sawmill” attachment for use with a chainsaw, which runs under $300. Difficult to find, this particular attachment is more of a guide, than anything else. it is designed to be attached to a chainsaw, providing a guide for cutting off planks. However, if the log does not already have a flat side to guile off of, the planks will come out somewhat wavy.
Chainsaw
A chainsaw can be used alone to split logs, especially in the hands of a skilled worker who has a lot of experience working with a chainsaw. It is possible to use a guide, holding the chainsaw a fixed distance (like ½”) from that guide. However, if the cutting chain hits that guide, it will damage it.
When working in this manner, it’s easier to make a vertical cut through the log, rather than trying to cut it horizontally, Either way the weight of the saw has to be held by the user, but when cutting with the chain bar vertically, the weight doesn’t pull the saw off line. One can see the cut line or guide that is being used much more easily, making it more likely to hold a straight line.
Splitting Wedges
One of the older ways of splitting logs for furniture and for floors is with splitting wedges. A set of wedges is needed, as they are first pounded into the end of the log, starting to create a rift. Then additional wedges are pounded into this rift, working the way down the length of the log, until it is split.
While a physically demanding way of splitting a log, this method has the advantage of not requiring a lot of expensive tools, just a lot of muscle power. But there is a disadvantage to this method, in that the log is essentially being broken, rather than cut. This will leave an uneven surface with lots of splinters, which need to be cleaned up with an adze.
Adze
The adze is an old tool, used primarily for the purpose of squaring up logs into beams. Looking at sailing-age ships and structures where beams are used, it’s not uncommon to see the marks of the adze on the surfaces. This tool works somewhat like a scoop, cutting off large chips from the surface. With practice, it is possible to make a perfectly straight and true surface, albeit a bit rough. But even that roughness is acceptable in a log bench, as properly done, it won’t be uncomfortable to sit on.
Broad Axe
The broad axe is another tool that can be used to smooth a surface of a split log, as well as being used to square up logs into beams. In use, the main difference is that an adze is wielded from overhead, working on the top surface of the log. However, the broad axe is used on the vertical side of the log, taking chips off of it. Some woodworkers prefer this over the adze.
Framing chisel
One very important tool in making log benches is the framing tool. Chances are that there will be someplace that the back side of the log will need to be flattened for connection with other wood surfaces. In such cases, it is customary to crosscut the end of that area with a chainsaw or bucking saw, and then use a larger chisel, the framing chisel, to cut in from the end of the log, much like using a smaller chisel to cut a tenon on a piece of furniture.
The Bench Itself
Design-wise, the first part of making any log bench is deciding what sort of seat it is going to have. Most log benches are a half log, with the log being split down the middle to form the seat. However, some people use a slab as a seat, rather than a half log, either to save material or because that is what they have available to them.
The seat itself should be at least 12” deep, to provide enough space to sit on comfortably. If the only logs available for making the bench are thinner than that, a single log can be split, with the two sides laid side-by side to make a seat that’s wide enough. In such a case, the adjoining edges should be trued up, so that they meet well, eliminating any crack between them, that could be pinch points which flesh could get caught in.
The Base
The bottom of the seat needs to mount onto the base or legs; so the next thing to decide is what sort of base will be used. Typically only two supports are needed, which are located close to, but not exactly at, the ends of the log used for a seat. There are several options to consider here:
Log laid horizontally – A single larger log section or two smaller diameter log sections can be laid horizontally for the bench seat to sit on. When two are used, they need to be nailed together with long spikes to ensure that they remain connected and don’t slip. The top of the logs is cut, forming a saddle for the curve of the bench to sit into.
Logs standing vertically – Sections of logs can be stood vertically as a base. These need to be cut to the same length and trued up, square, so that the top of the log will be level, when seated. In this case, a saddle is usually cut into the bottom of the log seat, to sit on top of the log base.
Legs – Smaller branches of the same tree, about two to four inches in diameter, can be cut to form legs for the bench. The top ends of these need to be cleaned and cut perfectly round, possibly narrowing them down to make the end into a dowel which can fit into a hole bored into the bottom of the log. The tricky part of this design is locating and boring the holes, so that the legs will be at the same angle and the bench will sit level. Some adjustment can be made by cutting the legs, once they are installed, but that only works to a point.
Brick or Stone – If a permanent base from another material is desired, two short pillars of either mortared stone or brick can be used. As with the vertical standing log, a flat saddle will have to be cut into the bottom of the log seat, so that it can sit flat on the base.
For any of the saddle parts mentioned above, a combination of woodworking techniques will probably be needed. In cases where the bottom of the log seat needs to be flattened, this is accomplished by making a crosscut in the log, either with a chainsaw or a bucking saw, and then chipping away the material, up to that crosscut, using either an adze or framing chisel.
In the case where the saddle needs to be cut into the base, such as in the case where the logs are laid horizontally, a curved cut is necessary, essentially forming a half circle. This requires some real skill with a chainsaw. Alternatively, the cutout can be made the old way, by making a series of vertical crosscuts into the log and then cutting out the material with an adze of framing chisel.
Assembly
With the base and seat made, assembly consists of nothing more than setting the base in place, where the bench is going to reside, and then sitting the log on top of it. This will probably be a two-man job, just due to the weight of the log. Once in place, the log should be fastened to the base with long spikes.
Of course, attaching with spikes is not the only way that a log bench can be put together. It was rare that pioneers in the old West had spikes handy, which they could use to put a log bench together. Rather, they would bore hole through the log into the base, using a bit and brace, and then drive hand-whittled pegs into those holes, cutting them off flush with the seat.
When whittling handmade pegs, it is not necessary to get them perfectly round and smooth. It’s actually beneficial to have a rough, uneven surface, just as long as the peg itself is straight. Those uneven spots will deform in the hole and/or cause the hole to deform, increasing the tension and friction. This, in turn, makes for a stronger pegged joint. While an adhesive is helpful in such a joint, it is not necessary.
Some people add a back to their log bench. This would have been considered a bit of a luxury in olden times, and may not have been added at the time that the bench was originally built. Likewise, any bench built today could have the back built on when the bench is built or the back could be added later.
The back itself is either another split log, or more likely a slab cut from a log. The seat and back can even be the two sides split from the same log. Regardless, it should be the same length as the seat, so that the two fit properly together. Many people use a 2”x 4” as supports for the back, but to do it traditionally, smaller diameter branches would be used for the supports, as 2”x 4”s wouldn’t be available.
The supports will either need to be attached to the back side of the log seat or the ends of it. In cases where the log supports are wider than the seat, sticking out to the back, a hole can be bored into the base logs and the supports can be attached there.
In almost any case, the front or facing side of the support will need to be cut flat, so that it makes good contact with the seat log and the back. It may also be necessary to cut a small flat onto the back of the seat log, for the same purpose, if the support is to be attached there. If it is to be attached to the ends of the seat log, there is no need to make a flat area, as the ends are already flat.
To attach the supports to the seat, it would again be good to use hand-whittled pegs, keeping the design more authentic. As before, a slightly out of round peg is useful, as it will grip tighter in the hole. Peg the supports to the seat or base, before attaching the seat back to it. Then double check all the joints to ensure that they didn’t loosen up while attaching somewhere else.
Finishing the Bench
Sanding kind of goes against the whole premise of making a natural log bench, as part of the beauty is the ruggedness of the log. Any “sanding” that happened came from the jeans of the many people sitting on the bench, wearing it smooth. Having said that, I highly recommend at least rough sanding the seat top and the bench back, so that there aren’t any splinters. Fine sanding really isn’t necessary.
It is typical to leave such benches natural, rather than applying any sort of finish to them. But to protect the wood from weathering and rot, it is a good idea to oil the wood. Don’t do this if the wood is dry, but rather, wait until the wood dries out, and then apply a good coat of tung oil or linseed oil. The bench should be oiled every year or two, to maintain the wood and help keep moisture from soaking into it, causing rot.
Related Posts:
DIY Farmhouse Bench for Beginners by Admin August 1, 2025 DIY One Saturday morning, I grabbed a couple of pine boards and carried them out to the driveway. A cool breeze was in the air, and…
Maple Plywood DIY Guide: Projects & Finishing Tips by Admin August 23, 2025 Hardwood My First Experience With Maple Plywood When I first started messing with plywood, I honestly didn’t care what I was buying. Pine was cheap, easy…