Wooden folding chairs in their home bring joy and comfort. We may not need them every day, but we all encounter those times when we don’t have enough seats around the table. Whether that’s a family get-together for the holidays, a meeting in the home, or a party, a few extra chairs can make all the difference. Folding chairs provide us with a means to accomplish that without the folding chairs taking up a lot of floor space when they’re not in use.
While there are plenty of folding chairs available for the home for sale on the market, most of those chairs are metal or plastic. They do the job, but to someone who likes wood, they’re not quite right. Wood folding chairs look much better than metal ones and can be made in color to match the color of the home’s furniture.
Folding Chair Mechanism
All wooden folding chairs, regardless of color or the material they are made from, work on a geometric principle. The chair is a series of three levers from the side, usually joined together by swiveling joints. The three levers are:
The chair’s back and front legs
The chair’s back legs
The seat
The seat is the key to the way it folds. The two sets of legs cross, with the top end of the back pair set of legs attached to the front corner of the best seat of the chair and the back corners of the seat of chairs attached somewhere around the middle of the front set of legs. Depending on the actual design of the chair’s operation, the chair can either be folded by lifting the front or back of the seat.
Folding the chair requires that these three levers change position. But to do so, at least one of the swiveling joints has to change. In most metal and wood folding chairs, however, this is accomplished by adding a shorter lever that fits between the seat and the front legs, hidden underneath the seat. This won’t work for a wood folding chair, as the wood parts need to be thicker than metal ones.
One option is to make a track that fits inside the lower part of the back legs. Pins on the back corner of the seat ride in this track as the seat is opened and closed. While an easy and effective design, we find this one has the potential of breaking and being more difficult to build.
Another option is to create two more sets of swivel points, with the third, the connection between the seat and the front set of legs to be a pin or dowel rod attached to the front set of legs that the seat sits upon. This is a considerably simpler design to find and build, but it includes the risk of the pin breaking, especially if too much weight is placed upon the seat. Still, it is a good option which will work in most circumstances.
Perhaps the simplest folding chair design bypasses these problems, providing a channel for the front legs to slide in. The channel is made by two crossbars attached across the front legs underneath the seat. Using this design eliminates the need for any moving parts in folding chairs other than the two swiveling joints at the front and back of the seat, simplifying the folding mechanism and the building of the chair.
Basic Chair Design
Regardless of the folding mechanism of the chair, some design elements will be the same. The first of these is that the legs and seat frame will be made of pieces of wood that are 1”x 2”, preferably with that being the finished size, not the cut size. So, while it is possible to just go out and buy 1”x 2’s at the lumberyard, we find it’s better to buy material that is larger and then cut and plane it down to the correct dimensions.
Secondly, the chair seat and back are made of ½” thick slatsnailed to the wood frame. These can be of any color and any width but are usually consistent and brown. Avoid cracks between the seat slats, putting the slats tightly up against each other. This may require that the one slat be cut a bit narrower than the others to make it fit. If this is the case, be sure that the narrow slat is somewhere in the middle of the seat and not on the edge. The overall seat size should be 14” to 15” square.
Typically, wood folding chairs don’t have much of a chair back, just a strip or two across the top of the back, supporting the upper part of the person’s back. The reason for this is to allow the chair to fold. The back is attached to the front side of the supporting legs, and the more of a back there is, the more it limits the folding of the back wood folding chair. Too much of a back,, and the chair won’t fold at all. So, to get a chair that folds the flattest, it’s necessary to have the least amount of back. Ideally, the back shouldn’t overlap the seat at all when the chair is folded.
Wooden table with fruit and book on it in room
Basic Folding Chair Building Techniques
Just as there are a variety of designs available for wooden folding chairs, there are also a range of different techniques that can be used in making them. There’s plenty of room for “mix and match” in making wood folding chairs. For example, dowel rods can be used instead of crossbars, as both will do the same job.
While the primary method of attaching the seat and seating and back to the framework is to overlay the wood slats used for the seat and seating and back on the frame and nail it in place, seating and back pieces can also be dowelled in place, drilling through the frame and into the edges of the wood slats, then gluing a dowel in place.
The basic design also calls for a flat back, but as we all know, a natural curved back is more comfortable. That natural curved back can either be made by laminating thin layers together, using a classic “bentwood” process, or the upper and lower cross members can be in a natural curve out of 2” dimensional lumber. Then fabric, woven caning, or thin strips of wood can be attached vertically to those natural back cross members to make the natural back.
Cut chair back rails
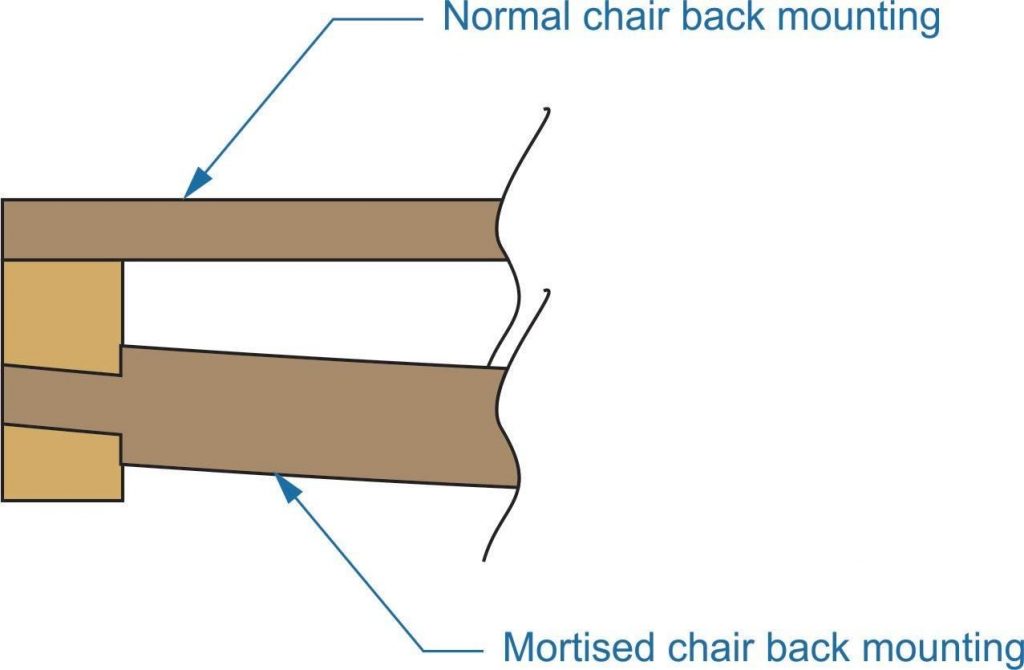
In general, doweling is an easier replacement for making a mortise and tenon joint. Either one applies to making wood folding chairs, depending on the skill level of the woodworker and how much effort they want to put into their wood folding chairs. Crossbars can be attached to the main frame pieces via mortise and tenon and the chair back. Even the seat can be attached via mortise and tenon if so desired. For the back and seat, the mortise could be a slot in the frame pieces, with the ends of the slats thinned down as a wide tenon to fit in that slot.
Chair back mounting
Any folding chair will require considerable sanding to remove sharp edges and corners that could cause scraped skin or splinters. I would recommend rounding all edges that can come into contact with the person’s skin while sitting in the chair with a 1/8” router roundover bit. Edges that do not come into contact, like the bottom edge of the seat frame, don’t need to be rounded.
The other thing that really needs rounding is the seat end of the back legs, where they attach to the front of the seat. It’s a good idea to make sure that it is rounded to the point where there will be no sharp corners sticking out past the end of the seat, regardless of the chair is position. Full rounding of the end is a good and easy starting point, but it may be necessary to go a bit farther, using a belt sander or even a right-angle grinder, once the seat is assembled.
All the hinge points should have the same-sized hole and bolts for the hinge pins. Place ash under both the bolt heads and the nuts. To make it so that the nuts do not come loose without having to over-tighten them on the bolts, nylon-insert lock nuts are a good idea. Adding a bearing sleeve inside the hole is not a requirement, but can help excessive wear from the bolt’s threads on the inside of the hole, especially when softwoods are used for making the chair.
One of the easier ways to make a folding chair, with the least geometry to deal with, is to use a pin or dowel to support the front part of the seat, thereby eliminating the need for one pin. That leaves only two hinge pins to deal with on each side of the best seat of the chair. The pin or dowel acting as a support for the front part of the seat replaces the third hinge point while still offering the necessary support.
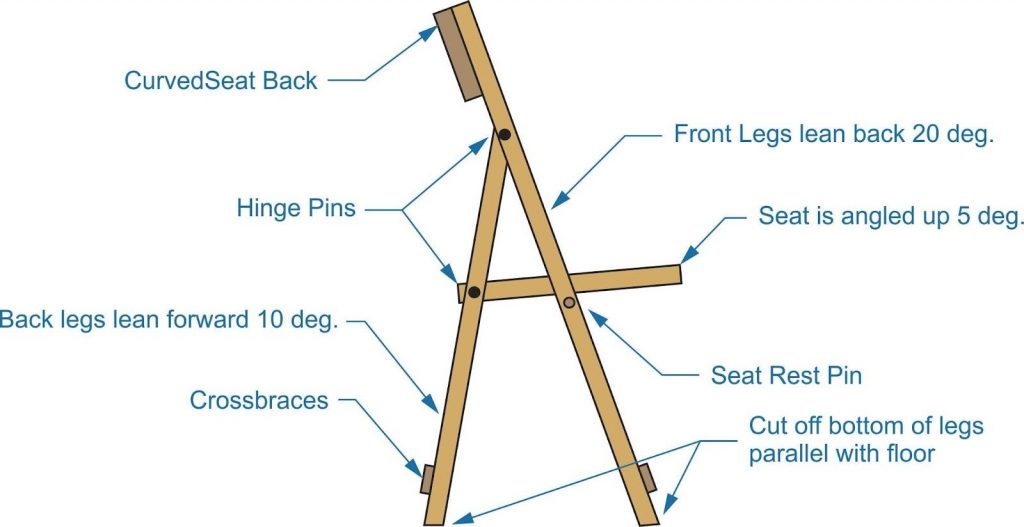
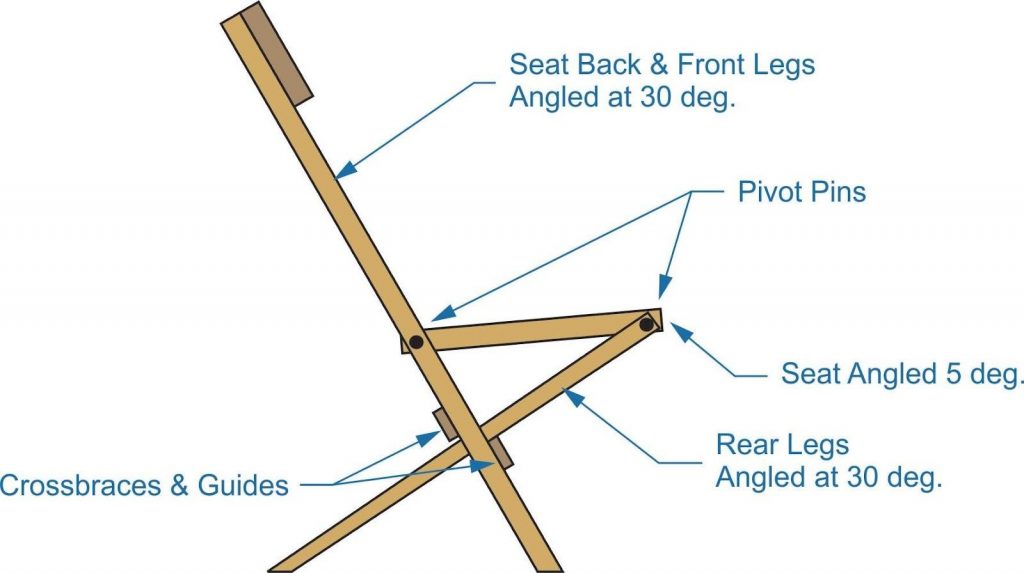
As you can see in the diagram below, each side of the chair still consists of three levers for the two legs and the seat. The real difference is the lack of a permanent connection between the seat and the front legs. This can make some find the seat a bit strange and easy to open and fold to those who are accustomed to working at home with metal folding chairs, but it provides excellent support, as long as hardwood dowels, at least ½” in diameter are used for the seat rest pin.
Folding chairs with pins
A critical part of making this sort of chair is the angles at which everything is. In the diagram above, the front seat legs are angled back at 20 degrees, while the back legs angle forward at only 10 degrees. The drawing doesn’t look that way, but that’s an optical illusion. The bottoms of the legs need to be cut off appropriately to match that angle or be fully rounded so that they will sit solidly on the floor. The seat is angled up slightly, at 5 degrees for comfort. Its front edge should be 17 to 19 feet off the floor for adult chairs.
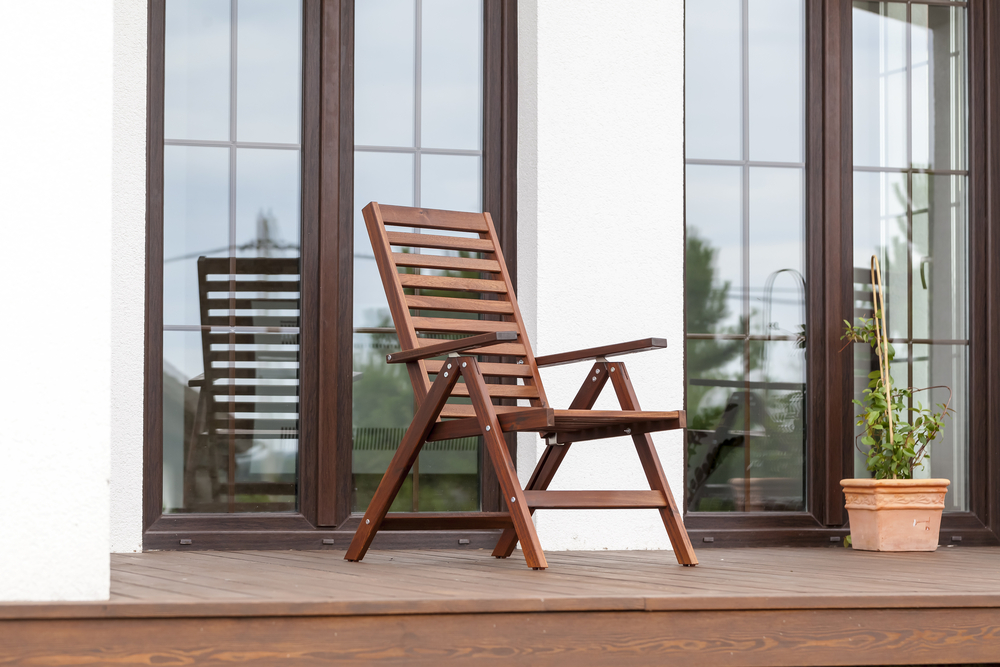
wooden folding chair on the terrace
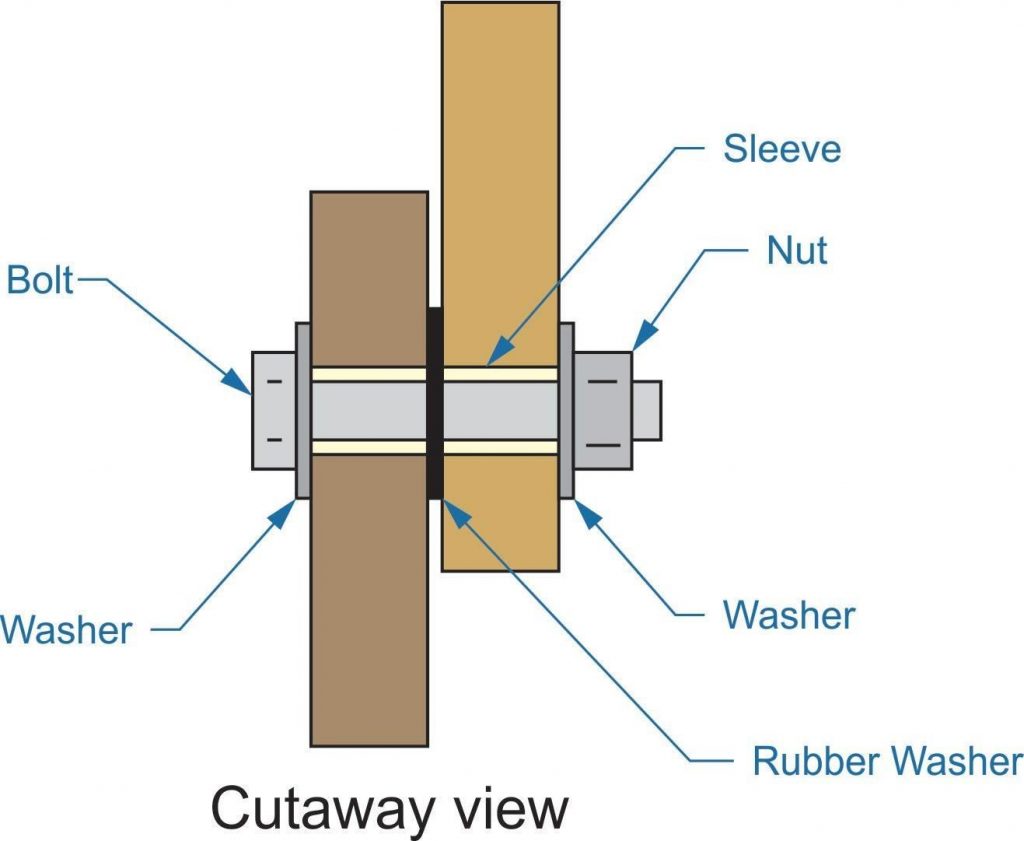
The two hinge joints consist of bolts with nylon-insert lock nuts. Flat ash should be used beneath both the bolt head and the nut. Most people don’t realize it, but flat washers have an “up” side and a “down” side created in manufacturing the washer. When the washer is stamped out of sheet metal, the pressure against the stamping die causes the top inner and outer edges to be curved slightly, while the bottom edges are sharp.
Placing the sharp bottom edge against the wood at the shoulder of the bolt can cause failure. That’s not likely to happen here, as the bolt doesn’t need to be tightened up that much. But putting that sharp edge against the wood will help keep people at home from accidentally scraping their skin against it.
In the cutaway drawing below, I’ve added a rubber ash between the two pieces of wood. This is not a requirement, but it is something I like to do when I have two pieces of wood having to move up against each other, such as in this case. Rubber washers are available in the plumbing department of the local home-improvement warehouse.
The washer keeps the wood from rubbing and damaging the finish, and being made of rubber, it provides some resistance to movement without it being excessive. That helps to keep the chair in whatever position (open or closed) it is left. Just be sure to account for the thickness of the rubber when laying out the chair.
I’ve also included the sleeves, showing how they would be used. It is possible to buy nylon bearing sleeves of items of this type or nylon spacers for folding chairs of this type very inexpensively, making a good addition item that improves the quality of the chair, without much additional effort or cost.
Cutaway: page view
Cross Braces are necessary, located close to the bottom of the chair legs. Note in the side-view of the chair how they are both located on the outside of the legs. This is done so they will not get in each other’s way when the chair is folded.
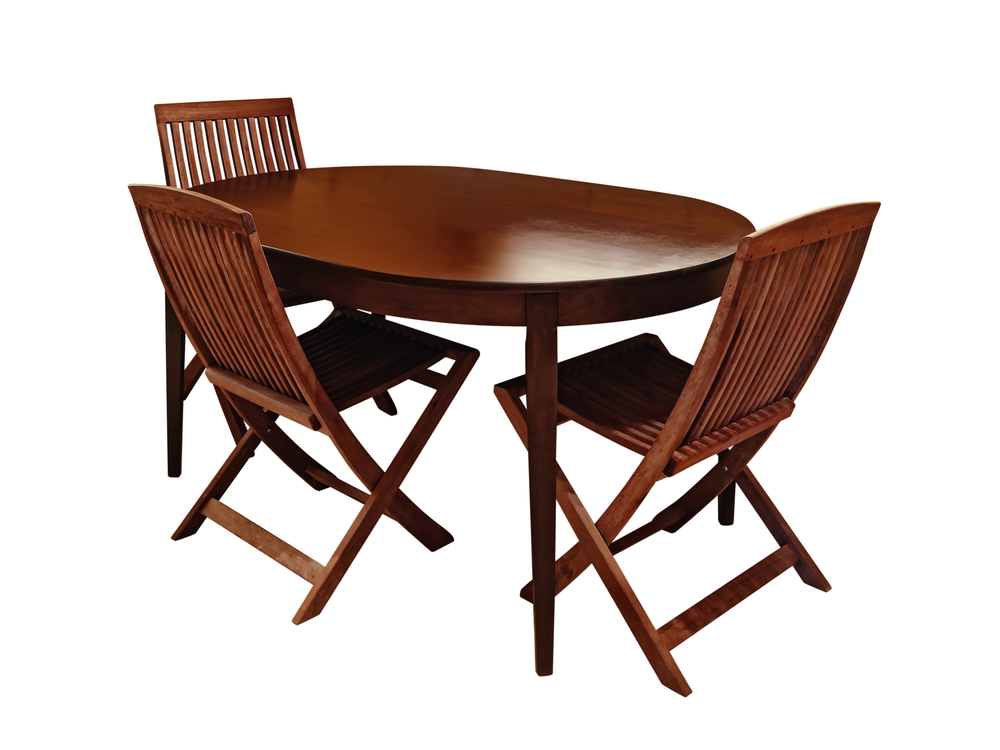
Dinnning table and three chairs over white background
Folding Chairs with Guides for Front Legs
I mentioned earlier that the easiest way to make a folding chair is to provide a channel in the back legs for the front legs to slide through. This is nowhere near as complicated as it might sound. In reality, it’s just judicial placement of the cross braces to form the channel. To make this work, the angles of both sets of legs need to change, and the back legs need to be attached to the front corner of the seat structure.
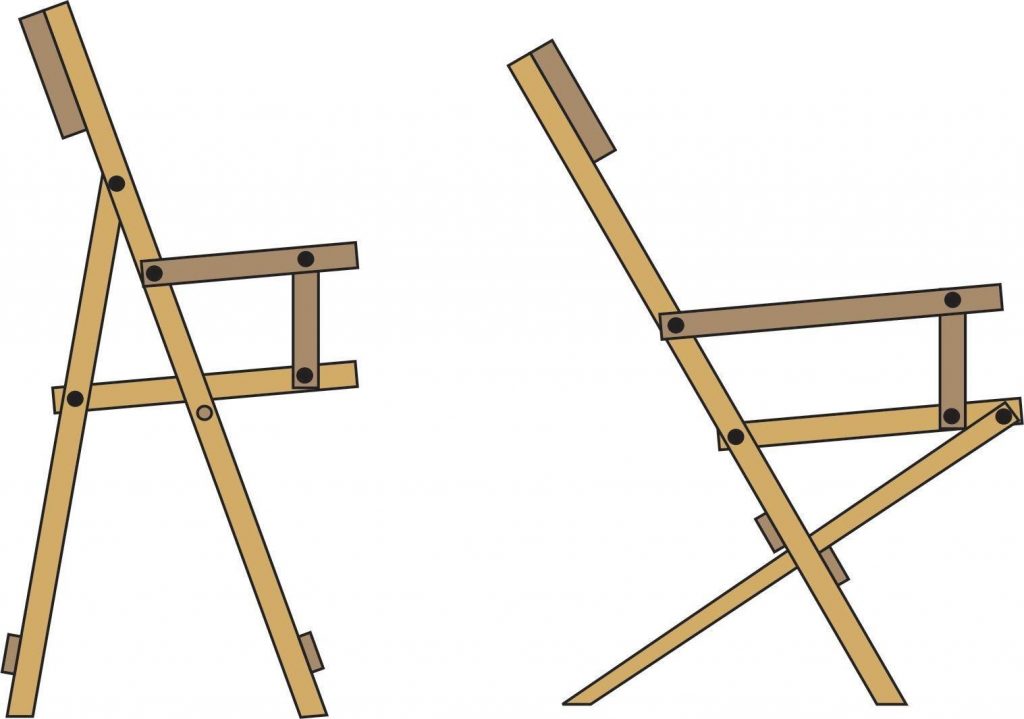
Wooden Folding chairs with guides
As you can readily see from the diagram above, this design style requires longer back legs. It also puts the bottom end of those legs farther back; but that’s not a trip issue, as the chair back is leaning back farther as well. The one way this style will make a difference is that the overall depth of the chair is slightly bigger, so if space is limited, it might be a good idea to avoid this seating design style.
The two cross braces that were placed on the front and back legs are both placed on the front legs in this case, forming a channel that the back legs ride in. Note that the upper guide is placed at the back and the lower one at the front. This is essential so that the chair will fold. If they are reversed the upper cross brace is to the front of the chair leg, the chair can’t fold. It’s not shown in the drawing, but it would be a good idea to add a cross brace to the back leg as well. That will help prevent the legs from loosening up over time and eventually collapsing.
Adding Arms to Wooden Folding Chairs
Folding wood chairs with arms aren’t anywhere near as common as those without, but it is possible to add arms to pretty much any wood folding chair you design. Some wooden folding chairs are made with different designs, just to accommodate the arms. When making a folding wooden chair with arms, the width of the chair might have to be made a bit broader, to accommodate larger people.
Each arm consists of two pieces, the arm itself and a support. The back of the arm is attached to the same pieces of material that make the chair back, and the support is attached to the sides of the seat. This adds three hinge points: the back of the arm, where the support attaches to the seat, and where the arm and support join together. Depending on the dimensions of the chair, it may be necessary to use a metal angle bracket for the hinge point between the arm and its support.
The diagram above, while a bit rough, shows both of the chair designs we’ve used in this article, with arms added. Some adjustment of the position of the arms and their supports may be necessary to make the chair fold. In the one on the right, it might be best to use the same hinge point for the arm support as for the rear legs. That would eliminate one hinge point and only require that the bolts used for the hinge point be longer.
Chair arms
By and large, the arms of these wooden folding chairs are made of a wider material than the rest of the chair’s framework. This is to provide a more comfortable armrest. When this is done, it is essential that the arm sits to the outside of the rest of the chair’s frame to ensure that it will still close correctly and the arm won’t get in the way of the other parts of wood folding chairs and dining chairs, when closing. If it is wide enough, a drink holder can be cut into the front end of the arm.
All About Wooden Spurtle by Admin June 9, 2023 DIY Origins of Spurtle The Spurtle is a wooden kitchen utensil that originated in Scotland. As kitchen utensils go, it is one of the simplest ones…
Wooden Plates by Admin July 28, 2023 DIY Wooden plates look very stylish on any table. Flat lay composition with wooden kitchenware on blue background Wood is by no means the oldest material…