Fishing is a popular pastime for those looking to get away from it all. A day spent on the lake or river, getting the line wet and hopefully catching dinner is a great way to relax, commune with nature, and clear one’s head from the hustle and bustle of everyday life. Some people are so in touch with their fishing selves, that they don’t even let the weather get in the way, but instead go fishing all year round.
Fishing in the winter holds some special problems, especially for those who live in the northern latitudes. While rivers and lakes may not freeze in Texas, they do in Minnesota. So anyone who wants to go fishing up there has to be ready for ice fishing. That means drilling a hole through the ice so that they can get to the water with the fish in it and hopefully having some sort of shelter to help keep them from freezing any body parts off, while they’re waiting for the fish to bite.
Those who go ice fishing regularly tend to invest in their hobby, finding it much better to do their fishing from inside some sort of structure that will keep them out of the wind and cold. These fishing huts or houses can take on many forms, from commercially available tents, to what may as well be a full-blown camper or cabin. Some people have spent as much as $50,000 on their luxury fish houses.
For the most part, fishing huts and houses are fairly simple things. Those who build their own generally just want something to block the wind and keep in a little heat. They may decide to improve upon that as time goes on, but that’s where they start.
Before starting to build, there are a few basic questions that need to be answered:
What’s the budget for the project?
How many people (fishermen and others) does it need to hold?
Does it need to be on wheels or skids?
The decision for how many people the fishing hut needs to hold determines how big it needs to be. The larger, fancier units out there seem to be built for family excursions or for a couple of guys to take their wives out on the lake with them. But most seem to be built for no more than two guys or three guys, going fishing by themselves and being willing to rough it. That can be done with a 4’x 8’ hut.
When it decides on wheels or skids, the decision depends mostly on where the ice hut will be stored, compared to where it will be used. Someone who lives on the shore of the lake can drag their fishing house out on the water with a snowmobile, while someone who lives a few miles away is going to have to tow it away on the roads. The skids won’t survive that all that well.
For this article, we’re going to stick to a fairly simple 4’x 8’ fishing hut. The same basic principles would apply to a larger one, with the addition of seating, cabinets, and anything else that the do-it-yourselfer might want to add.
Starting from the Base
As with any other sort of construction, building a fishing hut starts from the foundation and works its way up. That’s why it’s so important to decide whether the hut will be on skids or wheels right at the beginning. Making a change from one to the other midstream is difficult.
For Wheels
The easiest way to make a fishing hut on wheels is to start with a small flatbed trailer as a frame. Welding a homemade frame together and then adding an axle and wheel hubs is possible; but the big risk is not getting the wheel alignment correct.
If the wheels don’t have the right amount of toe in, the trailer won’t follow well as it’s being towed. If the amount of toe-in is correct, but it’s too far to one side, the trailer will follow, but won’t be centered behind the vehicle towing it. If the castor or camber of the wheels is off, it may follow well, but the tires will wear out much faster than they should.
Buying a small trailer, which can be found for as little as a few hundred dollars, solves all these problems. A used one would be even cheaper. The trailer will provide a frame that’s strong enough to hold the hut being built on top of it. Larger trailers provide the ability to build a larger hut, even one of the more elegant ones around.
For Skids
Building a fish hut on skids means a combination of skids and skis. The skids are made of two wood beams, usually 2”x 6” ones, made out of pressure-treated lumber. But since wood doesn’t work well for skids on ice, but rather tends to melt a small amount of ice and soak up the water, it only makes sense to cover the skids with something that won’t soak up water. The easiest thing to use for this is skis.
Used skis are often rather cheap, especially when bought at a second-hand store. Two pairs are usually required, with one pair being used on the front side of the skids and the other on the back. Take the bindings off and cut the skis to length, if needed. Then bolt them to the bottom of the skids with flathead wood screws, ensuring that the heads are below flush.
With the skids mounted to the skids, the next thing to do is to add crossbars, usually made of 2”x 4”s, creating the floor frame for the fishing hut. It’s also a good idea to use pressure-treated lumber for this, to protect the hut from damage.
As with the understructure, it’s important to make sure that the floor of the hut is water-resistant and resistant to decay. So ¾” thick pressure-treated plywood should be used for this as well. Attach it to the frame with a decking screw, so that it can’t pull loose from the floor if the floor ends up racking as the hut is being moved.
Up to this point, we’ve used fairly heavy materials. That was necessary. However, it is not necessary to use heavy materials for the upper part of the structure. Rather, it would be better to use lightweight ones, to keep the overall weight down. For that reason, the walls of the fishing house will be made of ¾” plywood or T1-11 siding. Rather than using 2”x 4”s for framing, we can allow the siding to carry most of the weight, using 2”x 2”s for the corner joints and to give the sides some rigidity. There is no need to connect the 2”x 2”s together, nailing through the ceiling and floor plates in the manner of framing a wall, as they are not providing the structural strength.
Since plywood products come in 4’x 8’ sheets, it’s going to take 6 sheets of plywood to do the walls, all the way around. These should be stood vertically and attached to the floor and each other by use of the 2”x 2”s I just mentioned. While either screws or nails can be used for attachment, screws will be stronger.
Build fish house – structure
To make the roof the easiest possible way, it’s a good idea to make a shed roof, rather than a gable end roof. This can be made so that the lower side is the side where seating is installed inside so that the extra space offered by the higher side of the roof is available for walking.
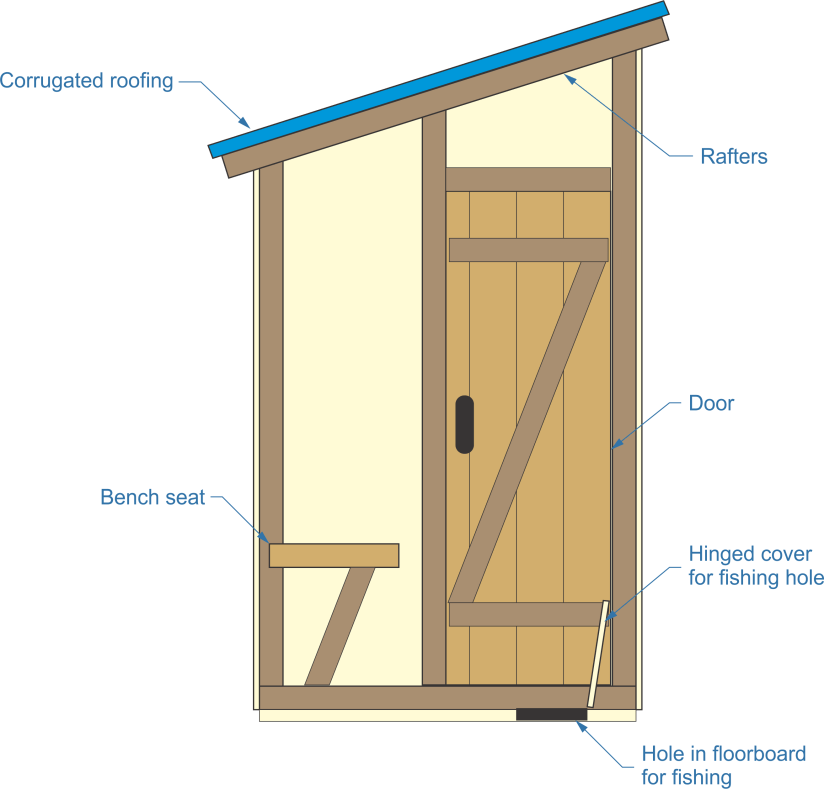
The roof itself need not be complicated at all. Once the walls are made, simple rafters can be installed, bridging from one long wall to the opposite. This can then be covered by corrugated roofing material. I’d recommend a translucent variety, to allow light into the fishing hut. Overlap the roofing material with at least one full corrugation to keep water from leaking in.
When installing any corrugated roofing material, it’s important to use the right fasteners. That is an ash-headed screw, backed up by rubber washers to provide a rain-proof seal. The screws must be inserted through the crown of the corrugation, not the valley to help prevent leaking.
Build fish house – inside
A door is going to be necessary on one end. If the fishing hut is always going to be used on the same lake, then it’s best to put the door in the end that will be upwind or where the wind will push the door closed, rather than open, when the door is opened. That will help keep what little heat there is inside the hut.
The easiest way to make a door that will be flat is barn door style, the same as making a gate to go into a cedar privacy fence. This consists of several boards, sitting side-by-side, vertically, which are held together by two crossbars. One diagonal piece is added, to keep the door from twisting. Between the two crossbars and the diagonal, it forms a Z, as shown in the diagram above.
Add some hinges, a handle, and a simple latch to your door and your hut will be snug, although not all that warm, on the inside.
Finishing out the Fish House
Most simple fishing huts are not finished on the inside; but rather, are left with an “exposed stud” décor. While that is simple, it should be remembered that this hut is going to be out on a lake, in the middle of winter. Adding a little bit of insulation on the inside might just make the fishing expedition a little bit more enjoyable.
Since the walls are not a stud’s thickness, normal fiberglass batts can’t be used for insulation. However, they’re just right for two layers of ¾” sheet Styrofoam insulation. With a small heater inside, it should be rather comfortable.
Either seats or a bench need to be installed inside the hut, giving the fishermen someplace to sit down. If a bench is going to be used, it is best to mount it the full length of the wall, on the side with the lower roof. That will give the most seating space (or a place to put coffee cups, lunch, etc.) while making sure that people don’t bump their heads. Cantilevering the bench with angled legs leaves more floor space available for fishing tackle boxes, bait buckets, and coolers.
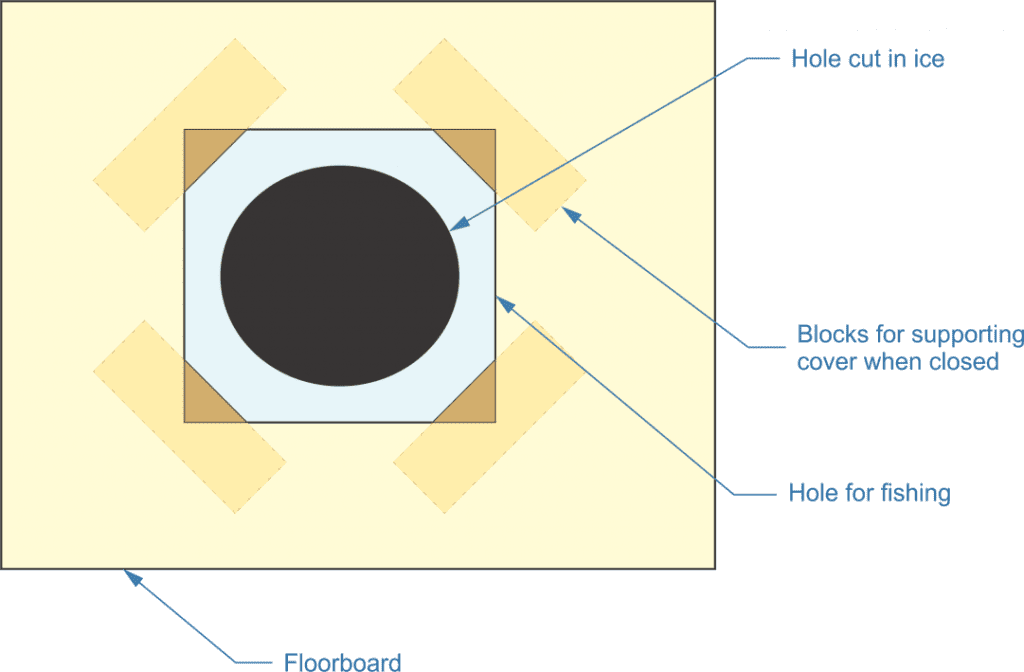
Anywhere from two to four fishing holes can be fit into a hut this size, although putting four of them in there will make it a bit crowded. Each hole needs to be 8” to 10” in diameter, through the floorboard, without running into the floor joists below. Make a hinged cover that will fit over these holes, allowing them to be closed off and making it safe to walk inside the hut when not fishing.
When making the covers for the fishing hole, keep in mind that they will need to support the weight of a full-grown man standing on them. They should either be made of ¾” thick plywood, just like the floor is. Ideally, they should sit flush with the floor, to avoid creating a tripping hazard. With that in mind, bracing in the corner, attached securely underneath the floorboards, will be needed to provide sufficient structural strength so that the covers can safely be walked upon.
Supports for hole cover
The finished fishing hut can either be left in place on the lake or towed into place when needed. If it is going to be left on the lake, a constant eye will need to be kept on the weather, to ensure that warming won’t cause the ice to melt enough to create an unsafe condition. It would be a shame to lose the fishing house the first season, just because of not paying attention to the ice melting. Oops!
Related Posts:
How to Build Stylish & Functional Radiator Covers – DIY Guide by Admin March 15, 2025 DIY Radiator covers enhance your room's aesthetics and provide a practical way to conceal radiators while ensuring efficient heat distribution. Whether you have a traditional steam…
How to Build a Lean-To Shed: A Step-by-Step Guide by Admin March 15, 2025 DIY Extra storage is always helpful in any home. The house often lacks adequate space to store tools, equipment, and other essentials. While some people rent…