Drawer boxes are the structural containers that hold drawer contents, while drawer slides are the mechanical tracks that allow the drawer to open and close smoothly. The best drawer system combines durable box construction, proper slide clearances, and hardware matched to the drawer’s weight capacity and intended use.
If you are planning a kitchen remodel, upgrading workshop storage, or building custom furniture, choosing the best drawer slides for kitchens or heavy-duty workspaces is the single most important decision you will make. Premium hardware from top-tier brands like Blum, Grass, and Kreg turns basic wood boxes into premium drawer hardware systems that operate flawlessly for decades.
Quick Recommendations & Selection Guide
Don’t have time to read the full guide? Here are our tested, expert-recommended hardware options based on your specific project needs:
Best Modern Design:Grass Dynapro on Amazon(Hidden undermount system with ultra-synchronized movement)
Top Commercial Comparison
Slide Type
Best For
Cost
Main Benefit
Key Brand
Undermount
Premium kitchens, Fine furniture
$$$
Hidden tracking + premium soft-close
Blum, Grass
Side-Mount
Utility cabinets, Toolboxes, Shop storage
$$
High weight capacity + easy installation
Fulterer, Vadania
Roller (Epoxy)
Budget residential closets, Light vanities
$
Cheapest option, highly forgiving
Generic / OEM
Drawer Box & Slide Compatibility Matrix
Before buying raw materials or ordering wholesale hardware, you must understand how your drawer box and track interact. Choosing the wrong pair is the fastest way to ruin an expensive project.
Drawer Box Type
Best Matching Slide
Clearances Needed (Per Side)
Ideal Application
Weight Capacity
Dovetail Solid Wood
Undermount (Soft-Close)
1/2-inch (Under box)
Kitchens, High-end furniture
75–100 lbs
Dowel / Pocket Screw
Side-Mount Ball Bearing
1/2-inch
Shop Cabinets, Closets
100–200 lbs
Melamine / Particleboard
Roller Slides (Epoxy)
1/2-inch
Budget builds, Light utility
50 lbs
Metal Drawer Systems
Integrated Slides
System Specific
Modern kitchens, Baths
80–150 lbs
Best Wood for Drawer Boxes
After spending more than two decades in cabinet shops, I’ve seen almost every material imaginable used for drawer boxes. Choosing the right material isn’t just about looks—it directly impacts how well your hardware mounts and whether your drawer box will warp, sag, or pull apart over time under load.
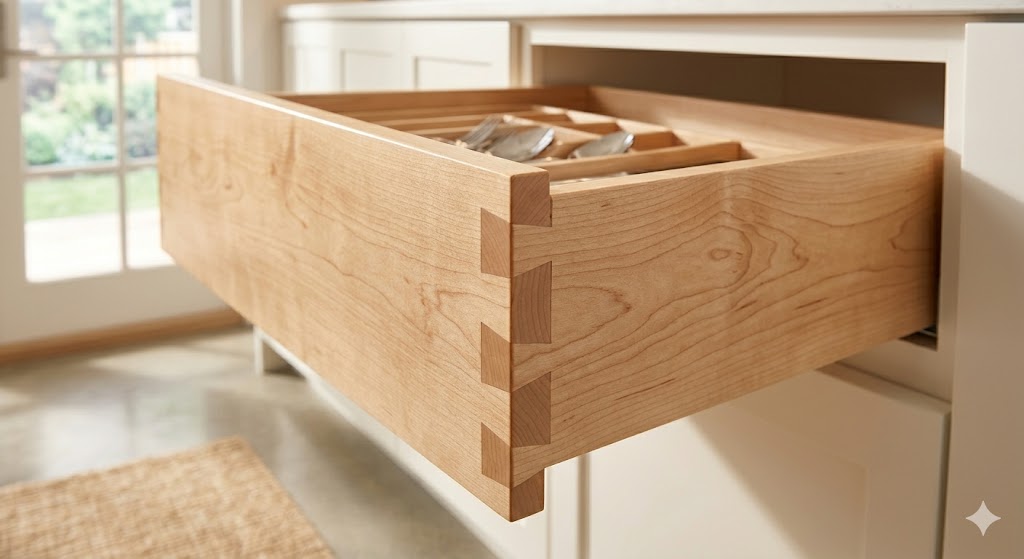
Hard Maple
Hard maple is the ultimate choice for premium, heirloom-quality cabinetry. Its dense, tight grain structure resists denting from dropped metal utensils, and it holds fasteners with an iron grip. When machined into dovetail joints, hard maple creates an incredibly strong mechanical bond that won’t deform under heavy daily use.
Baltic Birch Plywood
If you are building your own drawer boxes, Baltic birch plywood is the smartest, most reliable choice on the market. Unlike standard home-center plywood, true Baltic birch features void-free, cross-laminated layers of solid birch veneer. This unique construction gives it exceptional dimensional stability—it won’t warp or twist when seasonal humidity changes.
When prepping your material, it is critical to use the right thickness. For small to medium drawers, 1/2-inch material is ideal, while large, deep drawers benefit from 5/8-inch or 3/4-inch sides. To avoid ruining expensive sheets, review this guide on selecting the correct plywood thickness for your cabinet components. Additionally, learning how to cut plywood smoothly using a zero-clearance insert on your table saw will prevent ugly veneer splintering along your drawer edges.
Prefinished Plywood
Prefinished maple or birch cabinet plywood is a massive timesaver for both professional shops and DIYers. It comes from the mill coated with a durable, UV-cured clear topcoat on one or both sides. This eliminates the tedious process of sanding, sealing, and finishing the inside of small drawer boxes after assembly, where finish runs and fumes are notoriously difficult to manage.
Melamine
Melamine-faced particleboard is a highly popular budget choice for commercial casework, medical offices, and closet systems. It features a smooth, easy-to-clean plastic coating over a compressed particle core.
⚠️ Warning: Melamine is extremely susceptible to moisture damage. If water bypasses the edgebanding—especially in a kitchen sink base or a bathroom vanity—the underlying particleboard core will swell, flake apart, and cause your drawer slide mounting screws to pull completely out of the material.
MDF and Particleboard Warning
Avoid raw MDF (Medium-Density Fiberboard) or standard low-density particleboard for drawer box sides at all costs. These materials lack the interlocking fiber structure of real wood or plywood. Under the constant pulling force of daily use, the screws holding the drawer fronts or slides will inevitably strip out, causing the entire assembly to collapse.
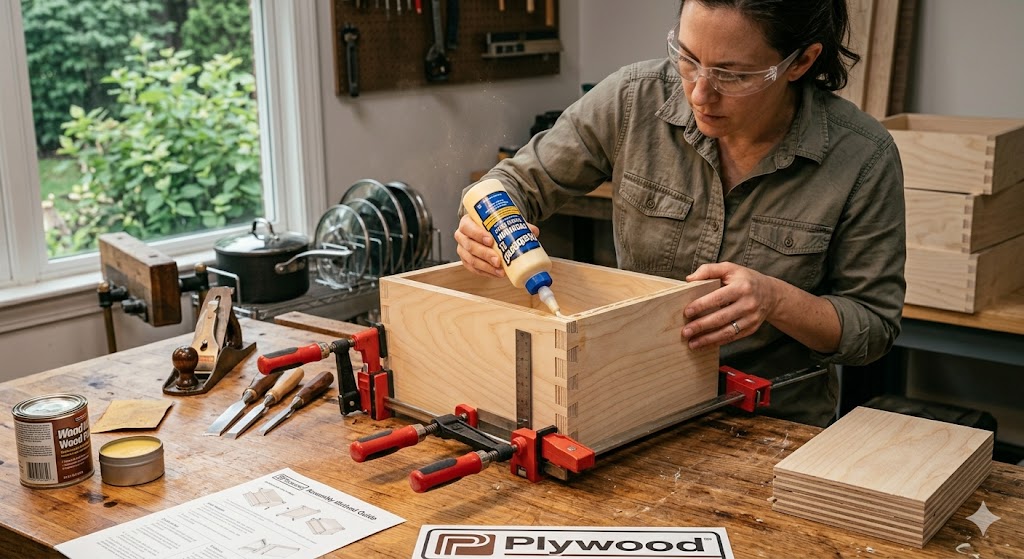
Drawer Box Construction & Joint Selection
The anatomy of a drawer box determines its lifespan. If you use weak joinery methods on high-use drawers, the daily mechanical stress will pull the box apart, causing your slides to bind and fail.
Dovetail Joints: The Structural Gold Standard
Dovetail joints feature interlocking pins and tails that create a powerful mechanical lock. Even without wood glue, a traditional dovetail joint cannot be pulled apart from the front. This is crucial for cabinetry because every time you pull a drawer open, you exert a direct outward force on the joint connecting the front to the sides.
Pocket Hole Joinery
Pocket holes are a fast, accessible way to assemble utility or shop drawers. By drilling angled pockets into the front and back pieces, you can drive pocket screws directly into the side walls using a dedicated jig.
While efficient, pocket hole joinery should be reserved for light-duty or utilitarian applications. Because the screws run parallel to the pulling force, they rely entirely on the thread grip rather than on a physical interlocking of the wood joints.
Dado Joints and Bottom Grooves
A common mistake I see among beginners is simply screwing or nailing the drawer bottom directly to the lower edges of the box walls. Over time, heavy contents will cause the bottom to sag and break free.
Instead, always mill dado joints or groove channels into the interior faces of the drawer sides, front, and back. The drawer bottom should slide loosely inside these grooves, allowing the wood to expand and contract naturally with changing humidity without splitting the frame.
Best Drawer Slides for Kitchens: Application Profiles
When engineering a high-traffic kitchen space, a single slide type rarely fits every single location. To build a kitchen that is truly worth upgrading, you need to match specific hardware models to your storage intent.
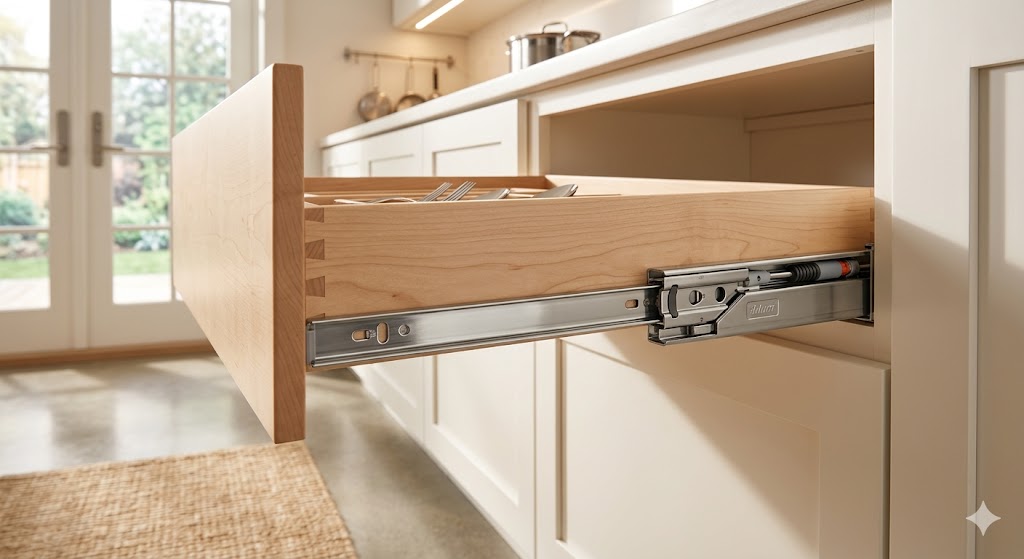
Best Premium: Blum Tandem with Blumotion
For main cutlery drawers, spice pull-outs, and everyday dinnerware storage, the Blum Tandem runner system is unmatched. It features an ultra-smooth gliding profile that responds to minimal pulling force and stops heavy drawers from slamming.
Best Budget: Vadania Full Extension Ball-Bearing Slides
If you are updating a large kitchen on a strict budget, allocating side-mount ball-bearing tracks to lesser-used zones—like perimeter pantries or island ends—can save hundreds of dollars while still maintaining crisp, full-extension access.
Best Soft-Close performance: Grass Dynapro
The Dynapro system features fully synchronized movement, meaning the inner and outer rails move in tandem rather than sequentially. This eliminates the mechanical “clunk” common when opening wide, heavy drawers.
Best for Heavy Pots and Pans: Fulterer 200-lb Heavy Duty Slides
Cast iron skillets, Dutch ovens, and commercial stand mixers will easily destroy standard 75-lb residential tracks. For deep under-cooktop drawers, use heavy-duty side-mount configurations to withstand the high downward forces.
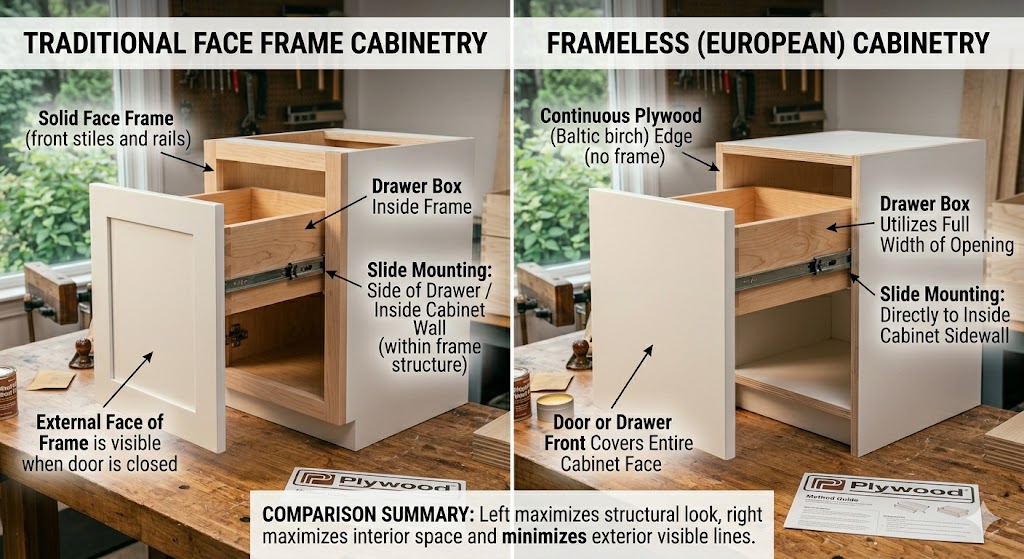
Frameless vs. Face Frame Cabinets: Hardware Installation Profiles
Your cabinet box architecture dictates exactly how your drawer hardware must be anchored. Installing slides without recognizing your structural style will lead to immediate alignment issues.
Face Frame Cabinets
Face frame cabinetry features a solid wood frame attached to the front edges of the cabinet box. Because this frame creates a lip that extends past the inner plywood walls, your drawer slides cannot be screwed directly into the cabinet sides without modification.
Rear Mounting Brackets: To install slides in a face frame cabinet, the rear of the slide track must be supported by a specialized metal or plastic bracket that mounts directly to the back wall of the cabinet carcase.
Spacer Blocks: Alternatively, you can install plastic or plywood spacer blocks along the inner cabinet walls to build out the surface until it sits perfectly flush with the inside edge of the face frame opening.
Frameless (Euro-Style) Cabinets
Frameless cabinets lack a decorative front frame; the front edges of the cabinet box panels are fully exposed when the doors are open.
Direct Mounting: Frameless construction makes slide installation incredibly straightforward. Tracks screw directly into the pre-drilled 32mm hole patterns along the flat interior sidewalls. This layout minimizes alignment issues and eliminates the need for floating rear brackets.
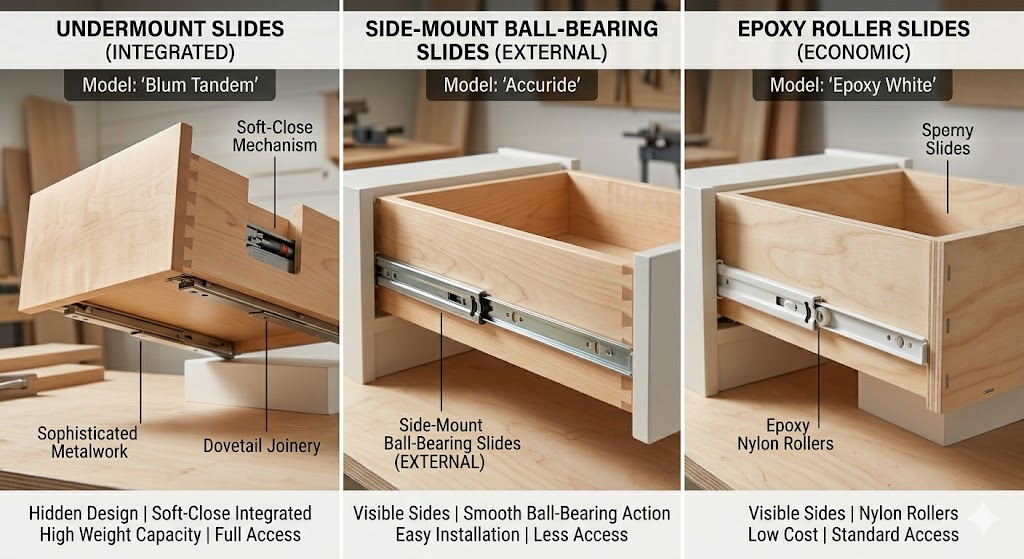
Undermount vs. Side-Mount Slides: Which Is Best?
Choosing between undermount and side-mount drawer slides changes your entire design workflow. It impacts your material thickness choices, your exact drawer box exterior dimensions, and how much visible hardware you are willing to accept.
Feature / Specification
Premium Undermount Slides
Side-Mount Ball-Bearing Slides
Hardware Visibility
Completely Hidden Beneath Box
Visible on Left & Right Sides
Side Clearance Required
Highly Precise (Determined by box thickness)
Exactly 1/2-inch per side (1-inch total)
Drawer Box Thickness Limitations
Strict: Requires 1/2-inch or 5/8-inch material
Flexible: Works with any thickness
Vertical Adjustment
Excellent: Toolless 3D micro-adjustments
Limited: Manual screw slot alignment
Debris Sensitivity
High: Protected under the box from dust
Low: Bearings can grit up over time
Installation Difficulty
Moderate to High: Requires precise milling
Easy to Moderate: Very forgiving
Decoding Drawer Slides: Movement Mechanics
A high-quality drawer box is completely useless if it rides on cheap, gritty tracks. Let’s break down the primary categories of slides dominating the market today.
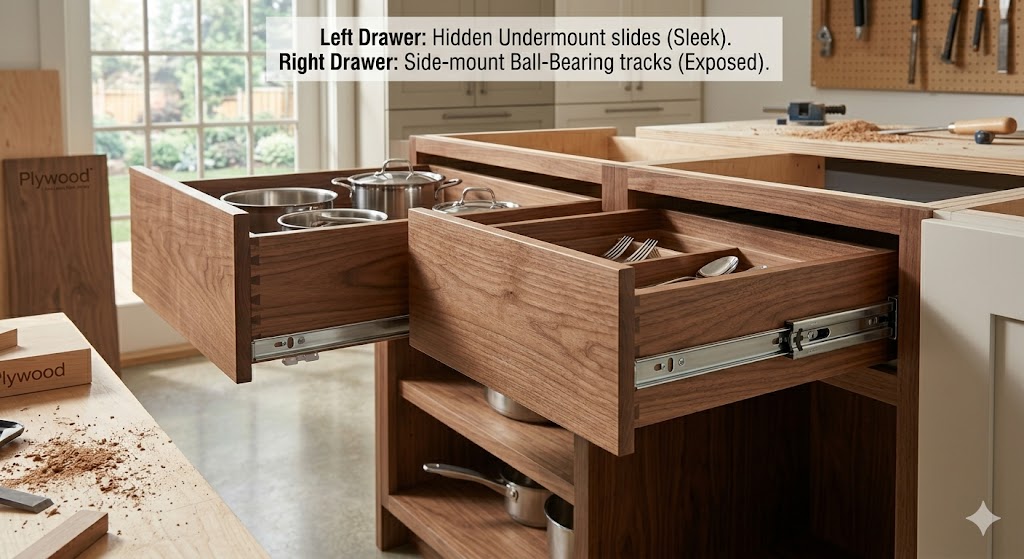
1. Premium Undermount Slides
Undermounts sit completely hidden beneath the drawer box, supporting the payload from the bottom. This layout eliminates side-to-side wobble and lets your woodworking take center stage. They are the best undermount drawer slides for high-end projects and are absolutely worth upgrading to if your budget allows.
Pros: Clean architectural profile, full telescopic extension, integrated soft-close dampening, superior weight distribution.
Cons: Requires strict, highly precise drawer box dimensions. If your wood sides are even 1/16-inch too thick, the undermount locking clips will not engage.
2. Side-Mount Ball-Bearing Slides
These workhorse tracks mount on the outer sides of the box and the inner walls of the cabinet carcass. They use steel ball bearings housed in stamped steel channels to provide smooth telescopic movement. On workshop drawers holding router bits and clamps, side-mount ball-bearing slides usually last longer than economy undermount systems due to their raw structural simplicity.
Pros: Highly tolerant of minor measurement variations, heavy-duty options available, inexpensive.
Cons: Visible whenever the drawer is pulled open, and they steal 1 inch of total horizontal storage space inside the cabinet opening.
3. Budget Epoxy/Roller Slides
The classic, low-cost option features a white captive steel channel and a single nylon wheel on each side. I’ve seen cheap roller slides fail within two years in busy kitchens, leading to costly replacements.
Pros: Extremely inexpensive, highly tolerant of out-of-square cabinet installations.
Cons: Partial extension only (the back 3 to 4 inches stay trapped inside the cabinet body), noisy, and prone to sagging or derailing under moderate weight.
Soft-Close vs. Push-to-Open Slides
Modern hardware does more than just slide—it controls the beginning and end of the drawer’s movement profile. Selecting the right mechanism depends heavily on where the cabinets will live.
Soft-Close Slides
Soft-close mechanisms feature integrated hydraulic dampeners and spring-loaded catches. When you push the drawer shut, the mechanism catches the box a few inches before it closes and gently, silently pulls it the rest of the way in.
Noise Reduction: Eliminates slammed drawer fronts, protecting your cabinet joinery and reducing household noise.
Reliability: High-end brands like Blum or Grass use sealed fluid mechanisms that retain their dampening qualities for decades.
Applications: Perfect for kitchens, bathrooms, and nurseries where quiet, controlled movement is essential.
Push-to-Open Slides
Push-to-Open (or touch-to-open) slides use a spring-loaded mechanical trigger. Lightly pressing the face of the closed drawer releases a latch, popping the drawer forward several inches so you can pull it open without a handle.
Installation Complexity: These require precise depth positioning. If the slide is mounted too far forward or too far back, the internal latch mechanism will not trigger properly.
Applications: Ideal for sleek, modern, handle-free minimalist kitchens, or for workshop benches where you need to access tools with your knees or elbows when your hands are full or dirty.
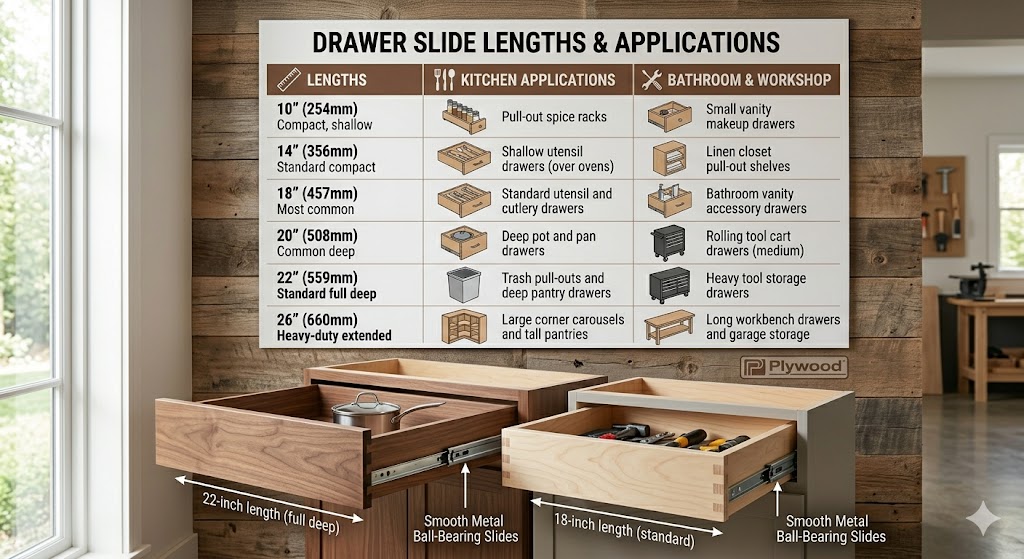
Common Drawer Slide Sizes & Lengths
Selecting the correct slide length is critical for maximum extension and smooth operation. Drawer slides are manufactured in standard 3-inch increments to match standard residential and commercial cabinet depths.
12-inch Slides: Primarily used for shallow bathroom vanities, built-in RV cabinetry, or narrow spice-rack pull-outs.
15-inch Slides: Standard choice for office desk pedestals, file drawers, and shallow bathroom vanity bases.
18-inch Slides: The default sizing for apartment-scale kitchen islands or custom-built-in bedroom dressers.
21-inch Slides: The absolute baseline standard for standard residential kitchen drawers. A nominal 24-inch-deep base cabinet uses a 21-inch slide to maximize interior storage capacity while ensuring adequate back clearance.
24-inch Slides: Ideal for deep pantry pull-outs, heavy utility closets, and deep home workshop drawers designed to hold long-hand tools and power tool cases.
How Much Weight Can Drawer Slides Hold?
Exceeding your hardware’s rated weight capacity will bend the steel tracks, displace the internal ball bearings, and cause the drawer box to catch or drop down onto the drawer below it.
75 lb Standard Capacity
This rating is common for entry-level side-mount slides and budget kitchen hardware. They are perfectly fine for silverware drawers, bathroom vanities, or linen storage, but will quickly fail under the weight of stacked heavy ceramic plates.
The true baseline for a high-quality residential kitchen or home office. High-end undermount slides and standard ball-bearing side-mounts carry a 100-lb rating. This provides ample capacity for deep pot-and-pan drawers, small pantries, and heavy file storage.
200 lb Heavy Duty
Engineered for demanding utility spaces. These thick-gauge steel slides are wider and feature reinforced ball-bearing tracks. Use these for wide pantry pull-outs, heavy kitchen trash bins, recyclers, and garage storage holding power tools.
500 lb Industrial Slides
Industrial slides are massive, heavy steel assemblies designed for mobile work trucks, machinist tool chests, and deep under-bed storage drawers in overland camper vans. They do not feature soft-close mechanisms, as their priority is structural survival under extreme mechanical stress.
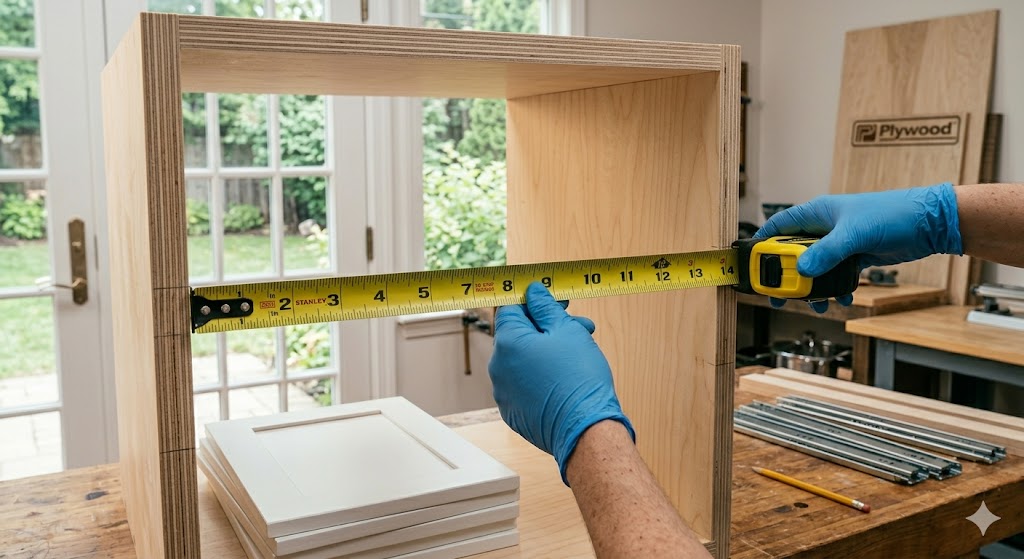
How to Measure Drawer Slides Correctly
Measuring incorrectly is the absolute fastest path to project frustration. If your measurements are off by even 1/16 of an inch, your drawer system will either bind up or fail to catch the tracks. Follow this systematic process to get it right the first time.
1. Measure the Cabinet Depth
Measure the inside clearance of your cabinet from the inside face of the front frame to the interior face of the back panel.
⚠️ Warning: One mistake I made early on was buying slides equal to cabinet depth instead of slightly shorter. Standard kitchen cabinets are nominally 24 inches deep, but the actual internal clearance is usually 22-1/2 to 23 inches once the back panel thickness is deducted. Always buy a slide that is at least 3/4-inch shorter than your total internal cabinet depth.
2. Measure the Cabinet Opening Width
Measure the exact horizontal opening of your cabinet frame where the drawer will slide through. Take this measurement at the front, middle, and back of the cabinet to ensure the opening is perfectly square and parallel.
3. Use the Standard Side-Mount Formula
When using standard side-mount ball-bearing slides, your drawer box must be exactly 1 inch narrower than your cabinet opening width to accommodate the 1/2-inch thickness of each slide rail.
Drawer Box Width = Cabinet Opening Width – 1 inch
4. Undermount Calculations
Undermount slides do not use a fixed 1-inch deduction. Instead, the drawer box width depends entirely on the thickness of your drawer box sides (e.g., 1/2-inch vs. 5/8-inch material). Always consult the manufacturer’s exact specification chart to determine the required internal drawer width before cutting your wood components.
💸 Cost Difference Breakdown: What Should You Spend?
Skimping on hardware is an expensive mistake. When budgeting for your build or remodel, remember that costs scale with features, finish quality, and raw weight capacity.
Hardware Tier
Typical Cost
Best Use Case
Budget Epoxy Slides
$5–$10 per pair
Closets, rentals, utility cabinets
Side-Mount Ball-Bearing Slides
$15–$30 per pair
Workshops, kitchens, heavy storage
Premium Undermount Slides
$40–$70+ per pair
Luxury kitchens and custom furniture
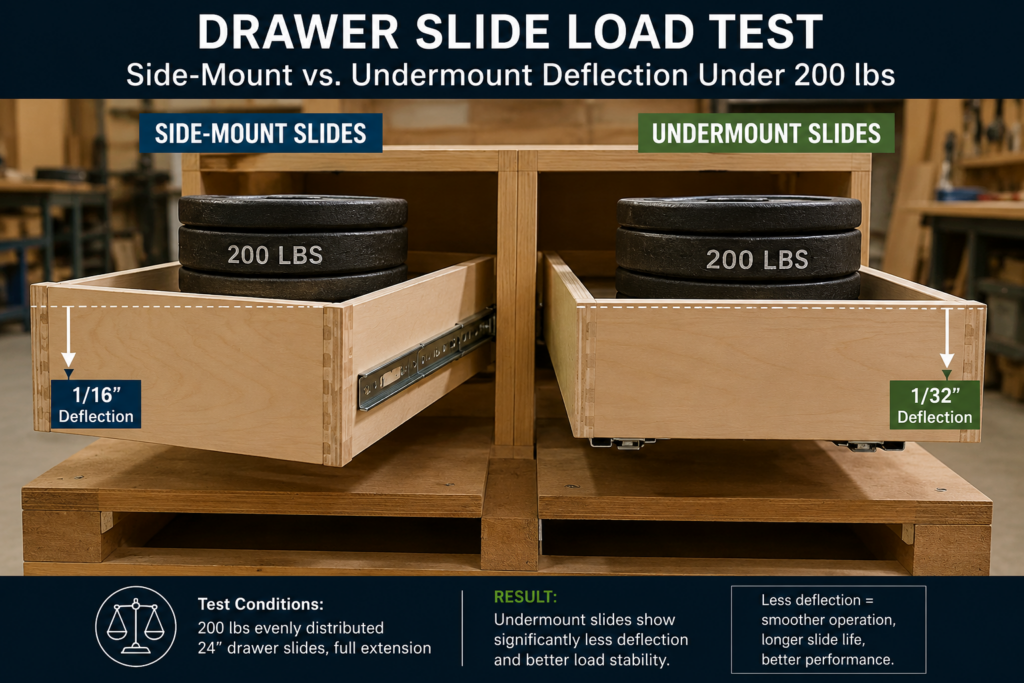
🧪 Real Test: Side-Mount vs. Undermount Deflection
To see how these systems handle real-world stress, we mounted two identical 24-inch Baltic birch drawer boxes inside a rigid test frame in our shop. Box A was suspended on standard 100-lb rated side-mount ball-bearing slides. Box B was mounted on premium 100-lb rated undermount slides with fluid soft-close. Both boxes were loaded with 75 lbs of solid steel barbell plates and mechanically cycled 1,000 times.
Box A (Side-Mount Test Results): Showed noticeable side-to-side play (lateral deflection) after 500 cycles. By the 1,000-cycle mark, we noted a slight crunching sound from the ball bearings during rapid opening movements. The steel tracks had flexed out of alignment by roughly 1/16-inch.
Box B (Undermount Test Results): Zero structural deflection. The bottom-supporting design and wide footprint kept the box tracking perfectly square. The soft-close mechanism engaged at the exact same speed from cycle 1 to cycle 1,000, proving that supporting a load from beneath is mechanically superior to hanging it from the sides.
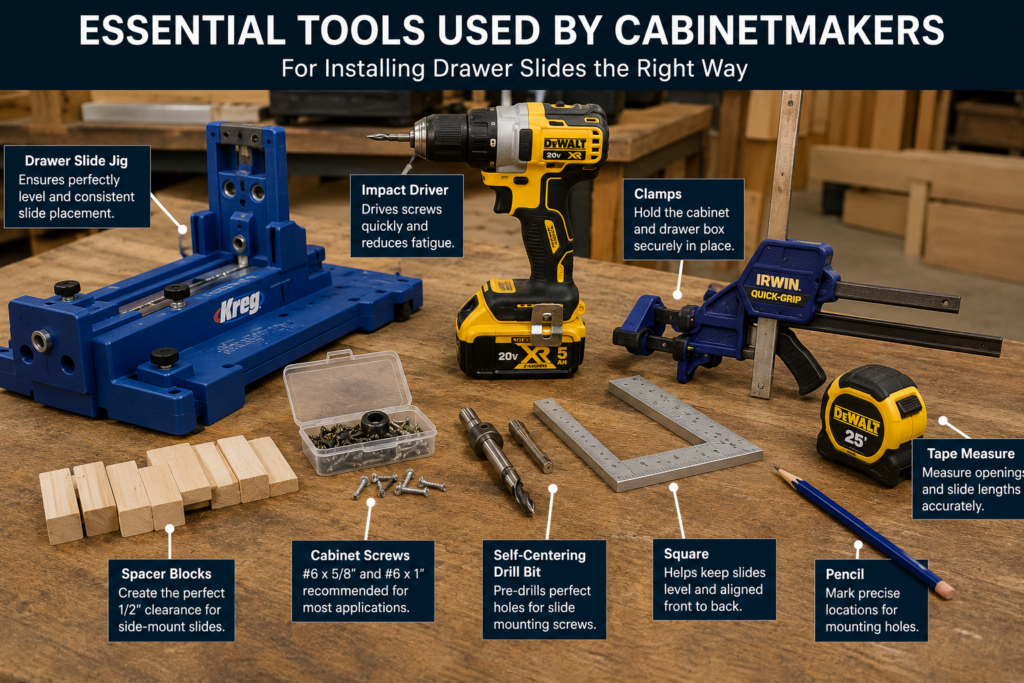
Essential Tools Used by Cabinetmakers
To ensure your installation runs smoothly without ruining your wood components, dynamic layout and drilling tools are mandatory. Here are the specific shop accessories worth adding to your kit:
Drawer Slide Installation Jig: The Kreg Drawer Slide Jig on Amazon automatically indexes tracks to face frames or frameless interiors, eliminating alignment time.
Self-Centering Drill Bits: To keep mounting screws perfectly square within stamped steel slots, use Vix Bits (Self-Centering Drill Bits) on Amazon to stop the bit from walking out of line.
Cabinet Installation Clamps: Keep your overlay faces aligned with Cabinet Face Frame Clamps on Amazon while you set your structural attachment screws from behind.
18-Gauge Pneumatic Brad Nailer: Perfect for setting temporary alignment strips or securing non-structural drawer box components via an 18-Gauge Brad Nailer on Amazon.
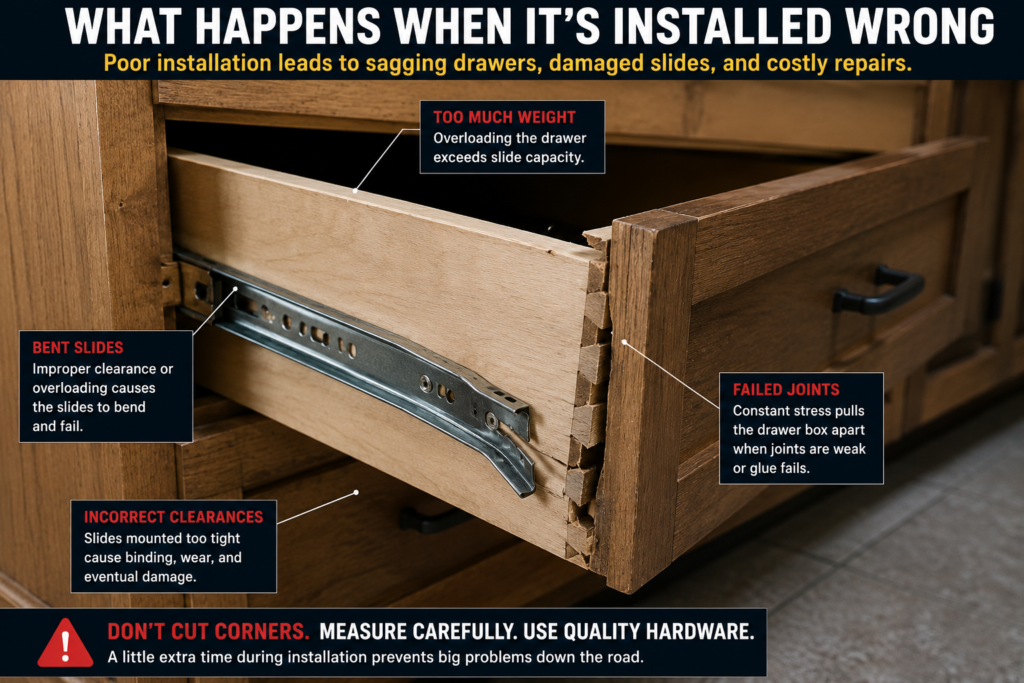
❌ 5 Critical Mistakes That Cause System Failure
😬 The Regret: “I thought pocket screws would save me time on my kitchen renovation. Three years in, my heavy cast-iron pot drawer fronts are pulling completely away from the sides because the screws stripped out of the end grain under the weight.”
1. Forgetting the “Drawer Slide Squeeze.”
Every standard side-mount slide requires exactly 1/2-inch of clearance per side. If your cabinet opening width is 15 inches, your drawer box must be exactly 14 inches wide. If it is 14-1/16 inches, the slide rails will bind, scrape, and completely destroy the internal ball-bearing cages within a few months of use.
2. Overlooking Cabinet Box Shimming
If your cabinet carcass walls are even 1/32-inch wider at the back than at the front face frame, your drawer will glide smoothly at first, then suddenly stiffen as it nears full closure. Always use plastic or wood shims behind your internal mounting brackets to guarantee your slide tracks run perfectly parallel.
3. Using Insufficient Fasteners
Never install heavy-duty side-mount or undermount slides using cheap drywall screws. Drywall screws are extremely brittle, and their heads can snap off under shear load. Always use specialized cabinet installation screws, such as deep-thread truss screws or pan-head wood screws that sit flush in the slide’s stamped-steel mounting holes.
4. Installing Heavy Materials into Thin Framing
Mounting high-capacity 200-lb slides to thin 1/2-inch particleboard cabinet sidewalls without reinforcing the backing structure is a major structural mistake. The slide may hold the weight, but the cabinet wall itself will bow or tear out. For proper carcass strength, ensure your build uses high-quality structural plywood to securely anchor your hardware.
5. Mixing Soft-Close Hinges with Non-Matching Slides
If you are upgrading an existing cabinet, always coordinate your hardware types. Combining aggressive spring-loaded door hinges with slow-acting soft-close drawer tracks can cause uneven pressure profiles on the face frames. Make sure your doors use high-quality soft-close cabinet hinges that match the premium operation of your undermount drawer systems.
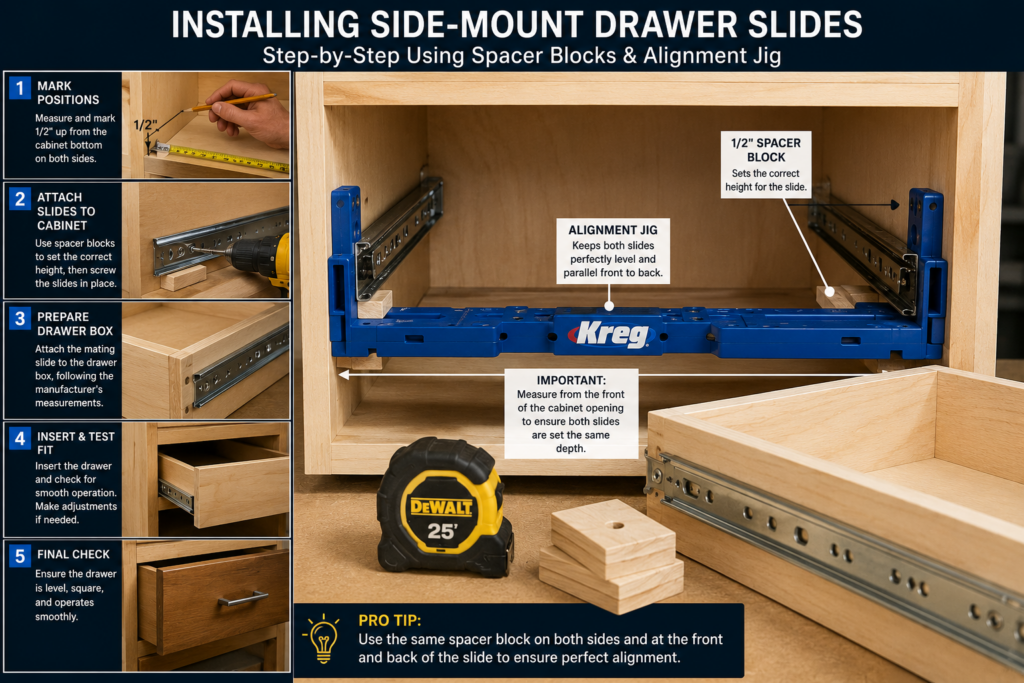
Ready to install your hardware? Follow this proven shop method to guarantee a smooth, friction-free operation on your very first try.
Step 1: Prep the Cabinet Interior
Cut two identical pieces of scrap plywood to act as custom spacer blocks. The height of these blocks should match the exact location where you want your tracks to sit inside the cabinet. Rest the first spacer block on the floor of the cabinet, place your left slide track flat on top of it, and pull the front edge back exactly 3/32-inch from the face of the cabinet frame. Repeat this exact process on the right side.
Step 2: Secure the Outer Cabinet Tracks
Drive your primary pan-head screws into the exact center of the horizontal oblong slots on the slide body. Do not tighten them down completely yet. Using these slots gives you a small amount of play to slide the tracks slightly forward or backward later on, aligning your decorative drawer fronts perfectly flush.
Step 3: Mount the Inner Rails to the Drawer Box
Press the small plastic release lever on the extended slide to separate the inner rail from the outer cabinet track housing. Align this inner rail flush with the bottom edge of your drawer box side wall. Ensure the front edge of the steel rail is flush with the front face of the drawer box wood. Secure it firmly using flat-head wood screws.
Step 4: Insert, Click, and Fine-Tune
Align the inner rails on your drawer box with the extended tracks inside your cabinet. Push the drawer straight back into the cabinet with steady, firm pressure. You will feel resistance initially as the bearing cages align, followed by a crisp click as the assemblies lock together. Open and close the drawer completely two or three times to fully seat the ball bearings along their tracking pathways.
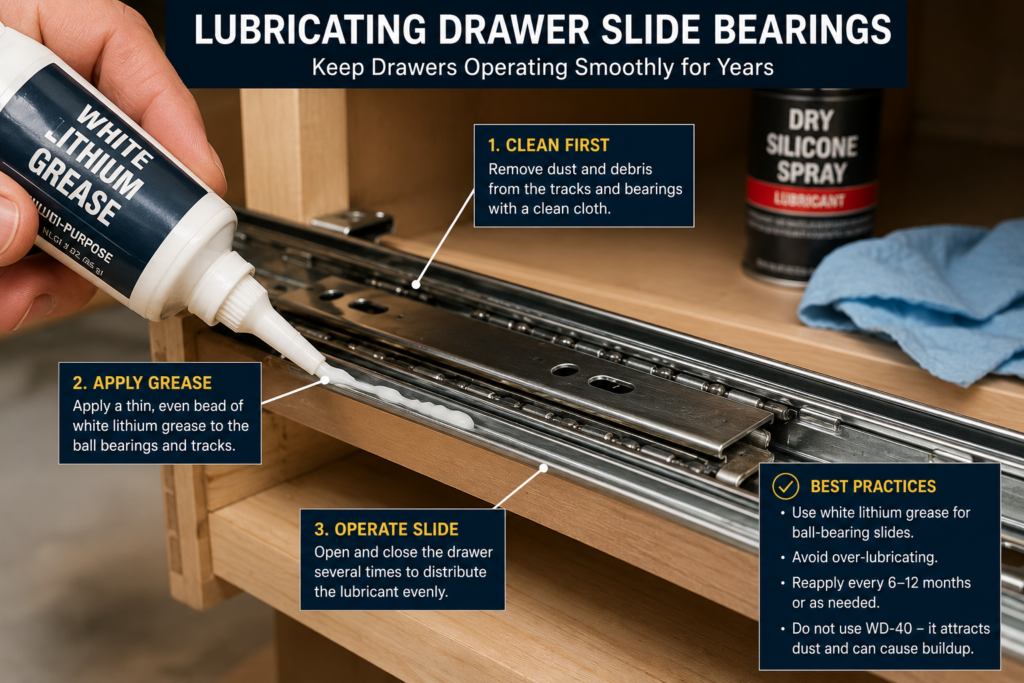
Maintenance and Troubleshooting
If an older drawer begins sticking or sagging, you don’t necessarily have to replace the hardware right away. A few quick maintenance steps can often restore factory-smooth operation.
Clean the Bearing Pathways
Sawdust, pet hair, and kitchen debris love to settle into the factory grease of ball-bearing tracks. This creates a gritty paste that grinds down the steel bearings. Blow out the tracks using compressed air, or run a vacuum brush attachment along the internal channels to clear out accumulated debris.
Lubricate with the Right Product
Never spray standard WD-40 onto your drawer slides. WD-40 is a solvent and a degreaser; it breaks down the heavy factory grease and leaves behind a sticky residue that attracts dust like a magnet. Instead, apply a thin coat of a dry silicone spray or high-grade white lithium grease directly to the ball-bearing carriages.
Fix Sagging Drawer Boxes
Over years of use, heavy contents can cause thin drawer bottoms to bow down until they rub against the cabinet stretchers below them. If you encounter this issue, you can reinforce the bottom panel from below by screwing small, triangular wood bracing blocks into the corners where the drawer bottom meets the side walls.
Frequently Asked Questions
Are undermount drawer slides worth the extra cost?
Yes, absolutely. For high-use areas like a kitchen or master bathroom, premium undermount slides are well worth the investment. They provide a completely hidden look, support the drawer box’s weight at its strongest point (the bottom), and feature excellent 3D micro-adjustments for perfect drawer front alignment. For general shop storage or light-duty closets, however, standard side-mount slides are a highly effective, cost-saving choice.
Can drawer slides be mounted upside down or flat under a drawer?
Standard side-mount ball-bearing slides can technically be mounted flat horizontally beneath a drawer box, but doing so drops their weight capacity by roughly 60% to 75%. When mounted flat, the gravity load applies a twisting leverage force across the steel channels rather than a direct downward vertical load, which will cause the tracks to flex and bind.
Why do drawer boxes start to sag or stick over time?
Drawers typically sag or stick due to three common factors: overloading the manufacturer’s rated weight limit, structural distortion of the cabinet walls due to house settling, or the failure of thin particleboard drawer bottoms as they expand from humidity. Cleaning your tracks and adding support bracing to the drawer bottom will often fix minor sticking issues.
Can I replace old roller slides without building a completely new drawer box?
Yes, you can replace old slides, but you must match the exact side clearance profiles of your original hardware. Standard side-mount ball-bearing slides require the exact same 1/2-inch clearance per side as traditional white epoxy roller slides, making them an easy, direct drop-in upgrade. Undermount slides, however, require specific box dimensions and bottom notches, so they cannot be retrofitted to old standard drawer boxes without extensive modification.
What is the standard clearance required for undermount slides?
Undermount slides generally require 1/2-inch of clearance underneath the drawer box bottom (the distance from the bottom edge of the side walls to the actual drawer bottom panel), and a specific total clearance between the drawer box exterior and the cabinet opening side walls. Because this varies based on your wood thickness, always check the manufacturer’s installation sheet before building your boxes.
Final Project Check: Build It to Last
Before ordering hardware or cutting your plywood, double-check your cabinet structure, opening widths, and slide compatibility. A properly built drawer system should glide smoothly under heavy load for decades—not bind up after six months of daily use.
If you want to ensure your structural boxes and frames don’t bow or twist under the weight of your new hardware, verify your casing materials with our comprehensive review of plywood grades to make sure your core carcass panels offer maximum stability.
Plywood Sheets Guide: Types, Sizes, Prices & Best Picks by Admin April 19, 2026 DIY Plywood sheets are engineered wood panels made from layered veneers glued together for strength and stability. They are commonly sold in 4x8 sizes and vary…
Firewood Guide: Best Types, Storage & Tools by Admin July 21, 2025 Grades 🔥 My Real Take on Firewood—What Works and What’s a Waste I’ve burned all kinds of firewood over the years—some that kept the house warm…


")


")

