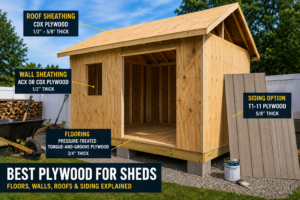
If you’re siding a shed, T1-11 is usually the first thing the lumber yard points you toward. It’s affordable, it goes up fast, and a single can brace the wall and finish it in one step. why it’s been a shed favorite since the 1960s.
It also has a reputation for rotting — but that reputation is mostly earned by how it gets installed and maintained, not by the panel itself. How long T1-11 lasts on a shed depends on a stack of things you control: the finish, how well the cut edges are sealed, how far it sits above the ground, your climate and roof overhang, splashback, ventilation, and whether you keep up with recoating. Get those right and T1-11 can look good for many years. Ignore them and it won’t.
This guide covers what T1-11 actually is, what thickness to buy, roughly what it costs, how to inspect panels before you pay, and how to install and finish it so it lasts.
What Is T1-11 Siding?
T1-11 is a grooved wood panel siding sold in 4×8 sheets, with vertical grooves commonly spaced every 4 or 8 inches to mimic board-and-batten. It comes in two very different materials, and the label alone won’t always tell you which one you’re holding.
Plywood T1-11 vs. OSB T1-11
Plywood T1-11 is thin wood veneers glued in alternating layers. OSB T1-11 is compressed wood strands and resin. They can look nearly identical on a rack but behave differently outdoors.
The fastest way to tell them apart is the cut edge: plywood shows clean layered plies, while OSB shows a rougher, compressed, flaky edge. In general, plywood holds up to moisture better, takes stain, and resists warping, while OSB costs less but is more sensitive to water once it gets in.
One distinction worth keeping straight, because a lot of sites blur it: the glue and the wood are two separate promises. Plywood T1-11 rated for exterior siding uses a waterproof glue bond, so the layers resist coming apart when wet. That is not the same as decay resistance. The wood fiber itself has no built-in rot protection unless the panel is pressure-treated. Waterproof glue keeps the sheet together; finish, flashing, and clearance are what keep the wood from rotting. If you want to confirm exactly what you’re buying, the panel’s plywood grade stamp spells out the bond classification, span rating, and standard it was made to.
Is T1-11 a Good Choice for a Shed?
For a shed, yes — T1-11 is one of the better-value sidings you can pick, as long as you’re honest about the upkeep.
A shed is where its trade-offs are easiest to live with. When the specific panel is rated and installed for it, T1-11 can brace the wall and finish it at the same time, which can save both a material layer and a step. It suits the look of a shed, and if a panel is ever damaged you can replace a single sheet. Where T1-11 is a weaker choice is on a house you want to ignore for a decade, because it needs periodic refinishing and it punishes sloppy water details. For a wider look at panel options across shed floors, walls, and roofs, see our guide to the best plywood for sheds.
What Thickness of T1-11 Should You Use on a Shed?
T1-11 is commonly sold in 1/2-inch and 5/8-inch (19/32″) thicknesses. For many sheds framed 16 inches on center, 19/32-inch plywood T1-11 is a sturdy, forgiving choice — it holds fasteners well and resists denting better than thinner panels.
That said, thickness isn’t a one-size answer. The right panel depends on your stud spacing, whether the siding is also doing structural work, the panel’s siding/span rating, your local wind and building-code requirements, and the manufacturer’s instructions. Pick a panel whose grade stamp and span rating match your framing rather than choosing by thickness alone — APA Rated Siding carries a span rating that identifies the stud spacing it supports. Groove spacing (4″ OC vs. 8″ OC) is a looks decision and barely affects price.
A related caution: T1-11 can serve as structural wall bracing only when that particular panel is rated for it and installed to the required fastening schedule. Decorative or lower-rated siding panels are not automatically structural — our guide to structural vs. non-structural plywood walks through how to tell the difference on the stamp.
How Much Does T1-11 for a Shed Cost?
T1-11 is one of the cheaper wood sidings, but the price you’ll pay swings with several factors: plywood versus OSB, panel thickness, veneer grade, whether it’s pre-primed, and your region and supplier. OSB versions sit at the low end; thicker, higher-grade, or pre-primed plywood costs more. Because siding prices are location-dependent and move around, check current pricing at your local yard or big-box store rather than trusting a range from an article.
To estimate how many sheets you’ll need, measure the wall area you’re covering (not indoor floor space) and divide by 32 square feet per 4×8 sheet, then round up and add a little for waste and cuts.
💸 Cost difference worth knowing: OSB T1-11 is usually a few dollars cheaper per sheet than plywood. In a dry climate under a good overhang, that can be fine. In a wet or coastal setting, plywood’s better moisture behavior is generally worth the difference — the cheaper panel is the one more likely to swell if water reaches it.
Here’s how T1-11 compares with the common upgrade, LP SmartSide, for a shed — and if you’re weighing the two, our T1-11 vs. LP SmartSide breakdown goes deeper on cost and durability:
Factor
Plywood T1-11
LP SmartSide
Approximate price
Verify locally
Verify locally
Finish
Paint or compatible stain
Paint only
Moisture protection
Depends heavily on finish and detailing
Factory-treated engineered wood
Maintenance
Inspect regularly; refinish when needed
Inspect regularly; repaint before coating failure
Structural use
Only when its rating and installation support it
Depends on the specific product
Why T1-11 Sheds Rot Early (and How to Prevent It)
When T1-11 fails early on a shed, water is almost always involved — and often it’s water reaching the panel’s cut edges rather than soaking through the printed face. End grain at a cut edge wicks moisture like a bundle of straws. A bare, unsealed bottom edge sitting close to the ground can draw up moisture, and the grooves and cut edges are the first places water tends to enter. How badly this bites depends on climate, roof overhang, splashback off the ground, ventilation, installation, and how well the finish is maintained — no single detail is the whole story. But edge sealing and ground clearance are the cheapest, highest-leverage things you control.
❌ Common mistake: Hanging a panel with bare, unsealed cut edges — especially the bottom edge — and setting it too close to the ground.
⚠️ Warning: Cut edges and grooves are the weak points, not the printed face. Every field cut exposes raw wood. Seal those edges before the panel goes up.
Three habits prevent most edge-driven trouble:
Keep it up off the grade. Follow the panel manufacturer’s instructions and your local code for clearance above finished ground. As a reference point, LP, for example, calls for keeping its siding at least six inches above finished grade; use the figure your product and code require.
Seal every cut edge before it goes up — bottoms and field cuts included — with a compatible primer or sealer.
Flash the horizontal joints. On taller walls where panels stack, use Z-flashing (a metal drip cap) at the horizontal seam so water sheds outward instead of running behind the lower sheet.
😬 A common regret: People who tear soft, crumbly panels off a shed rarely blame “bad siding” — they wish they’d sealed the bottom edges and kept the panel off the dirt. Both are cheap to do on install day and expensive to fix later.
How to Inspect T1-11 Before Buying
Don’t buy off the top of the stack without a look. A few checks at the yard save you from a bad panel:
Read the stamp. Confirm it’s plywood versus OSB, check the bond classification and siding/span rating, and make sure the actual thickness matches what you need (e.g., 19/32″ for a nominal 5/8″ sheet).
Check the edges. Clean layered plies = plywood; rough compressed strands = OSB. Look for existing edge damage, crushed corners, or open plies.
Look for delamination or swelling. Any lifted plies, soft spots, or swollen edges mean a panel already took on moisture in storage. Leave it.
Sight for warp. Look down the length of the sheet. If it’s cupped or twisted like a Pringle, pick another one — panels warp when stored badly.
Ask how it’s been stored. Sheets left flat and dry hold up better than ones stood in a damp yard.
How to Install T1-11 on a Shed
Once you’ve picked good panels and sealed the edges, the hang itself is straightforward:
Seal all edges and cuts first. Bottoms, tops, sides, and any groove or field cuts. Let them dry before hanging.
Set your ground clearance per the product instructions and local code, and snap a level line to keep the bottom edge consistent.
Fasten to the manufacturer’s schedule. Follow the fastening pattern printed by the panel maker and required by your shed’s approved design or local code. Use corrosion-resistant fasteners (such as galvanized or stainless siding nails) so they don’t rust and streak the panel.
Lap vertical joints on a stud so the shiplap edges overlap on solid framing.
Z-flash horizontal seams on tall walls before setting the upper panel.
Caulk trim-to-panel joints, but leave the vertical shiplap seams alone — those need to drain and breathe.
Finish it within the panel manufacturer’s exposure limit. Different products allow different amounts of time bare; follow the product’s stated limit rather than a generic rule of thumb.
How to Finish and Maintain T1-11
On T1-11, the finish isn’t decoration — it’s the moisture protection. A bare panel is on a clock.
Match the system to the product. For a paint system, use an exterior primer compatible with your topcoat, then your finish coats — for APA Rated Siding, an all-acrylic latex primer-and-topcoat system is generally a solid choice. For a stain system, apply the stain according to its label; penetrating stains usually go on without a paint primer, so don’t add one unless the stain manufacturer calls for it. Plywood T1-11 can take stain or paint; OSB versions realistically need paint. Our guide to painting plywood covers prep and coat build for a clean exterior finish.
Then keep up with it: inspect the siding regularly and recoat before the finish starts to fail, on the schedule your finish manufacturer specifies. Letting the finish wear through is what reopens the edge-moisture problem.
How Long Does T1-11 Last on a Shed?
There’s no single number, because lifespan tracks the same factors as everything above: climate, roof overhang, splashback, installation quality, the finish and how faithfully it’s maintained, ventilation, and whether the panel is kept off the ground. Well-finished, well-detailed plywood T1-11 that stays dry and gets recoated on time lasts far longer than a neglected panel sitting in wet grass. In other words, the water detailing ages the siding more than the calendar does. For more on what shortens or extends it, see our guide to T1-11 siding lifespan.
Recommended Tools and Materials for a T1-11 Shed
These are the supplies that actually decide how long T1-11 lasts — mostly the edge-sealing and fastening gear people under-buy. (Amazon links; prices and availability change.)
Exterior wood primer/sealer — for sealing every cut edge, the highest-leverage purchase here. Shop on Amazon
Solid-color exterior stain or 100% acrylic exterior paint — your long-term protection and recoat finish. Shop on Amazon
Galvanized or stainless ring-shank siding nails — corrosion-resistant so they won’t rust-streak the panel. Shop on Amazon
Z-flashing / drip cap — for horizontal panel seams on taller walls. Shop on Amazon
Exterior-grade sealant/caulk — for trim-to-panel joints. Shop on Amazon
Wood moisture meter — to confirm panels are dry before you finish them. Shop on Amazon
Brush and roller kit — for priming edges and rolling on the finish. Shop on Amazon
Frequently Asked Questions
Is T1-11 good for a shed?
Yes. For a shed, T1-11 is one of the better-value sidings, because when the panel is rated and installed for it, it can brace the wall and finish it in one step. The trade-off is that it needs periodic refinishing and careful water detailing at the edges.
What thickness of T1-11 is best for a shed?
T1-11 is commonly sold in 1/2-inch and 5/8-inch (19/32″) thicknesses. For many sheds framed 16 inches on center, 19/32-inch plywood is a sturdy choice, but pick a panel whose span rating and grade stamp match your framing and local code rather than choosing by thickness alone.
How much does T1-11 for a shed cost?
It varies with plywood versus OSB, thickness, veneer grade, whether it’s pre-primed, and your region. OSB versions are cheapest; thicker or higher-grade plywood costs more. Because siding prices are location-dependent, check current pricing at your local yard or big-box store.
Should I use plywood or OSB T1-11 on my shed?
Plywood T1-11 generally handles moisture and finishing better and can be stained. OSB is cheaper but more moisture-sensitive once water gets in. Choose based on your climate, budget, and any local rating requirements.
Why does T1-11 rot on sheds?
Early failures usually involve water reaching unsealed cut or bottom edges, often combined with panels set too close to the ground. Climate, roof overhang, splashback, ventilation, installation, and finish maintenance all play a part. Sealing every cut edge and keeping the siding off the grade prevents much of it.
There’s no single number — it depends on climate, overhang, installation, finish, ventilation, ground clearance, and maintenance. Well-finished, well-detailed plywood T1-11 that stays dry and gets recoated on time lasts much longer than a neglected panel.
Do you have to paint or stain T1-11?
Yes. On T1-11 the finish is the moisture protection, not just the color. Use a compatible paint or stain system per the product label, and recoat before the finish fails.
The Bottom Line
T1-11 earns its spot on sheds: affordable, quick to install, and easy to repair a panel at a time. Its rot reputation comes mostly from how it’s handled — bare edges, ground contact, and skipped recoats — not from the panel itself. Choose a panel rated for your framing, seal every cut edge, keep it up off the ground per code, and refinish it before the coating fails. Do that and T1-11 for sheds is a hard value to beat.
Black Walnut Wood: Hardness, Cost, Uses & How to Buy It by Admin August 23, 2026 DIY Black walnut wood comes from the American Black Walnut tree (Juglans nigra), and it's the premium dark hardwood most people picture when they hear "walnut."…
Rhino Lining Plywood: A DIY Way to Make Plywood Last by Admin January 25, 2026 Grades I didn’t start using Rhino lining plywood because I wanted something extreme or clever. I ended up there because I got tired of replacing plywood…