If you have ever stared at a stamped sheet of CDX sheathing at the lumberyard, trying to decipher what numbers like 32/16 mean, you are not alone. A plywood span chart is one of the most important tools for selecting the correct panel thickness, joist spacing, and roof sheathing layout. Choosing the wrong sheet thickness can lead to saggy floors, roof deflection, and costly repairs.
What plywood span can 1/2-inch plywood handle?
Standard 15/32-inch (1/2-inch nominal) plywood is rated for a maximum floor span of 16 inches on-center and a maximum roof span of 32 inches when installed with structural edge support, according to APA guidelines.
The overall stability of a residential build relies entirely on matching your engineered wood structural panels to your specific framing spacing. This comprehensive guide simplifies the structural layout rules, outlines standard performance categories, and shares real-world framing setups to ensure your next build stays rock solid.
Quick-Reference Plywood Sizing Guide
For those standing in the lumber aisle or placing a material order right now, this expert summary details the minimum recommended panel dimensions for standard residential framing spacing.
Recommended Minimum Framing Specifications
Application
Joist / Rafter Spacing
Minimum Recommended Panel Thickness
Roof Deck
16″ On Center (OC)
7/16 inch
Roof Deck
24″ On Center (OC)
15/32 inch
Plywood Floor Span
16″ On Center (OC)
15/32 inch (Traditional 1/2″)
Plywood Floor Span
24″ On Center (OC)
23/32 inch Tongue & Groove (T&G)
⚠️ Warning: The second number in a standard sheathing stamp represents the maximum allowable spacing for floor framing. Attempting to stretch a 32/16 panel over joists spaced 24 inches on center will cause noticeable floor bounce, significant surface deflection under regular foot traffic, and will likely crack any finished tile or hardwood installed above it.
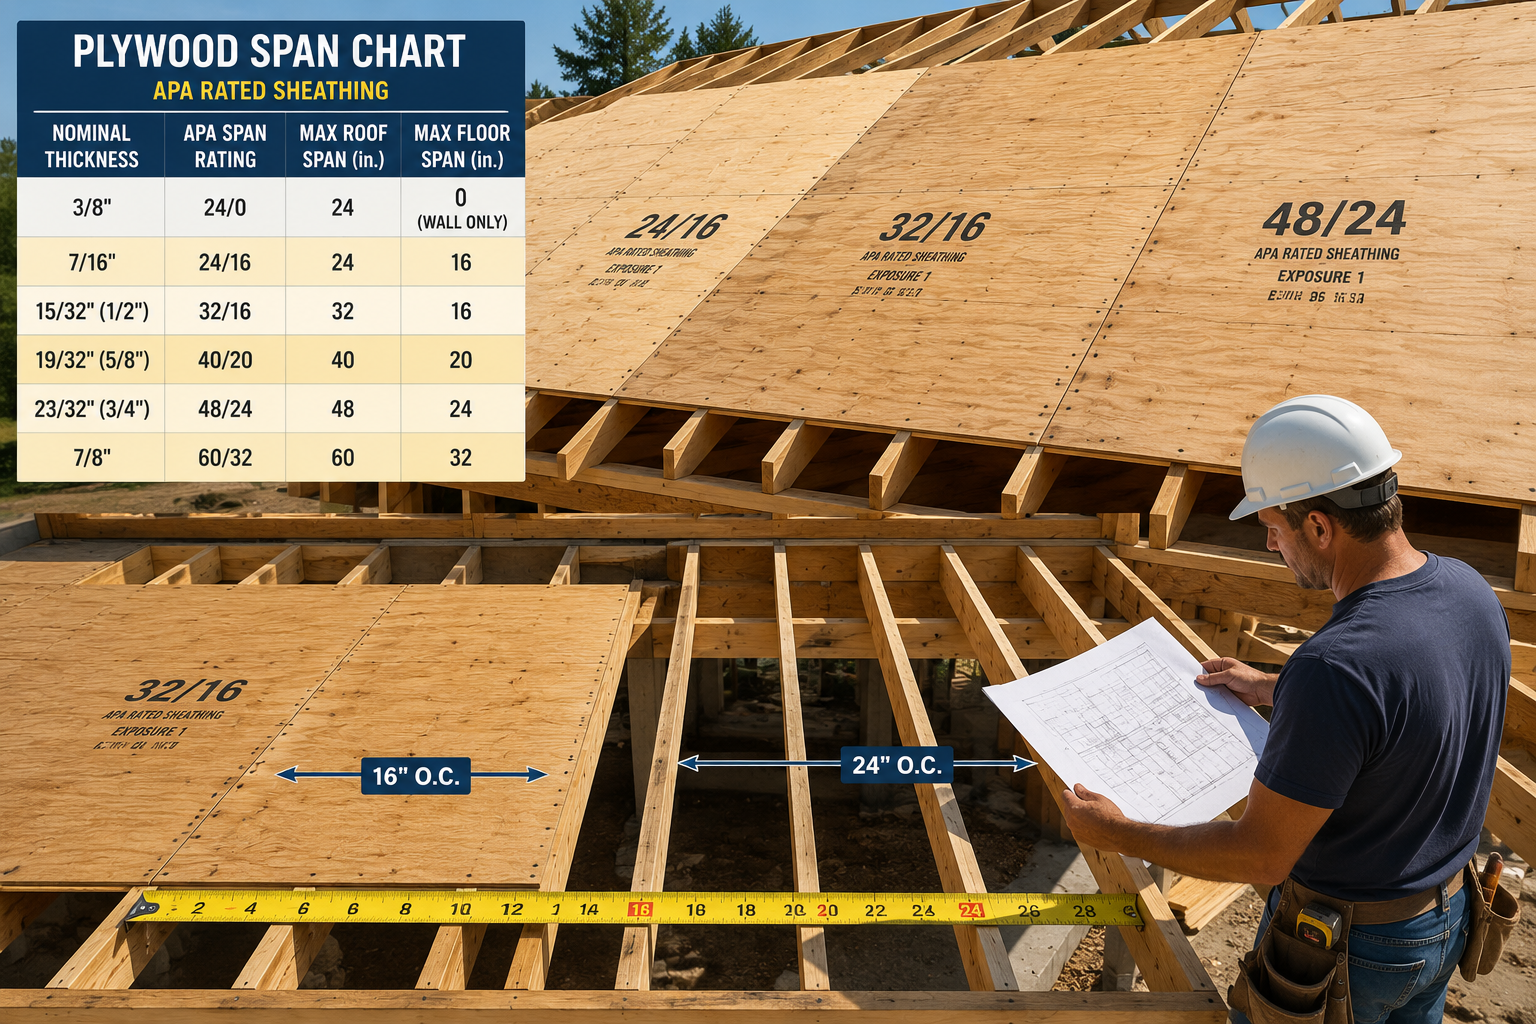
Master Plywood Span Chart
This reference chart outlines how standard panel performance categories correlate to safe framing spans under normal residential live and dead loads.
Core Thickness and Span Capabilities
Performance Category (Nominal Thickness)
APA Sheathing Span Rating
Max Roof Span (With Edge Support)
Max Subfloor Span (On Center)
3/8 in
24/0
24 inches
0 (Wall sheathing only)
7/16 in
24/16
24 inches
16 inches
15/32 in (1/2″ nominal)
32/16
32 inches
16 inches
19/32 in (5/8″ nominal)
40/20
40 inches
20 inches
23/32 in (3/4″ nominal)
48/24
48 inches
24 inches
7/8 in
60/32
60 inches
32 inches
How to Read a Plywood Span Chart
Understanding how to read a plywood span chart comes down to looking at the mechanical relationships between thickness and framing layout. When you view a standard table, find your framing spacing (such as 16″ or 24″ on-center) along one axis, then trace it to identify the corresponding minimum required performance category.
The charts assume the panel’s major strength axis—the direction of the face plies—runs perpendicular across three or more framing supports. If you install panels parallel to your framing, the load capacity drops by more than half.
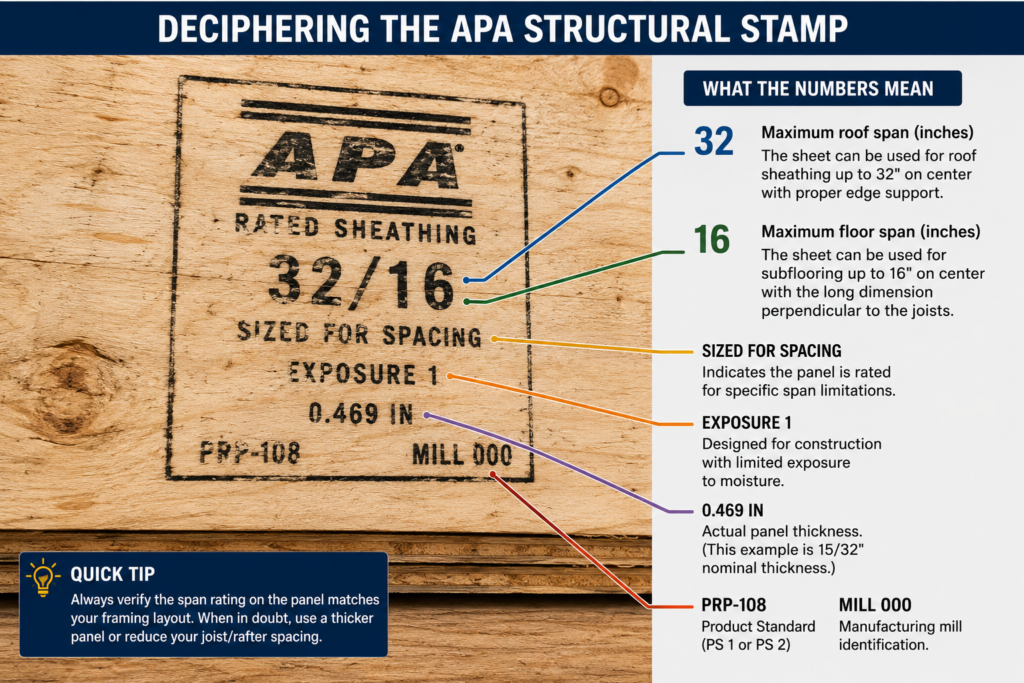
Deciphering the APA Structural Stamp
Before looking at the detailed load data, it is critical to know how to read the physical stamp burned into every piece of structurally engineered wood. The Engineered Wood Association (APA) regulates these markings to verify compliance with Voluntary Product Standards PS 1 or PS 2.
+--------------------------------------------+
|          APA RATED SHEATHING               |
|                 32/16                      |
|          SIZED FOR SPACING                 |
|              EXPOSURE 1                    |
|                0.469 IN                    |
|    PRP-108                MILL 000         |
+--------------------------------------------+
When you inspect an APA-rated sheathing panel, the two numbers separated by a forward slash tell the physical story:
The Left Number (e.g., 32): This indicates the maximum allowable center-to-center framing spacing in inches when the sheet is used as roof sheathing, provided the long axis of the sheet runs perpendicular to your rafters or trusses.
The Right Number (e.g., 16): This indicates the maximum allowable plywood joist spacing when the sheet is installed as a subfloor, with the long axis running perpendicular to your floor joists.
Look closely at the layout marks on your stamp to identify your specific plywood grades. You will also see an “Exposure 1” or “Exterior” rating, which dictates how the panel handles construction-phase moisture.
Plywood Span Chart Load Capacity Tables
These comprehensive tables break down specific applications for structural panels based on uniform live and dead loads.
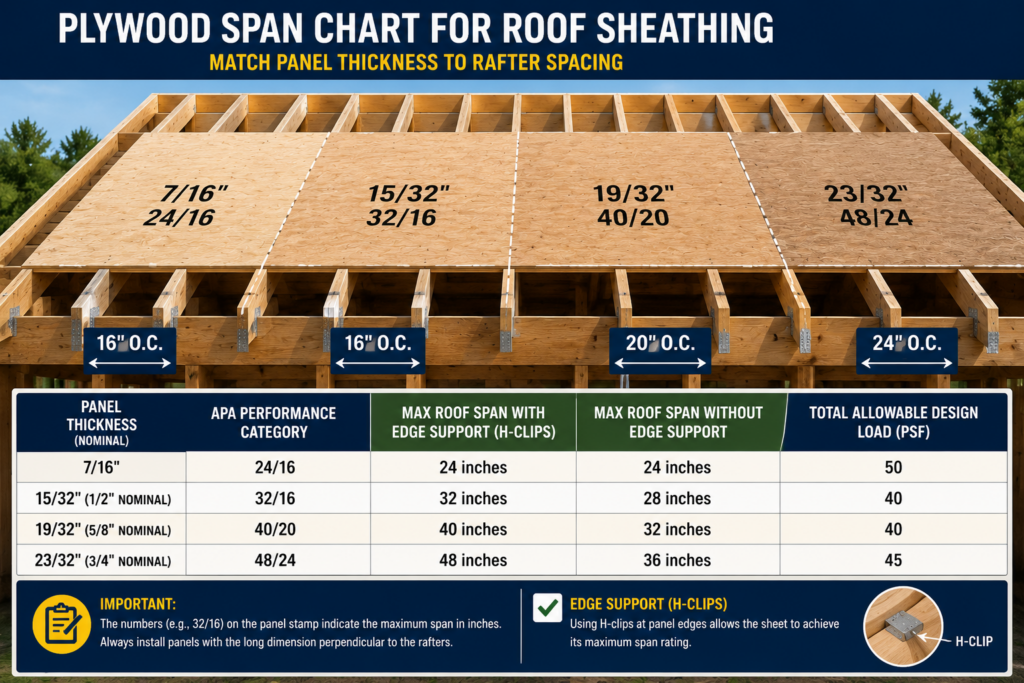
1. Roof Sheathing Thickness and Spans
A plywood roof deck must withstand downward live loads (like heavy snow) and wind uplift without excessive deflection. The deflection limit under total design load is restricted to $L/180$, where $L$ represents the span length between framing centers.
Performance Category
Max Span with Edge Support (H-Clips)
Max Span without Edge Support
Total Allowable Design Load (PSF)
3/8 in
24 inches
20 inches
40
7/16 in
24 inches
24 inches
50
15/32 in
32 inches
28 inches
40
19/32 in
40 inches
32 inches
40
23/32 in
48 inches
36 inches
45
2. Subflooring and Combined Single-Floor Spans
Subfloor panels are engineered to handle concentrated point loads (such as heavy appliances or heavy foot traffic) rather than uniform loading. The standard deflection criteria for a stable, quiet residential floor is constrained to a much stiffer $L/360$.
Panel Type / Application
Performance Category
APA Single-Floor Rating
Max Joist Spacing (O.C.)
Standard Subfloor
7/16 in
24/16
16 inches
Standard Subfloor
15/32 in
32/16
16 inches
Standard Subfloor
19/32 in
40/20
20 inches
Standard Subfloor
23/32 in
48/24
24 inches
Sturd-I-Floor (T&G)
19/32 in
16 o.c.
16 inches
Sturd-I-Floor (T&G)
23/32 in
24 o.c.
24 inches
Sturd-I-Floor (T&G)
1-1/8 in
48 o.c.
48 inches
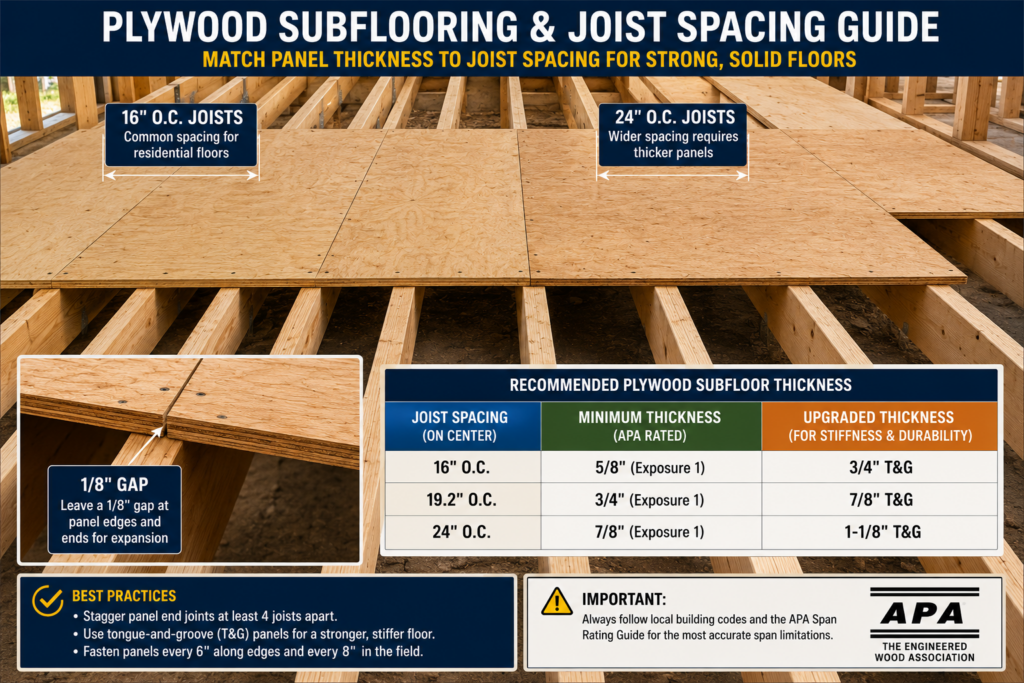
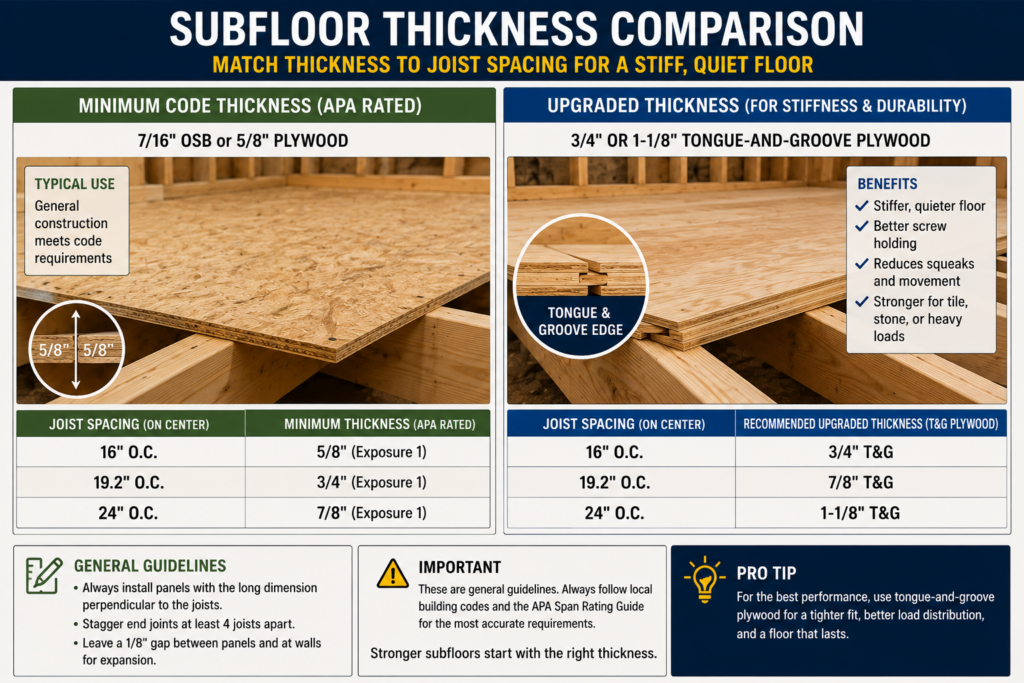
Plywood Span Chart Recommendations by Joist Spacing
To build a floor that feels completely premium underfoot, consider upgrading beyond the minimum structural standard.
Joist Spacing
Minimum Code Thickness
Preferred Upgrade Thickness
16″ On Center
15/32 inch
23/32 inch Tongue & Groove
19.2″ On Center
19/32 inch
23/32 inch Tongue & Groove
24″ On Center
23/32 inch
1-1/8 inch Tongue & Groove
How I Choose Plywood on Real Job Sites
From the Field: After twenty years of framing residential additions, I have learned that building strictly to the minimum code limits isn’t always the wisest choice. For example, while a standard plywood thickness guide says a 15/32″ sheet can technically span 16 inches on a floor, I rarely use it as a single-layer subfloor. It simply allows too much deflection under modern heavy stone tile installations.
On my jobs, if the floor joists are 16 inches on center, I upgrade the subfloor thickness to 23/32″tongue and groove plywood. It increases raw material costs up front, but it completely eliminates the bounce that triggers callbacks from unhappy homeowners. For roofs, I always push for a minimum of 5/8″ thickness on 24-inch rafter configurations because it stands up much better to heavy snow loads without telegraphing wavy seams through the shingles over time.
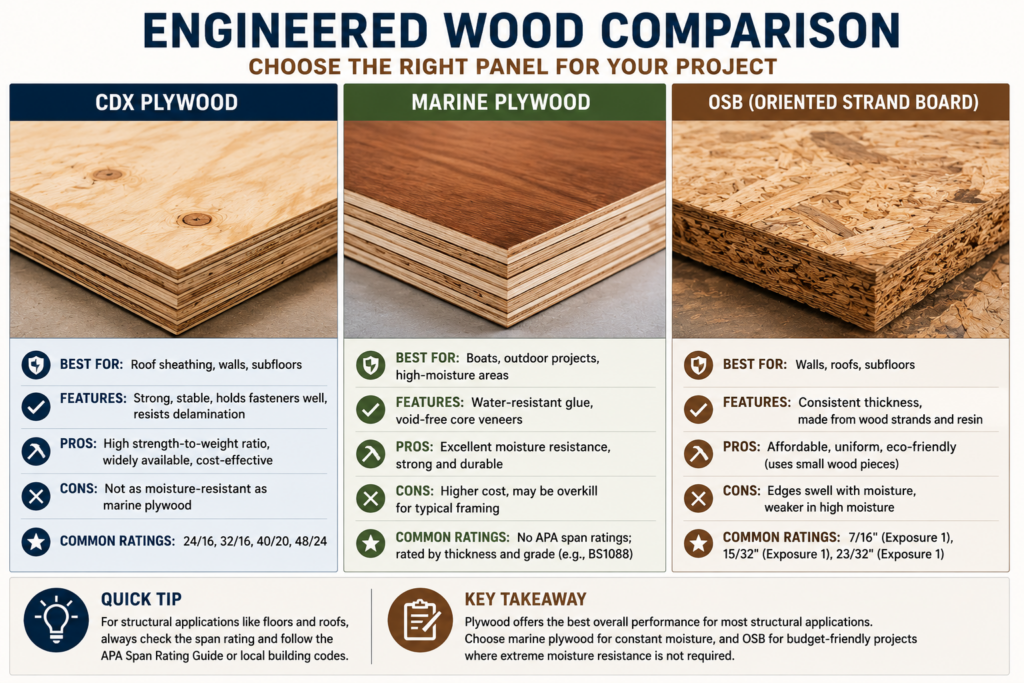
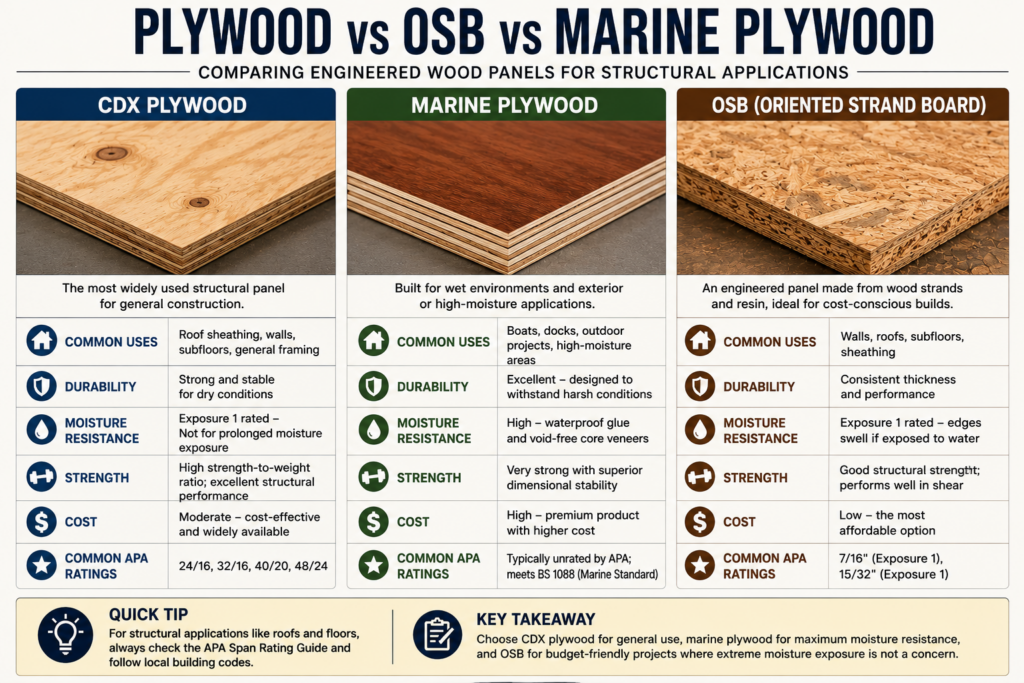
Material Comparison: Engineered Wood Options
Choosing the right panel composition is just as important as selecting the correct thickness. While a plywood span chart helps determine allowable spans and framing requirements, panel composition is equally important because different materials react differently to moisture, fasteners, and structural loads.
To ensure your structural panels achieve their full rated capacity without working their way loose or squeaking over time, using code-compliant fasteners, specialized edge hardware, and structural adhesives is non-negotiable.
Subfloor Adhesives: Using a high-strength polyurethane adhesive such as Loctite PL Premium prevents micro-movements between the plywood and the floor joist, which is the primary cause of floor squeaks.
Panel Edge H-Clips: When installing a thinner roof sheathing thickness (like 7/16″ or 15/32″) over 24-inch rafter spans, sliding specialized steel Roof Sheathing H-Clips between the horizontal panel joints binds the edges together. This distributes concentrated loads between adjacent sheets and prevents uneven sagging between rafters.
Pneumatic Ring-Shank Nails: Smooth-shank nails can back out over time as framing lumber shrinks and expands. High-grip Ring-Shank Framing Nails lock tightly into the wood fibers, maximizing withdrawal resistance.
Real-World Project Profiles
Case Study 1: The Modern Backyard Studio
Project Scope: A 12′ x 16′ home office shed with floor framing set at 16 inches on center and roof rafters set at 24 inches on center.
Material Selection: The builder specified 23/32″ Tongue-and-Groove Sturd-I-Floor for the subfloor and 15/32″ CDX sheathing backed by a central row of metal H-clips for the roof deck.
The Outcome: Because the subfloor layout spacing (16″) was well below the panel’s maximum 24-inch allowable limits, the floor feels exceptionally rigid. The roof sheathing meets the 32-inch maximum span rating, providing a straight, wave-free baseline for architectural shingles.
Case Study 2: The Extended Joist Workshop
😬 Regret: A budget-conscious homeowner decided to frame a detached workshop extension with floor joists spaced at 24 inches on center to save money on dimensional lumber. To save even more, they purchased standard 15/32″ CDX plywood instead of structural subfloor panels, assuming that a half-inch of solid wood would be plenty strong.
💸 The Cost Difference: Buying the correct 23/32″ T&G flooring would have cost roughly $180 more across the entire deck layout. However, once the workshop tools were moved in, the thin 15/32″ sheets flexed noticeably underfoot, causing tool carts to roll on their own and cracking the perimeter wall seams. The homeowner had to completely rip out the bottom rows of finished drywall, add intermediate blocking between every single joist, and overlay a secondary layer of underlayment—turning a simple job into a multi-thousand-dollar structural repair.
Critical Sizing Mistakes to Avoid
❌ The “CDX Equals Waterproof” Fallacy
The “X” in CDX denotes Exposure 1, meaning the glue bond can withstand temporary moisture exposure during typical construction delays without delaminating. It does not mean the plywood is waterproof or intended for permanent exterior exposure. If left uncovered or untreated in damp conditions, the face plies will check, swell, and split. For true open-air or wet settings, you must always upgrade to a dedicated exterior plywood.
🧪 The Concentrated Punch Test
If you want to understand why subfloor layout limits are so conservative compared to roofs, try this real test: Place a sheet of 15/32″ plywood across two sawhorses set 32 inches apart. Step directly onto the center of the sheet with all your weight concentrated on one heel. You will immediately feel the panel deflect significantly. While that same sheet can easily support a uniform blanket of winter snow across a roof truss, it lacks the concentrated point-load resistance required to safely hold moving human bodies over a wide floor span without a stiffening underlayment.
Frequently Asked Questions
What happens if I install plywood with the face grain parallel to the joists?
Installing panels parallel to the framing drastically reduces their strength. Plywood is an anisotropic material, meaning its mechanical capacity is directional. The long plies run parallel to the length of the 4’x8′ sheet; turning those plies parallel to your joists cuts your allowable plywood load capacity by over 50%, resulting in immediate structural sagging.
Do I really need to leave a 1/8-inch gap between plywood sheets?
Yes. Wood structural panels expand slightly as they absorb atmospheric moisture during construction. If you butt the sheets tightly together, they will push against one another as they expand, causing the edges to buckle upward. This expansion buckling creates permanent, visible ridges across your finished metal roof or hardwood floors.
Can I use OSB instead of plywood for a roof deck?
From a building code perspective, an OSB panel with an identical APA span rating (like 32/16) can directly substitute for a matching plywood panel. However, OSB absorbs moisture more slowly but holds onto it much longer than plywood. If your roof develops a minor leak, the edges of OSB panels are far more prone to swelling and permanent edge deformation than real wood veneers.
Can 1/2-inch plywood span 24 inches on a floor?
No. Standard 1/2-inch (15/32″ performance category) plywood carries a maximum subfloor span rating of 16 inches. Spanning it across 24 inches creates an unsafe, bouncy deck that violates IRC residential building codes.
What is the actual difference between 15/32″ and 1/2″ plywood?
Due to manufacturing tolerances and sanding down the face veneers, what the industry traditionally called “1/2-inch plywood” is legally designated under a Performance Category of 15/32 inches. They are the exact same product at retail.
When are panel edge clips (H-clips) required by code?
H-clips are typically required by building code when your roof rafter spacing matches the absolute maximum allowable span of the panel (for example, using 7/16″ sheathing over 24-inch centers) unless the panel edges are completely supported by structural lumber blocking underneath.
Is Marine Grade plywood stronger than standard structural plywood?
Marine plywood uses high-strength exterior resins similar to those of standard structural exterior plywood, but it is manufactured with fully solid, knot-free inner plies. This eliminates hidden internal voids where trapped moisture could sit and cause rot, but it does not significantly increase its dry bending strength or its span capacity over standard Group 1 structural panels.
What does “Sturd-I-Floor” mean?
Sturd-I-Floor is an APA proprietary designation for single-layer floor panels intended for direct application under carpet and padding. These panels feature a touch-sanded face veneer and tongue-and-groove side profiles, allowing you to completely skip a separate underlayment layer.
How many nails are required along the edges of a standard plywood panel?
Per standard residential framing code, structural sheathing panels must be fastened using 6d or 8d common nails spaced every 6 inches along all supported panel edges, and every 12 inches along intermediate framing members (the “field” of the sheet).
Can I use structural plywood for concrete formwork?
While standard structural plywood can be used for basic, single-use concrete forming, it will warp and swell quickly from the moisture in the wet concrete mix. For smooth, repetitive concrete work, you should utilize specialized B-B Plyform panels, which are coated with a factory-applied release agent to resist moisture absorption.
Conclusion
Understanding and respecting plywood span ratings is one of the most critical elements of residential structural framing. These engineering limits ensure daily safety and comfort by regulating the extent of panel deflection under load. For roof spans, standard 15/32-inch sheathing can safely span up to 32 inches when paired with proper edge hardware, whereas floor spans require far greater rigidity to withstand concentrated foot traffic, limiting that same 15/32-inch sheet to 16 inches on-center.
While sticking to the minimum structural code requirements produces a safe floor system, upgrading your material thickness beyond the bare minimum is almost always a worthwhile investment. Stepping up to a thicker panel or a high-performance profile completely transforms a home’s interior feel, eliminating annoying floor bounce and saving your finished flooring from premature cosmetic cracking. If you’re selecting material for a new floor system, also see our guide to subfloor thickness to confidently build an unyielding baseline.
Triple 2 x 10 Beam Span by Admin August 5, 2023 Installing Wood-framed buildings use standard dimensional lumber as the load-carrying members, divided into two categories: posts, which are vertical elements holding up the structure's weight and…


")


")
