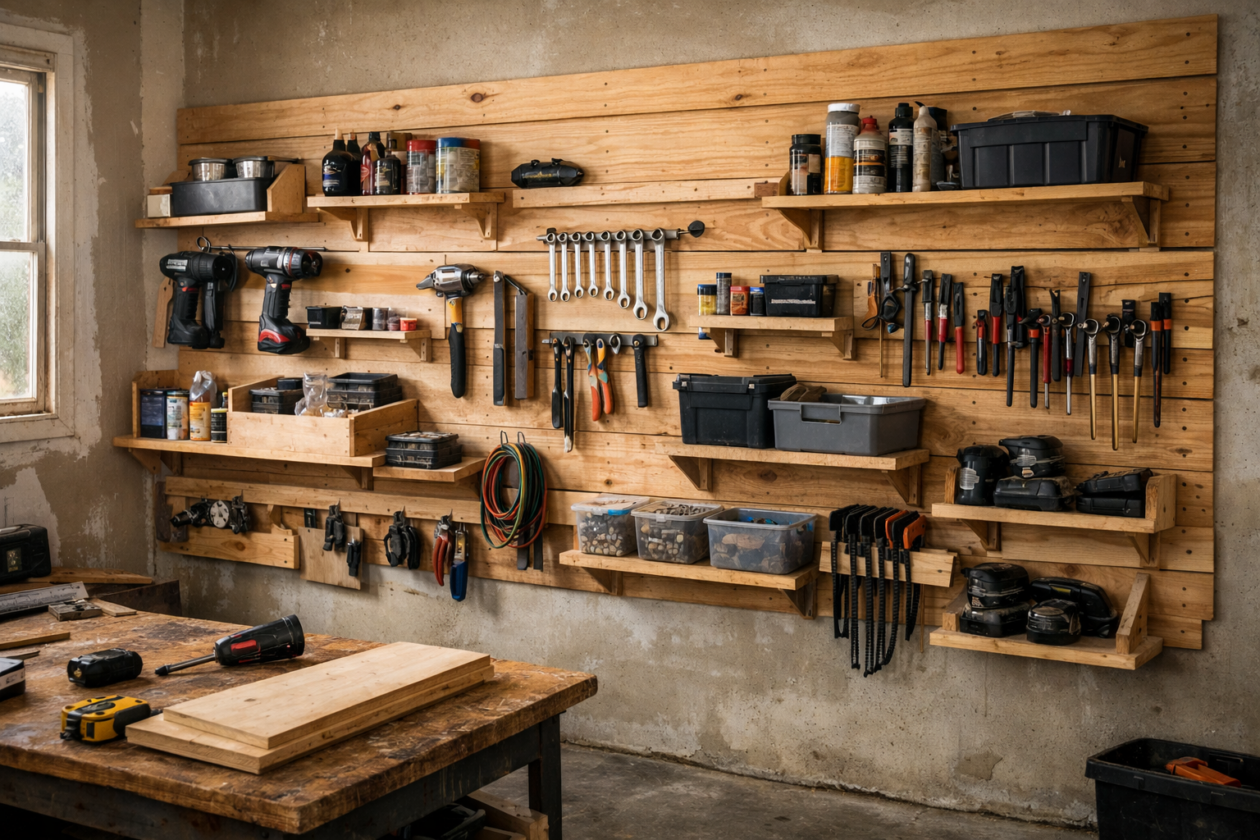
My workshop wall used to be a disaster—tools piled everywhere, nothing had a place, and I wasted more time searching for my tape measure than actually building. I tried pegboards and hooks, but they all failed under real weight. Then I discovered the French Cleat.
It’s the single most effective shop upgrade I’ve ever built. It costs less than a tank of gas, requires zero fancy jigs, and is strong enough to hold a literal engine block. If you are tired of the “pegboard shimmy” and want a wall that actually works, this is the system for you.
Why This System Beats Everything Else
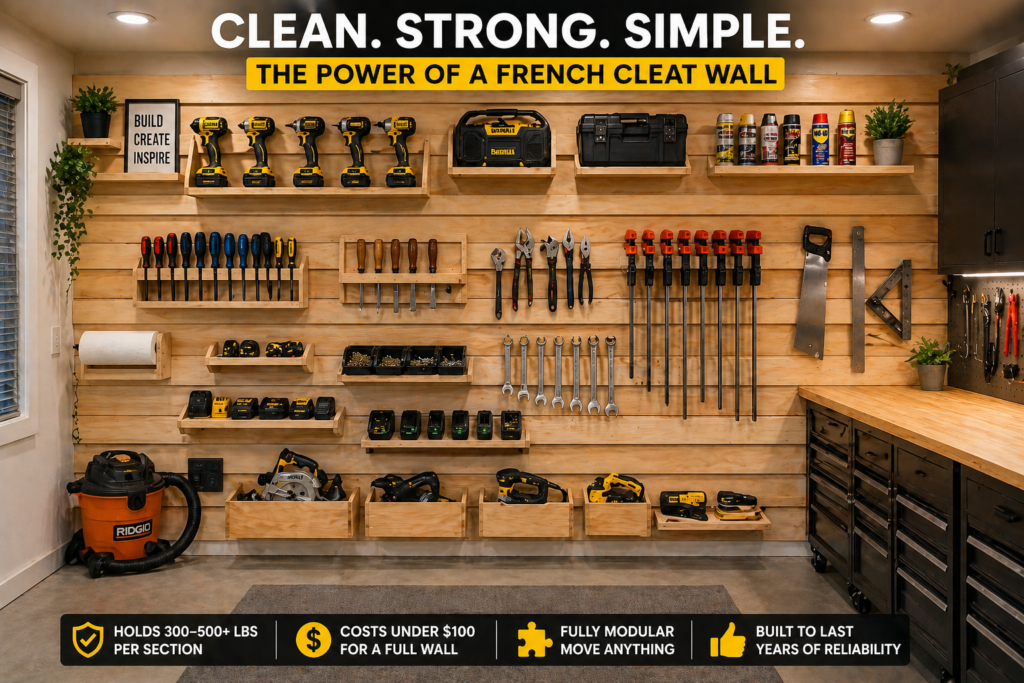
Holds 300–500+ lbs per section: Secure enough for heavy machinery.
Costs under $100 for a full wall: Drastically cheaper than metal track systems.
Fully modular: Move, swap, or reorganize your entire shop in seconds.
Pure Simplicity: No brackets, no hardware systems, no limitations—just wood and gravity doing the work.
Best Budget Option:CDX Plywood + Circular Saw (under $50 setup).
Best for Heavy Tools:Double Cleat System + 3″ Structural Screws (max load capacity).
🧱 Section 1: What is a French Cleat?
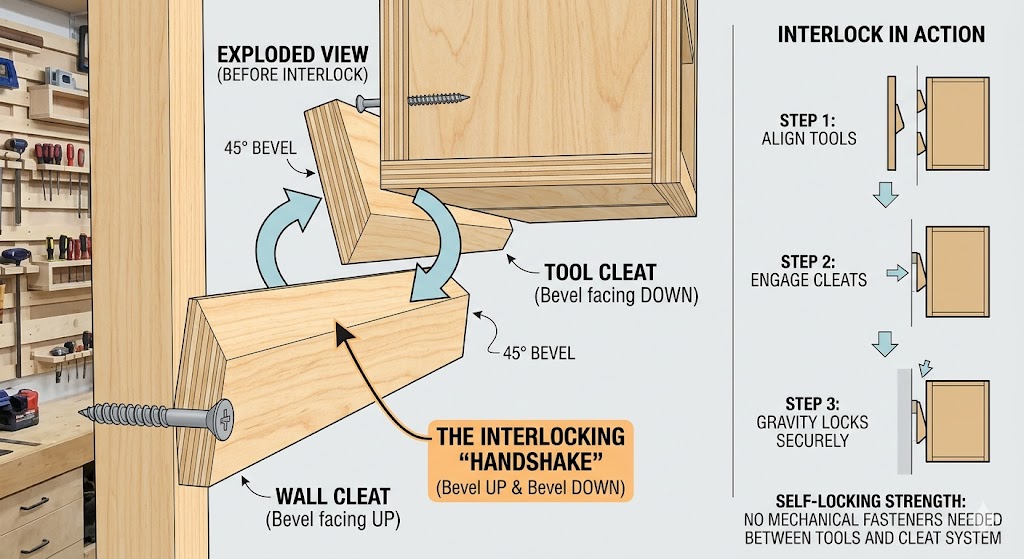
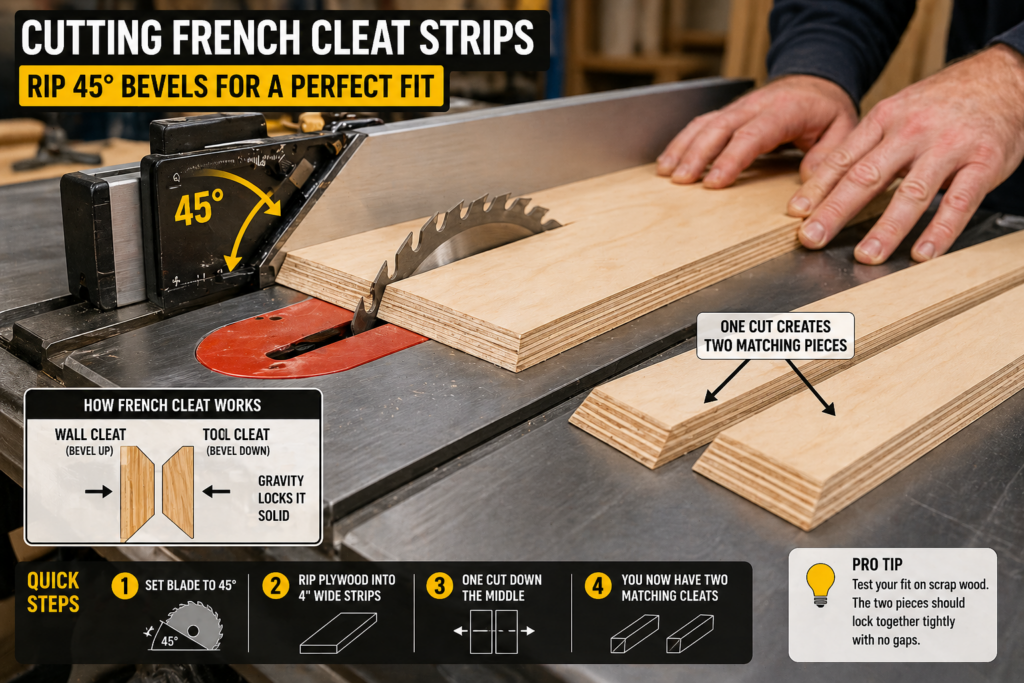
A French cleat is a high-strength wall mounting system consisting of two interlocking $45^{\circ}$ beveled strips of wood. One strip is anchored to the wall (bevel up) and the matching strip is fastened to the back of a tool rack (bevel down). Gravity pulls the object into the wall, creating a secure, self-locking connection.
Imagine two strips of wood meeting like a firm handshake. Because of the $45^{\circ}$ angle, the physics are in your favor: the heavier the object you hang, the more it “wedges” itself into the wall cleat.
🏗 Section 2: How Much Does a French Cleat Wall Cost? (2026 Price Guide)
One of the biggest perks of this system is the low barrier to entry. Compared to expensive metal track systems like Gladiator or Wall Control, the ROI on a plywood cleat wall is unbeatable.
Material
Estimated Cost
Notes
3/4″ Plywood Sheet
$55–$85
Yields approx. 120+ linear feet of cleats.
Box of 2.5″ Wood Screws
$12–$18
Go for high-quality Torx-drive screws.
Wood Glue
$8
Optional, but recommended for tool holders.
Total Project Cost
$75–$115
Covers a massive 8′ x 8′ wall area.
🆚 Section 3: French Cleat vs. Slatwall vs. Pegboard
Before you commit to a wall system, it’s vital to understand the trade-offs. Most beginners choose a pegboard because it’s available at every big-box store, but they usually regret it within a year.
French Cleats: The gold standard for woodworkers. Cost is low ($), strength is unmatched (High), and flexibility is infinite because you build your own holders.
Slatwall: Excellent aesthetics and great for retail-style hooks. However, the cost is very high ($$$), and the PVC or MDF slats can snap under the concentrated weight of heavy power tools.
Pegboard: The cheapest entry point. Strength is low (50 lbs max). The biggest frustration? Hooks that fall off every time you grab a tool.
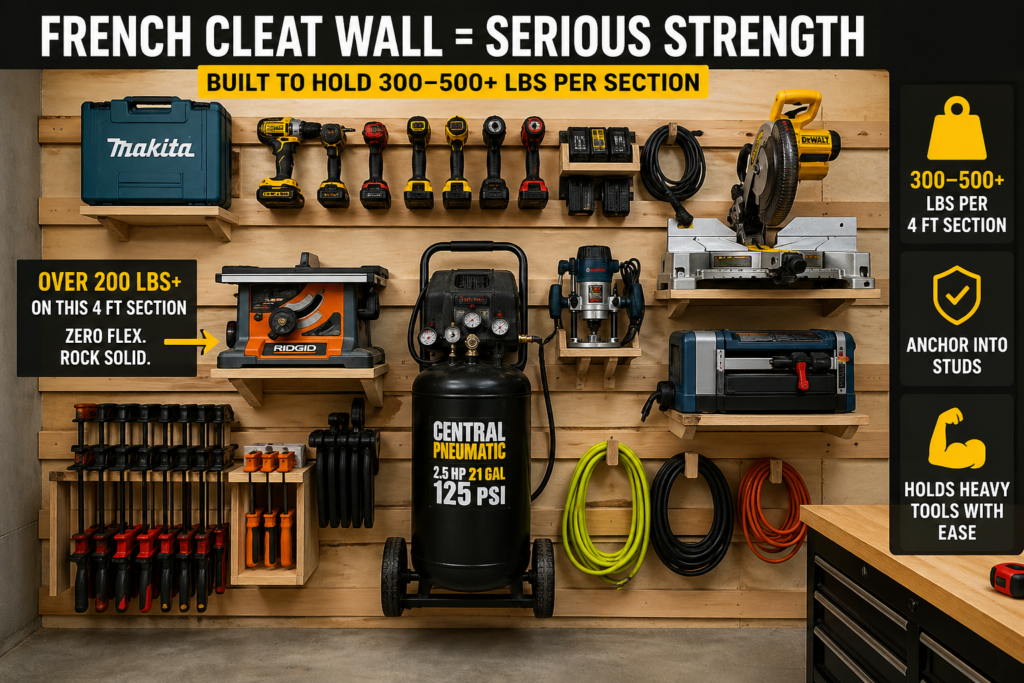
⚖️ Section 4: Weight Capacity & Engineering
Most people underestimate how much weight this system can actually handle. When you distribute the load across multiple studs, the capacity is massive. I’ve personally loaded over 200 lbs onto a single cleat section without any flex or movement.
How Much Weight Can a French Cleat Hold?
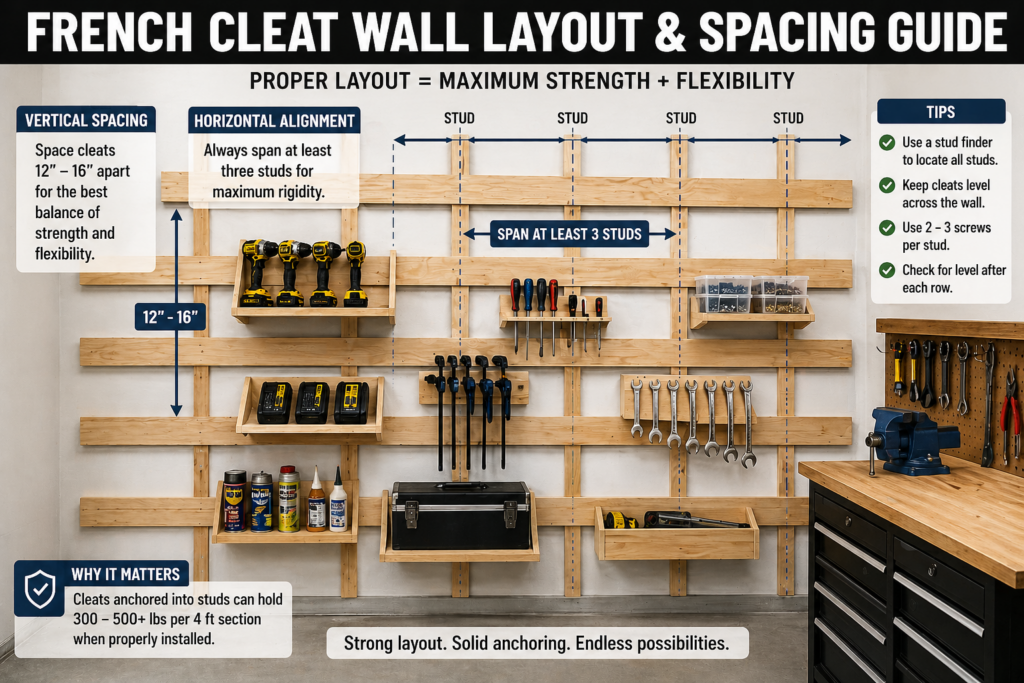
A properly installed French cleat anchored into wall studs can hold 300–500 lbs per 4-foot section, and significantly more when the load is distributed across multiple cleats or a “Double Cleat” system.
French Cleat Layout & Spacing
Vertical Spacing: Every 12–16 inches. This gives you enough “real estate” to move tool holders around.
Horizontal Alignment: Always span at least three studs for maximum rigidity. Before you buy your lumber, see our plywood thickness guide before cutting to ensure your backing material is strong enough.
🛠 Section 5: Tools Required for a Professional Build
To get those perfect interlocking angles, you need gear that doesn’t “drift” mid-cut.
The Table Saw: The gold standard. It allows you to set a fence and rip 10 identical strips.
The Stud Finder: Avoid the “knock and guess” method. A Precision Magnetic Stud Finder is essential to ensure your cleats are anchored into the structural framing.
The Level: Use a 24-inch Box Level. If your cleats are off by even 1/4″, your tools will slide to one side like a slow-motion car crash.
🔨 Section 6: DIY French Cleat Wall (Beginner-Friendly Build)
If you just want the simplest way to build this without overthinking it, here’s the exact setup I’d use starting from scratch:
Materials:
1 sheet of 3/4″ plywood
2½” or 3″ wood screws
Wood glue (optional)
Basic Steps:
Rip plywood into 4″ strips at $45^{\circ}$: One cut down the middle of a strip creates both interlocking pieces.
Locate and mark all studs: Use a stud finder; never anchor into drywall alone.
Mount the first cleat level into studs: Start at eye level and work your way up/down.
Repeat every 12–16 inches vertically: Maintain a consistent grid for modularity.
Attach matching cleats to tool holders: Screw the matching $45^{\circ}$ piece to the back of your bins or racks.
Most first-time builds aren’t perfect—but even a rough cleat wall works better than any pegboard setup.
French Cleat Wall Layout Ideas (Small vs Large Shops)
If you’re working with a small garage, you don’t need a full wall right away.
Small Shop Setup (4–6 feet wide):
2–3 rows of cleats
Focus on drills, clamps, and small bins
Keep everything within arm’s reach
Medium Shop Setup (8-foot wall):
4–5 rows spaced 12” apart
Add a charging station + storage bins
Keep heavy tools low
Full Wall Setup (Garage Buildout):
Floor-to-ceiling cleats
Dedicated zones (tools, hardware, cutting area)
Double cleats for heavy stations
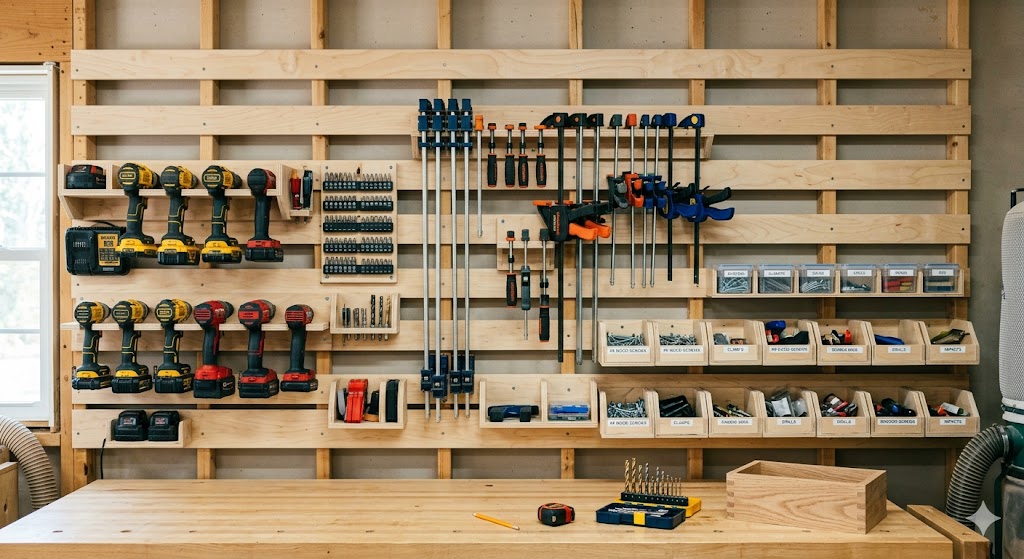
💡 Section 7: Real-World Use Cases (What You Can Actually Build)
A French cleat wall is useless without the holders. Here are the most popular “cleat-ready” projects to build once your wall is up:
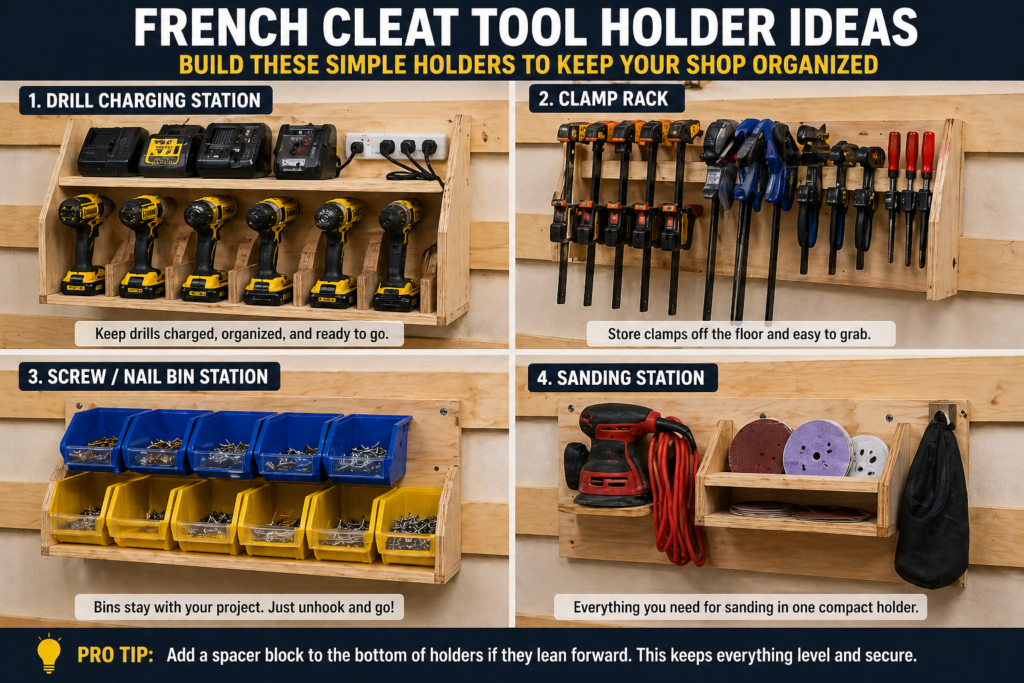
Drill Charging Station: A dedicated box with slots for 3-5 drills and a top shelf for chargers. This frees up a massive amount of space on your workbench.
Clamp Rack: Simple plywood arms glued to a cleat. It keeps your heavy parallel clamps organized and off the floor.
Screw/Nail Bins: Mount small plastic bins to a plywood backer. This allows you to bring the entire bin of screws to your project and “clip” it back when finished.
Sanding Station: A holder that stores your orbital sander, a variety of grit discs, and the power cord in one compact unit.
✂️ Section 8: The Pro Installation Checklist
For a search-dominating build, follow this checklist:
[ ] Set blade to exactly $45^{\circ}$: Test on scrap wood first to ensure a flush fit.
[ ] Rip 3/4″ plywood into 4″ strips: Provides enough surface area for screws.
[ ] Mark all studs: Use a pencil and a level; do not guess where the framing is.
[ ] Mount wall cleat with bevel facing UP: The “pocket” must face away from the wall.
[ ] Use 2–3 screws per stud: This prevents the cleat from pulling away.
[ ] Add spacer blocks: Glue a scrap piece to the bottom of your tool racks so they sit perfectly vertical.
🌲 Section 9: Choosing the Best Wood
If you choose the wrong material, your cleats will sag, warp, or split.
3/4” Plywood (Best Overall): Plywood has alternating grain layers, making it incredibly strong against “shear force.” You can compare materials in our OSB vs. Plywood guide to see why plywood is the only choice for a heavy-duty wall.
Hardwood (Premium): Strong, but expensive and prone to splitting.
⚠️ Section 10: Mistakes From Experience (The 2 AM Crash)
Most failed cleat walls don’t break immediately—they fail slowly over weeks of use. I learned this the hard way. I once hung a 40-lb pancake compressor on a single cleat anchored with drywall toggles. I thought it was rock solid.
At 2:00 AM, a thunderous crash shook the house. The toggles hadn’t snapped; they had simply vibrated enough to “saw” through the drywall until the whole cleat peeled off like a zipper. And when it fails, it doesn’t give you a warning—it all comes down at once. Now, I never hang anything over 10 lbs without hitting at least two studs.
A properly built French cleat wall can last 10–20+ years with no structural issues.
Plywood resists warping and splitting
Screws into studs don’t loosen easily
The system actually gets stronger over time as you refine it
The only time failures happen is when:
you miss studs
use thin plywood
overload a single cleat
❓ Section 11: French Cleat FAQ (Expanded)
Can you install a French cleat on a concrete wall?
Yes, but you must use Tapcon screws or sleeve anchors. I recommend mounting $2\times4$ furring strips to the concrete first, then screwing your cleats into the wood.
Do cleats damage drywall?
If screwed into studs, the damage is minimal—just a few small screw holes. If you use anchors and the cleat fails, it will tear out large chunks of gypsum.
Can you paint cleats?
Absolutely. In fact, painting the wall cleat a contrasting color makes it much easier to align your tool holders in a dimly lit shop.
How long should the cleats be?
The wall cleats should span the entire length of your wall. The tool-side cleats only need to be as wide as the tool holder itself—usually 6 to 12 inches.
Final Thoughts
A French cleat wall isn’t just about storage; it’s a shop philosophy. If you have a free Saturday and a sheet of 3/4″ plywood, stop overthinking it and start cutting. Your future self will thank you.
Floating Shelves: Stylish Storage & Easy DIY Guide by Admin September 8, 2025 DIY I still remember the first time I put up floating shelves. It wasn’t some big renovation—just a Saturday project in my living room. Instead of…
How to Build a DIY Couch With Storage by Admin May 31, 2025 DIY A couch is more than just a piece of furniture. It’s where we relax after a long day, binge-watch our favorite shows, or chat with…