I built my first set of cabinets the old way—table saw, clamps, and a full weekend gone. The next time, I used a CNC. Same kitchen, same materials… but it took a single morning.
Most people don’t realize this until they’ve wasted an entire weekend cutting panels that a CNC could finish before lunch. That’s the real shift CNC cabinetry creates: it doesn’t just make things easier—it completely changes the cost, speed, and precision of cabinet building.
What is CNC cabinetry?
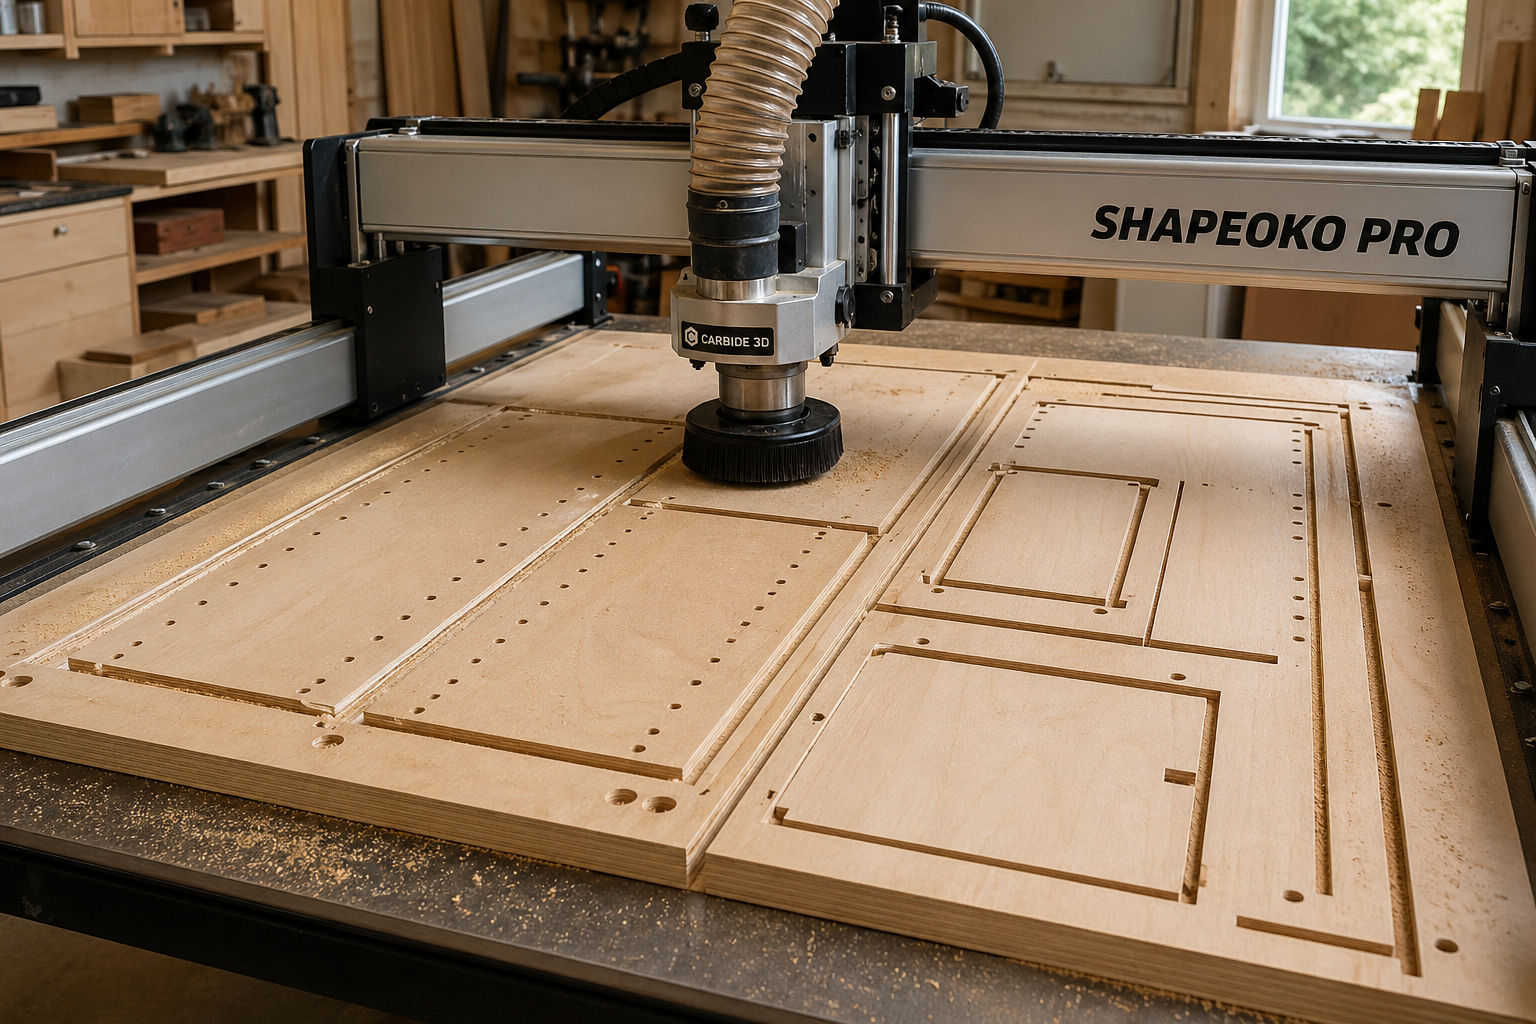
CNC cabinetry is the process of designing cabinets digitally and using a computer-controlled router to cut, drill, and shape components with extreme precision. It replaces manual cutting with automated “nested” layouts, reducing material waste and ensuring consistent, repeatable cabinet parts that fit together perfectly every time.
Best CNC Setup for Cabinet Making (2026)
To maximize your ROI, choose a setup that matches your production goals.
Best Overall Setup (DIY Shop)
CNC Router: 4×4 or 4×8 hobbyist-pro machine (e.g., Shapeoko, Onefinity).
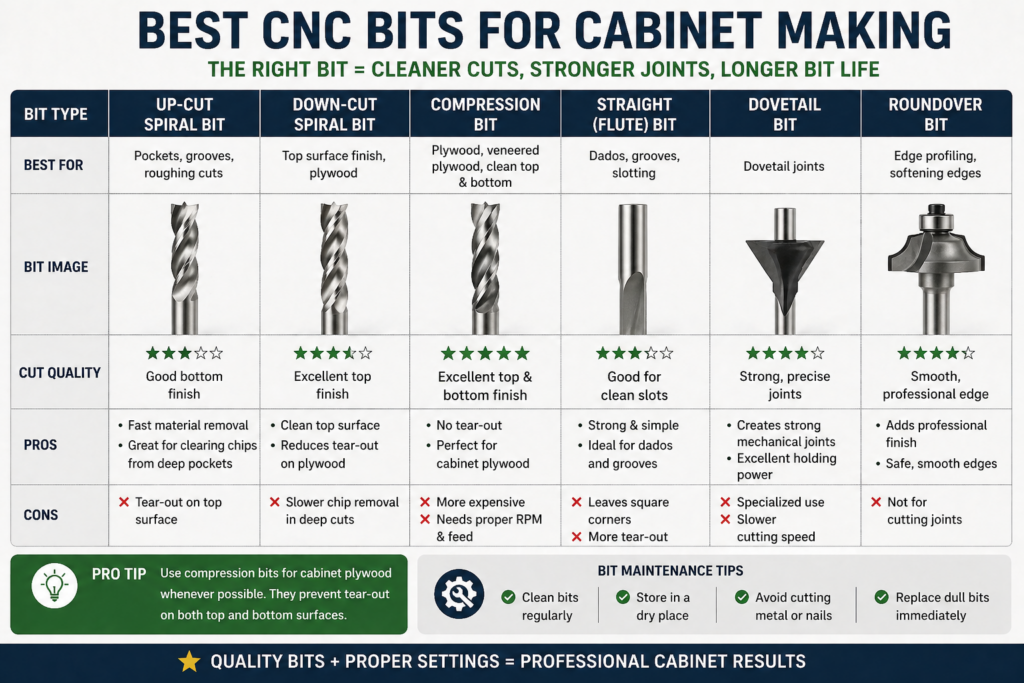
Conversion Tip: If you only upgrade one thing, start with a compression bit. It’s the difference between clean, professional panels and chipped plywood you’ll have to redo.
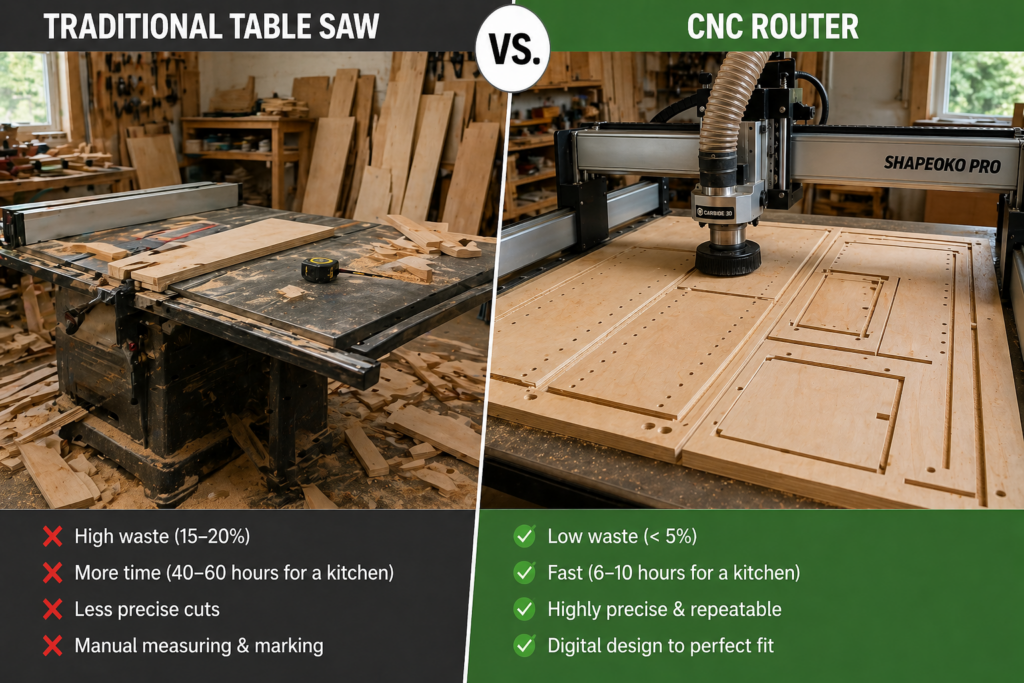
CNC Cabinets vs. Traditional Methods
Feature
Traditional Table Saw
CNC Router
Accuracy
+/-0.8 mm
+/- 0.05 mm
Labor Time
40–60 Hours (Full Kitchen)
6–10 Hours (Full Kitchen)
Complexity
Difficult (manual curves)
Simple (automated geometry)
Waste
15–20% (Manual layout)
< 5% (Software nesting)
Why CNC Is Actually Cheaper Long-Term
Most people focus on machine cost—but ignore labor.
If your time is worth $75/hour:
Traditional build (50 hours) = $3,750 labor
CNC build (10 hours) = $750 labor
That’s a $3,000 difference on a single kitchen.
Add reduced waste (saving $200–$500 in materials), and the machine can realistically pay for itself in one to two projects.
How CNC Cabinetry Actually Works (Step-by-Step)
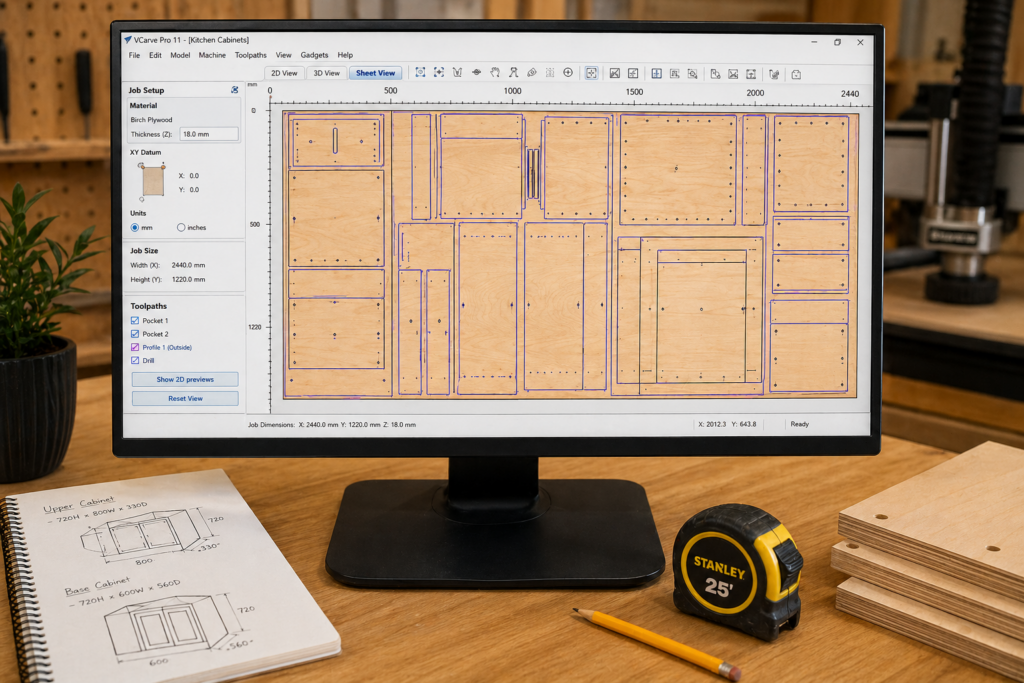
Design: Cabinets are created in CAD software with exact dimensions.
Nesting: Parts are automatically arranged on sheets to minimize waste.
Toolpaths: Software converts the design into G-code (machine instructions).
Cutting: The CNC router drills holes, carves grooves, and cuts panels in one pass.
Assembly: Pre-cut parts fit together like a “Lego” set with minimal adjustment.
Real CNC Cabinet Cost Breakdown (2026)
Plywood (per kitchen): $1,500 – $4,000
Hardware (hinges/slides): $500 – $2,000
CNC Machine (DIY): $2,000 – $15,000
Software: Free – $60/month
Shop Cut Service: $200 – $400 / linear foot
The Reality: A full kitchen that costs $15,000–$25,000 via a custom shop can often be built for $4,000–$8,000 using CNC. For many DIYers, the machine pays for itself in a single room.
Is CNC Cabinetry Actually Worth It? (The ROI)
Time is Money: A project that takes a week on a table saw is cut in hours.
Material Savings: Software “nests” parts closer than humans can. Check our guide on plywood thickness for different uses to ensure your digital offsets are correct.
Accuracy ROI: You stop wasting $100 worth of plywood due to human error.
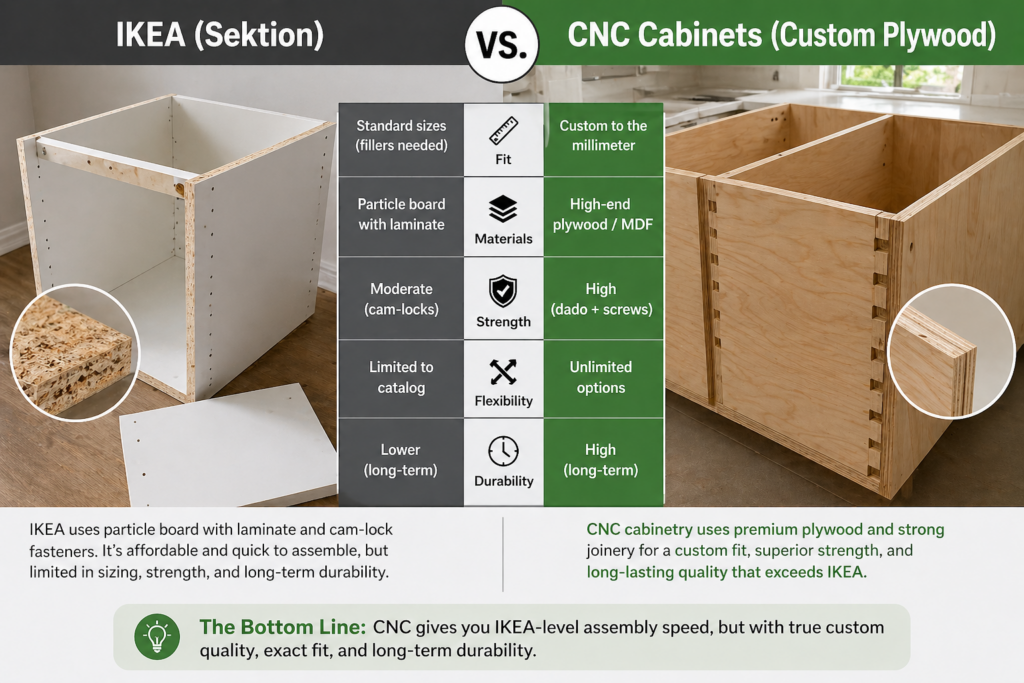
CNC Cabinets vs. IKEA Cabinets
Homeowners often ask: “Why build when I can buy IKEA?” Here is the reality of the two methods:
Feature
CNC Cabinets
IKEA (Sektion)
Fit
Custom to the millimeter
Standard sizes only
Materials
High-end Plywood / MDF
Particle board
Strength
High (Dado/Screw Joinery)
Moderate (Cam-locks)
Flexibility
Unlimited
Limited to catalog
The Bottom Line: CNC cabinetry gives you IKEA-level assembly speed but with heirloom-level custom quality. You aren’t limited to 3-inch increments; you build to your space.
Best Materials for CNC Cabinetry
The machine is only as good as the material you feed it. I’ve tested “big box” cheap plywood on a CNC—it looks fine until you hit a massive internal void, and the whole edge blows out mid-cut.
Birch Plywood: The workhorse of the industry. It offers great strength and clean cuts, though it can have occasional voids.
Baltic Birch: The premium choice. It is virtually void-free and has more plies per inch, making it the most stable material for high-end CNC joinery.
MDF (Medium Density Fiberboard): Ideal for painted cabinet doors. Because it is isotropic (no grain), the CNC can carve intricate 3D designs into the face without splintering.
Melamine: The budget-friendly choice for interiors. The particleboard core is easy on bits, and the prefinished surface saves you days of painting or staining.
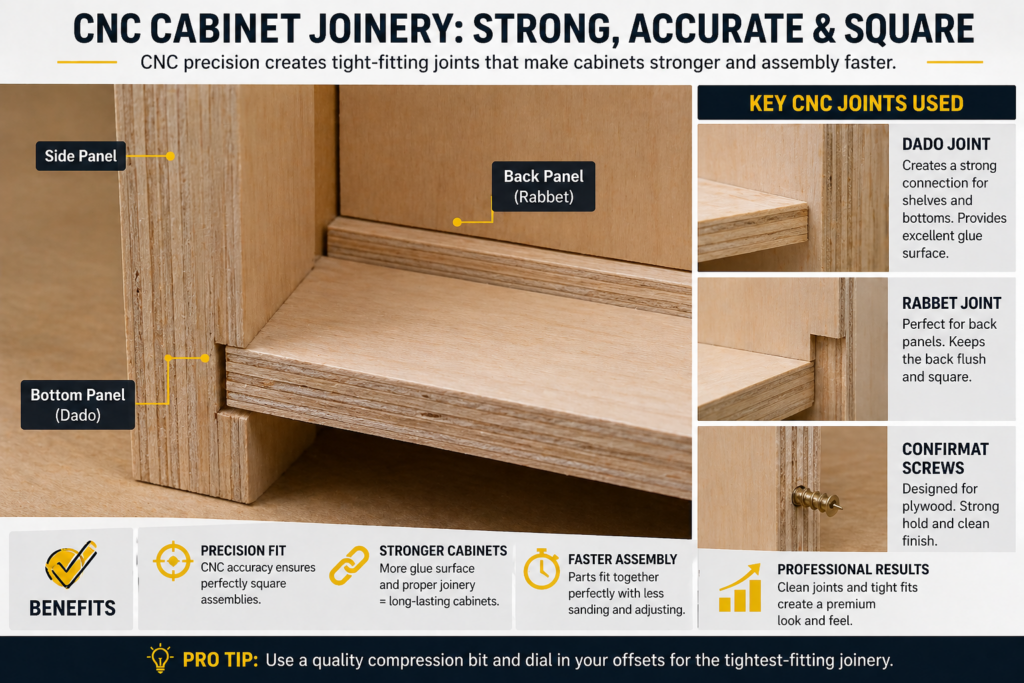
CNC Cabinet Joinery (Why It’s So Strong)
Traditional woodworking often relies on pocket screws or simple butt joints because cutting complex joints by hand is too slow. With CNC, joints aren’t “adjusted”—they either fit perfectly or your file is wrong.
Blind Dados: the gold standard for CNC. A tenon is machined into a panel edge, and a corresponding mortise is cut into the mating surface. Because the tenon is shorter than the full edge, the joint is hidden from the front, giving you custom aesthetics with industrial strength.
Rabbets: Perfect for recessed cabinet backs. The CNC zips a perimeter shelf into the rear of the box, allowing the back panel to drop in for a square, rigid assembly.
Confirmat Screws vs. Pocket Holes: While pocket screws work, CNC allows for perfectly pre-drilled holes for Confirmat screws. These have a deep thread and a large shoulder, designed specifically for the end grain of plywood and MDF.
DIY CNC Ownership vs. Hiring a CNC Shop
Not everyone needs to own a machine to benefit from this technology.
Option
Cost
Time
Skill Level
DIY Ownership
Lowest (Long-term)
High (Setup/Learning)
Medium-High
Local Cut Service
Medium
Low
Low
Full Custom Shop
Highest
Lowest
None
Most DIYers underestimate the initial setup time. Your first cabinet box will take the longest as you dial in your “feeds and speeds.” By the second box, you are moving at the speed of light. If you only plan to do one kitchen in your life, hiring a local “cut-only” service is often the smartest move.
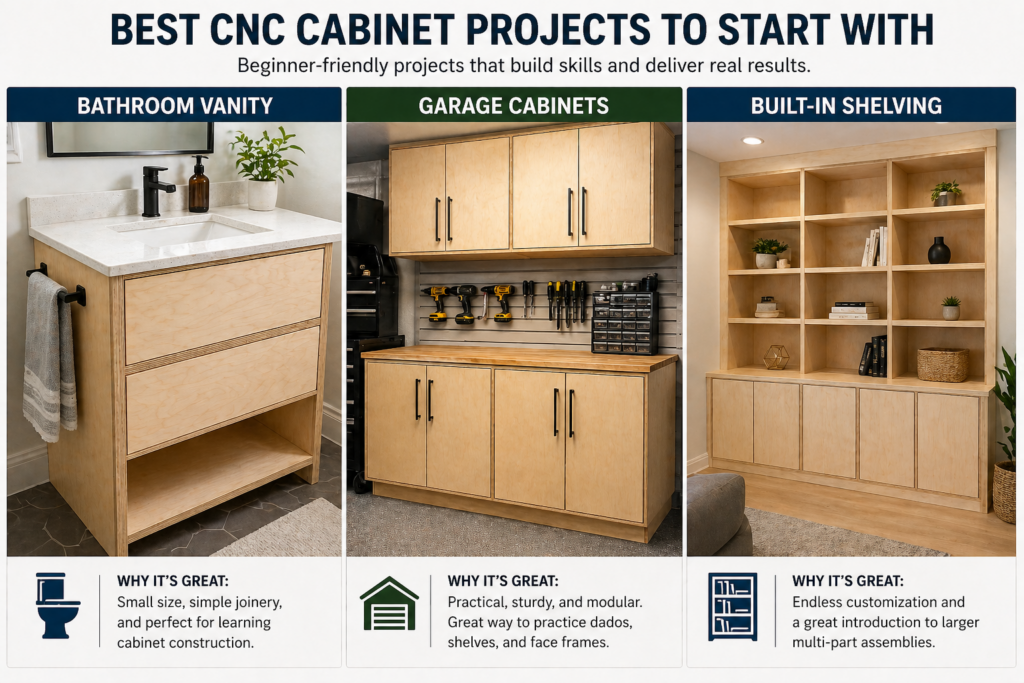
Best CNC Cabinet Projects to Start With
Don’t start with a complex 20-unit kitchen. Start with these high-win projects:
Bathroom Vanity: A small, manageable project that lets you practice moisture-resistant material handling.
Closet Systems: These are essentially just “open” cabinet boxes. They are great for mastering shelf pin hole layouts.
Garage Cabinets: Use cheap melamine or BCX plywood to practice your toolpaths without the stress of ruining expensive hardwood.
Kitchen Uppers: Once you’ve mastered the base boxes, uppers introduce challenges in door alignment and wall mounting.
Advanced Software & Workflow in 2026
In 2026, the software landscape has shifted toward Integrated Ecosystems. Gone are the days of manually drawing every line.
Parametric Design: Software like Autodesk Fusion allows you to change the “height” variable once, and every related panel, hole, and dado in your entire kitchen design updates instantly.
AI-Assisted Nesting: Modern CAM tools use AI algorithms to rotate and nest parts across multiple sheets of plywood, often achieving material yields above 90%.
Automatic Hole Recognition: High-end software can now “see” a 35mm circle and automatically assign the correct toolpath for a European hinge cup without human input.
5 Critical Mistakes to Avoid
The Biggest Beginner Mistake
Most beginners try to build a full kitchen as their first CNC project.
That’s a mistake.
CNC is fast—but only after your workflow is dialed in. Your first project should be a simple cabinet box or vanity.
Your speed increases dramatically—and mistakes become far less expensive.
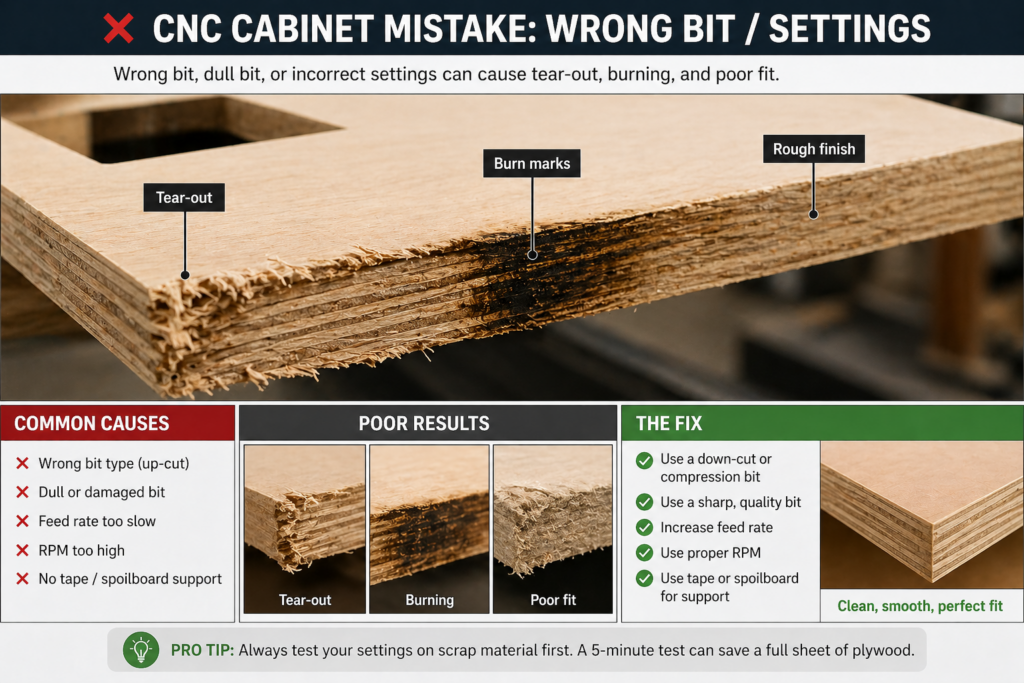
Wrong Bit Selection: Using a standard upcut bit will cause massive tear-out on the top veneer. Always use a compression bit.
No “Onion Skin” Pass: Small parts can move mid-cut due to vacuum loss. Use an “onion skin” pass (leaving 0.5mm of wood) to keep parts stable.
Ignoring the Feed Rate: Moving too slow burns the wood; moving too fast breaks the bit.
Poor Vacuum Hold-down: If your parts shift even 1mm, your joinery won’t line up.
Wrong Material Thickness: Plywood is rarely exactly $3/4″$. Measure your sheet with calipers and update your toolpaths, or have your plywood grading explained to avoid voids.
Maintenance: Keeping Your CNC Cabinet Shop Running
A CNC router is a precision instrument operating in a hostile, dusty environment. 2026 data shows that 80% of machine downtime is caused by poor maintenance.
Daily Care: Clean the machine bed and slide rails. Dust buildup in the rack and pinion can cause “steps” in your cuts, ruining panel squareness.
Spindle Care: Clean the spindle nose and tool holders daily. A single chip in the taper can cause “runout,” leading to poor finish quality and broken bits.
Vacuum Pump Maintenance: Monthly, clean and inspect the vacuum pump filters. Low pressure is the #1 cause of part movement during aggressive cutting.
Lubrication: Establish a schedule for greasing ball screws and linear guides. In a professional shop, this should be done every 500–1,000 hours of operation.
When CNC Cabinetry Does NOT Make Sense
CNC is powerful—but it’s not always the right tool.
You should stick to traditional methods if:
You’re building a single small project (like a nightstand or simple shelf)
You don’t have space for a CNC machine and a dust collection system
You have no interest in learning CAD/CAM software
Your total project budget is under $2,000
For one-off builds, the setup time can outweigh the time savings. CNC shines when you are building multiple cabinets or repeating designs.
It’s not for every project. Stick to traditional tools if:
You are doing a one-off small project (e.g., a single nightstand).
You have no space for a machine and a dust collection system.
You have no interest in learning CAD software.
Your total project budget is under $2,000.
FAQ: CNC Cabinetry (Snippet Capture)
Is CNC cabinetry hard to learn?
The machine itself is easy to operate. The learning curve comes from CAD/CAM software. Most users become comfortable after 2–3 small projects and then scale quickly.
Is CNC cabinetry cheaper than custom cabinets?
Yes. CNC reduces labor costs significantly, which is typically the largest expense in custom cabinetry. It also reduces material waste through digital nesting.
Can beginners use CNC for cabinets?
Yes, though there is a learning curve with CAD software. Most beginners start with simple “six-sided box” designs before attempting complex integrated joinery.
What is the best material for CNC cabinets?
Birch or Baltic Birch plywood is the industry standard due to its strength, flat surface, and how cleanly it handles high-speed router bits.
Do CNC cabinets require special screws?
While not required, Confirmat screws are highly recommended. They are designed specifically for the end-grain of engineered wood and provide a much stronger mechanical bond than standard wood screws.
We are entering an era of “Mass Customization.” AI design tools now allow users to simply type “L-shaped kitchen with 36-inch uppers,” and the software automatically generates the G-code. Small one-man shops are now competing with massive factories by using automated nesting and high-speed routers. The barrier to entry is dropping, and the quality of “home-made” cabinets has never been higher.
Conclusion
CNC cabinetry isn’t just faster—it eliminates the biggest source of frustration in woodworking: bad cuts. Once your parts fit perfectly, everything else becomes predictable.
If you’re serious about building cabinets that actually come out right the first time, start with your material and setup. That’s where the real leverage is. Start by selecting your materials (see our guide to the best plywood for CNC cutting), then move on to your machine configuration.