Christmas is coming. Actually, Christmas is always coming. Just ask any truly dedicated aficionado of this joyous holiday and they’ll tell you that the next Christmas season starts on December 26th. My wife starts Christmas shopping during the after-Christmas sales and plays Christmas music most of the year long.
For those of us who make the Christmas presents we give or who like to make our own Christmas décor, that early start on Christmas is necessary. I remember many a year when I got too late to start, and the decorations I was making had to wait for the next winter to go up. I’ve since learned and make any decorations that I want to in the summertime, while there’s plenty of time to get them just the way I want to, including the details of the paint.
Amongst the Nativity Scenes and Santa Clauses that everyone seems to make, wooden reindeer seem to have carved out their own a special place in Christmas décor, either together with Santa and his sleigh or separate. Even reindeer horns alone are used as Christmas decorations, although the whole reindeer is more common. There are several different types of these, all of which are fairly easy to make. By and large, they are mostly left unpainted, with the exception of a few accents, such as Rudolph’s nose or perhaps a colorful scarf.
Log Reindeer
Log reindeer are traditionally made from birch logs, due to the unique bark of the birch tree, which is associated with Christmas. However, they can be made of any sort of log available, in pretty much any size desired. Just make sure that the log being used is from a type of tree where the bark will remain on the log when the log dries. With oak, for example, shrinkage of the log causes it to separate from the bark as it dries. People make log reindeer for their front yards, as well as tiny ones to hang on the tree. If a grouping of reindeer or a reindeer family is desired, making a smaller log reindeer to take the place of a fawn is a nice addition to the grouping.
Log reindeer can be made in any size desired, although 4” to 6” diameter is the most common. There is some need to keep the proportions within a certain range, in order to have the reindeer look right. This is determined by the diameter of the log. Generally, both the body and the head are cut from the same piece of log, with legs, neck, tail and antlers cut from smaller branches. The head of the reindeer is usually 1.5 to 2 times the diameter of the log, while the body of the reindeer is 2 to 2.5 times the length of the head. Leave the bark on the log.
In addition to cutting the logs for the body and head, some additional pieces will need to be cut. Keep in mind in all these cases that the length of these sticks includes about 1” of material to go inside the body and/or head. In the case of the neck, that includes inserting it at both ends:
1 neck, 4” to 8” long, up to ½ the diameter of the body and no smaller in diameter than the legs
4 legs, 3 to 4 times as long as the diameter of the body, 1” to 2” in diameter
1 tail, short, roughly 1” in diameter
2 ears, made by cutting a 3” to 4” section of stick the same diameter as the legs at a severe angle, from one end to the opposite corner at the other end
2 antlers, made from branch tips, cutting off the very ends at an angle and thinning out the smaller twigs. The antlers need to be roughly the same size, even if they are different in appearance
Wherever one of the sticks is inserted into the body, the inserted end should be whittled, at least enough to remove the bark (to provide a good glue surface) the depth of insertion. Make sure that the whittling doesn’t cause the stick to taper and that it ends up as round as possible. If so desired, the tail can be whittled to a point, removing all the bark.
Start by attaching the legs to the body. To do this, drill four holes in the bottom of the log, two at each end, directly across from each other and spaced far enough apart so that the legs will angle out about 10 to 20 degrees. These holes can be drilled either with spade bits or forstner bits, whichever are available. Make the holes snug, but not so snug that the legs can’t be inserted. Glue the legs into these holes, making sure that they are snug.
Drill one hole in the center of the top, directly above one pair of legs. Glue the neck into this hole. Drill another hole in the center of the top, at the other end and glue the tail into this hole. Obviously, different sized drill bits will have to be used for the various holes.
Holes in the head for the eyes and nose. Most are left without anything in these holes, merely painting them black. However, small round ornaments can be glued into these holes to represent the eyes and nose. For Rudolph, a red ornament should be used for the nose. Then, drill holes and glue in the antlers.
At this point, it might be a good idea to give the glue time to dry, before continuing, especially if the legs aren’t extremely tight. Once dried, check the reindeer body and legs for balance, if it wobbles excessively, it might be necessary to cut a little off one of the legs. However, if there isn’t much wobble, don’t worry about it, as the ground will probably be slightly uneven anyway.
Glue the head onto the neck and allow the glue to dry. The log reindeer is now finished.
Wood Board Reindeer
Log reindeer are not the only type that woodworkers make for yard decorations. Reindeer are also made of wood boards, whether dimensional lumber, plywood or reclaimed lumber. These can actually take on a larger design variety than the log ones, allowing the woodworker to express their individual creativity.
Making this sort of reindeer starts with a pattern, usually full-sized. However, a smaller pattern can be used, if a video projector is available to project the pattern onto the wood that the reindeer parts are going to be cut out of. I find it much easier to draw these patterns out by hand, rather than to try and draw them on the computer.
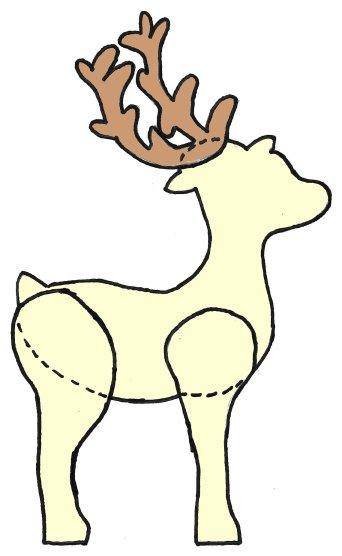
Reindeer pattern
This particular reindeer pattern actually consists of seven parts; 4 legs, the body and 2 antlers. Dotted lines show where the edges of the body are. In at least the case of the body, this will mean that several boards will have to be laminated together, unless plywood is used. One alternative to typical laminating, such as is done in making a table top, is to attach pieces of wood, perhaps even reclaimed wood, to a plywood base. Really this would only have to be done on the front side, if the reindeer are going to be placed close to the house, so that only one side would be showing. Then the outlines of the parts can be cut out of that.
Once the pieces are cut out, I would recommend rounding the edges with a router bit to eliminate the risk of splinters. This can also be accomplished by sanding the parts, but it is faster to do it with a router bit. Then the parts can be attached together, with one pair of legs and one antler on each side of the main body piece. To finish it off, the nose, eyes, antlers and hooves can be painted.
Keep in mind that the grain of the wood needs to be sealed, even if the reindeer is not to be painted. This is especially true of plywood, which tends to soak up water quickly along the edges, leading to delamination of the plywood. Of course, if pressure treated boards or plywood is used, they are protected against moisture, eliminating this worry.
Other designs of reindeer can be made out of plywood or boards, including those which are just silhouettes and don’t require any more work than cutting them out and painting them. The variety of potential designs is literally endless, dependent solely on the artistic creativity of the person making them.
A good place to look for designs that can be enlarged to turn into patterns is coloring books. The simple drawing in childhood coloring books are readily adapted to plywood cutouts. All that’s needed is to either blow them up on paper or to scan them into a computer and then project them onto the plywood that the design is to be cut out of. Projecting them also provides a very easy way of altering the size of the animal or other design.
Related Posts:
Wooden Garden Troughs by Admin May 20, 2021 DIY Adding green growing things to any living space just makes it more livable. Interior decorators and workplace designers figured this out long ago. That’s why…
How to Clean a Wooden Cutting Board by Admin June 4, 2021 Finish There’s a lot of false information around about wood cutting boards, mostly due to restaurants not using them. This has led people to think that…
How to Make Wooden Gears by Admin June 22, 2021 DIY Wooden gears and sprockets have been in use for millennia. While the actual history of early gears is rather unclear, they were first written about…