It doesn’t matter whether you’re building a large number of custom kitchen cabinets for your own home, a simple bathroom vanity or a place to store your tools out in your shop, basic cabinet construction follows a relatively straightforward formula. At their core, cabinets are simply large boxes that are further subdivided into shelves, drawers or doors. The formula requires two sides, a top, a bottom and a back; these components can be made using plywood available at most home centers. The front of the cabinet receives a face frame that outlines the type of subdivision that section of the cabinet will receive (shelf, door or drawer). Face frames are normally constructed using hardwood, but if the cabinet is going to be painted, the added expense of including hardwood may be skipped. The following outlines the construction of a simple wall of kitchen cabinets (floor cabinets) but may be easily adapted for any type of cabinet construction.
Sides
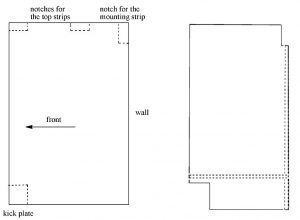
The first two components to make are the sides. Carefully choose good plywood for the sides keeping the good face on the outside of the cabinets– especially if they’re going to be visible. Cut several notches in the sides, one for the kickplate, notches for the top strips (optional) and one for the wall mounting strip in the back. See the image on the right. Cut additional center sections to divide the main box into the desired number of cabinets.
Cutting and attaching
How to cut
With a router or using a table saw with a dado blade, cut a groove towards the bottom of the panel that will receive the bottom as well as a narrower groove (¼” or 6 mm) along the back to receive the back panel. Make sure the groove in the bottom is above the kickplate and that the groove in the back is flush with the mounting strip. The figure on the left illustrates these cuts. In addition, these same cuts need to be made in each of the center sections (if necessary) on either side of the section, so make sure the cuts aren’t any deeper than ¼” (6 mm), otherwise the integrity of the center panels may be compromised. Also note that the initial notches for the wall mounting strip much must account for the additional depth of the plywood back, for the ends as well as any center panels. Once the end panels and center sections have been cut and grooved, cut the bottom panels for each section and fit them into the grooves cut in the previous step. Since plywood is dimensionally stable, gluing the bottoms into the grooves is fine and will probably provide additional stability to the cabinet. Attach the top strips (if incorporated) and the wall mounting strip to the ends and the center panels. Use both glue and screws to attach the strips to the cabinet carcass. With the wall mounting strip in place, cut a large piece of ¼” (6 mm) plywood for the back of the cabinet and attach that to the ends and center panels using glue and nails (or if using screws, predrill pilot holes for the screws). Attaching the back to the cabinet really confers a significant strength and stability to the carcass. At this point, the carcass is ready to attach directly to the wall. Unless the home is new construction, chances are that the floor will be slightly (to majorly) out of level. Shim the bottom of the end panels (and/or center panels) so that the top of the cabinet is level and then anchor the carcass into the wall using screws drilled into the wall studs. You can now measure, cut and install the kickplate.
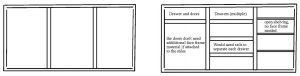
Now that the cabinet has been anchored to the wall, the face frame completes the cabinet carcass construction. The basic shape of the face frame will follow the desired cabinet divisions (drawers, open shelves or doors) and despite the variety, face frame construction also follows a standard construction formula. The most effective way to join face frame pieces together is using pocket screws, though simple butt joints would probably suffice. Most face frames are constructed using rails (horizontal) and stiles (vertical) to outline the desired cabinet divisions. To make the face frame, begin with the two rails that define the length of the cabinet. However, if the face frame is to be stained, make sure the stiles run completely from top to bottom. This avoids staining the endgrain of the rails—which will appear much darker than the surrounding wood. If the face frame is to be painted, then the orientation of the rails and stiles doesn’t matter. Make sure the top rail is flush with the top strips. The bottom rail can either be mounted flush with the bottom or form a bit of a lip with the bottom of the cabinet. Cut the two outside stiles and attach these four pieces together. Note: since walls are rarely plumb, getting the stiles to mate flush with the wall often requires some handplaning of the stile for a perfect fit. Therefore, when making the face frame, it’s advisable to cut the stiles slightly oversized (1/4–1/2” or 6–12 mm) to allow for this fine-tuning to the wall. If the cabinet is a free-standing unit, then the face frame can be mounted flush to the cabinet if desired. With the outline of the cabinet now constructed (glue and pocket screws), the last part of the face frame is to construct the center stiles, if any, followed by the outline of the subdivisions (again, if any). Cut the center stiles to length, make the width about twice the thickness of the center panel and attach to the face frame. For a bottom kitchen cabinet carcass with three divisions, the face frame will look like the graphic below; the picture on the right shows the different types of cabinet division possibilities.
Oven Base Cabinet by Admin October 16, 2021 Installing One of the key features of any kitchen is a range. In most kitchens, this means a combination stovetop and oven, built together into a…
Corner Wall Cabinet by Admin October 17, 2021 Installing One of the key elements of any kitchen is cabinet space. Lack of sufficient cabinet space makes it difficult to store everything we find in…
Sliding Cabinet Doors, Easy Guide by Admin June 7, 2023 DIY Sliding cabinet doors aren't used much in modern cabinetry, but they were a big part of mid-century modern furniture and cabinetry. With the resurgence of…