Lampshades go all the way back to the 18th century, in Paris, where reflectors were first attached to oil-burning street lamps. The reflectors were intended to direct the glow of the lamps downwards, making them more effective. Today, lampshades perform much the same purpose, directing light where we need it, while at the same time protecting our eyes from the glare of direct light. So for any lampshade to be effective, it has to both allow light through, while cutting light off at the same time. In most cases, the majority of the light coming out of the lampshade is coming out of the top and bottom, where it can reflect off of the ceiling and tabletop.
These lampshades come in an almost infinite variety of styles and shapes, made of a variety of materials, although most lampshades follow some similar patterns. Matching the size of the lampshade to the size of the lamp is important, both from an aesthetic as well as a functional point of view. In most cases, the lampshade should account for about 40% of the lamp’s overall height, with the base providing the other 60%. Ideally, the shade will come down just far enough to cover the working part of the lamp, without overlapping any of the lamp’s decorative base. The width of the shade should be about double the width of the base.
Most lampshades are made of fabric, paper or plastic, although there has always been a place for wooden lampshades, especially where more elaborate or highly figured modern lamps are desired. Wooden lampshades can either be made of solid strips of wood or of wood veneer. Almost without exception, lighter colored woods are used, as dark colors tend to absorb light. In the case of veneer lamp shades, highly figured veneers provide exceptional shades, allowing the light shining through to bring out the grain pattern of the wood. If a dark colored wood is used for a lampshade, the inner surface should be painted white (or off-white) or covered with a light colored material.
Some people might be concerned about a wooden lampshade, wondering if it could burn. The filament of an incandescent bulb is hot enough to ignite wood, if it were in direct contact. But the glass of the light bulb is only 150 to 200°F. That’s not even hot enough to burn paper, which ignites at 451°F. Wood burns much hotter and today’s light bulbs don’t get anywhere near as hot as an incandescent bulb does.
It is literally impossible to cover all the possibilities of design for wooden lampshades in one article. Nevertheless, we will explore a few different options, giving a framework of information that can be experimented with to create a wide variety of different lampshades.
One of the most basic considerations for any lampshade is the overall shape. There are wire frames that can be purchased and used for making lampshades or the wire frame can be salvaged from an old lampshade that’s on its way to the trash. However, a wire frame is not required, as all that’s really needed for most wooden lampshades is a simple ring of wood at the top and bottom. The decorative wood covering will provide the rest of the structure needed.
Wood Strip Lampshade
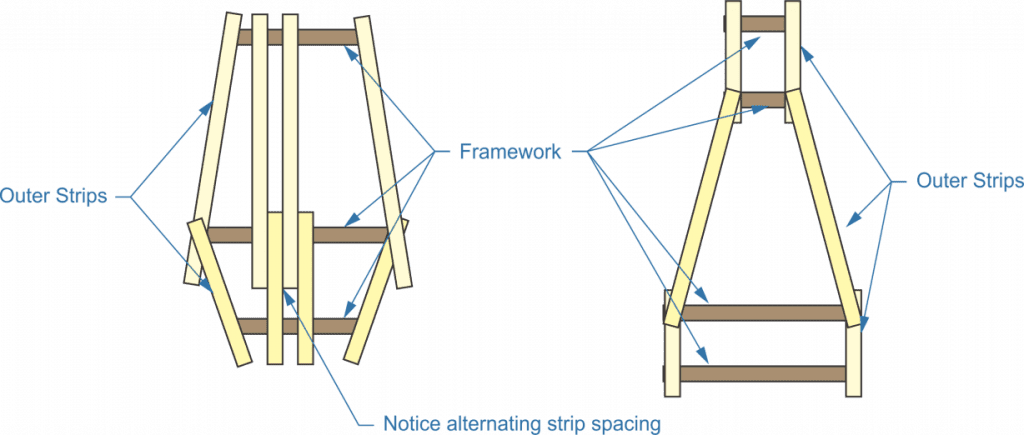
Most wooden lampshades are made of strips of wood. These wood strips can either be the same size and type of wood or they can alternate. Either way, they are attached to the frame. While that might seem like it would limit the design possibilities, it really doesn’t. Lampshade frames can take on a large number of different profiles, such as those shown below.
Wood strip lampshade
Please note that in both of these cases, the overall dimensions can vary considerably, such as making the bottom of the one on the right much wider, such as what one might find over a poker table. In both cases, the strips of wood are attached all the way around the shade, alternating between the upper and lower strips. This provides alternating spaces for the light to shine through, while providing some protect from glare.
In order to make this sort of lampshade, start by cutting the wood strips, ripping them on a table saw or band saw. It would be best to smooth them out on a planer after that, eliminating the saw marks on all four sides. The framework is nothing more than rings cut out of plywood or hardwood. finish the plane and sand those as well, before assembly.
The tricky part of this is the assembly. The various pieces of the framework need to be held in place, parallel to each other, while the wood strips are attached around them. Once attached, the wood strips will hold the frames together. That raises the question of how to hold the frames in place, while attaching the strips?
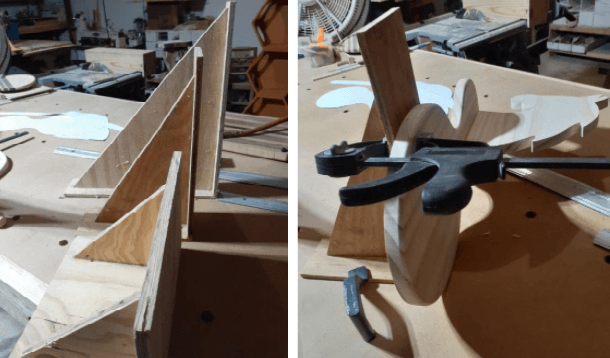
I have a number of wood squares I’ve made out of scrap wood, which work ideally for holding things like this. All they are is the triangular corner cut off of a sheet of plywood, with two strips of plywood attached to them. But each of them is exactly 90 degrees, allowing me to use them to hold things vertically on the workbench, by simply clamping those parts to the squares.
Wood squares and rocking horse parts clamped to wood square
Notice in the picture on the right that the wood square is held to the workbench by a hold fast and the part is held to the wood square with a clamp. It would be no harder to set a series of these in line, with each of them holding a separate part of the frame. Spacing blocks between them, with long clamps holding the separate frame pieces against those spacing blocks could be used to ensure that spacing is maintained evenly while gluing.
I would recommend using cyanoacrylate adhesive, more commonly known by the trade name “Super glue” for assembly of the lampshade. Not only is cyanoacrylate fast drying, but works extremely well with porous materials that have some moisture content, like wood. The finished lampshade won’t be subject to much in the way of movement of stress on the parts, so there is little possibility of the adhesives coming loose.
Once a few key pieces have been installed, such as installing at every 90 degrees around the lampshade, the framework can be detached from the wood squares, allowing it to be worked on freehand, where it is easy to turn the pieces as needed for access.
While running the strips vertically on the lampshade seems the natural way to go, and is, in fact, the more common way to make a wooden lampshade, it is possible to run the wooden strips horizontally as well. With this sort of design, it is not necessary to use any sort of framework, as the strips form their own framework.
The idea here is to make a number of geometric wood rings out of wood, such as shown in the drawing below. The one on the left is an octagon and the one on the right is a hexagon; but any number of sides can be used. All the pieces are identical and are glued together to make the shapes. Then the shapes are stacked on top of each other, gluing them together to make a geometric cylinder.
Horizontal wood strip lampshade
This style of lampshade will probably take longer to make, just because of having to glue the rings together. That requires a band clamp to hold the pieces while the glue dries. But once the rings are made, final assembly of the lampshade is extremely easy. The pieces are just stacked and glued together.
In both of the drawing above, two alternating layers are shown, with the top layer imposed upon the lower one so that its points are equidistant between the points on the lower one. But in the case of the hexagon, the points could be offset by 15 degrees, instead of 30 degrees. Subsequent layers could be added at every 15 degrees, creating a spiral pattern.
A Modification – Using Plywood
A very similar sort of wood strip lampshade can be made out of pieces cut from thin plywood. This provides an option of making the different pieces curved, rather than straight. A simple possibility might be to make each of the pieces like a slice of orange peel and then assemble them together so that they form a ball. But this assembly option offers us many more possibilities, like going with asymmetrical designs.
Plywood strip lampshade
In the lampshade design above, a series of pieces of similar design are cut out of ¼” thick plywood. But as is readily visible in the series of images to the left, each of the pieces has the bump in a different, progressing position. When these pieces are then assembled to framework rings at the top and bottom, it converts those bumps into a continuous bump that spirals down the otherwise straight cylinder.
The same concept, but much more complex can be done to make a wide variety of different, but similar lampshades. Modifying this bump to be larger and more triangular, on a longer lampshade, could provide an appearance much like a screw thread. Adding a twist to the pieces, as they are glued to the framework rings at the top and bottom could add an additional element to the design.
Another way of using plywood is to cut a number of concentric rings, either round or oval, and assemble them together, with each one offset X number of degrees from the next, creating a spiraling hole, with the bulb in the middle of it.
Making Lampshades out of Wood Veneer
The other way of making wooden lampshades is out of wood veneer. This can either be purchased veneer or veneer cut in the workshop. The nice thing about wood veneer is that it is thin enough that light will shine through it, illuminating the veneer itself. With a highly figured wood, the lampshade can become a thing of art, all by itself.
Wood veneer can be used in one of two ways. The first is as I just mentioned, where a highly figured wood is used to make a simple lampshade, allowing the wood grain to become the design. The other is to use strips of wood veneer, allowing the geometry of how those strips are attached together to become the design. In this second case, fine-grained woods are usually used, rather than the more highly figured woods.
Veneer lampshades which are intended to show off the wood grain are normally quite simple, either round or square. The ends of the veneer are either glued together or stitched together to hold them together. When glued, the glue seam becomes the “back” of the lampshade. When stitched, leather is usually used, in an X stitch, allowing the stitching to become part of the design.
While most lampshades of this type are simple cylinders, a nice effect can be achieved by using the live edge from the veneer to form the bottom of the lampshade, depending on whether the live edge is available for use and how it looks.
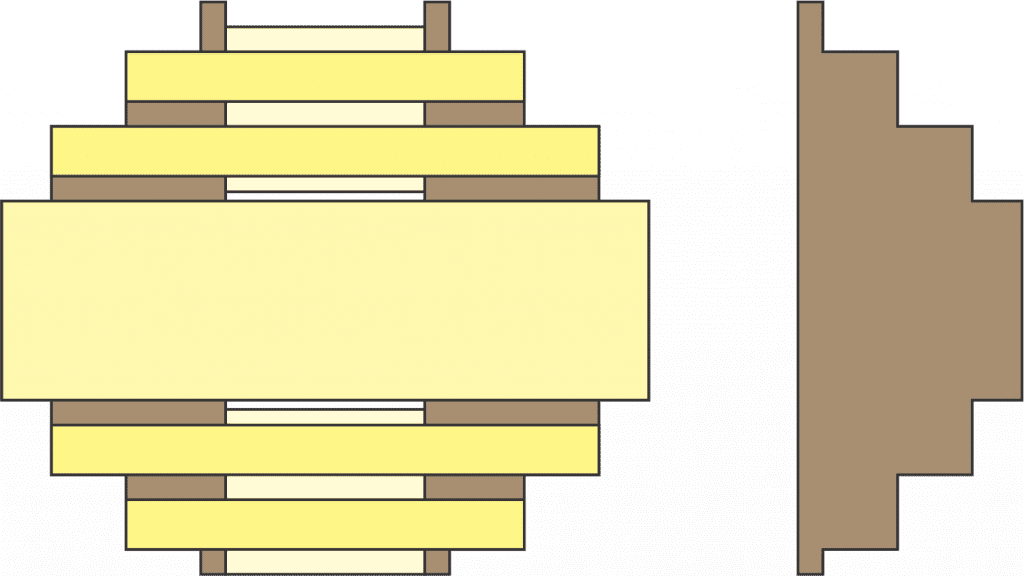
When making a wood veneer lampshade out of veneer strips, it is helpful to have something that can be used as a mold to form the strips around. It may also be necessary to make some sort of framework to attach the various pieces of veneer together on, depending on the design of the lampshade. In the design below, three to four of the framework pieces, (in brown) shown to the right, would be needed to attach the various pieces of veneer to (shown in shades of yellow). All of the rings of veneer are attached to the outside of the framework pieces, with the exception of the smallest diameter ring, which is attached on the inside of the framework.
Veneer lampshade
Making a Wooden Hanging Lamp
Some people like using hanging or pendulum lamps in their home, rather than table lamps. One of the beauties of making lampshades out of wood is that it takes very little change to the design, in order to make the lampshade into a hanging lamp. The top framework element, which is normally a ring on a lampshade, has to be changed over to a solid piece and a lamp socket needs to be mounted into it. Then the lamp can be hung by a chain, attached to two or three screw hooks, inserted into that solid piece of top frame.
Related Posts:
Making Wooden Bathtubs Guide by Admin September 19, 2023 DIY Wooden bathtubs require planning, precise construction, and maintenance. However, they are an elegant and unique addition to your bathroom. Guide to Set Started Materials Needed:…
How to Make a Wooden Sword by Admin July 14, 2025 DIY 1. Why I Still Make Wooden Swords I wasn’t planning to make a wooden sword that day. I just needed something—anything—for my kid’s last-minute costume.…
How to Make Wooden Gears by Admin April 2, 2025 DIY Building Wooden Gears — My No-Nonsense Notes from the Garage If you've ever thought about building wooden gears for a clock, a jig, or just…