Live edge countertops are very trendy right now, incorporating the natural beauty of wood into a home’s décor. But this actually isn’t a new style. Using natural wood slabs for furniture goes back at least as far as the hippies of my parents’ generation and even hearkens back to the homemade furniture of the Colonial and Pioneering eras. Although I will have to say, modern live edge countertops are much more attractive and durable than those earlier examples.
The term “live edge” applied to these countertops is in reference to the fact that the edge of the slab of wood used in making them is the actual edge of the log from which that slab of wood was cut. This gives a rough, often freeform edge, which is attractive and gives the feel of inviting nature into your home.
Many people who make live edge countertops or tables cut their own wood slabs in their own sawmill. That’s not an option for many of us, who don’t have a sawmill or even one of the sawmill attachments for a chainsaw. Rather, we must depend on being able to find an appropriate slab that we can use for our countertop.
Fortunately, these aren’t all that hard to find. There are a number of small businesses and lumberyards around the country who are making live edge wood slabs available to the public. If your local lumberyard doesn’t carry any, then I’d check CraigsList to see if anyone is selling them. You can also find them on eBay, although shipping can be costly.
It is theoretically possible to find live edge slabs for virtually any type of wood, but in reality you’re more likely to find live edge slabs for trees that grow in that region. In the United States, that means that walnut, oil, red cedar, maple and cherry are the most likely to be found.
Slabs will range anywhere from 1 ½” to 2 ½” thick. Thicker than that is a waste of material. Thinner slabs can be a problem, in the sense that after flattening they might be a bit thin. Be sure to check any slab you buy for flatness, to the point of taking a straight edge and winding sticks with you when you go to look at it. If the wood has been properly dried after milling, this shouldn’t be much of an issue. But since most of it will have been air dried, rather than kiln dried, there is always a chance that it will be bowed or twisted.
Drying Live Edge Slabs
When you buy a life edge slab for a countertop or table, it may not be fully dried. In most cases, the only drying that will have been done is air drying, possibly outdoors, but hopefully in a covered shed. Air drying in this manner requires roughly one year per inch of wood thickness. Nevertheless, it is always a good idea to start with air drying, even if you will be using kiln drying to finish the process.
You can kiln dry these slabs at home, fairly easily. Kiln drying of hardwoods is normally accomplished at 120 to 190 degrees Fahrenheit, a fairly low temperature. You can attain this temperature in a temporary solar kiln, made of visqueen plastic over a wood frame. If you have the space and prefer to do your kiln drying indoors, you can make a similar structure out of visqueen, blowing warm air through the kiln from an electric or propane heater. A dehumidifier at the other end, to suck out the moisture can add to the drying ability of your kiln.
It is important, whenever drying wood, to stack it carefully, ensuring that it is flat across its length and width. Cut 1 ½” x ¾” wood spacers to put between the slabs or boards, so as to provide for good airflow between the boards. These should be placed every 12 inches. Weigh down the stack with cinder blocks or something else heavy.
One key to accomplish effective kiln drying, without warping or twisting the boards, is to seal the ends of the boards, before starting. Normally, moisture will escape from the ends about 12 times faster than through the rest of the board. Sealing the ends will help to prevent checking caused by the ends drying faster than the middle of the board.
All wood will shrink slightly when drying, so if you are looking for a particular size, you want to cut the wood oversize, perhaps as much as 15% to 20%.
Drying times vary, but should take somewhere around 28 days. you’re looking for a finished moisture content of 6% to 8%. As the slabs reach this moisture content, check them regularly with a moisture meter.
Making a Natural Live Edge Countertop
It is important with any live edge countertop to level the surface before doing anything else. Wood is an organic material, so chances are that it won’t dry evenly. Even with all the right precautions to protect it from warping and twisting, there is still a chance that your wood won’t come out straight and flat. With that in mind, it’s always a good idea to check it before using it and then flatten it as necessary.
There are several ways of flattening a board or wood slab. The oldest is to use a plane, with a pair of winding sticks to show you where material needs to be taken off. This is a time-consuming method and you’d better be good with a plane if you’re going to try it.
More commonly, these slabs are leveled with a router. This works best if you make a bridge for the router to sit in, which spans over the slab and guides off the surface of your workbench. A large, straight bit can be used, passing it back and forth over the slab to cut off high areas, while leaving the low areas alone.
Once leveled, the slab can be sanded smooth. Start sanding with a coarse grit sandpaper, then work your way gradually through various grits, up to a 220 or 320 very fine grit. The better a sanding job you do, the better your final finish will turn out.
Take care, while sanding, to keep your sander in constant motion, so that it doesn’t sit in one place and dig in, creating a low spot. Also be sure to keep the sander’s pad level on the slab, so as to avoid any chance of gouging.
Simple Live Edge Countertop
The simplest way of making a live edge countertop is to leave the edge natural so as to enjoy the contours of the wood. This is commonly done for raised portions of countertops that are used as a breakfast bar or buffet. In these cases, the only modification that needs to be made to the slab, besides leveling it and cutting it off to length, is to remove the bark from the live edge. Bark left in place will crumble eventually, damaging the integrity of the countertop.
The slab can be attached to the cabinets or whatever other supporting structure in a number of different ways:
If there’s a stem wall behind the cabinets, then glued dowel rods into the top plate of that stem wall is an ideal connection. In this case, dowel rods of ¾” or greater diameter, into holes that are 1/16” bigger in diameter work well.
Shelf brackets, especially wood ones, can be used under the countertop to support the cantilevered part.
Custom made metal brackets, out of 1”x 2” rectangular steel tubing, provide a very strong option.
In this case, finish will normally be applied to the countertop after it is installed. A high build urethane varnish is a common finish to use, although high build epoxies work as well. Rarely is pigmentation added to the finish for this sort of countertop.
Making a Clean Edge Slab
While not technically a “live edge” it’s not uncommon for people to modify their live edge slab, embedding it into epoxy to make a rectangular countertop. This is especially useful for the back edge of the countertop, where you need a straight edge to meet up with the backsplash.
If the slab you are working with is wide enough, it’s possible to merely cut off the back edge straight, eliminating the need to embed the slab in epoxy. However, that adds considerably to the cost of your slab, as slabs which are 28” wide or wider are hard to find and considerably more expensive than narrower ones are.
Your other option is to embed the slab in epoxy. While this usually hides the live edge, it is still possible to make the live edge visible by using a translucent epoxy, rather than an opaque one.
To embed the slab in epoxy, you’ll first need to make a mold for it on a flat workbench, which is large enough to accommodate the finished size of your mold. This should be slightly wider and deeper than the finished size of your slab. It only needs to be long enough for the slab to fit; any longer will just waste epoxy. The extra width will allow you to make clean finish cuts for your edges, while the extra depth will help prevent spills. The inside of this mold needs to be covered with a waterproof tape, such as Tyvek tape or G-tape.
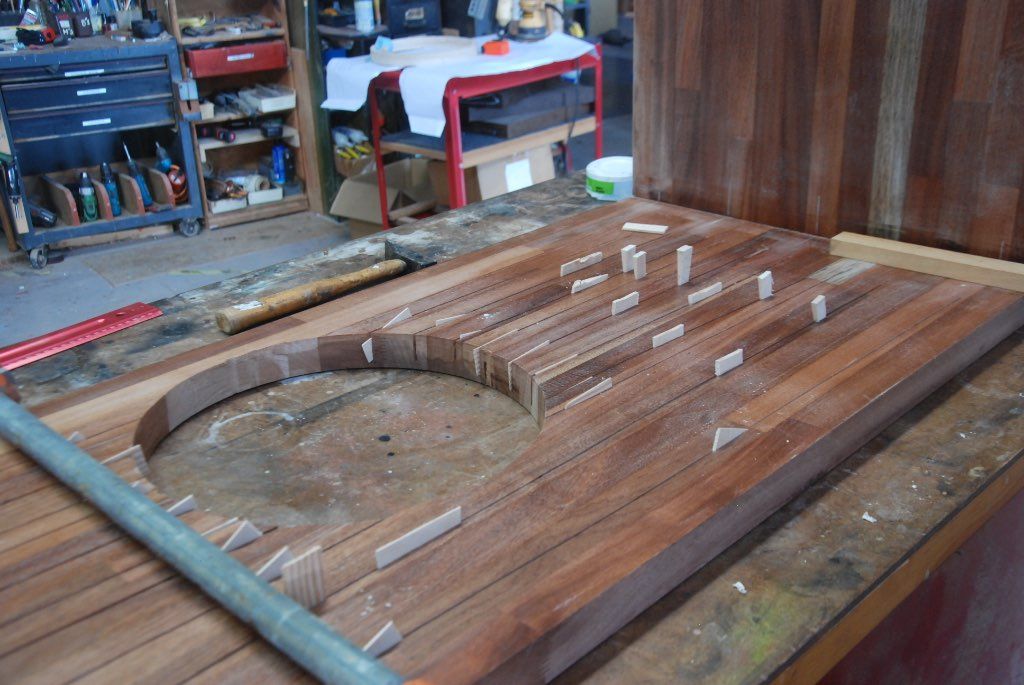
Set the slab into the mold, centering it as you want the finished countertop to look. If you have cracks and checks in the slab, which you need to fill, make a dam around those with silicone caulking, and allow it to dry.
It will take a lot of epoxy to fill your mold. Calculate the volume of the space you will need to fill, in cubic inches. That’s length x average width x depth. There are 231 cubic inches in a gallon, so divide the volume by 231 to figure out how many gallons of epoxy you’ll need. You want to make this as one continuous pour, so don’t short-change yourself in your calculations.
Mix epoxy, adding tint as needed. Typically, these are made with black-tinted epoxy, although you can use any color you like. If you use less than the required amount of tint, you can get a translucent look, allowing you to see some of the live edge. Pour the mixed epoxy into the mold, stopping flush with the top of the slab. Accuracy is important here, as if you are too low, you’ll need to sand off the top of the slab to meet the epoxy and if you use too much, you’ll need to cut it off to meet the wood.
Use a soldering torch to heat the surface of the epoxy and cause air bubbles to pop. Then allow the epoxy about three days to cure, before disassembling your mold and revealing the finished slab. If you created a dam to keep epoxy in a crack, cut the caulking off with a chisel.
You will most likely need to do a final cut around the edges of the countertop, especially on the exposed edges. Make this cut with a fine-toothed blade in a track saw or a circular saw with a guide. The track saw gives you the advantage that you won’t be straying from the straight and narrow. Finish these edges by using an edge trimming tool, such as you would use for laminate and rounding the edges with a 1/8” or 1/16” rounding bit in your router.
No matter how careful you were with your pour, you’ll still need to sand the surface to smooth it out. If your epoxy or wood are too high, you’ll need to level the entire thing again with your router, before sanding. As before, you’re going to want to start out with a coarse sandpaper and work your way down, ultimately going to a 400 grit sandpaper, especially on the epoxy.
Wax makes a very nice final finish for the wood and is considerably easier than the other option; that of actually polishing the epoxy. Polishing requires continuing with successively finer abrasives, up to 3,000 grit, then switching over to a polishing compound. It gives a great finish, but is very time consuming.
You can cheat on a finish, by pouring a thin coat of a high-build epoxy over the entire surface of the countertop and allowing it to set. That may not end up quite as level and smooth as sanding and polishing, but it will give you a very attractive finish.
The river countertop is very similar to what we just discussed, with the exception of creating the space for the river itself. This is accomplished by cutting the live edge slab down the middle, using a track saw or circular saw with a straight edge. Depending on the final design you want, you might want to make this cut slightly off-center, allowing you to move the river closer to the edge of your counter.
The two half slabs are then placed in a mold, just as we discussed above, with the exception that the cut edges will go to the outer edges of the mold, with the live edges facing each other, forming the river banks.
The river bed can be left plain or modified. It is very common to use a translucent epoxy mix, either blue or green, for the river, so what makes up the river bed can be important. While many people leave this plain, it’s also possible to use:
A thin piece of wood, especially a wood burl, cut to fit
Gravel
Mosaic tile
Another option is to pour a thin layer of opaque epoxy into the river, allowing it to harden and become the river bed. Then a translucent epoxy is poured over it, to be the “water.” This provides the translucent water look, without the countertop ending up see through.
The translucent epoxy can be swirled, giving the impression of moving water. To do this, don’t mix the dye fully into the epoxy. Then, once it is poured in place, swirl it around with a stick. Additional dye can be added at this point, if necessary.
Each river made in this way is unique, depending on the live edge that the wood provides, how the slabs are placed, the coloration of the epoxy and the way it is poured. Before attempting such a countertop, take some time to look at what others have done and get some idea of how you would like your finished countertop to turn out.
How to Use Edge Banding for Plywood Like a Pro by Admin January 19, 2026 Repairs Walk into any modern kitchen or look inside a custom-built cabinet, and you’ll see a neat, finished look along the exposed edges of plywood or…

")

")
