When I built my first exterior wall, I had no clue what I was doing. I was halfway through a shed build when I suddenly realized, “Wait, how do I even start framing this thing?”
That was a few years and a lot of 2x4s ago. Now I’ve got my own process down. It’s not fancy. It’s not from a book. It’s just what’s worked for me after screwing up enough times.
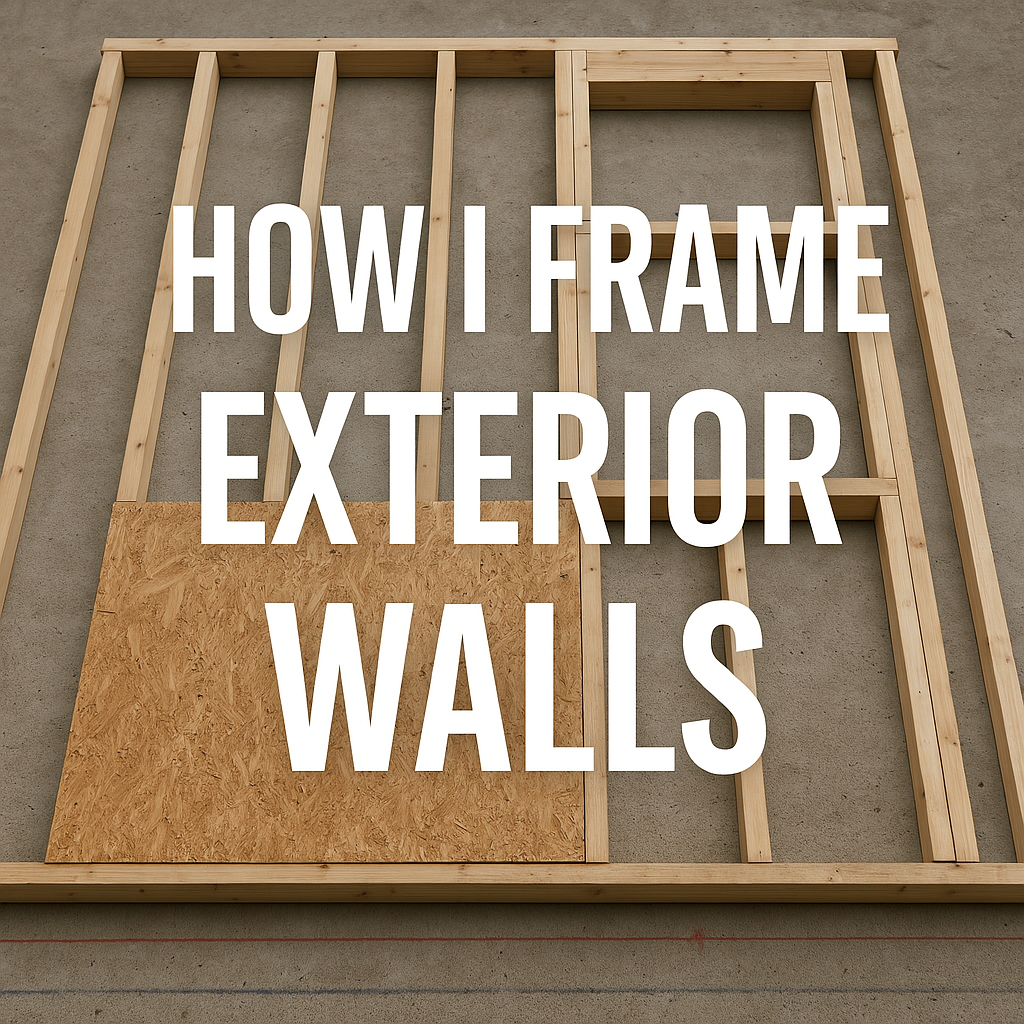
If you’re building a shed, a garage, or even something bigger, here’s exactly how I build exterior walls from start to finish.
What I Use (Tools + Materials)
You don’t need a high-end setup, but here’s what I always grab first:
Tape measure and chalk line
Speed square
Circular saw (or miter saw if it’s nearby)
Framing nailer (or a hammer, if you’re patient)
A pile of 2x4s or 2x6s (don’t cheap out here — warped lumber sucks)
Sheathing — I usually use plywood or OSB
A buddy to help lift the wall (I’ve tried solo… not smart)
If I had to pick one “must-have,” it’s my nail gun. Makes life easier, especially when you’re working alone.
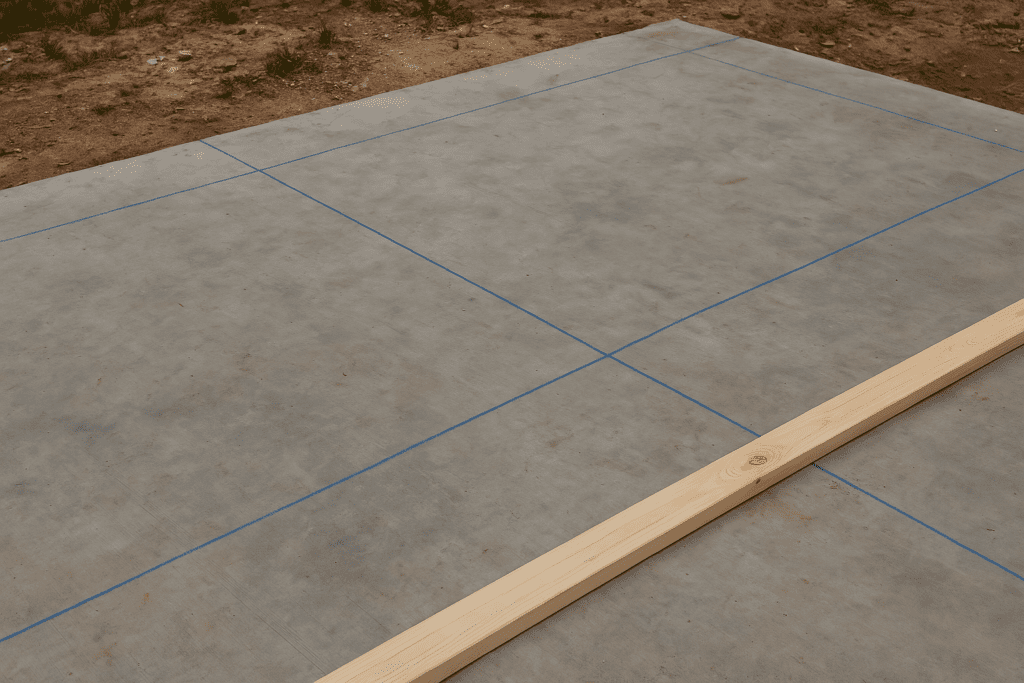
Step 1: Lay It Out
First, I snap chalk lines on the subfloor or slab where the wall will go. Then, I sketched where the doors and windows would be.
This step takes five minutes but saves you hours later, especially when you realize you forgot to leave room for a door.
Step 2: Stud Spacing
Lay the top and bottom plates side by side and mark your studs. I do 16″ on center, which starts with a 15-1/4″ mark for the first one.
Use a speed square. Trust me. And mark where your jacks, kings, and headers go now — it’s a pain to figure it out later with nails in your hand.
Step 3: Cut the Studs
This is where I usually cut everything in batches. For standard walls, 92-5/8″ is my go-to stud length. That plus the top and bottom plates gets me an 8-foot fence.
I cut all the jacks, headers, and cripples now too — better to have everything ready before nailing.
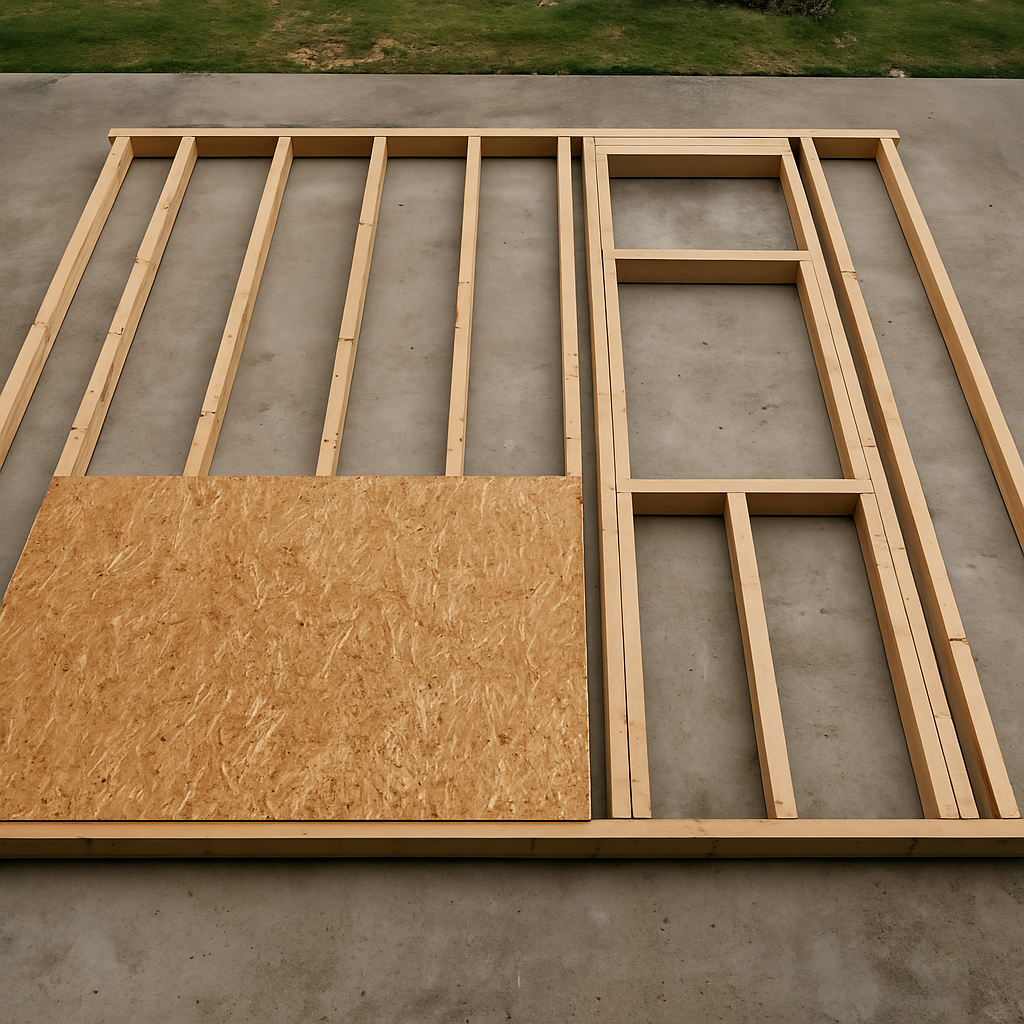
Step 4: Frame It Flat
I always build walls flat on the ground. Top and bottom plates on the ground, studs in place, nail it all together.
Once I have a few nails in, I check diagonals — corner to corner — to make sure it’s square. Fix it now, or you’ll be fighting it when you’re raising it.
Step 5: Sheathing Before Raising (Most of the Time)
If there’s space, I’ll tack the sheathing on while the wall’s still flat. Way easier than doing it vertically. Just line up the bottom flush with the plate and nail it down.
Some folks skip this, but if you’re working with someone, it makes raising the wall a lot sturdier.
Step 6: Lift and Brace
Me and a buddy lift it slowly, one end at a time. Once it’s up, I tack it down and check it for plumb with a level. Brace it in place while you move to the next wall.
Pro tip: Don’t try to rush this alone unless you like chiropractic visits.
Step 7: Rinse and Repeat
From there, I just repeat the process. Next wall, next corner. Once you’ve got the first one up, the rest go faster. Just make sure the corners tie together tight.
Connecting Corners and Door/Window Framing
One thing I didn’t think much about early on was how to properly frame corners and openings. I figured, “Eh, I’ll just throw some studs in and call it a day.” Yeah — don’t do that.
When two walls meet, you want something solid to tie them together. I usually use three-stud corners — two studs nailed together like an “L,” and then one more facing the inside so the next wall has something to anchor into. That setup also leaves room for insulation, which is a win if you’re planning to finish the interior later.
For windows and doors, it’s all about getting your header height right. I’ve messed that up before — framed a window too low once and had to cut it out and redo the whole thing. These days, I measure rough openings carefully and dry-fit the header before nailing anything. If the door says it needs a 82-1/2” rough opening, I don’t try to fudge it. Just follow the spec and save yourself the headache.
Another small thing that makes a big difference: I always add blocking for future things like shelves or siding transitions. You don’t think you need it during framing, but you’ll be kicking yourself down the road when you’re trying to screw something into thin air.
Warped lumber ruins your day. Pick straight boards. It’s worth it.
Use screws on corners if needed — sometimes nails don’t hold like they should.
Check for a square every time. It’s easier to fix on the ground than after it’s nailed down.
Always have more 2x4s than you think you need.
What Comes Next?
If you’re framing your own walls, you’re already doing the hard part. Once these go up, it’s on to roofing, siding, windows… but that’s a post for another day.
How to Frame a Basement Wall by Admin June 17, 2023 Installing Average home ownership today is a mere eight years. That's up, as in the decade from 2000 to 2009, it was only four years. According…
How to Make A Humidor the Easy Way by Admin September 8, 2023 DIY Simple cigar humidors aren't at all difficult to make an easy way to build. Not only will you save a little cash by building a…

")


")

