Making a cutting board seems to be one of those projects that every woodworker gets around to, sometime or other. Whether it’s early on in their woodworking journey or later, we all end up hitting a point where we decide that we need a cutting board and make one, rather than taking the more pedestrian route of buying one.
Cutting boards have taken on many styles through the years, all depending on the woodworker’s personal preferences. But the classic style is the time-honored butcher block, so named because any self-respecting butcher of old had to have one, as one of their most important tools. Cutting meat all day long required more of a cutting board than the average homeowner needed. The butcher block gave them something that would last them for years.
But as good as it is, the butcher block isn’t a perfect cutting board. Laying the boards up long-grain and laminating them together produces a board that’s plenty strong enough; but the act of using the board causes the grain to be cut. At the same time, cutting across the grain tends to dull knife blades, because the wood is fibrous.
The solution to that problem is to use an end grain cutting board, rather than long grain. With an end grain cutting board, the wood fibers can separate for the knife blade, then “heal” again, moving back into close up the gap the blade created. Since there is no cutting of the grain fibers, it doesn’t dull the blade.
Walnut, oak and maple end-grain cutting board
End grain cutting boards can be made of literally any scrap wood sitting around the shop, although a dense, closed grain hardwood is best. Softer woods tend to become damaged more easily by cutting and open grain wood is more likely to soak up liquids from the food being cut on it, staining the wood.
There’s another advantage of making an end grain cutting board, rather than making it long grain. That’s the ability to make a wide range of different designs in the board, through the selection of different types of woods. The natural difference in wood grains and colors provides an excellent opportunity to be creative with a cutting board’s design.
Design Considerations for a Basic End-Grain Cutting Board
The most basic end-grain cutting board design is made from only one type of wood, allowing the randomness of the wood’s grain to create the pattern of the cutting board. If a wood is used which naturally provides a lot of different grain patterns and color variations, this can become a very nice cutting board, just allowing the differences to fall as they will.
Maple is the traditional wood for butcher block cutting boards. Even so, there are a wide variety of different materials that can be used. A basic cutting board might be made of only one wood species, but that can still be beautiful. Another option is to use random pieces of whatever scrap is sitting in the scrap bin, creating a “chaos” or “random pattern” design.
As part of the process in designing the cutting board, the board’s thickness needs to be decided upon. Literally any thickness works, from less than ½ inch up to 2 inches. The pieces used don’t need to be 2” thick to make a 2” thick cutting board either, as long as the boards are at least 2” wide.
Overall size of a cutting board is somewhat limited by the tools available to work with. While there are ways around it, if a power planer is being used as part of the process, then the width of the planer creates limitations. This probably has something to do with why most cutting boards are no more than 12” wide, even if they are 24” long.
Finally, how the cutting board is going to be used must be taken into consideration. Making a large, heavy, 2” thick cutting board for use by the lady of the house might not be considerate, if it is hard for her to lift and move around. Likewise, a cutting board which is only going to be used as a cheese board doesn’t need to be 12”x 18”, something smaller will do.
Making a Basic End-Grain Cutting Board
A basic cutting board 12”x 18” x ¾” thick can be made from 12 pieces of 1”x 2” hardwood, 12” long. However, many people prefer making their cutting boards out of 2” square stock. It’s all a matter of personal preference and how the finished cutting board is intended to look. Select the material and set it up to be laminated, gluing it on the wide side.
Many people skip evening up their boards, before gluing them together. Whether or not this is really necessary depends a lot on the cutting board’s design. If a chaos design is desired, then it makes sense to not worry about evening them up. But most fancier designs require the boards to be either the same size or multiples of the same direction. A simple example of that is a checkerboard design. If the boards aren’t all exactly square and the same size, it will throw off the checkerboard.
When selecting material, keep in mind that it will be rotated 90 degrees for the final gluing. In other words, what is the thickness for the first glue-up will be the width of the strips of wood for the second glue-up.
The layup should be done using cauls to align the boards. The better a job of alignment that can be accomplished during layup and gluing, the less material will have to be removed by sanding or on the planer. Wax the cauls to prevent the adhesive from sticking.
The best glue to use for this is waterproof polymer wood glue, like Titebond III, rather than PVA wood glue. While the PVA wood glue is water resistant, it is best to go with a true waterproof glue, to help ensure a long life for the finished project. Titebond III also has some gap-filling capability, although not as much as epoxy would. Enough glue should be used so that it squeezes out when clamping; but don’t leave that glue there, wipe it off, as that’s easier than chipping it off with a chisel later.
Once the glue is applied to the joining surfaces, clamp the boards together using a minimum of 3 bar clamps (more is better). Alternate those clamps position, with the bars above and below the glue-up to provide more even clamping pressure. Add the top cauls and clamp the cauls through the thickness to prevent the boards from slipping or the assembly from bowing.
Allow the glue to dry at least overnight then take the clamp off. If the surface is not smooth and level, plane it lightly to bring it level. If it is smooth and level, that step can be ignored.
Using a sled on the table saw, cut the laminated block into strips, 1/8” wider than the cutting board is to be thick. That extra 1/8” of material will allow four – 1/32” thick passes of the cutting board through the planer. A good, sharp blade is needed to make it through the hardwood and prevent chipping. If a sled is not available, the strips can be cut using a miter gauge and the saw’s fence. This is actually not recommended by the manufacturer, but quite effective.
Lay out the strips for a second glue-up, rotating them 90 degrees, so that the end grain is up, as shown in the diagram below. clamp the pieces together, just as before, but this time take care to ensure that the ends of the strips are even. A framing square or T-square works well for this. If those are not available, placing strips of wood across the ends and clamping across the length of the pieces with light pressure works well to square it up.
The use of cauls is even more important during this glue-up, so as to ensure that the glue dries at least overnight once again, before removing the clamps. Trim the edges on a jointer or table saw, to ensure that they are all straight and square. Then run the cutting board through the planer, on both sides, flattening the surface and removing any cutting marks from the table saw.
Before running the cutting board through the planer, it’s a good idea to chamfer the trailing edge. The rotation of the cutting head and the blades hitting the end grain tends to cause his trailing edge to chip. Chamfering it about 1/8” with a block plane will help eliminate this chipping.
I recently purchased a planer and made the end grain cutting board shown above. While looking over the various brands available, it seemed that they were all extremely similar. The bed sizes for the typical planer that one might buy for a home workshop were either 12 ½” or 13”. All of them seemed to have the same size motor, operating at the same speed. The height adjustment mechanisms and depth of cut gauges varied, but were still pretty much the same.
The one thing I found to be significantly different, which ultimately made my selection easy, was the number of cuts per inch. This specification comes from a combination of the number of blades on the cutting head, the motor speed and the speed the stock moves through the planer. The higher the number of cuts per inch, the smoother the surface coming out of the planer will be, reducing the time spent on sanding afterwards.
When No Planer is Available
If there is no planer available in the workshop, finish the surface of the cutting board is a bit harder, but not impossible. There are three basic options that can be used:
Sanding – The first cutting board I ever made was sanded. Even though I had a belt sander to use, it took forever to sand that board. The other problem with sanding, especially with a handheld belt sander, is ensuring that there isn’t any gouging and that the surface ends up flat. Winding sticks can help with that, but there are easier methods.
Block Plane – Because the cutting board is end grain, most planes won’t work well for leveling the surface. However, the lower angle of the block plane makes it ideal for this. As with sanding this takes a lot of work, but the end result is clean and smooth, especially if the plane is followed up with a scraper.
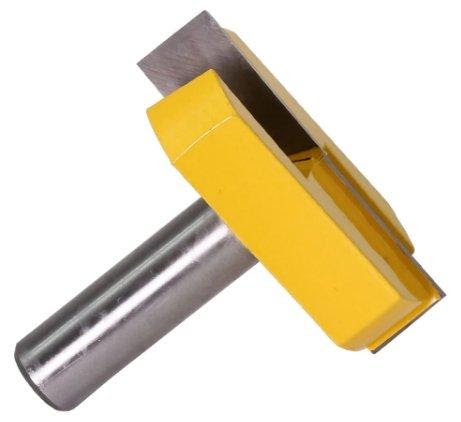
Planing Bit in Router – The same sort of planning bits that are used in routers for leveling the surface of live edge and river tabletops and countertops works for leveling an end grain cutting board. In order to do this, a jig is needed, essentially a bridge to go over the workpiece and make contact with the workbench on either side of it. A slot in the bridge allows the planning bit to make contact with the workpiece being planed, while the bridge holds the router at a consistent height above it. Moving the router back and forth and the bridge down the workbench after each pass, allows the bit to cut the entire surface, leveling it.
Planing router bit
When using a planing bit, keep in mind that the bit will be moving in a circular pattern. This will leave some tooling marks behind, much like the blade marks from a table saw. Working slowly to plane the board will help reduce these marks, making the sanding afterwards easier.
Finishing the Cutting Board
While the cutting board could be used at this point, there are a few finishing steps that should be taken. The first is to round the corner and top edges with a ¼” roundover bit, either on a router table or with a handheld router. I’ve used both and find it works equally well, either way.
When rounding the corner with a handheld router, it’s best to work halfway down from the top, and then flip the board over to do halfway through from that side. This simple change helps eliminate the chipping that can happen when the router bit reaches the end of the cut. I use a ½” roundover bit for the corners, rather than the ¼” bit that’s used for the top edge.
When rounding the top edge on a router table, it’s best to use the fence and stand the cutting board on its edge. This causes the bearing to ride on the top surface of the board, ensuring the smoothest possible transition from the flat to the curve. If the board is held flat and the height is wrong, the bit could cut too deep, creating a line in the surface. That would be harder to remove, than removing it on the edge of the board.
Some people cut handles into the ends of their cutting boards as well; but this only works well on cutting boards that are at least 1 ½” thick. Ideally, this inset cut should be spaced exactly halfway through the thickness and should be roughly six inches long. Cutting these handles is also done on the router table, using a round nose router bit. To help ensure that the spacing of this inset is correct, clamp blocks to the fence, on either side of the bit, with both of them being the same distance from the bit.
With all the cutting done, it’s time to start sanding. If everything was done well up to this point, sanding really shouldn’t be much of a problem. It will be necessary to work through the various grits of sandpaper, starting with 80 grit and working up to 220, but there shouldn’t be much in the way of serious tooling marks to remove from the planed surface. On the other hand, the edges might need considerable sanding to remove the blade marks from the table saw.
Finish the wood and then add rubber feet to the bottom, in the corner of the cutting board. These are necessary more for the protect of the cutting board from water, than any other reason. The feet will hold the cutting board up from the countertop and the bottom of the sink, preventing it from sitting in water.
What Sort of Finish Should be Used?
finish selection for any cutting board is important. Because it will be used for food, a food-grade finish is required. It’s also important to avoid any finish where slivers of the finish could inadvertently be cut off with the knife, as those could end up in the food and ingested. Even if the finish is food-grade, such as food-grade epoxy, we don’t want to end up with it in our food.
This eliminates both varnish and epoxy as potential finish. Wax can be used, but wax will come off in the food, affecting its flavor. Leaving that out, the best finish to be used is some sort of oil, either a food-grade mineral oil, Danish oil or Tung oil.
Making End Grain Cutting Boards with Fancier Designs
Looking online, one can find a wide variety of custom designed end grain butcher block cutting boards. These are all made using variations on the basic method described above. The design comes from using different woods, capitalizing on their distinct coloration.
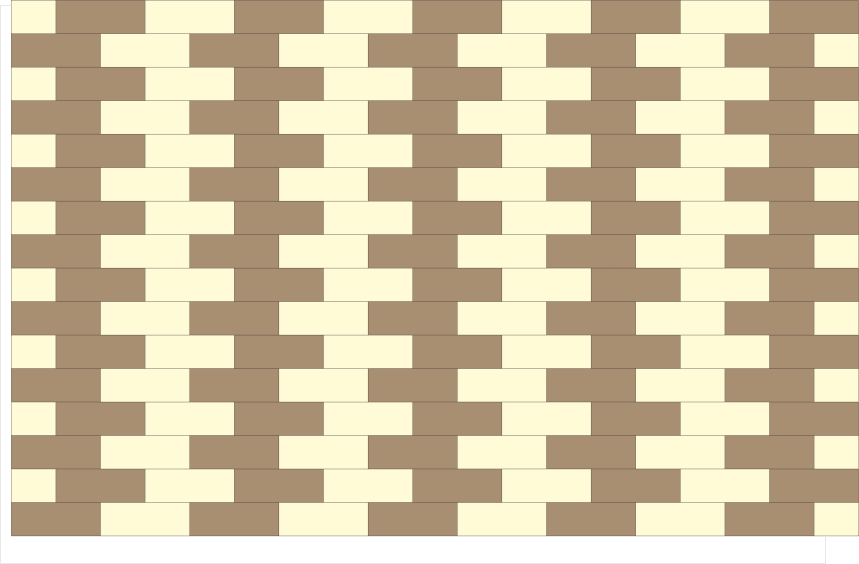
One of the major “tricks” to making these designs is to alternate the direction the strips are laid for the second glue-up. By reversing the pattern, a variety of different effects can be achieved, which will look much more complex to the uninitiated, than they do to the woodworker who made them.
The Design Above
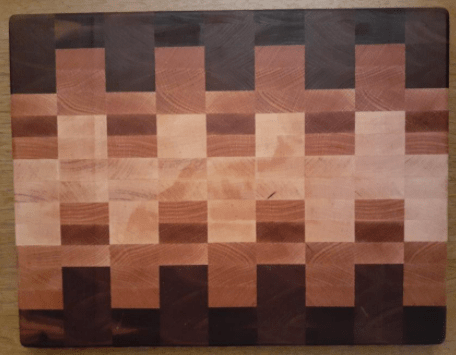
The design shown at the beginning of this article is a cutting board that I just recently made. It is made from walnut, oak and maple and was actually made as a trial piece for a countertop that I’m going to make for our new home. While it looks like there are two different patterns of blocks in the strips, there is only one. I’ve reversed the direction for every other row to give it the sawtooth design.
Cutting boards – end grain 1
It’s easier to see how the design was produced from this diagram, which I made to design the cutting board. The first glue-up consisted of two pieces of:
4 pieces of walnut
3 pieces of oak
4 pieces of maple
3 more pieces of oak
2 more pieces of walnut
Endless variations of this basic design can be accomplished by changing out the pieces of wood used and the thickness of those pieces. A thin piece of ebony, between the oak and maple would make a dramatic statement, changing the overall appearance. Placing a half-thickness board at one end of the stack would alter how the pieces aligned with each other.
This same method would be used for making a checkerboard, using square pieces of walnut and maple. Reversing the direction of every other piece would provide the classic checkerboard design.
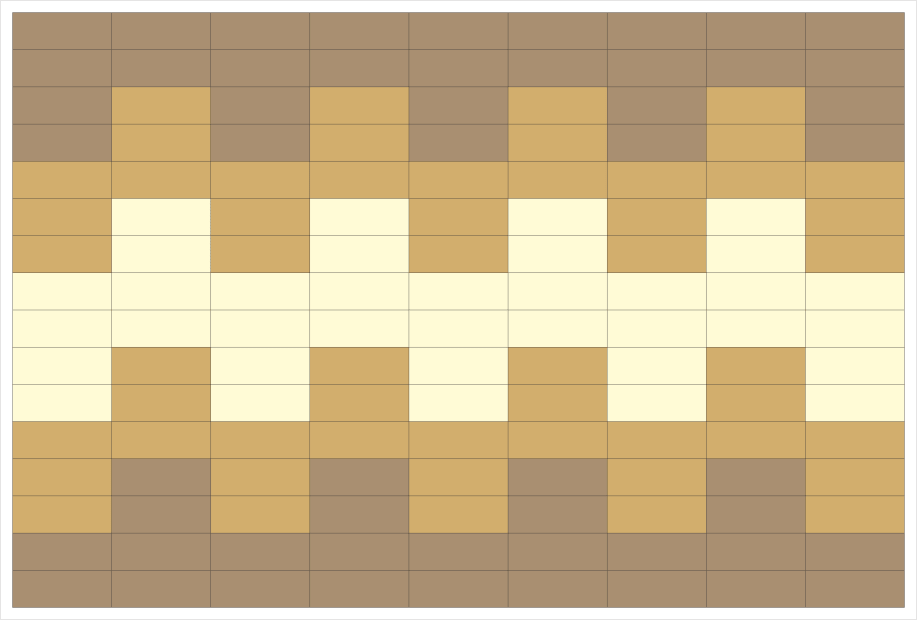
The same basic design can be combined with other design elements, creating a different look. In the diagram below, the bottom part of the cutting board is made identically as the board above, with most of the oak and walnut in the upper part of the design being replaced by maple. The two strips of walnut in the upper part and one in the lower part are half the thickness of the rest of the blocks and made of wenge.
Cutting boards – end grain 2
Making this particular design is slightly different in that two separate glue-ups are needed in the first stage of construction. One has two pieces of walnut in it and the other has three. When doing the final glue-up of the cutting board, the pieces are alternated, using the two different designs.
Flipping the Staggering
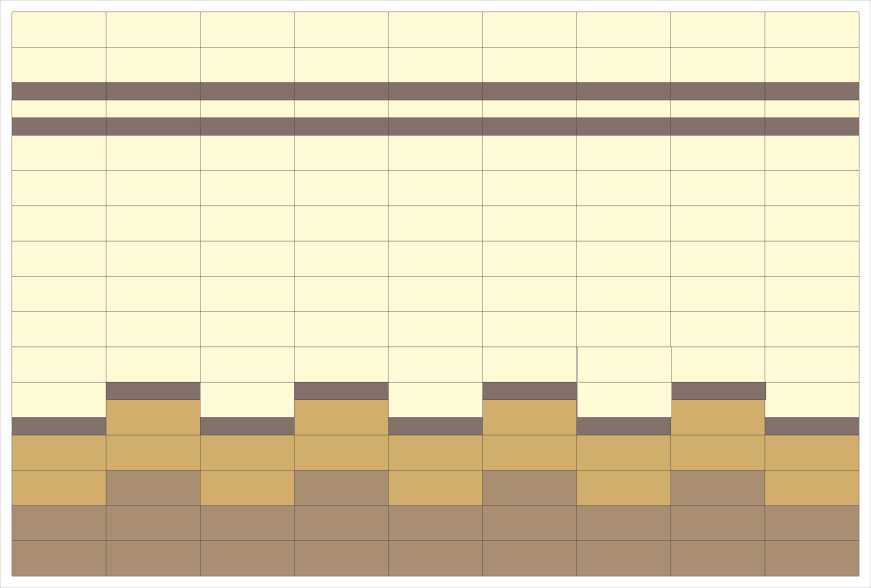
While most variances in these cutting board designs are made by assembling 12” sections, cutting them into 12” long strips, and then alternating the strips of wood on reassembly, the same trick can be used going the long way on the cutting board. In the design below, each horizontal strip of wood is reversed from its neighbors, giving a different effect.
Cutting boards – end grain 3
Design options for these cutting boards are virtually limitless, depending on the woodworker’s imagination. I’ve even seen geometric boards, which are cut on an angle. That’s considerably more work though and creates a higher percentage of waste. But the results are stunning.
Related Posts:
How to Make Cornhole Boards by Admin March 25, 2025 DIY I’ve built a few cornhole boards over the years — mostly for family barbecues and neighborhood game nights. It’s one of those backyard projects that’s…


")


")
