A coping saw is a thin-bladed, C-frame handsaw used to cut tight curves, cope joints, and intricate shapes in wood, trim, and plastic. It’s one of the most underrated tools in a woodworker’s shop — and one of the most misused.
Prices approximate. Use the product buttons below for current Amazon pricing.
Quick Comparison: Which One Should You Buy?
If You Want
Buy
Best Overall
Bahco 301
Cheapest Option
Stanley 15-104
Best Value
Olson SF63510
Best Professional Option
Eclipse E44-PB
What Is a Coping Saw?
If you’ve ever tried to cut a curved piece of baseboard molding, trim a scrollwork pattern into a cabinet door, or make a cope joint at an inside corner, you’ve already met the problem a coping saw solves.
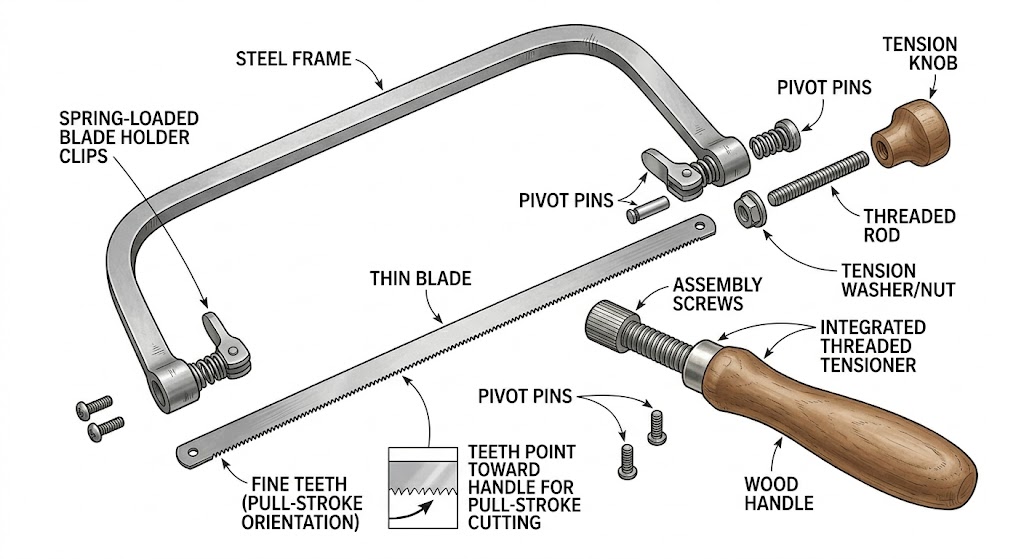
It’s a deceptively simple tool: a thin, replaceable blade stretched across a deep C-shaped steel frame. The blade rotates 360°, which is the whole point. You can plunge mid-board, spin the blade, and cut in any direction without lifting the saw off the work.
Among commonly recommended hand tools for trim work, the coping saw consistently tops the list — not because it’s flashy, but because nothing else handles inside profiles and cope joints as cheaply or as well.
❌ The Most Common Coping Saw Mistake
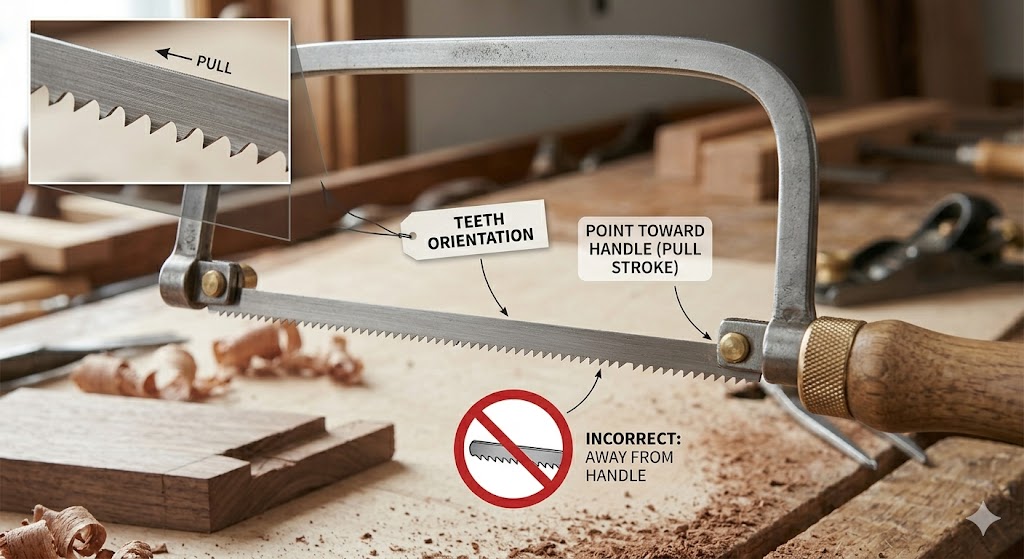
The single biggest mistake beginners make with a coping saw is running the blade on the push stroke.
Most coping saw blades are designed to cut on the pull stroke. With the teeth pointing away from the handle (toward the frame), every push cuts, and every pull just drags. The blade wanders constantly, teeth snap, and cuts look ragged, no matter how slowly you go.
Users frequently report this as the root of their frustration with coping saws — until they flip the blade around. With teeth pointing toward the handle, the saw cuts on pull and control improves immediately. Curves become predictable instead of a fight.
📌 Which direction should the coping saw teeth face? Teeth should point toward the handle so the saw cuts on the pull stroke. This gives more control and cleaner cuts, especially in hardwoods. Most broken blades and wandering cuts trace back to having the teeth facing the wrong way.
😬 The Regret Most Woodworkers Share: Cheap Blades
In comparative reviews and woodworking forums, one regret comes up constantly: spending months on cheap replacement blades before switching to quality ones.
Cheap blades dull fast, flex unevenly, and snap at the worst possible moment — usually mid-curve on a piece of trim measured twice and cut once wrong. Many woodworkers note they burn through more cheap blades in a single project than they would with a quality brand across three projects.
The blades most commonly recommended by experienced users: Olson Saw FR49600 multipacks. Consistent quality across the whole pack, longer edge retention, and even tooth set. Worth it every time over no-name alternatives.
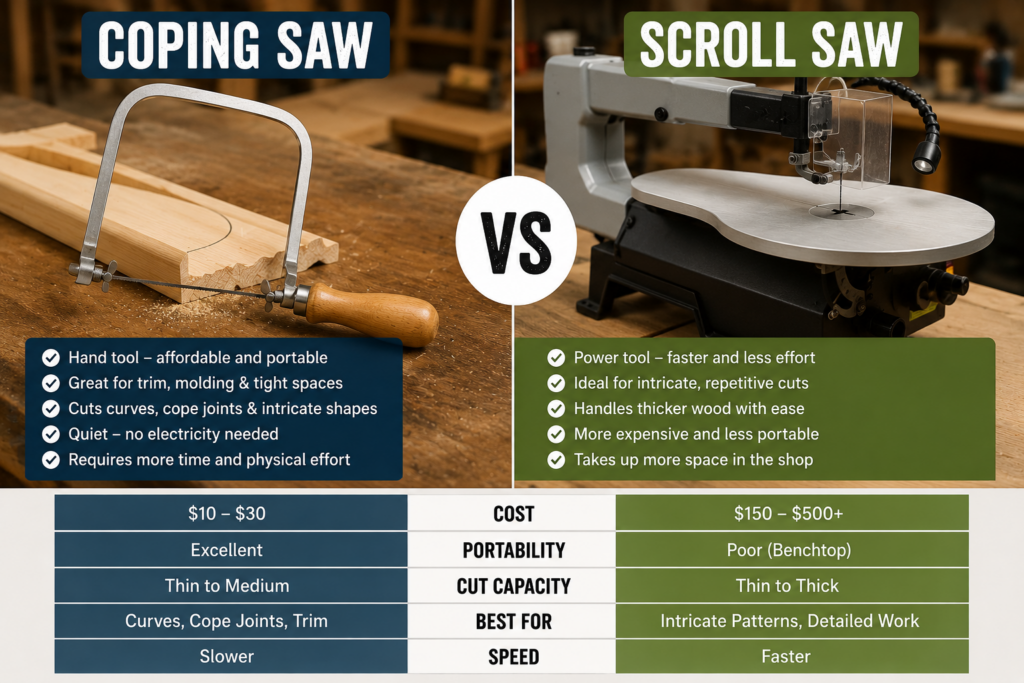
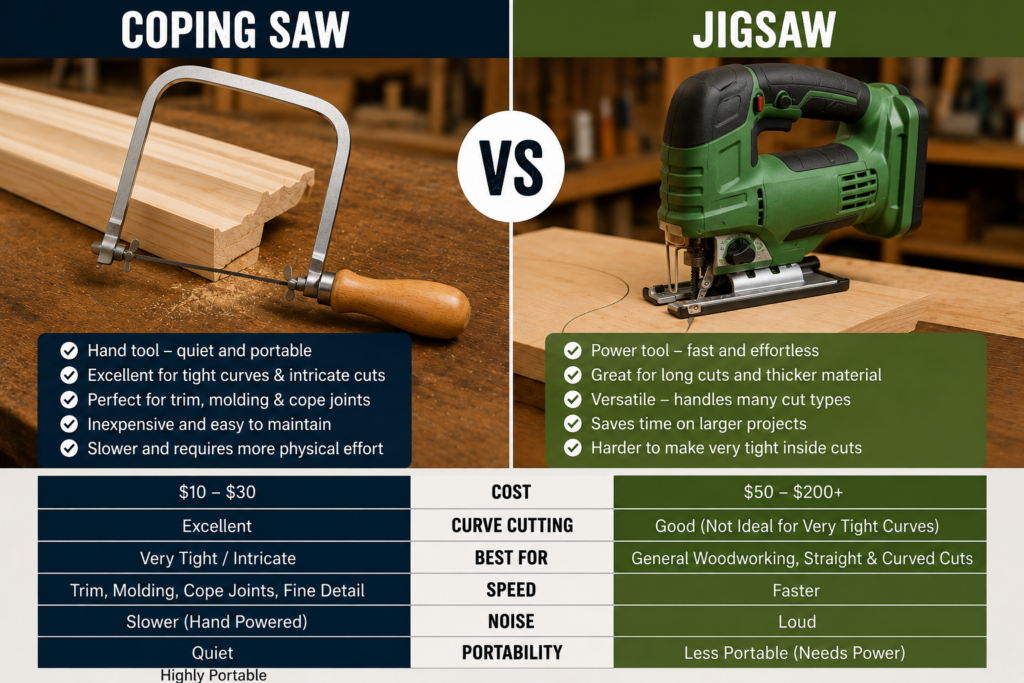
Compared to a jigsaw ($50–$200) or a scroll saw ($150–$500+), a coping saw is an almost-free entry into curved cuts. The trade-off is speed and stamina — it’s a hand tool, and your forearm will notice it after a long session on hardwood.
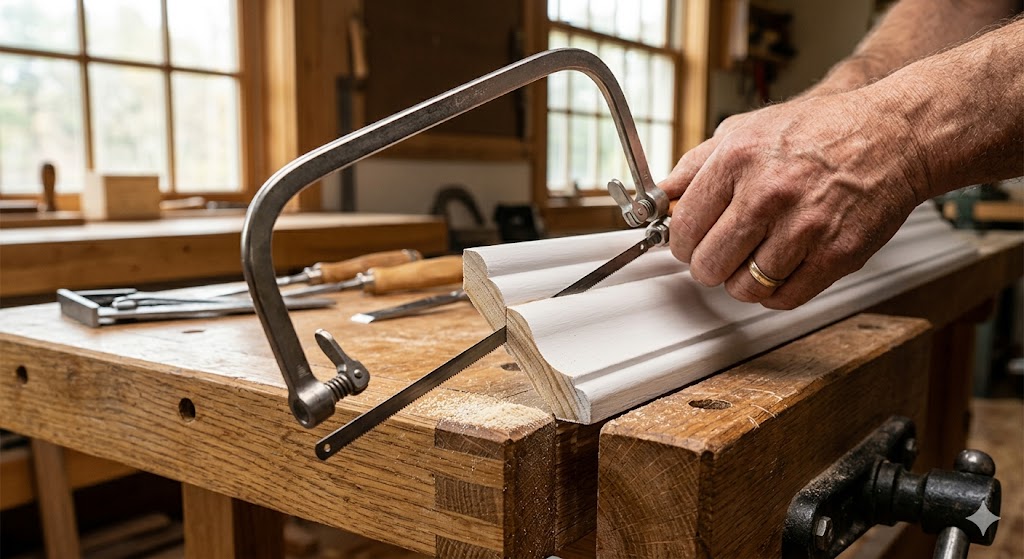
For trim and molding work, though? A coping saw and a miter box is genuinely all you need. Many trim carpenters prefer this combination for baseboard and crown work precisely because it’s portable, quiet, and doesn’t require a power outlet.
🧪 Best Coping Saws Reviewed
Based on user feedback, comparative reviews, and verified published specifications, here’s how these four saws stack up.
🥇 Best Overall: Bahco 301 Coping Saw
Among the coping saws commonly recommended in woodworking communities, the Bahco 301 consistently comes out on top. The nickel-plated solid steel frame is notably stiffer than competing models at this price — when you tension the blade, it stays taut without creep. The beechwood handle is comfortable for longer sessions, and blade changes are straightforward once you’ve done a couple.
In comparative reviews, users highlight its tracking consistency on hardwoods like oak and maple as the primary reason they recommend it over cheaper alternatives.
The Stanley 15-104 FatMax is the standard recommendation for beginners. At $10–$14, it’s widely available and ships with a usable blade. Users frequently report it as perfectly capable on pine, cedar, and light trim — the work most beginners actually do.
The frame flexes slightly under high tension, which is more noticeable on hard oak than on softwood. Blade changes are a little fiddly compared to higher-end models. For learning techniques and getting through DIY trim projects, it’s the right starting point.
Spec
Detail
Throat Depth
4¾ in
Frame Material
High carbon steel
Weight
0.52 lb (approx. 8.3 oz)
TPI
15
Blade Included
Yes
Pros: Affordable, widely available, cushion grip handle, good starter blade included
Cons: Frame flexes under high tension, less comfortable for extended use
Verdict: Best way to get started without overspending. Upgrade when you’re ready.
Buy this if you’re just getting started with trim work and want a capable saw without committing much money while you’re still building technique.
The Olson SF63510 sits between the Stanley and the Bahco in price and performance — and in comparative reviews, it frequently punches above its price. The frame is more rigid than Stanley’s, the included blade is high-quality (Olson is well regarded for blade manufacturing), and it features a dual-tensioning system that uses both the handle and an end thumbscrew for more precise blade control.
Users note that on softwoods and medium hardwoods, it performs nearly on par with the Bahco. The gap between them shows up mainly under maximum blade tension in dense hardwoods.
Spec
Detail
Throat Depth
4½–5 in (varies by source)
Frame Material
Steel
Weight
0.6 lb (approx. 9.6 oz)
TPI
15
Blade Included
Yes
Pros: Quality included: blades, a dual-tensioning system, a solid frame for the price, and clean cuts in softwood and medium hardwood.
Cons: Not quite as rigid as the Bahco under max tension.
Verdict: The go-to pick when the Bahco is out of stock or just over budget.
Buy this if you want better-than-budget performance without paying for the Bahco — especially if you’re cutting a mix of pine, poplar, and occasional hardwood.
The Eclipse E44-PB is what most woodworkers point to when the question is “what’s the best coping saw without budget constraints?” The steel frame is built for rigidity, the tensioning system is smooth and precise, and the blade holds tension longer during extended use — no mid-project re-tightening. Throat depth is 4⅝ in, slightly deeper than the Stanley, giving a bit more reach on wider workpieces.
In reviews from professional trim carpenters, the Eclipse is frequently cited for daily-use durability. For occasional DIYers, the Bahco is likely sufficient. For anyone running a coping saw through dozens of cuts a week, the Eclipse is the logical choice.
Spec
Detail
Throat Depth
4⅝ in
Frame Material
Steel
Weight
Not published by manufacturer
TPI
14
Blade Included
Yes
Pros: Best build quality in this roundup, excellent blade retention, precise tensioning, slightly deeper throat than competitors
Cons: More expensive, overkill for casual or occasional use, weight not published.
Verdict: The right tool for professionals and serious woodworkers who use a coping saw regularly.
📌 What is the best coping saw for beginners? The Stanley 15-104 is the most commonly recommended entry-level coping saw — under $15, widely available, and capable of softwood and light trim. For the best all-around performance at any skill level, the Bahco 301 is the upgrade worth making.
Why Buy a Coping Saw Instead of a Jigsaw or Scroll Saw?
This is the question that stops many buyers mid-decision. Here’s the honest answer.
A coping saw does something neither a jigsaw nor a scroll saw handles as well — it lets you work on installed trim, in tight corners, flat on a floor or against a wall, with no power cord and no noise. For baseboard and crown molding, it’s faster to set up than any power tool because there’s nothing to set up.
The jigsaw is faster on the cut itself, but it’s bulkier, requires power, and is harder to control on thin molding profiles. The scroll saw is extremely precise but costs 10–20x more and never leaves the benchtop.
For any woodworker doing trim, furniture joinery, or occasional curved cuts: a coping saw is the right first tool. Add a jigsaw or scroll saw later, when your work has genuinely outgrown what the coping saw can handle.
Coping Saw vs. Scroll Saw
Feature
Coping Saw
Scroll Saw
Power
Manual
Electric
Curves
Excellent
Excellent
Speed
Slow
Fast
Cost
$10–$30
$150–$500+
Portability
Fully portable
Benchtop only
Interior cuts
Yes (thread blade through hole)
Yes
Best For
Trim, molding, cope joints
Intricate patterns, fretwork
Learning curve
Low
Medium
Use a coping saw if you’re doing trim, baseboard, crown molding, or cope joints and want something cheap, portable, and simple.
Use a scroll saw if you’re cutting intricate decorative patterns, doing fretwork, or cutting large volumes of curves repeatedly in a dedicated shop space.
📌Coping saw vs scroll saw — what’s the difference? A coping saw is a manual hand tool costing $10–$30, best for trim, molding, and cope joints. A scroll saw is an electric benchtop tool ($150–$500+) suited for intricate decorative patterns and high-volume curved cuts. For most DIY and finish carpentry work, a coping saw is all you need.
Coping Saw vs. Jigsaw
Feature
Coping Saw
Jigsaw
Power
Manual
Electric
Cost
$10–$30
$50–$200
Precision
Excellent
Good
Speed
Slow
Fast
Trim Work
Excellent
Fair
Thick Lumber
Poor
Excellent
Portability
Pocket-sized
Handheld (needs power)
Best For
Cope joints, molding profiles
Thick stock, fast curves
Choose the coping saw for installed trim, tight corners, quiet work, and cope joints. Choose the jigsaw for thick lumber, plywood, and when speed matters more than precision on a profile.
📌 Coping saw vs jigsaw — which is better for trim work? For trim and baseboard molding, a coping saw is generally preferred. It gives more precise control on thin profiles, works in tight spaces without power, and handles cope joints cleanly. A jigsaw is faster but harder to control on narrow molding. Many trim carpenters keep both — the coping saw for profiles, the jigsaw for rough curved cuts in thicker stock.
How to Use a Coping Saw: Step by Step
Step 1 — Set blade direction
Teeth toward the handle = pull-cut. This is correct for almost all work in wood.
Step 2 — Set blade tension
Tighten the handle until the blade produces a clean ping when flicked with a finger. Loose blades wander. Over-tensioned blades snap.
Step 3 — Mark your line clearly
Use a sharp pencil or marking knife. The blade is thin and will follow your line if you let it.
Step 4 — Use short, controlled strokes
Don’t force it. On tight curves, rotate the blade incrementally using the pins at each end of the frame.
Step 5 — For cope joints
Miter the molding at 45° first, then follow the exposed profile line with the coping saw. Undercut slightly — angle the saw back a few degrees — for the tightest possible fit against the mating piece.
📌How do you cope with a baseboard joint? Miter the end of the molding at 45°, then use a coping saw to follow the exposed profile line of that cut face. Undercut slightly for the tightest fit. This joint tolerates seasonal wood movement better than a plain miter corner and is the method most trim carpenters prefer for inside corners.
How to Replace a Coping Saw Blade
Blade changes take about 30 seconds once you know the steps:
Loosen the handle by turning it counterclockwise to release blade tension.
Unhook the blade pins from the slots at each end of the frame.
Remove the old blade and discard it.
Hook the new blade into the pin slots — teeth pointing toward the handle.
Re-tension by tightening the handle until the blade is firm. Flick it — it should ping, not thud.
If a blade won’t seat properly in the pin slots, check that the blade length matches your frame. Most standard coping saws take 6½” blades, but a few models use a slightly different length.
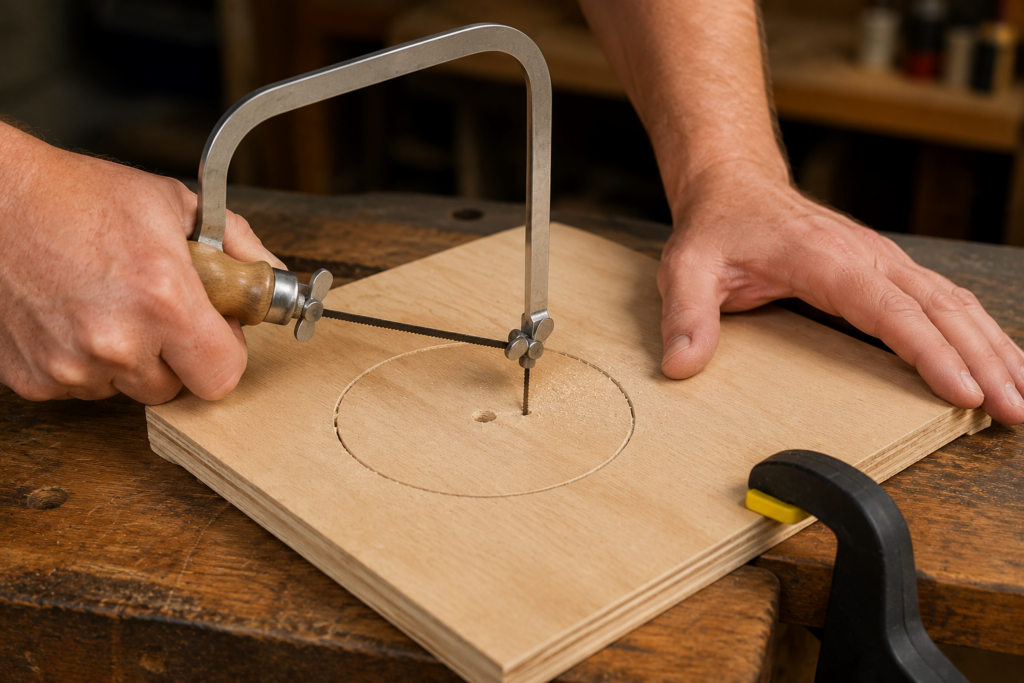
How to Cut Inside Circles with a Coping Saw
Mark the circle on your workpiece with a compass or template.
Drill a starter hole just inside the circle line — large enough to thread the blade through (a ¼” bit works for most blades).
Detach one end of the blade from the frame pin, thread it through the drilled hole, then reattach it.
Re-tension the blade and begin cutting, following the circle line from the inside out.
Rotate the blade as needed to keep a smooth curve without the frame hitting the workpiece edge.
This same process works for any interior cutout — keyholes, decorative shapes, cabinet cutouts — not just circles.
Common Coping Saw Mistakes to Avoid
Forcing the cut. A coping saw works best with light pressure and a controlled stroke. Pushing hard causes blade flex, wandering, and premature breakage.
Ignoring blade tension. Too loose and the blade drifts off your line. Too tight and it snaps under lateral pressure. The ping test is a reliable check.
Using the wrong TPI for the material. Low-TPI blades on thin molding tear out the edge. High-TPI blades on thick softwood clog with sawdust and stall. Match the blade to what you’re cutting.
Twisting the blade in tight corners. In very tight turns, rotate the blade with the frame pins rather than torque the handle sideways. Lateral stress breaks blades at the pin holes.
Skipping the undercut on cope joints. A straight 90° cut on a coped profile often looks fine at first — until the wood moves seasonally. Undercutting slightly keeps the visible face tight year-round.
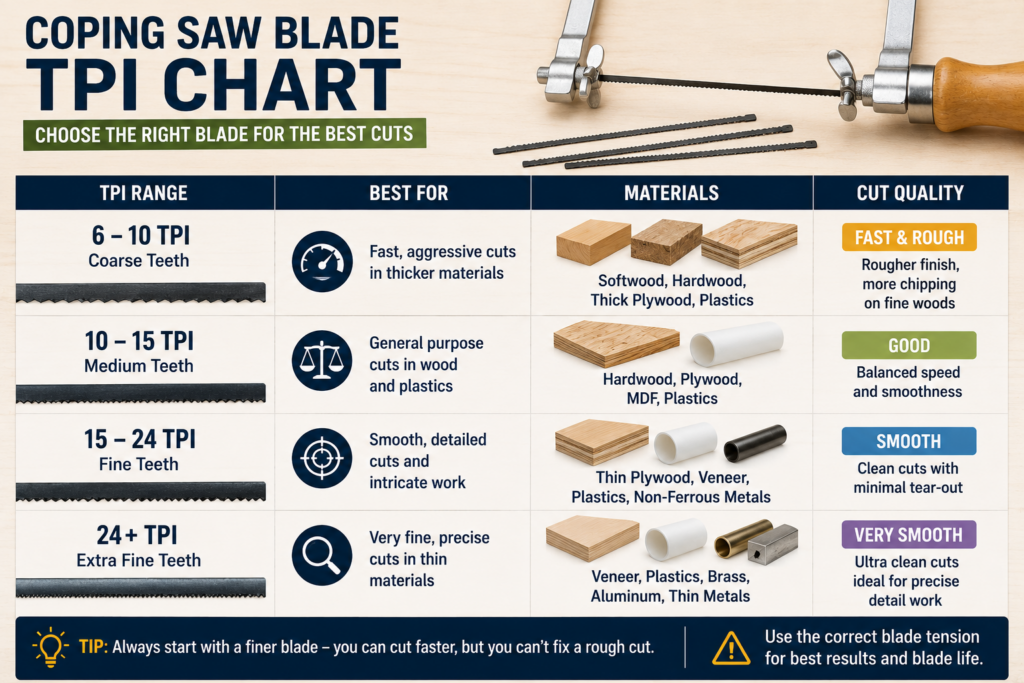
Coping Saw Blade Guide: TPI by Material
Material
Recommended TPI
Notes
Softwood (pine, cedar)
10–15
Fast cut, slightly rougher edge
Hardwood (oak, walnut, maple)
15–18
Slower but cleaner
MDF / plywood
12–15
Watch for tearout on face veneer
Plastic / PVC
18–24
Use blades rated for plastic
Metal (thin sheet)
24–32
Metal-rated blades only
Higher TPI = smoother cut, slower speed. Lower TPI = faster cut, rougher edge. For trim work, 15 TPI is a solid starting point across most materials.
📌 What TPI blade should I use in a coping saw for hardwood? Use 15–18 TPI for hardwoods like oak or maple. This gives a clean, controlled cut without blade wander. Lower TPI blades cut faster but leave a rougher edge that requires significantly more sanding on close-grain hardwoods.
⚠️ Warning: Materials This Saw Wasn’t Built For
Coping saws designed for woodworking are not suitable for metal conduit, PVC pipe, or sheet metal without the correct blades. Woodworking blades dull in seconds on metal, and most budget frames aren’t built for the added resistance.
Also, never force a coping saw through a knot in wood. The blade catches, buckles, and either snaps or throws the cut line sideways. Work around knots or switch to a different tool for those sections.
Maintenance and Storage
A coping saw needs very little attention, but a few habits keep it performing well:
Replace blades proactively. If cuts are taking noticeably more effort than usual, change the blade. Forcing a dull blade causes wandering and breakage.
Check the frame pins. The small pins that hold the blade can wear smooth on cheaper saws over time. If blades are slipping under tension, inspect the pins — replacements are inexpensive.
Back off tension for storage. Leaving a blade fully tensioned for extended periods can gradually deform cheaper frames. A quick half-turn of the handle before storing costs nothing.
Light oil once a year. A very light wipe on the frame joints and tensioning mechanism — particularly on saws stored in humid shops — keeps everything moving smoothly.
Can a coping saw cut plywood? Yes, though it’s slow on thicker sheets. Best for ¼”–¾” where you need a curved or interior cut. For repeated cuts on thick plywood, a jigsaw is more practical.
How deep can a coping saw cut? Most standard coping saws have a throat depth of 4½–5 inches, meaning you can cut curves up to that distance from the board edge. Deep-frame versions extend further.
Can I cut circles with a coping saw? Yes. Drill a starter hole, thread the blade through before reattaching it to the frame, then cut from the inside. It’s one of the more useful techniques a coping saw offers that a jigsaw can’t replicate cleanly on installed work.
What’s the difference between a coping saw and a fret saw? A fret saw has a much deeper throat (up to 12 inches) and finer blades designed for delicate scroll patterns and decorative fretwork. A coping saw is heavier-duty and better suited for trim, molding, and joinery. For baseboard and crown work: coping saw. For intricate scrollwork: fret saw.
Is a coping saw good for beginners? Yes — it’s one of the most beginner-friendly hand saws available. There’s no power source to manage, the blade is replaceable and inexpensive, and the technique is straightforward to learn. The most common beginner error (wrong blade direction) is easy to fix once you know about it.
📌 Coping saw vs fret saw — what’s the difference? A coping saw has a shallower throat and heavier frame suited for trim and joinery. A fret saw has a throat up to 12 inches deep and uses much finer blades for scroll patterns and decorative fretwork. For baseboard or crown molding, use a coping saw. For intricate decorative cutting, use a fret saw.
Final Thoughts
The best coping saw for most woodworkers is the Bahco 301, but any of the models reviewed above can handle trim, molding, and curved cuts successfully. It’s a tool that takes 20 minutes to learn, and a few projects to get genuinely comfortable with — once blade direction, tension, and profile-following click into place, it handles curved cuts and cope joints faster than most people expect, without any power tools required.
Start with the Stanley 15-104 to learn technique without overspending, then move up to the Bahco 301 once you know you’ll use it regularly. Stock up on Olson blades from day one — cheap blades are the regret users mention most consistently.
Flip those teeth toward the handle. Most problems start there.
Best Plyo Box : Foam vs Wood + Top Picks by Admin April 13, 2026 DIY What Is the Best Plyo Box for Home Gyms? The best plyo box for most home gyms in 2026 is a heavy foam box with…
Plywood Sheets Guide: Types, Sizes, Prices & Best Picks by Admin April 19, 2026 DIY Plywood sheets are engineered wood panels made from layered veneers glued together for strength and stability. They are commonly sold in 4x8 sizes and vary…