I’ve been in enough basements — my own and other people’s — to notice a pattern: many finished basement wall failures begin with moisture-management decisions rather than visible carpentry defects. Framing went up before anyone checked whether the wall was dry. Insulation went in before anyone thought about where moisture would go. The drywall looked perfect for a year or two, and then the smell started.
This guide is the sequence that avoids that outcome.
Here’s the short version before we go deep:
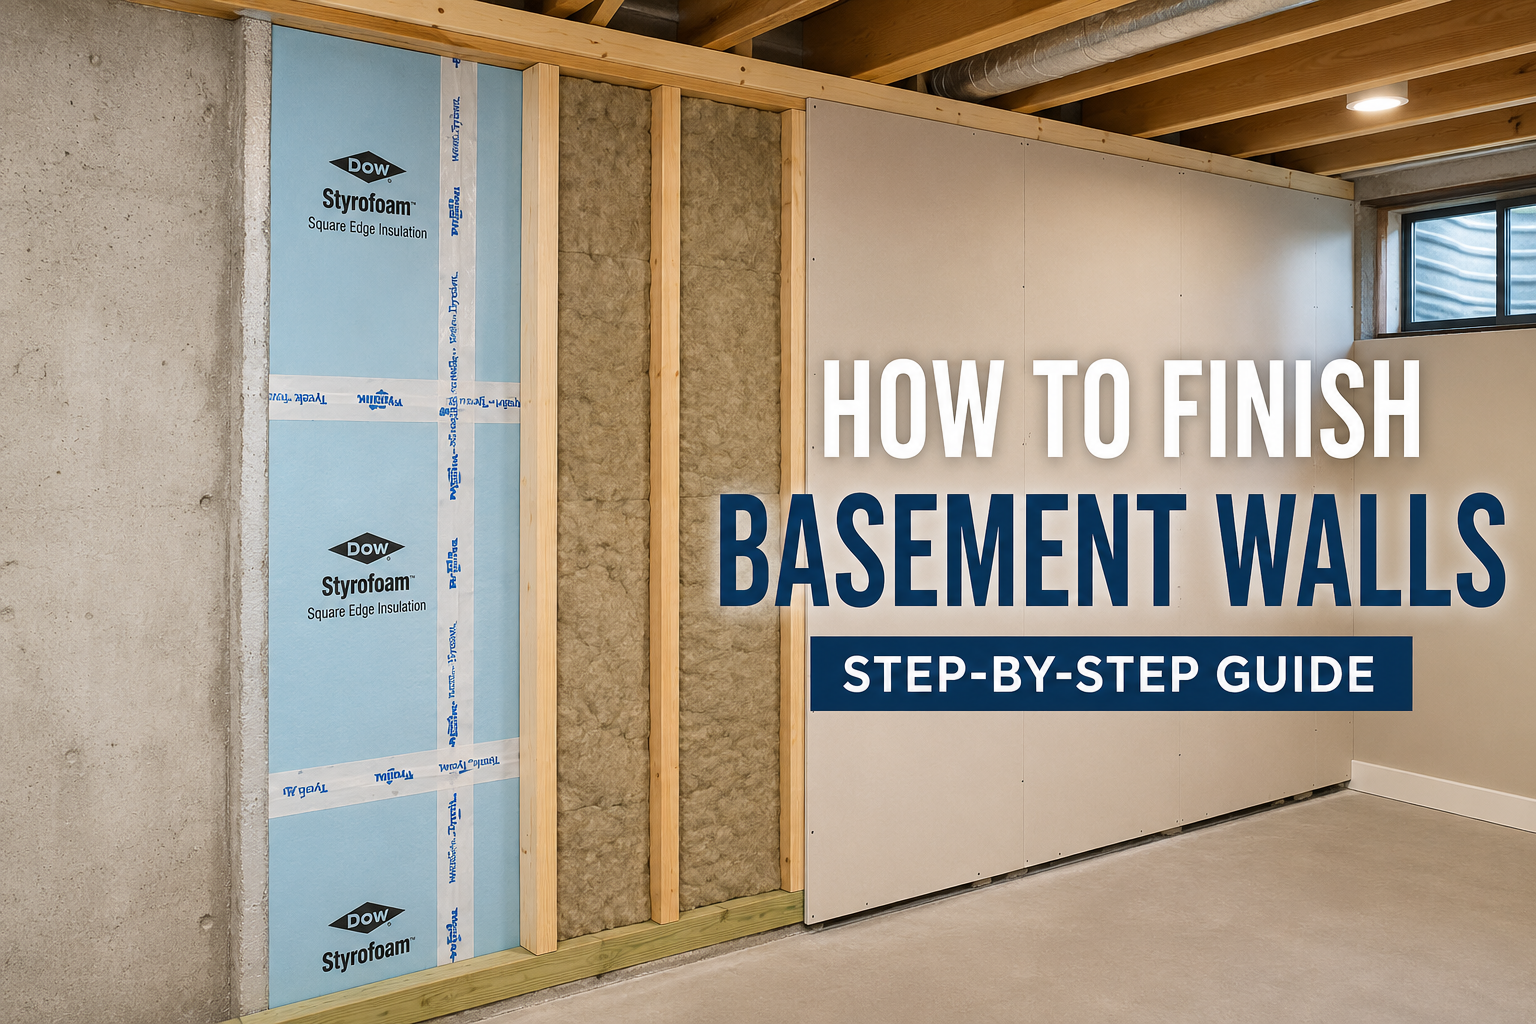
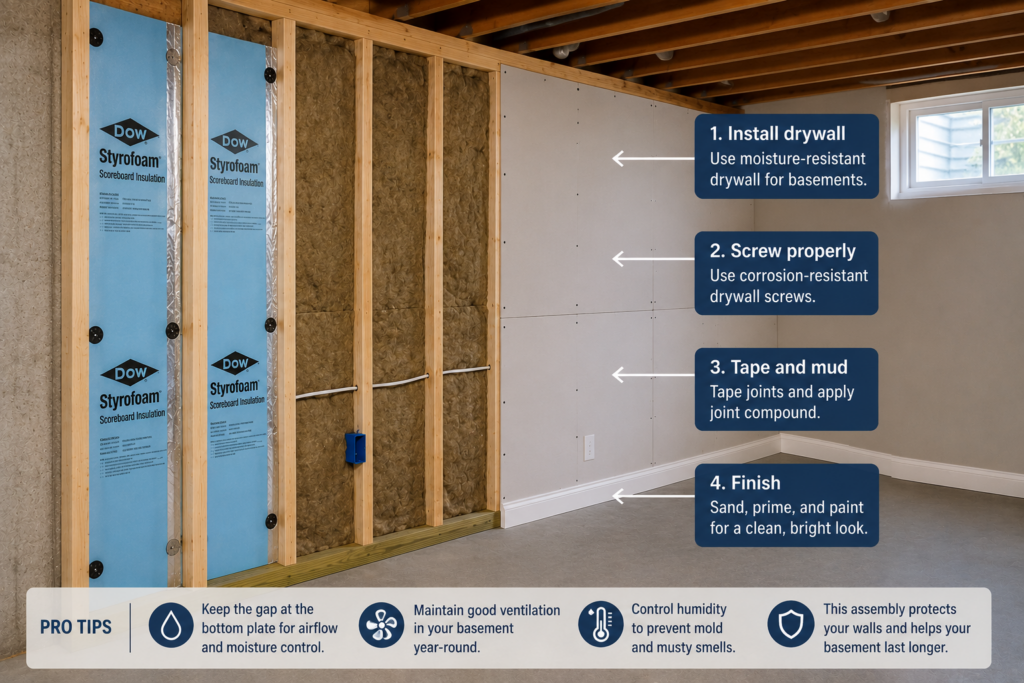
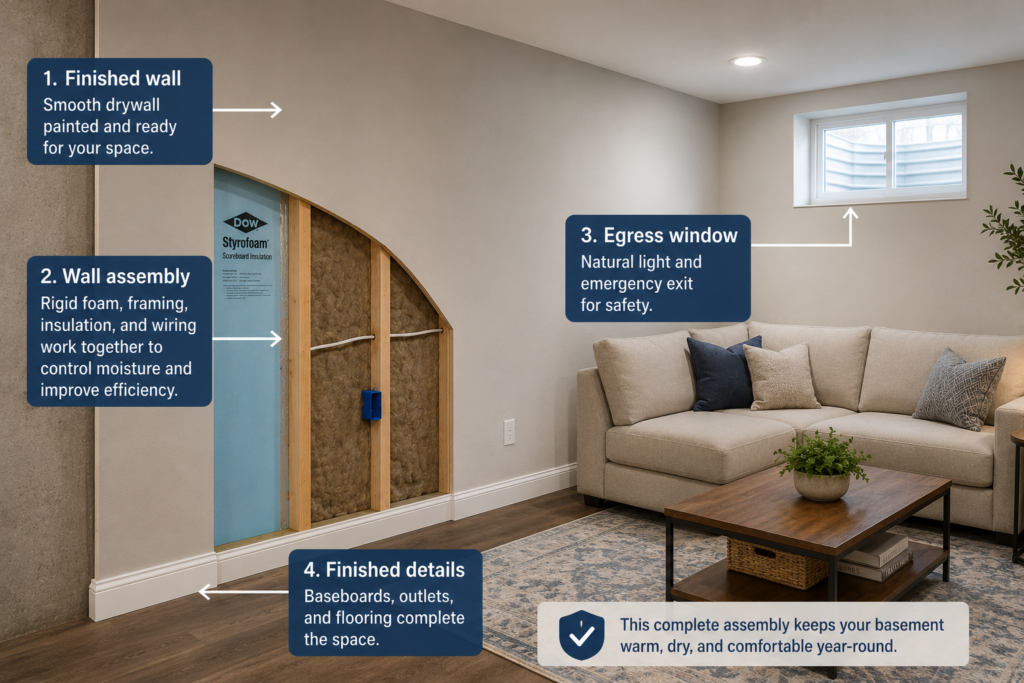
To finish basement walls, work in this order: screen the concrete for moisture, fix any water problems at the source, install rigid foam insulation directly against the concrete with taped seams, frame a wall with a pressure-treated bottom plate, add cavity insulation if needed, and finish with mold-resistant drywall or wall panels held off the floor. In most climates and assemblies, polyethylene sheeting does not belong inside a below-grade wall.
Now the long version, including the mistake that generates more basement mold remediation bills than any other.
Basement Wall Finishing Options Compared
Approach
Relative Materials Cost
Moisture Risk
DIY Difficulty
Best For
Rigid foam + framing + drywall
$$
Low (done right)
Moderate
Most basements, best value
Basement wall panel systems
$$$$
Very low
Easy–Moderate
Damp-prone basements, resale speed
Framing + fiberglass + drywall (no foam)
$
High
Moderate
Very few situations
Furring strips + foam board + drywall
$–$$
Low–Moderate
Easy
Dry basements, tight budgets
Drylok + foam + framing + drywall
$$–$$$
Low
Moderate
Minor dampness, belt-and-suspenders types
Material prices move around too much to print hard numbers here — check current sheet prices at your supplier before budgeting, because the gap between XPS and EPS foam alone can swing a whole-basement budget by hundreds of dollars.
If you’re torn between the panel route and traditional drywall, I broke that decision down in detail in my comparison of basement wall panels vs drywall — the short answer is that panels win in damp basements and drywall wins on cost almost everywhere else.
Step 1: Screen for Moisture Before You Buy Anything
This is the step everyone skips, and it’s the step that decides whether your finished wall lasts decades or a couple of years.
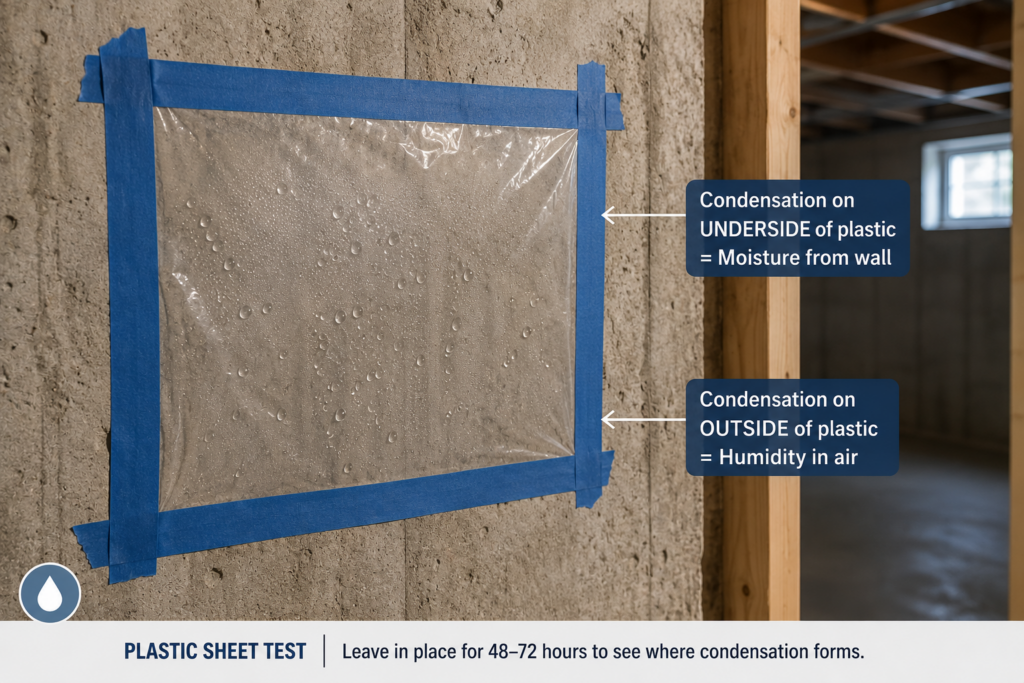
The plastic sheet test: tape a 2-foot square of clear plastic sheeting to the bare concrete wall, seal all four edges with painters tape, and leave it for 48–72 hours. Condensation on the underside of the plastic suggests moisture is migrating through the wall. Condensation on top suggests humidity in the room air is the bigger factor.
Two honest caveats. First, this is a screening test, not a diagnosis — it’s a simplified home version of the concept behind ASTM D4263, and it tells you whether to investigate further, not exactly what’s wrong. A wall can pass in July and fail in April, so if the basement has any history of dampness, run it in the wet season, and back it up with comparative moisture meter readings across the wall. Second, a passing test doesn’t rule out bulk water problems like a seasonal high water table or a downspout dumping at the foundation — those need to be looked for directly.
I walked through this test plus the meter-based methods, what the readings mean, and when to call in a pro in my full basement moisture test guide — if you only read one supporting article before starting this project, make it that one.
If screening shows active water intrusion — liquid water, not just vapor — stop. Finishing a wet basement wall doesn’t fix the water, it hides it. Fix gutters, extend downspouts well away from the foundation, regrade soil to slope away from the house, and seal visible cracks. Then retest before continuing.
Step 2: Understand the Vapor Question (This Is Where the Big Mistake Happens)
The most common basement finishing mistake I see: stapling polyethylene sheeting over the concrete or over the framing as a “vapor barrier,” because that’s how above-grade walls in cold climates were traditionally done.
Here’s the problem below grade. Foundation walls are in contact with damp soil, and moisture moves through concrete as vapor more or less continuously in most homes. An above-grade wall can dry to the outside; a below-grade wall generally can’t — the realistic drying direction is inward. Put a sheet of poly in that assembly and you’ve built a moisture trap: the poly sweats, fiberglass behind it soaks, and mold takes it from there. Building Science Corporation has documented this failure mode for over two decades, and it’s the single most repeated finding when moldy basement walls get opened up.
Two important qualifications. First, this is climate- and assembly-dependent, not a universal law. Some cold-climate jurisdictions — parts of Canada in particular — still have code provisions involving interior vapor retarders, and specific assemblies (like a poly slip sheet behind foam on an irregular rubble wall) have legitimate uses. Check what your local adopted code actually requires before deviating from it. Second, poly absolutely does belong in basements — beneath concrete slabs and in certain approved basement-floor assemblies, depending on the system. The rule of thumb for most US basements is: poly at the floor level where the system calls for it, not in the wall.
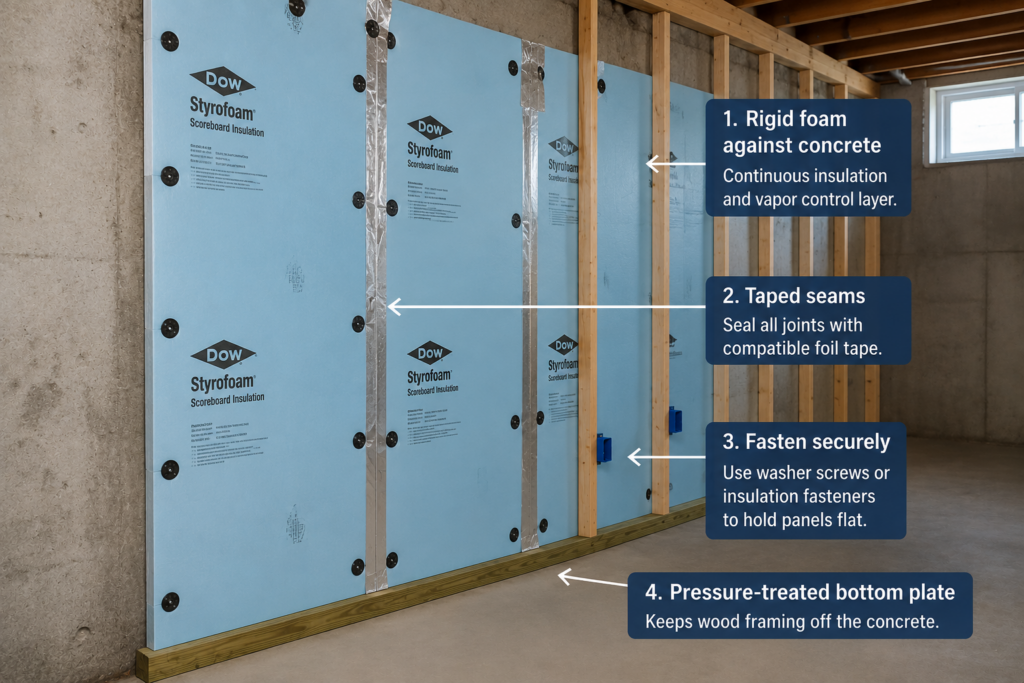
For the wall itself, rigid foam installed directly against the concrete typically handles the vapor control role.Rigid foam is moisture-resistant, slows vapor movement, and helps keep the interior framing warm enough to reduce condensation risk. If you’re wondering whether a masonry waterproofing paint can do this job instead, I compared the two approaches directly in Drylok vs vapor barrier — they solve different problems, and a coating alone is not a wall-finishing moisture strategy.
Step 3: Install Rigid Foam Against the Concrete
This is the layer that makes everything else safe.
What to use: XPS or EPS rigid foam, commonly 1.5 to 2 inches for basement walls, with 2 inches the safer call in colder climates so the concrete-side surface of your framing stays above the winter dew point. Polyiso is an option above the slab line but shouldn’t sit in contact with a wet floor, since it can take on moisture at cut edges. Minimum basement insulation R-values vary by climate zone under the IRC/IECC energy provisions and by what your jurisdiction has adopted — verify your zone’s requirement before buying, because “2 inches” is a rule of thumb, not a code citation.
How I install it:
Cut boards to height with a utility knife and straightedge — score deep, snap, done.
Adhere to the concrete with a foamboard-rated adhesive. This matters more than it sounds: solvent-based construction adhesives can dissolve foam board on contact. The tube has to say foam-compatible. Test on a scrap first — a two-minute test that can save a wall of ruined panels.
Butt seams tight and tape every seam with sheathing tape. Untaped seams are how humid interior air reaches cold concrete and condenses. Housewrap-grade seam tape holds long-term; general-purpose tapes tend to let go.
Seal the top edge and penetrations with canned spray foam.
It’s the least glamorous step in the project and the most important one.
Step 4: Frame the Wall
With foam handling moisture, framing becomes normal carpentry — with two basement-specific rules.
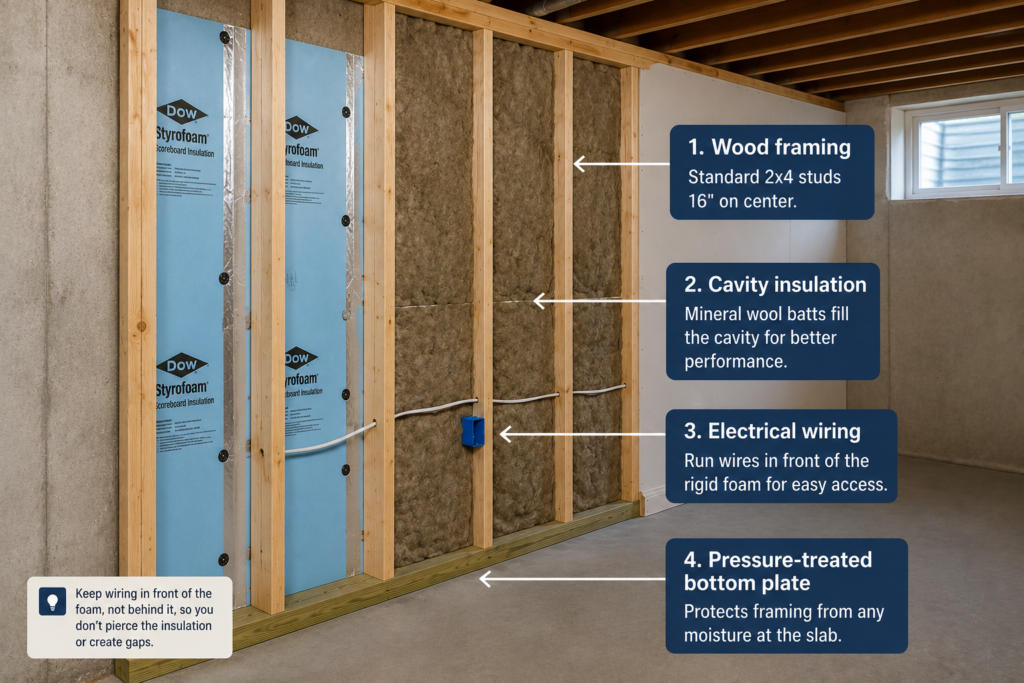
Rule 1: the bottom plate in contact with the slab should be pressure-treated lumber or otherwise isolated from the concrete. The IRC (R317.1 in recent editions — confirm your local adopted version) requires protection for wood in contact with concrete, and the physics backs it up regardless: concrete wicks moisture, and an untreated plate sitting on it is a rot appetizer. I use a treated plate and a strip of foam sill gasket under it — the gasket costs almost nothing and adds a capillary break. If you’re speccing the plate material, my guide to pressure-treated plywood and lumbercovers what the treatment ratings actually mean.
Rule 2: frame tight to the foam, not to the concrete. The old-school “leave an air gap behind the studs” advice came from the pre-foam era. With taped foam board on the wall, frame right against it — a 2×4 wall gives you a deep cavity for wiring, outlets, and additional insulation.
Studs 16 inches on center, plate anchored to the slab with concrete screws or powder-actuated fasteners, wall plumbed to the foam. If the slab is wavy (most are), shim the plate rather than fighting each stud — a flat plate makes everything above it easier.
Step 5: Cavity Insulation (Optional, but Only Behind Foam)
The counterintuitive part: in the wall assembly described here, fibrous insulation should only be installed after a continuous moisture-resistant insulation layer separates it from the concrete. Fiberglass or mineral wool against bare concrete collects condensation and holds it. Behind foam, it’s fine — use unfaced batts, because a kraft facing is a vapor retarder in exactly the wrong place in this assembly. Mineral wool is my pick below grade: it’s water-repellent, vapor-permeable, can retain its performance after it has dried, and cuts cleaner than fiberglass.
The foam-thickness math, climate-zone targets, and the rigid-vs-batt tradeoffs are covered properly in my basement wall insulation guide — worth reading before you buy, because insulating basement walls the wrong way is one of the most expensive mistakes in home improvement.
Step 6: Drywall or Panels — the Finish Layer
Two rules I follow no matter what the finish material is:
Hold it 1/2 to 5/8 inch off the slab. Every basement eventually gets some water on the floor — a water heater, a laundry mishap, a hundred-year rain. Drywall touching the slab wicks that water up the wall; drywall held off the floor shrugs it off. Set panels on scraps of 1/2-inch plywood while fastening, then pull the scraps.
Use mold-resistant (paperless or treated-paper) drywall below grade. It runs meaningfully more than standard drywall — check current sheet pricing — but the upcharge on a whole basement is a fraction of what a single mold remediation costs. The paper facing on standard drywall is mold food; removing the food source is cheap insurance. Be clear about what you’re buying, though: it improves resistance but will not prevent mold if the wall assembly remains wet. My full breakdown of what’s worth paying for below grade (and what’s marketing) is in mold resistant basement materials.
One code note that surprises people: IRC foam-plastic provisions generally require exposed rigid foam to be protected by an approved thermal barrier, commonly 1/2-inch drywall. In the 2021 IRC, this requirement appears in Section R316.4; section numbering changed in the 2024 edition, so confirm the code adopted locally. Limited exceptions may apply in crawlspaces, utility areas, or with specially approved products rated for exposed use — check with your local building department before leaving any foam uncovered.
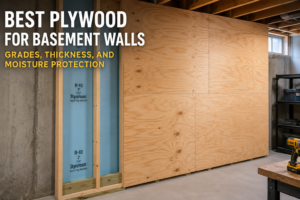
If you’re paneling instead of hanging drywall — or building storage walls, workbench backers, or a utility-room wall — plywood is a legitimate below-grade finish when you choose the right sheet, and I ranked what holds up in my guide to the best plywood for basement walls. If the project includes the floor, don’t set your bottom plates until you’ve decided on flooring height — my basement subfloor plywood guide explains why the subfloor decision changes your wall measurements. And for how engineered panel systems stack up against the assembly in this guide, the cost and moisture comparison in basement wall panels vs drywall covers the tradeoffs.
What You’ll Need (and What’s Worth Spending On)
The tool list here is short, and most of it you may already own: utility knife, straightedge, drill, level, caulk gun, and either a hammer drill with concrete screws or a rented powder-actuated nailer for the plates. The items worth buying deliberately, linked where I have a preference (as an Amazon Associate, ThePlywood.com earns from qualifying purchases):
The one instrument I’d call mandatory is a pinless moisture meter. It helps compare suspicious areas and identify moisture patterns before the wall is closed, although concrete readings should be treated as relative unless the meter is specifically designed for masonry. Beyond that, the material choices matter more than the tools: foamboard-rated adhesive rather than general-purpose construction adhesive, sheathing seam tape rather than whatever tape is in the drawer, sill seal gasket under the treated plate, and unfaced mineral wool batts for the cavities. A basement dehumidifier running during and after the project keeps interior humidity from working against everything you just built — in most finished basements it earns its keep every summer regardless.
None of these are exotic, and the total for the specialty items is small next to the lumber and drywall. The expensive version of this project is the one where you skip them.
The Order Matters More Than the Products
If you remember one thing: screen, fix water, foam, frame, insulate, finish — in that order. Nearly every finished-basement failure traces back to reordering those steps, usually because framing feels like progress and foam feels like nothing. The foam against the concrete is doing most of the work; the framing is just holding the drywall.
Done in sequence, this is a very forgiving project. Done out of sequence, it’s a project you get to do twice.
FAQ
Do I need a vapor barrier when finishing basement walls? Not a polyethylene one in the wall assembly, in most US climates — rigid foam against the concrete typically performs the vapor control role, and interior poly in a below-grade wall commonly traps moisture. Requirements vary by climate zone, assembly, and local code, so verify what your jurisdiction requires. Polyethylene is commonly installed beneath concrete slabs and may be required in certain approved basement-floor or subfloor systems.
Can I use regular drywall in a basement? You can, but mold-resistant (paperless or treated-paper) drywall is the better choice below grade, and either way the drywall should be held 1/2 to 5/8 inch off the slab so incidental floor water can’t wick up the wall.
How thick should rigid foam be on basement walls? Commonly 1.5 to 2 inches, with 2 inches the safer choice in colder climates so the framing stays above the winter dew point. Required R-values vary by climate zone and local energy code, so check your zone’s minimum before buying.
Should I use pressure-treated wood for basement framing? The bottom plate in contact with the slab should be pressure-treated or isolated from the concrete, consistent with IRC wood-protection provisions (R317.1 in recent editions). The studs above can be standard lumber once the plate and foam are handling moisture.
Is the plastic sheet test reliable? It’s a useful screening test, not a complete diagnosis. It indicates whether moisture is moving through the wall or condensing from room air, but it can’t rule out seasonal water problems or identify the source. Pair it with a moisture meter, run it during the wet season if the basement has any dampness history, and investigate further if anything looks marginal.
Can I skip the foam and just use faced fiberglass batts? This is the assembly most likely to grow mold below grade. Fibrous insulation against or near bare concrete collects condensation, and the facing traps it. If the budget only allows one insulation layer, make it the rigid foam against the concrete.